Center Console Trim Removal (JPG heavy!)
#1
 02-06-2014, 07:33 PM

Join Date: Dec 2013
Location: Chalfont, PA
Posts: 678
Rep Power: 53 

Following is Part 1 of a multi-part DIY.
I will also post a link to this thread in the DIY section.
(Sorry for the crummy pics- I use my iphone, don't own a camera. It is ok at best....)
I am pulling the control button panel from the center console on my 3-month old '14 991 C4S as I am considering some hacks errr... I mean modifications.")
The first stage of the effort is to get a feeling for the complexity of the dis assembly job by removing the trim and getting the button-box out. Never did this on a 991 (or any 911 for that matter!) and have no idea how difficult they make it for us.
I don't have time now to go much further with the project, so I'll post this as Part 1 only for now. Anyone wanting to get into the center tunnel might find this useful. In the next part I will crack-open the box and take a look at the guts....
1. My 991 has full leather. The trim pieces are all covered in a black "leather" or material of some sort. Don't think it is leather, but it is a soft black covering matching the interior black leather.

2. Just below where the coin-tray or ashtray is located, you can work a soft tool under the edge and pry-up. Be very careful. The fabric pieces can be dimpled or marked as you apply leverage. I don't have a set of trim tools, so I improvised and used a plastic squeege tool I have from applying films.

3. Prying the end up a bit further to get the sides started....

4. And then working the tool around the length of the trim... The trim is fragile, and I was taking great care not to mark it or "dent". Later you'll see the long prongs that you need to work free to release the trim. Just work up each side to the top above the shift lever.

And

And
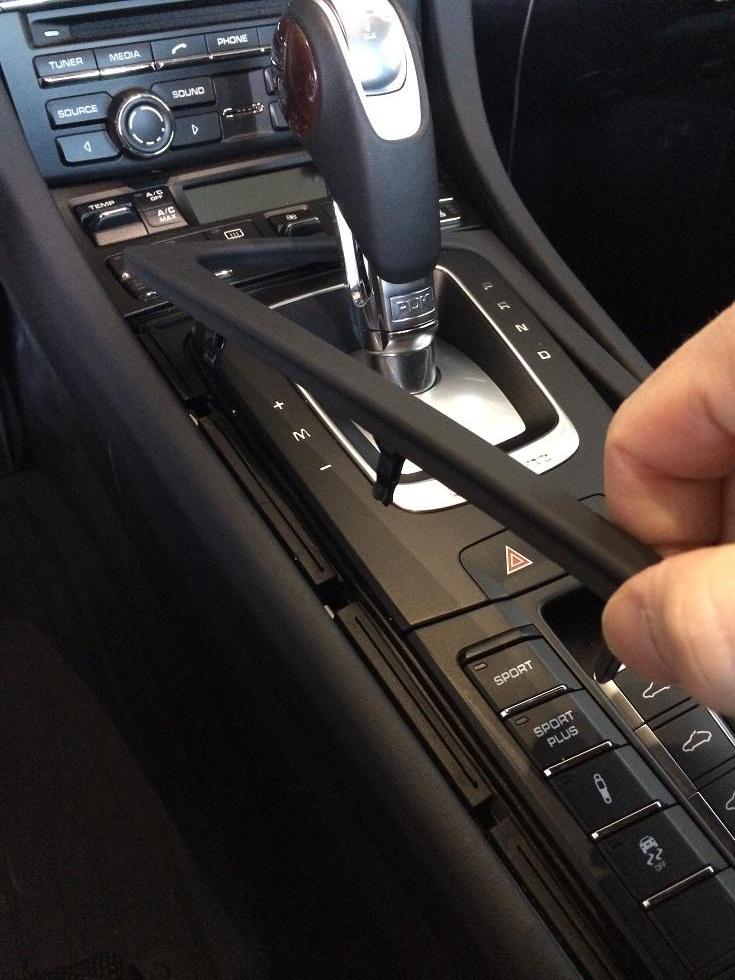
5. Gently pull the trim piece off and over the shifter.

6. Here is the trim piece fully removed. Note the long tension prongs around the sides. Don't want to break those off.... Put the piece somewhere safe.

7. Not the best pic, but note the gap around the button and shifter modules. There is a rubber gasket down in the space.

8. Gently pull the rubber gasket out -- in my case I simply pulled it up and back over the shifter but didn't fully remove.

9. With the gasket removed, you now have the sides of the button and shifter modules exposed a bit. These are just held in place by tension -- no screws or other tricks.

10. I started with the button module. It is in there very tight, so you need to be careful but pull on it enough to free the tension tabs -- there are 4 tabs, two on each side. I put a fiber cloth over the unit and pulled up on one side first to get it free. Then it popped-out suddenly!

And...

11. Pull the center unit out of the way, and you have now exposed all of the great space hidden underneath. The unit is a single "box" set for all of the buttons.

12. I pulled the small black "coin-tray" out (just held in place by a couple of tabs) of the way and you can see some of the great stuff inside. Like the white and chrome cylinder thingy -- a linkage to the PDK shifter. Bunch of other wires, but a lot less cluttered than I thought it would be!

13. Flipping the button-box over, you will find that there is a single, thin gang of 5 or so wires attaching the box to the car via a small white plastic connector. Easy enough to pull out! But also note on the underside is a sticker with several part numbers. I am guessing the part numbers correspond to the optional buttons that I have included in my build -- I do not have PSE, so I am thinking the numbers must be Sport Chrono, but not sure what else. I did a quick Google of the part number, but got nuthin'! Anyone have a part manual around??? Anyone know what the "DML" designation stands-for after each number?

The numbers at the bottom of the sticker may be the Software (SW) and Hardware (HW) rev numbers for the unit. There is also a date, 05/27/2013 which I am assuming is the date the unit came of the bench or configured for my install. My 991 build date was 06/2013, so that sounds right.
Anyways -- that is it for now. I don't have the time to pull the rest apart. My next post will likely be deconstructing the "button-box" to take a peek inside. Hope this helps someone!
I will also post a link to this thread in the DIY section.
(Sorry for the crummy pics- I use my iphone, don't own a camera. It is ok at best....)
I am pulling the control button panel from the center console on my 3-month old '14 991 C4S as I am considering some hacks errr... I mean modifications.
The first stage of the effort is to get a feeling for the complexity of the dis assembly job by removing the trim and getting the button-box out. Never did this on a 991 (or any 911 for that matter!) and have no idea how difficult they make it for us.
I don't have time now to go much further with the project, so I'll post this as Part 1 only for now. Anyone wanting to get into the center tunnel might find this useful. In the next part I will crack-open the box and take a look at the guts....
1. My 991 has full leather. The trim pieces are all covered in a black "leather" or material of some sort. Don't think it is leather, but it is a soft black covering matching the interior black leather.

2. Just below where the coin-tray or ashtray is located, you can work a soft tool under the edge and pry-up. Be very careful. The fabric pieces can be dimpled or marked as you apply leverage. I don't have a set of trim tools, so I improvised and used a plastic squeege tool I have from applying films.

3. Prying the end up a bit further to get the sides started....

4. And then working the tool around the length of the trim... The trim is fragile, and I was taking great care not to mark it or "dent". Later you'll see the long prongs that you need to work free to release the trim. Just work up each side to the top above the shift lever.

And

And

5. Gently pull the trim piece off and over the shifter.

6. Here is the trim piece fully removed. Note the long tension prongs around the sides. Don't want to break those off....
Put the piece somewhere safe.
7. Not the best pic, but note the gap around the button and shifter modules. There is a rubber gasket down in the space.

8. Gently pull the rubber gasket out -- in my case I simply pulled it up and back over the shifter but didn't fully remove.

9. With the gasket removed, you now have the sides of the button and shifter modules exposed a bit. These are just held in place by tension -- no screws or other tricks.

10. I started with the button module. It is in there very tight, so you need to be careful but pull on it enough to free the tension tabs -- there are 4 tabs, two on each side. I put a fiber cloth over the unit and pulled up on one side first to get it free. Then it popped-out suddenly!

And...

11. Pull the center unit out of the way, and you have now exposed all of the great space hidden underneath. The unit is a single "box" set for all of the buttons.

12. I pulled the small black "coin-tray" out (just held in place by a couple of tabs) of the way and you can see some of the great stuff inside. Like the white and chrome cylinder thingy -- a linkage to the PDK shifter. Bunch of other wires, but a lot less cluttered than I thought it would be!

13. Flipping the button-box over, you will find that there is a single, thin gang of 5 or so wires attaching the box to the car via a small white plastic connector. Easy enough to pull out! But also note on the underside is a sticker with several part numbers. I am guessing the part numbers correspond to the optional buttons that I have included in my build -- I do not have PSE, so I am thinking the numbers must be Sport Chrono, but not sure what else. I did a quick Google of the part number, but got nuthin'! Anyone have a part manual around??? Anyone know what the "DML" designation stands-for after each number?

The numbers at the bottom of the sticker may be the Software (SW) and Hardware (HW) rev numbers for the unit. There is also a date, 05/27/2013 which I am assuming is the date the unit came of the bench or configured for my install. My 991 build date was 06/2013, so that sounds right.
Anyways -- that is it for now. I don't have the time to pull the rest apart. My next post will likely be deconstructing the "button-box" to take a peek inside. Hope this helps someone!
Last edited by plenum; 02-07-2014 at 07:15 AM.
#3
02-06-2014, 10:41 PM
Thanks for this informative post.
DML is the finish code for: Matt Black/hi-gloss chrome
DML is the finish code for: Matt Black/hi-gloss chrome
#5
02-07-2014, 12:23 AM
Registered User
Join Date: May 2012
Location: Cape Town - Somerset West
Posts: 302
Rep Power: 35
Thanks a lot. Very useful.
BTW, there is a tool to pry open panels in your toolbox in the trunk.
Instructions on how and where to use it are in the manual (You need to use it to get the car into neutral if the lever is locked).
Rainier
BTW, there is a tool to pry open panels in your toolbox in the trunk.
Instructions on how and where to use it are in the manual (You need to use it to get the car into neutral if the lever is locked).
Rainier
#6
02-07-2014, 12:27 AM
Registered User
Join Date: May 2012
Location: Cape Town - Somerset West
Posts: 302
Rep Power: 35
BTW, it would be great if you could locate the switches for the manual shift. They could be box side but could equally be close to the lever itself. I'd be keen to switch those wires around to change the switch direction...
Rainier
Rainier
#7
02-07-2014, 04:09 AM
Join Date: Dec 2013
Location: Chalfont, PA
Posts: 678
Rep Power: 53 Thanks Rainier -- Actually, I intended to pull the panel around the PDK pole and everything else out at the time, but I only had about 20 minutes total before I had to be somewhere else, so maybe I'll get to that today. I did see a post on another board about reversing the switches for shifting... sounds like something right up my alley. I'll post when I get into it.
Trending Topics
#8
02-07-2014, 04:14 AM
Join Date: Dec 2013
Location: Chalfont, PA
Posts: 678
Rep Power: 53
Thanks lunarx! Finish code DML makes sense -- how about the part numbers? I am wondering if anyone else has pulled their own switch-panel and if the part numbers correspond to specific options included in my build. But why not have part numbers for each of the switches, such as the auto-stop, or the sunroof controls, or PASM, Sport, Sport + and so on. There are only three numbers on my box....
#9
02-07-2014, 04:36 AM
Join Date: Dec 2013
Location: Chalfont, PA
Posts: 678
Rep Power: 53  Thanks!

#14
02-07-2014, 08:56 AM
Registered User
Join Date: Jul 2012
Location: Just visiting the planet
Posts: 1,055
Rep Power: 85
"Reversing the switches for shifting..." That is a BAD idea on many levels.
Liability issues, warranty issues, safety issues all discussed in-depth and ad nauseam on another forum.
I'd think long and hard before opening Pandora's box.
Just my $0.02
Liability issues, warranty issues, safety issues all discussed in-depth and ad nauseam on another forum.
I'd think long and hard before opening Pandora's box.
Just my $0.02
#15
02-07-2014, 09:53 AM
Join Date: Dec 2013
Location: Chalfont, PA
Posts: 678
Rep Power: 53  Didn't say I was going to DO IT... I really don't care to change or reverse the switches. But I am all for learning, understanding how things work.... so my response to Rainier was whether I could identify the switches that are the contact points controlling PDK up/down. I have a completely different project planned which has nothing to do with PDK lever controllers.
Thanks for the concern guys!