991

Money2536's White 991 C2S Journal

Thread Tools
 
Search this Thread
 
Rating: Thread Rating: 2 votes, 5.00 average.
 
  #211  
Old 05-23-2014, 08:22 AM
Fester's Avatar
Registered User
Join Date: Jan 2012
Location: Silicon Valley, California
Posts: 2,293
Rep Power: 150
Fester Is a GOD !Fester Is a GOD !Fester Is a GOD !Fester Is a GOD !Fester Is a GOD !Fester Is a GOD !Fester Is a GOD !Fester Is a GOD !Fester Is a GOD !Fester Is a GOD !Fester Is a GOD !
Good for you.
 
  #212  
Old 05-23-2014, 09:07 AM
eg991's Avatar
Registered User
Join Date: Apr 2013
Location: Long Island, NY
Posts: 809
Rep Power: 53
eg991 is a splendid one to beholdeg991 is a splendid one to beholdeg991 is a splendid one to beholdeg991 is a splendid one to beholdeg991 is a splendid one to beholdeg991 is a splendid one to beholdeg991 is a splendid one to beholdeg991 is a splendid one to behold
That's great stuff. Good for you, and congrats on all of this awesome news!
 
  #213  
Old 05-23-2014, 09:23 AM
saraojo's Avatar
Registered User
Join Date: Mar 2013
Location: North NJ/NYC
Posts: 90
Rep Power: 15
saraojo will become famous soon enough
Congrats! 991s, new m3 and another kid on the way . Living the dream!
 
  #214  
Old 05-23-2014, 10:31 AM
LPB987S's Avatar
Registered User
Join Date: Nov 2005
Location: Toronto, Canada
Age: 47
Posts: 390
Rep Power: 39
LPB987S is a name known to allLPB987S is a name known to allLPB987S is a name known to allLPB987S is a name known to allLPB987S is a name known to allLPB987S is a name known to all
Congrats ! Now you have to find a baby seat for the F80! Looking forward to the comparison of the 2 vehicles.
 
  #215  
Old 05-23-2014, 07:42 PM
Money2536's Avatar
Registered User
Thread Starter
Join Date: Nov 2009
Location: The Villages, FL
Age: 44
Posts: 671
Rep Power: 65
Money2536 has a reputation beyond reputeMoney2536 has a reputation beyond reputeMoney2536 has a reputation beyond reputeMoney2536 has a reputation beyond reputeMoney2536 has a reputation beyond reputeMoney2536 has a reputation beyond reputeMoney2536 has a reputation beyond reputeMoney2536 has a reputation beyond reputeMoney2536 has a reputation beyond reputeMoney2536 has a reputation beyond reputeMoney2536 has a reputation beyond repute
Thanks for the comments all. I pulled the PSE off tonight. AWE Switchpath should be here tomorrow for install. Stay tuned for photos and videos!
 
  #216  
Old 05-23-2014, 08:43 PM
Sizzle Chest's Avatar
Registered User
Join Date: May 2009
Location: Naples, FL
Posts: 1,492
Rep Power: 110
Sizzle Chest has a reputation beyond reputeSizzle Chest has a reputation beyond reputeSizzle Chest has a reputation beyond reputeSizzle Chest has a reputation beyond reputeSizzle Chest has a reputation beyond reputeSizzle Chest has a reputation beyond reputeSizzle Chest has a reputation beyond reputeSizzle Chest has a reputation beyond reputeSizzle Chest has a reputation beyond reputeSizzle Chest has a reputation beyond reputeSizzle Chest has a reputation beyond repute
^^^Can't wait for the review...and some pics...and sound clips!
 
  #217  
Old 05-24-2014, 06:48 PM
Money2536's Avatar
Registered User
Thread Starter
Join Date: Nov 2009
Location: The Villages, FL
Age: 44
Posts: 671
Rep Power: 65
Money2536 has a reputation beyond reputeMoney2536 has a reputation beyond reputeMoney2536 has a reputation beyond reputeMoney2536 has a reputation beyond reputeMoney2536 has a reputation beyond reputeMoney2536 has a reputation beyond reputeMoney2536 has a reputation beyond reputeMoney2536 has a reputation beyond reputeMoney2536 has a reputation beyond reputeMoney2536 has a reputation beyond reputeMoney2536 has a reputation beyond repute
DIY: AWE SwitchPath Install

After a little over a month wait, I finally got my AWE Switch Path center section exhaust with Diamond Black tips today. I was tracking it on FedEx. Since it was going to be about 98 degrees today, I preemptively de-installed the PSE center section to make the job a little easier. Boy am I glad I finally bought those Air King fans. It makes a big difference.

Here is the link to the exhaust:

http://www.awe-tuning.com/awe-tuning...exhaust-system

I put together a half-hearted DIY. I started running out of gas since it was so hot, and my hands were super dirty. I got a little too lazy to pick up the camera toward the end. The AWE instructions do an okay job of explaining the process. Their instructions don't tell you how to de-install the OEM PSE center section, but I found it not too challenging.

I'm not super handy but have installed about a dozen different exhausts on other cars. The Porsche exhaust isn't as easy as a Honda but simpler than a BMW. It took me about 5 hours between Friday night and this afternoon. I'm sure a "real man" with better blue collar roots could do the install in a few hours.

Tools I needed
3/8" Ratchets
11mm, 12mm, 13mm, 15mm Sockets
11mm, 15mm Ratcheting Wrenches
Wire Crimpers
E-12 External Torx Socket
2-Top Low-Profile Jacks
4-Ramps
Hex Bit
Extensions

I just bought a new cheap jack from Harbor Freight to semi-match my old one. It makes it easier to get the car in the air without a lift. I'm sure you all believe me when I tell you an in-ground scissor lift is in the works.


Even the jack points on this car are awesome!


Almost done with Dexter Season 8. I need to find a new show to start watching in the garage.


I feel safer on ramps rather than jack stands. Plus, they are quicker and easier to get the car on.


Remove the three bolts that connect the cats to the center section.


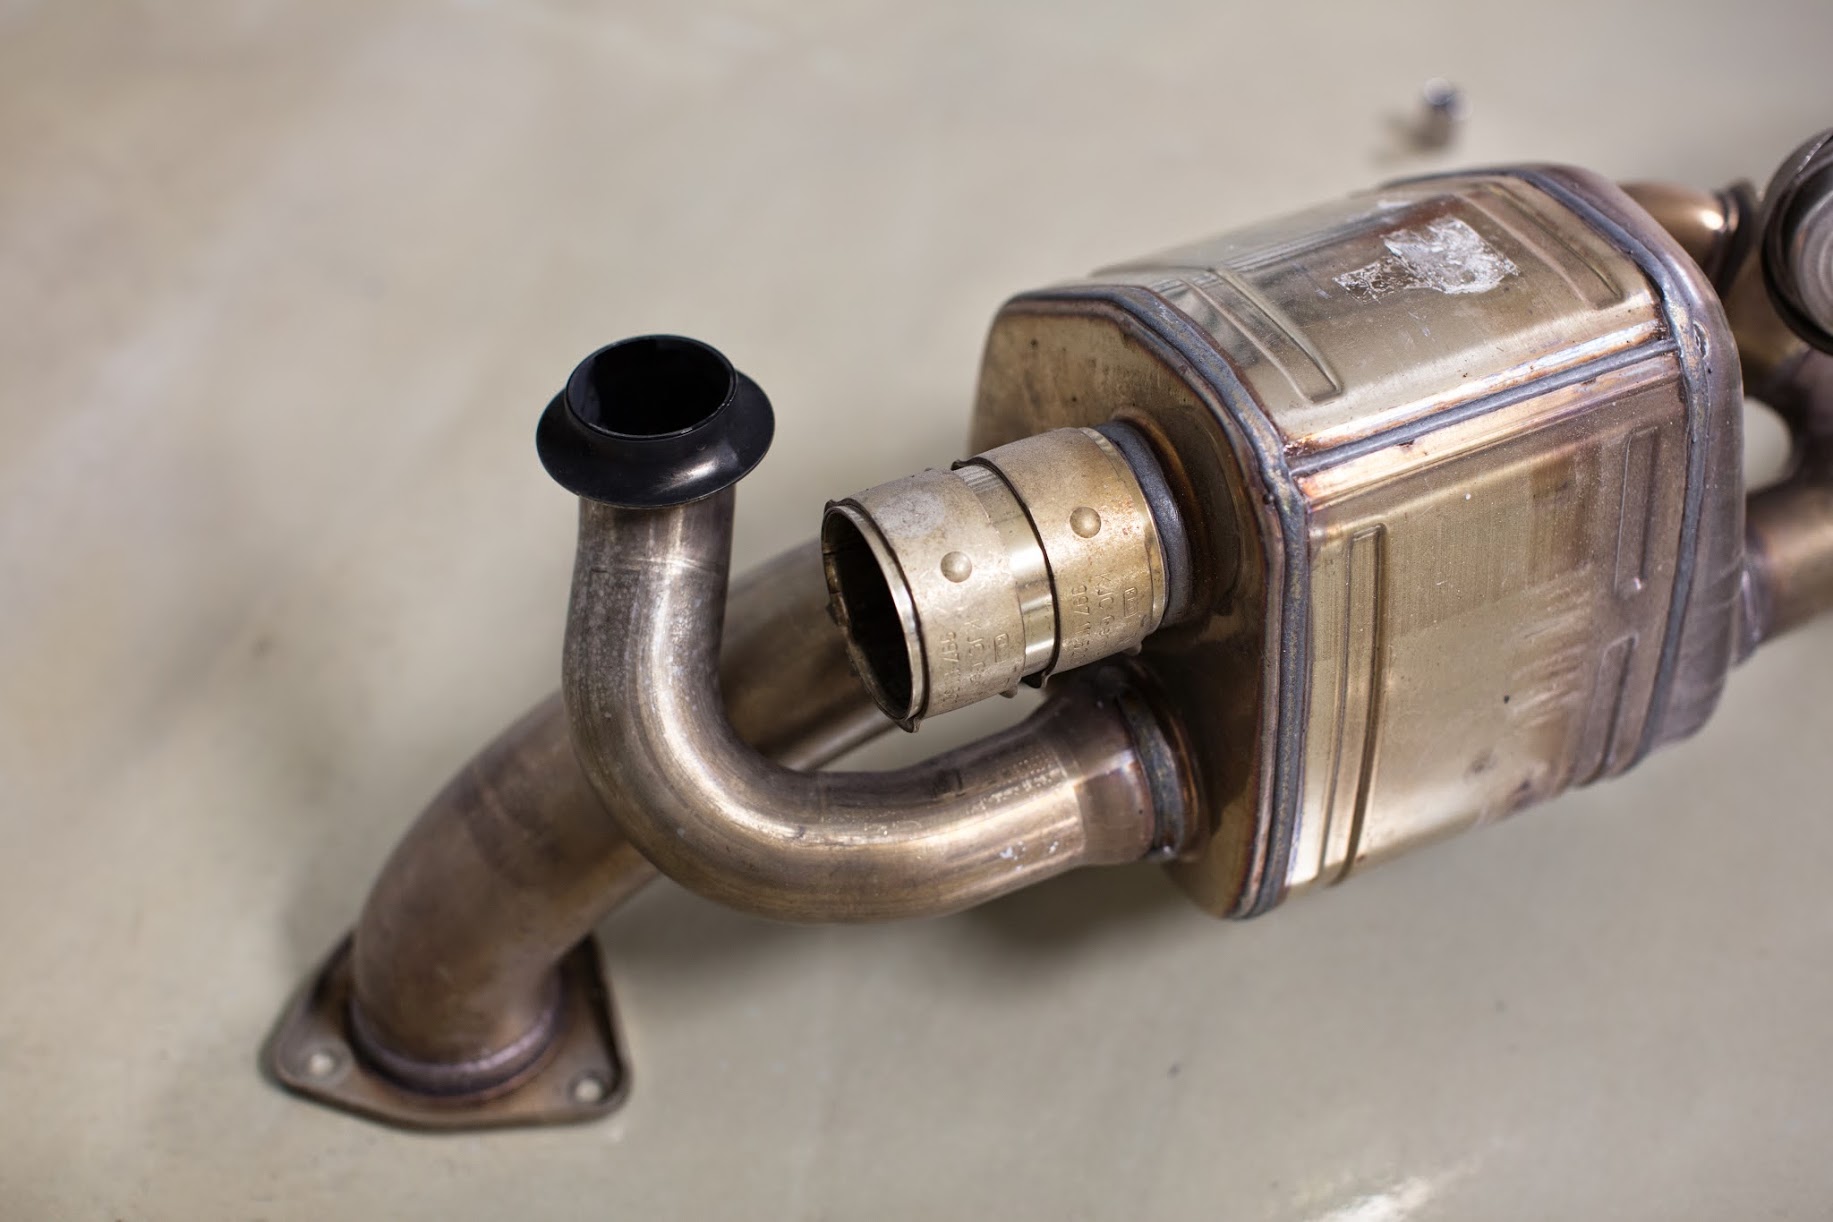
Loosen the collars that connect the mufflers to the center section.


Clean-up the tips for storage.


Bolts removed.


Remove the straps that hold the mufflers in place.


Remove the tips using the E-12 Torx. I thought I was going to need to break the welds on the factory tips to be able to add the AWE. The entire tip assembly won't be reused. The new tips attach directly to the exit pipes of the side mufflers and center section.


Center section is out. I found it necessary to loosen the two bolts on the plate the holds the side mufflers in place. It made it easier to pull the plate out of the holes on the cat studs.


PSE vacuum line.


Pull collars off to be reused with AWE.


Weight of just center section.


Total weight of items removed.


Finally! It showed up around 2 PM.


Hey, that lollypop isn't Paleo! I ate it anyway.


Attached Thumbnails Click image for larger version

Name:	0U9A5065.jpg
Views:	1029
Size:	240.1 KB
ID:	378404   Click image for larger version

Name:	0U9A5069.jpg
Views:	978
Size:	201.4 KB
ID:	378405   Click image for larger version

Name:	0U9A5070.jpg
Views:	985
Size:	208.5 KB
ID:	378406   Click image for larger version

Name:	0U9A5072.jpg
Views:	973
Size:	180.0 KB
ID:	378407   Click image for larger version

Name:	0U9A5073.jpg
Views:	977
Size:	251.6 KB
ID:	378408  

Click image for larger version

Name:	0U9A5074.jpg
Views:	1008
Size:	234.1 KB
ID:	378409   Click image for larger version

Name:	0U9A5075.jpg
Views:	1002
Size:	205.8 KB
ID:	378410   Click image for larger version

Name:	0U9A5076.jpg
Views:	984
Size:	183.7 KB
ID:	378411   Click image for larger version

Name:	0U9A5077.jpg
Views:	966
Size:	159.0 KB
ID:	378412   Click image for larger version

Name:	0U9A5078.jpg
Views:	954
Size:	80.5 KB
ID:	378413  

Click image for larger version

Name:	0U9A5082.jpg
Views:	947
Size:	121.1 KB
ID:	378414   Click image for larger version

Name:	0U9A5083.jpg
Views:	1007
Size:	270.0 KB
ID:	378415   Click image for larger version

Name:	0U9A5085.jpg
Views:	993
Size:	117.0 KB
ID:	378416   Click image for larger version

Name:	0U9A5087.jpg
Views:	971
Size:	132.2 KB
ID:	378417   Click image for larger version

Name:	0U9A5090.jpg
Views:	1001
Size:	233.4 KB
ID:	378418  

Click image for larger version

Name:	0U9A5091.jpg
Views:	958
Size:	80.5 KB
ID:	378419   Click image for larger version

Name:	0U9A5092.jpg
Views:	952
Size:	43.0 KB
ID:	378420   Click image for larger version

Name:	0U9A5094.jpg
Views:	955
Size:	194.2 KB
ID:	378421   Click image for larger version

Name:	0U9A5095.jpg
Views:	992
Size:	207.6 KB
ID:	378422   Click image for larger version

Name:	0U9A5097.jpg
Views:	968
Size:	130.5 KB
ID:	378423  

Click image for larger version

Name:	0U9A5099.jpg
Views:	986
Size:	284.8 KB
ID:	378424   Click image for larger version

Name:	0U9A5100.jpg
Views:	995
Size:	339.8 KB
ID:	378425   Click image for larger version

Name:	0U9A5103.jpg
Views:	947
Size:	202.7 KB
ID:	378426   Click image for larger version

Name:	0U9A5104.jpg
Views:	965
Size:	209.6 KB
ID:	378427   Click image for larger version

Name:	0U9A5105.jpg
Views:	969
Size:	202.1 KB
ID:	378428  

Click image for larger version

Name:	0U9A5106.jpg
Views:	949
Size:	170.4 KB
ID:	378429   Click image for larger version

Name:	0U9A5109.jpg
Views:	974
Size:	220.0 KB
ID:	378430   Click image for larger version

Name:	0U9A5110.jpg
Views:	971
Size:	230.6 KB
ID:	378431   Click image for larger version

Name:	0U9A5113.jpg
Views:	960
Size:	163.9 KB
ID:	378432   Click image for larger version

Name:	0U9A5115.jpg
Views:	956
Size:	162.8 KB
ID:	378433  

Click image for larger version

Name:	0U9A5116.jpg
Views:	953
Size:	217.6 KB
ID:	378434   Click image for larger version

Name:	0U9A5117.jpg
Views:	984
Size:	315.1 KB
ID:	378435   Click image for larger version

Name:	0U9A5118.jpg
Views:	932
Size:	253.1 KB
ID:	378436   Click image for larger version

Name:	0U9A5121.jpg
Views:	966
Size:	177.7 KB
ID:	378437   Click image for larger version

Name:	0U9A5122.jpg
Views:	960
Size:	239.8 KB
ID:	378438  

Click image for larger version

Name:	0U9A5123.jpg
Views:	956
Size:	176.1 KB
ID:	378439   Click image for larger version

Name:	0U9A5124.jpg
Views:	957
Size:	186.0 KB
ID:	378440   Click image for larger version

Name:	0U9A5125.jpg
Views:	965
Size:	149.2 KB
ID:	378441   Click image for larger version

Name:	0U9A5126.jpg
Views:	970
Size:	150.2 KB
ID:	378442  
  #218  
Old 05-24-2014, 06:52 PM
Money2536's Avatar
Registered User
Thread Starter
Join Date: Nov 2009
Location: The Villages, FL
Age: 44
Posts: 671
Rep Power: 65
Money2536 has a reputation beyond reputeMoney2536 has a reputation beyond reputeMoney2536 has a reputation beyond reputeMoney2536 has a reputation beyond reputeMoney2536 has a reputation beyond reputeMoney2536 has a reputation beyond reputeMoney2536 has a reputation beyond reputeMoney2536 has a reputation beyond reputeMoney2536 has a reputation beyond reputeMoney2536 has a reputation beyond reputeMoney2536 has a reputation beyond repute
DIY: AWE SwitchPath Install Part 2


Weight of just the Center Section.


Total weight savings over stock is roughly 6 lbs.


Anti-Seize for the cat studs.


From here it's best to follow the AWE instructions. I skipped some photos, sorry.


Crimp.


Pull off the factory line.


Route behind bracket. I was worried about doing this correctly. It was very simple.


Pull off the stickers.


This about made my brain almost explode. The exhaust ships backwards. The reason the two valved sections are labeled is because you have to pull them off and switch sides. I finally got it right after a few minutes.


Just tighten enough to keep the from falling off, but don't torque them down.


Put new exhaust gaskets on. They were supplied with new exhaust.


You can torque these down now. They don't offer any adjustment. Make sure to put the side muffler brackets on before the washers.


Driver's side.


Tip install. One of the tips was very snug. I sanded the exit pipe for the side muffler smooth, added a little WD-40, and used some persuasion. That why I prefer ramps to jack stands.

 
Attached Thumbnails Click image for larger version

Name:	0U9A5129.jpg
Views:	941
Size:	158.2 KB
ID:	378444   Click image for larger version

Name:	0U9A5130.jpg
Views:	950
Size:	145.2 KB
ID:	378445   Click image for larger version

Name:	0U9A5132.jpg
Views:	951
Size:	217.6 KB
ID:	378446   Click image for larger version

Name:	0U9A5133.jpg
Views:	945
Size:	191.7 KB
ID:	378447   Click image for larger version

Name:	0U9A5134.jpg
Views:	935
Size:	179.8 KB
ID:	378448  

Click image for larger version

Name:	0U9A5137.jpg
Views:	955
Size:	230.8 KB
ID:	378449   Click image for larger version

Name:	0U9A5138.jpg
Views:	964
Size:	257.5 KB
ID:	378450   Click image for larger version

Name:	0U9A5140.jpg
Views:	948
Size:	165.2 KB
ID:	378451   Click image for larger version

Name:	0U9A5143.jpg
Views:	943
Size:	168.3 KB
ID:	378452   Click image for larger version

Name:	0U9A5144.jpg
Views:	943
Size:	191.4 KB
ID:	378453  

Click image for larger version

Name:	0U9A5145.jpg
Views:	961
Size:	195.7 KB
ID:	378454   Click image for larger version

Name:	0U9A5148.jpg
Views:	975
Size:	198.2 KB
ID:	378455   Click image for larger version

Name:	0U9A5151.jpg
Views:	963
Size:	195.8 KB
ID:	378456   Click image for larger version

Name:	0U9A5154.jpg
Views:	970
Size:	310.1 KB
ID:	378457   Click image for larger version

Name:	0U9A5156.jpg
Views:	922
Size:	189.8 KB
ID:	378459  

Click image for larger version

Name:	0U9A5158.jpg
Views:	939
Size:	109.9 KB
ID:	378460   Click image for larger version

Name:	0U9A5159.jpg
Views:	950
Size:	230.2 KB
ID:	378461   Click image for larger version

Name:	0U9A5160.jpg
Views:	931
Size:	155.5 KB
ID:	378462   Click image for larger version

Name:	0U9A5161.jpg
Views:	1939
Size:	239.0 KB
ID:	378463   Click image for larger version

Name:	0U9A5163.jpg
Views:	904
Size:	202.8 KB
ID:	378464  

Click image for larger version

Name:	0U9A5164.jpg
Views:	913
Size:	206.9 KB
ID:	378465   Click image for larger version

Name:	0U9A5165.jpg
Views:	915
Size:	136.1 KB
ID:	378466   Click image for larger version

Name:	0U9A5169.jpg
Views:	917
Size:	125.8 KB
ID:	378467   Click image for larger version

Name:	0U9A5171.jpg
Views:	930
Size:	144.9 KB
ID:	378468   Click image for larger version

Name:	0U9A5173.jpg
Views:	929
Size:	134.6 KB
ID:	378469  

Click image for larger version

Name:	0U9A5174.jpg
Views:	931
Size:	146.8 KB
ID:	378470   Click image for larger version

Name:	0U9A5175.jpg
Views:	922
Size:	144.5 KB
ID:	378471   Click image for larger version

Name:	0U9A5176.jpg
Views:	932
Size:	133.5 KB
ID:	378472   Click image for larger version

Name:	0U9A5181.jpg
Views:	907
Size:	138.3 KB
ID:	378473   Click image for larger version

Name:	0U9A5186.jpg
Views:	914
Size:	175.0 KB
ID:	378474  

Click image for larger version

Name:	0U9A5187.jpg
Views:	915
Size:	71.4 KB
ID:	378475   Click image for larger version

Name:	0U9A5190.jpg
Views:	915
Size:	100.7 KB
ID:	378476   Click image for larger version

Name:	0U9A5191.jpg
Views:	917
Size:	146.2 KB
ID:	378477   Click image for larger version

Name:	0U9A5192.jpg
Views:	916
Size:	71.4 KB
ID:	378478   Click image for larger version

Name:	0U9A5194.jpg
Views:	903
Size:	74.2 KB
ID:	378479  

Click image for larger version

Name:	0U9A5195.jpg
Views:	937
Size:	143.3 KB
ID:	378480   Click image for larger version

Name:	0U9A5196.jpg
Views:	902
Size:	65.5 KB
ID:	378481   Click image for larger version

Name:	0U9A5199.jpg
Views:	910
Size:	129.3 KB
ID:	378482  

Last edited by Money2536; 05-24-2014 at 07:49 PM.
  #219  
Old 05-24-2014, 06:53 PM
Money2536's Avatar
Registered User
Thread Starter
Join Date: Nov 2009
Location: The Villages, FL
Age: 44
Posts: 671
Rep Power: 65
Money2536 has a reputation beyond reputeMoney2536 has a reputation beyond reputeMoney2536 has a reputation beyond reputeMoney2536 has a reputation beyond reputeMoney2536 has a reputation beyond reputeMoney2536 has a reputation beyond reputeMoney2536 has a reputation beyond reputeMoney2536 has a reputation beyond reputeMoney2536 has a reputation beyond reputeMoney2536 has a reputation beyond reputeMoney2536 has a reputation beyond repute
DIY: AWE SwitchPath Install Part 3

The tip adjustment was actually very easy on this car. I don't like it when my exhaust tips stick out, so I recessed them as much as possible. I installed and torqued the outside tips as the side muffler doesn't allow the outside to be adjusted. Then I torqued the Accu-Seal clamps just enough to allow for movement of the center tip that is attached to the valved section. I set the position and gap and torqued the Accu-Seal. Then I adjusted and torqued the center tip. It was very easy.


I skipped taking other photos, but you can follow the AWE directions. Torque everything down and wipe off your finger prints with WD-40. I cleaned up the tips last with some detail spray.


Done!


I'll have more photos of how the Diamond Black looks and do a review when I've had more time to drive it. I will say it is a whole lot louder than I was expecting. I'm going to try and do a video on Monday, so stay tuned.

Thanks for reading,
Matt
 
Attached Thumbnails Click image for larger version

Name:	0U9A5201.jpg
Views:	913
Size:	104.4 KB
ID:	378485   Click image for larger version

Name:	0U9A5202.jpg
Views:	927
Size:	233.8 KB
ID:	378486   Click image for larger version

Name:	0U9A5203.jpg
Views:	902
Size:	186.7 KB
ID:	378487   Click image for larger version

Name:	0U9A5204.jpg
Views:	905
Size:	195.1 KB
ID:	378489   Click image for larger version

Name:	0U9A5205.jpg
Views:	937
Size:	178.4 KB
ID:	378490  

Click image for larger version

Name:	0U9A5206.jpg
Views:	894
Size:	116.1 KB
ID:	378491   Click image for larger version

Name:	0U9A5207.jpg
Views:	906
Size:	182.3 KB
ID:	378492   Click image for larger version

Name:	0U9A5208.jpg
Views:	920
Size:	163.9 KB
ID:	378493   Click image for larger version

Name:	0U9A5209.jpg
Views:	922
Size:	158.6 KB
ID:	378494  
  #220  
Old 05-24-2014, 07:34 PM
Josh/AWE's Avatar
Former Vendor
Join Date: Jul 2003
Location: Horsham, PA
Posts: 6,669
Rep Power: 0
Josh/AWE Is a GOD !Josh/AWE Is a GOD !Josh/AWE Is a GOD !Josh/AWE Is a GOD !Josh/AWE Is a GOD !Josh/AWE Is a GOD !Josh/AWE Is a GOD !Josh/AWE Is a GOD !Josh/AWE Is a GOD !Josh/AWE Is a GOD !Josh/AWE Is a GOD !
Matt, incredible review, DIY, and install impressions. Can't wait to hear what you think of it after a little more seat time this weekend.

Again, big fan of the garage. So neat, clean, spacious, organized, and well-lit! Consider me envious!
 
  #221  
Old 05-25-2014, 12:12 AM
Fester's Avatar
Registered User
Join Date: Jan 2012
Location: Silicon Valley, California
Posts: 2,293
Rep Power: 150
Fester Is a GOD !Fester Is a GOD !Fester Is a GOD !Fester Is a GOD !Fester Is a GOD !Fester Is a GOD !Fester Is a GOD !Fester Is a GOD !Fester Is a GOD !Fester Is a GOD !Fester Is a GOD !
I love your attention to detail and coverage in the writeups. You definitely make your garage cozy and livable enough to do such projects. Well done!
 
  #222  
Old 05-25-2014, 05:56 AM
Money2536's Avatar
Registered User
Thread Starter
Join Date: Nov 2009
Location: The Villages, FL
Age: 44
Posts: 671
Rep Power: 65
Money2536 has a reputation beyond reputeMoney2536 has a reputation beyond reputeMoney2536 has a reputation beyond reputeMoney2536 has a reputation beyond reputeMoney2536 has a reputation beyond reputeMoney2536 has a reputation beyond reputeMoney2536 has a reputation beyond reputeMoney2536 has a reputation beyond reputeMoney2536 has a reputation beyond reputeMoney2536 has a reputation beyond reputeMoney2536 has a reputation beyond repute
Originally Posted by Zack/AWE
Matt, incredible review, DIY, and install impressions. Can't wait to hear what you think of it after a little more seat time this weekend.

Again, big fan of the garage. So neat, clean, spacious, organized, and well-lit! Consider me envious!
Zack,

I'll be sure to get a video up with impressions.

Originally Posted by Fester
I love your attention to detail and coverage in the writeups. You definitely make your garage cozy and livable enough to do such projects. Well done!
Thanks!
 
  #223  
Old 05-25-2014, 10:23 AM
saraojo's Avatar
Registered User
Join Date: Mar 2013
Location: North NJ/NYC
Posts: 90
Rep Power: 15
saraojo will become famous soon enough
Congrarts and great update. Time for some videos.
Your garage is always so clean. Do you have a cleaning service that keeps it that way? Haha
 
  #224  
Old 05-25-2014, 10:50 AM
Money2536's Avatar
Registered User
Thread Starter
Join Date: Nov 2009
Location: The Villages, FL
Age: 44
Posts: 671
Rep Power: 65
Money2536 has a reputation beyond reputeMoney2536 has a reputation beyond reputeMoney2536 has a reputation beyond reputeMoney2536 has a reputation beyond reputeMoney2536 has a reputation beyond reputeMoney2536 has a reputation beyond reputeMoney2536 has a reputation beyond reputeMoney2536 has a reputation beyond reputeMoney2536 has a reputation beyond reputeMoney2536 has a reputation beyond reputeMoney2536 has a reputation beyond repute
Originally Posted by saraojo
Congrarts and great update. Time for some videos.
Your garage is always so clean. Do you have a cleaning service that keeps it that way? Haha
I was just thinking the floor looking so dirty after all of the rain dripping off the S4. I need to mop it.
 
  #225  
Old 05-25-2014, 11:43 AM
Sizzle Chest's Avatar
Registered User
Join Date: May 2009
Location: Naples, FL
Posts: 1,492
Rep Power: 110
Sizzle Chest has a reputation beyond reputeSizzle Chest has a reputation beyond reputeSizzle Chest has a reputation beyond reputeSizzle Chest has a reputation beyond reputeSizzle Chest has a reputation beyond reputeSizzle Chest has a reputation beyond reputeSizzle Chest has a reputation beyond reputeSizzle Chest has a reputation beyond reputeSizzle Chest has a reputation beyond reputeSizzle Chest has a reputation beyond reputeSizzle Chest has a reputation beyond repute
Great write-up! Looking forward towards some video/sound clips and a review after some seat time!


You have already rated this thread Rating: Thread Rating: 2 votes, 5.00 average.

Quick Reply: Money2536's White 991 C2S Journal


All times are GMT -6. The time now is 12:41 PM.