Retrofitting 991 GT3 Style Spoiler to a C2S
#1
 01-25-2015, 09:39 PM


Retrofitting 991 GT3 Style Spoiler to a C2S
Hi all,
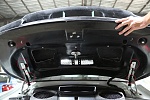
Recently installed a 991 GT3 style kit to a C2S and thought should share how the rear spoiler is swapped for those who are also interested. Please bare with me as this is my first not so technical write up. Before installing, I thought it would be an easy swap, (removing and putting back a few screws) but turned out to be slightly more than just that. So, first step is to remove the hood. This can be easily done by removing the 4 screws as indicated in the picture below.
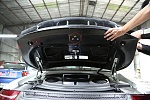
Next is to remove the spoiler. This might be slightly more difficult depending on which route one would like to go about doing so. One way is to remove the entire motor which moves the spoiler up and down, (this will take about 4 hours or so to do) the other is the lazier way (which I took) by removing just the spoiler blade. Different from the hood, Porsche used 4 soldered screws (indicated by red circles) to keep the spoiler in place, so you will not be able to remove them. To avoid these 4 screws I cut out 4 respective holes on the hood (indicated by blue circles).

The GT3 style hood is now secure, so one can now move on to the (in my opinion) most difficult part of this install. Since the C2S has a hood and a separate spoiler where the GT3 only has one big hood, their release mechanism are located at different places. (Red circle is where the GT3's latch is suppose to be, and blue circle is where it needs to be in order to match a C2S). So I had to measure out where the latch is suppose to be and adjust the height of it by adding a few washers underneath it.
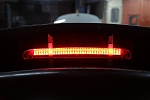
Everything shall be easy from here on out. Fastening the third brake light is really straight forward, (just screw 'em in) but REMEMBER TO CHECK THE POSITIVE AND NEGATIVE ON THE CABLE. If I remember correctly, the red wire is the ground, so if the positive is connected to the negative and vice versa, you will probably have to get another set of the brake light.
The installation of the spoiler is also straight forward. Just reach your hand in from where the red circle is and let the screws come out from where the blue circles are.
Lastly, one WILL NEED TO REPROGRAM PCM. Else the rear spoiler motor will lift up at start up and might puncture the hoos.
Hope all of the above is helpful. The car is currently at the paint shop, so will update once its fully painted.
Recently installed a 991 GT3 style kit to a C2S and thought should share how the rear spoiler is swapped for those who are also interested. Please bare with me as this is my first not so technical write up. Before installing, I thought it would be an easy swap, (removing and putting back a few screws) but turned out to be slightly more than just that. So, first step is to remove the hood. This can be easily done by removing the 4 screws as indicated in the picture below.
Next is to remove the spoiler. This might be slightly more difficult depending on which route one would like to go about doing so. One way is to remove the entire motor which moves the spoiler up and down, (this will take about 4 hours or so to do) the other is the lazier way (which I took) by removing just the spoiler blade. Different from the hood, Porsche used 4 soldered screws (indicated by red circles) to keep the spoiler in place, so you will not be able to remove them. To avoid these 4 screws I cut out 4 respective holes on the hood (indicated by blue circles).
The GT3 style hood is now secure, so one can now move on to the (in my opinion) most difficult part of this install. Since the C2S has a hood and a separate spoiler where the GT3 only has one big hood, their release mechanism are located at different places. (Red circle is where the GT3's latch is suppose to be, and blue circle is where it needs to be in order to match a C2S). So I had to measure out where the latch is suppose to be and adjust the height of it by adding a few washers underneath it.
Everything shall be easy from here on out. Fastening the third brake light is really straight forward, (just screw 'em in) but REMEMBER TO CHECK THE POSITIVE AND NEGATIVE ON THE CABLE. If I remember correctly, the red wire is the ground, so if the positive is connected to the negative and vice versa, you will probably have to get another set of the brake light.
The installation of the spoiler is also straight forward. Just reach your hand in from where the red circle is and let the screws come out from where the blue circles are.
Lastly, one WILL NEED TO REPROGRAM PCM. Else the rear spoiler motor will lift up at start up and might puncture the hoos.
Hope all of the above is helpful. The car is currently at the paint shop, so will update once its fully painted.
Last edited by shihwei; 01-25-2015 at 10:23 PM.

Thread
Thread Starter
Forum
Replies
Last Post
WheelB
GT3/GT2
17
01-06-2018 11:08 AM