DIY Clutch Install
#1
 03-05-2011, 09:06 PM

Join Date: Oct 2009
Location: New Orleans
Age: 53
Posts: 421
Rep Power: 53 

DIY Clutch Install
996TT DIY Clutch Install
I searched a ton and couldn't find a single “How to” for doing your own clutch job. I found many threads saying you have to pull the engine, and many saying you don't. A few where people claim it takes 20 hours, and some claiming under 3 hours. But no “How to”. So here we go! I probably would not try this without a lift.
DISCLAIMER: I am by no means qualified to write this “How to”, but hopefully someone who actually knows what they are doing will chime in and point out anything I did wrong.
DISCLAIMER: I am by no means qualified to write this “How to”, but hopefully someone who actually knows what they are doing will chime in and point out anything I did wrong.
- Put car on lift.
- Disconnect battery.
- Disconnect battery
- Disconnect battery. (Yeah, well, I didn't do this and just decided to cover starter wires, big mistake, see https://www.6speedonline.com/forums/...head-move.html)
- Remove air box: 1 bolt, and 1 band clamp. We are removing this because we are going to lower the motor about 1” and don't want it binding up.
- Remove hoses going to intake plenum: pull spring retainer and they pull right out
- Remove plastic under panels.
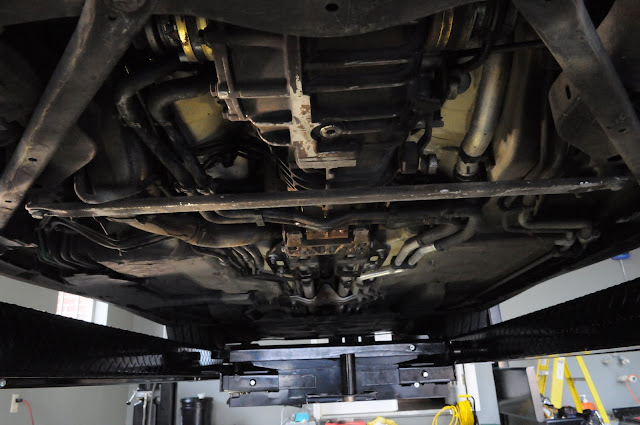
- Remove all of the bracing under the engine and tranny.
- Unbolt axles(do this after removing bracing, its a lot easier.
- Optional: Remove sway bar(i didn't, but it got in the way a few times, I would probably remove it if I did the job again.
- Disconnect shift linkage, I just grabbed with open end wrench and turned, it pops right off.
- Disconnect sensor near front of transmission.
- Secure pole jack under motor.
- Secure tranny jack under transmission.
- Remove cover that is blocking access to drive shaft bolts. 4 nuts and 2 bolts.
- Unbolt front drive shaft(3 bolts) and zip tie in place to keep it out of your way.

- Make sure there is pressure on the transmission with the jack.
- Unbolt transmission mount.
- Make sure there is pressure on pole jack under motor.
- Loosen the two nuts holding motor to motor mounts(18mm socket I believe). Loosen these about 1”, doesn't seem like much, but it helps a lot when removing transmission because of the stupid crash brace thingy.
- The motor should now be resting on the pole jack, lower it down onto the nuts you just lowered 1”
- Now lower the transmission about 4” this should give you lots of room to work.
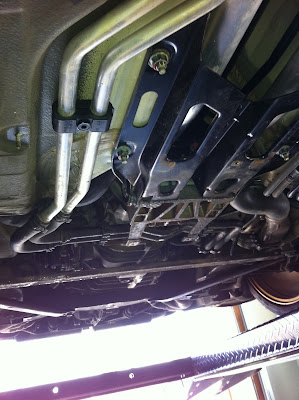
- Remove starter cables and zip tie out of the way. Remove starter (2 bolts)
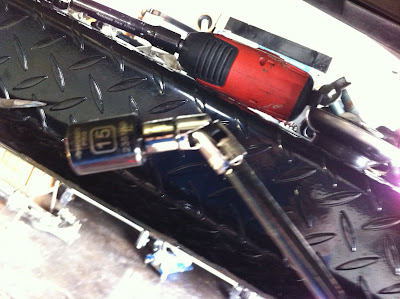
- Now for the 1st tricky part, removing the slave cyl. Its held on by 3 bolts, 2 horizontal, 1 vertical. The horizontal on near the motor is the tricky one, I used a Ľ drive 10” extension with a swivel going to the appropriate socket. I used Ľ” because its a tight fit.
 Once disconnected, you guessed it, zip tie in place. Don't underestimate the zip tying, its very helpful.
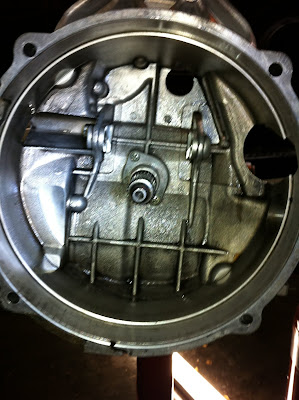
- Now for the 2nd tricky part, removing the fork pivot shaft. There is a u shaped tube on the driver side of the tranny near the motor. Remove the tube and the plate holding it. This will open a window to the pivot shaft. Now remove the pivot shaft retaining bolt and clip. The retaining clip holds a plastic cap that is holding the pivot shaft in place. You need to grab this with some flat tipped pliers, not needle nose, too difficult. Once the cap is removed, you will see a greasy hole, this is the side of the pivot shaft, it is threaded. Thread in a 6mm bolt and pull out the shaft. You may lose one of the roller bearings when you do this. No big deal, you can get it later. Now your fork is free.
- Now double check everything, you should be ready to separate the tranny from the motor. At this point(or maybe sooner) you should strap the transmission to the tranny jack. I used a cargo ratchet strap.
- Remove 4 nuts holding transmission to motor. Use flashlight and see if the crash brace on the top of the transmission is going to clear the transmission tunnel. Lower tranny as needed to clear this.
- With tranny supported grab the front and wiggle left and right pulling towards the front of the car. It should separate pretty easily. If not, check alignment, make sure tranny jack isn’t to low or high.
- Once apart, you will see your clutch and let out a big sigh of relief. Remove the bolts holding clutch on, these are goofy 12 point torq bolts. Don’t try to use a 6 point, you will strip them. The only 12 points I could find were from Snap On.
- Once clutch is removed, you will see the flywheel, and yep, MORE 12 Point torq bolts.
- Probably not necessary, but I cleaned everything while I had it apart with citrus engine degreaser.
 (Fork, in and out of tranny, starter and starter area of tranny) This makes for a much cleaner re-assembly.
 - Check the rear main seal, if its leaking, replace it.
- Install new flywheel, use blue locktite and torque per specs.(63 ft-lb if I remember correctly)

- Clean flywheel surface with alcohol or equivalent to remove grease from handling it.
- VERY IMPORTANT STEP. Using the alignment tool, center the clutch disc and pressure plate on the flywheel and lightly secure the flywheel. Once lightly secured, eye of the alignment tool and MAKE SURE its centered. This will be a major PITA later if not.
- Now torque down the pressure plate, using normal diagonal pattern.(24 ft-lbs I believe, confirm for yourself in manual for clutch or Porsche repair manual)
- Lube the tranny spline shaft with appropriate grease(i used lithium grease)
- Lube the fork tips where it rubs against the throwout bearing(or just lube throwout bearing)
- I lubed the fork where the slave cylinder shaft hits, not sure if this was necessary.
- Be sure the fork holes are cleaned and lightly lubed, makes sliding in the pivot shaft easier.
- Now the 3rd tricky part, put the fork in place, and tape it to the pressure plate. It should be perfectly horizontal, if not re-tape. I used electrical tape, put it on your pants first to make it less sticky(easier to pull off). Position the end of the tape towards where the opening will be on the passenger side of the transmission. This is where you will remove the tape from.
- Slide transmission back into place, the top passenger side shaft is the 1st one to get into place, then adjust accordingly for the rest.
- Look thru driver side port hole to line up fork with pivot shaft hole.
- VERY CRITICAL STEP. Time to slide the pivot shaft back in place, if you drop anything, you have to pull tranny back out. Using the same 6mm bolt you used to remove it, instal it. When I did this the outside roller bearing popped off, I made a tool using nut driver and some sockets to push the outside bearing in place.
- Replace plastic cover and retaining clip and bolt.
- Smooth sailing from here, put everything back the way you found it.
- Check turbo inlets hoses directly at turbos, by drivers side worked itself off during the process.
Last edited by Talisman013; 11-29-2023 at 03:33 PM. Reason: formatting

#5
03-05-2011, 09:59 PM
Join Date: Oct 2009
Location: New Orleans
Age: 53
Posts: 421
Rep Power: 53 Actual hands on time was around 12 - 14 hours, but I wasnt trying to do it fast, didnt use any power tools, etc. Now that I have done it, I think I could do it start to finish in 5-7hrs.
The pivot shaft kicked my ***. Because I had no idea how it was installed. I probably spent 1.5 hrs on that alone, now it would take 1/2 hr tops.
#6
03-05-2011, 10:00 PM
Join Date: Oct 2009
Location: New Orleans
Age: 53
Posts: 421
Rep Power: 53
In case anyone was wondering, all video was done with iphone 4, and holy crap the video was helpful.
#7
03-06-2011, 04:56 AM

Very nice write up! I assisted (water boy) my indy mechanic when I had mine out last year and it is a PITA!!! Took 9 hours total... He doesn't do turbos very often cause they aren't many in town, but could probably go faster if he did them more often...
Trending Topics
#11
03-06-2011, 05:54 AM
Actual hands on time was around 12 - 14 hours, but I wasnt trying to do it fast, didnt use any power tools, etc. Now that I have done it, I think I could do it start to finish in 5-7hrs.
The pivot shaft kicked my ***. Because I had no idea how it was installed. I probably spent 1.5 hrs on that alone, now it would take 1/2 hr tops.
The pivot shaft kicked my ***. Because I had no idea how it was installed. I probably spent 1.5 hrs on that alone, now it would take 1/2 hr tops.
Great job! The pivot shaft ether goes right in or takes hours..

#12
03-06-2011, 08:32 AM
On a scale of 1-10, how would you rate the install? Is it worth saving the $1000 install cost? I've done the little things like slave cylinder, but never dropped the motor or even attempted a clutch on anny car. Would you just recommend bringing it to a shop?
#13
03-06-2011, 08:41 AM
Join Date: Oct 2009
Location: New Orleans
Age: 53
Posts: 421
Rep Power: 53
No. This is the longest one, but I was able to clear it.
#14
03-06-2011, 08:48 AM
Join Date: Oct 2009
Location: New Orleans
Age: 53
Posts: 421
Rep Power: 53 1. I dont trust anyone else to work on my car. They might ground a starter wire to the tranny

2. I enjoy working on it.
3. I used this clutch job to justify buying a $3000 lift for my garage with my wife.

4. The expense.
If you dont have a lift, definately bring it to someone. $1000 is a pretty good price, most dealerships bill $2000+ for this job.
As for a 1-10 rating, maybe a 7. Before starting I would have guessed a 10 because I read so many posts saying you must pull the motor. I did the clutch job on my previous Supras and 300ZX, it really wasnt much more difficult than they were.
Last edited by Talisman013; 03-06-2011 at 08:51 AM. Reason: forgot rating
#15
03-06-2011, 09:00 AM
Registered User
Join Date: Nov 2005
Location: Under Your Car
Age: 46
Posts: 573
Rep Power: 78
For those that want to see the pivot shaft in detail, click on my blog, and it is about the 6th or 7th post down I think.