DIY GUIDE: 996 Gauge Face Color Change
#1
 08-27-2013, 07:58 PM


Hello Everyone!
I've spent a lot of time learning and researching how to execute this project. I'm finally ready to give you all a write-up on this!
I recently changed the gauge faces of my 2003 996 GT2 from the dull orange to a brand new BIGHT WHITE! The results are amazing... I have to share with everyone else.
This guide will cover the disassemble and changing of the LEDs within the HVAC and Gauge Cluster systems on Porsche 996's 2001-2005.
Tools required:
- You will use 47 LEDs total.
I got mine from http://sportscarleds.com/. You have to buy two packs of the small white LEDs which will give you 50. You will have 3 spares. I found this was not enough if you messed up and burnt an LED. I would buy 3 packs.
- Various Torx sizes
- Soldering iron/supplies (Solder, a wet sponge, iron, stand etc..)
- Flathead screwdrivers/interior removal tool
- Pliers
- Screw holders for organization
- IMPORTANT: Watch battery (3v) for testing LEDs once they're on the board.
Disclaimer: I am not responsible for any damage to your vehicle. This guide is merely a direction in which to follow if you're going to take on the risks of doing this yourself. Be smart, gentle, and safe!
This guide is for someone who has previous soldering experience. The PCB contacts are sensitive, so if you don't know what you're doing you can end up with a dark spot in your gauges. There are work-arounds to this, but it takes even more time and skill.
You have been warned!!!
First off, the gauge cluster needs to be removed. Here is a good informative guide for getting the cluster out:
http://www.pelicanparts.com/techarti...96_Cluster.htm
I would HIGHLY recommend putting various towels, or blue tape over your leather bits surrounding the cluster, the bottom has sharp edges that WILL scratch stuff up.. (happened to me a bit )
)
The HVAC also needs to be removed, but this is rather simple. I used a credit card to pry the bezel away, then you will see the brackets holding it in.
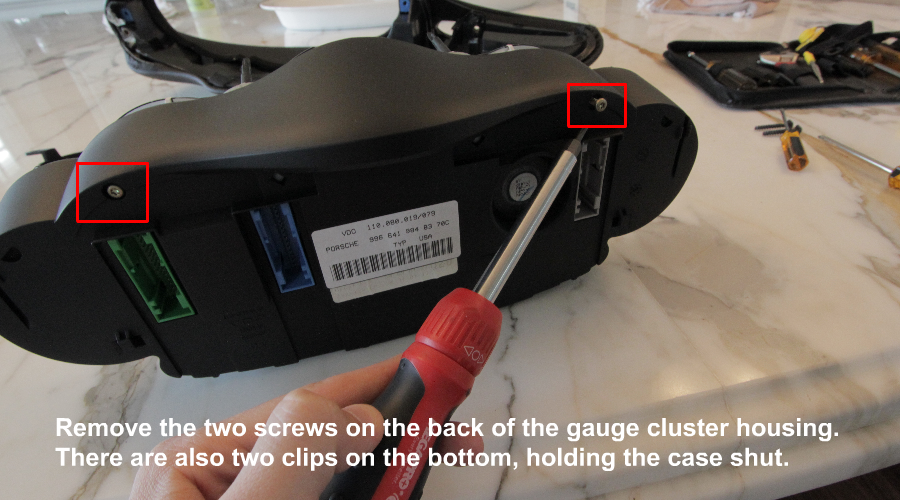
My disassembly process is highlighted in the following photos (CLICK TO ENLARGE):


Reguarding the gauge needle position:
In order to get my guages to the original position they were, I gently pushed them onto the shaft of each motor, but not all the way.
The motors stop turning to their far left and far right positions (which is usually 7-8 o'clock at the very bottom, and when rotated to the right, most go all the way to 3'oclock).
I would gently rotate the gauges until I felt the motor lock up and the needles begin to spin on top the shaft. I would then spin them a full counterclockwise to the OEM position (slightly below 0). I would then press them all the way down to lock the position in. I may make a video of this if lots of people request it.
If none of these images are working for you, let me know. In the meantime heres a link to the gallery:
http://postimg.org/gallery/1g5ug23y/
I've spent a lot of time learning and researching how to execute this project. I'm finally ready to give you all a write-up on this!
I recently changed the gauge faces of my 2003 996 GT2 from the dull orange to a brand new BIGHT WHITE! The results are amazing... I have to share with everyone else.
This guide will cover the disassemble and changing of the LEDs within the HVAC and Gauge Cluster systems on Porsche 996's 2001-2005.
Tools required:
- You will use 47 LEDs total.
I got mine from http://sportscarleds.com/. You have to buy two packs of the small white LEDs which will give you 50. You will have 3 spares. I found this was not enough if you messed up and burnt an LED. I would buy 3 packs.
- Various Torx sizes
- Soldering iron/supplies (Solder, a wet sponge, iron, stand etc..)
- Flathead screwdrivers/interior removal tool
- Pliers
- Screw holders for organization
- IMPORTANT: Watch battery (3v) for testing LEDs once they're on the board.
Disclaimer: I am not responsible for any damage to your vehicle. This guide is merely a direction in which to follow if you're going to take on the risks of doing this yourself. Be smart, gentle, and safe!
This guide is for someone who has previous soldering experience. The PCB contacts are sensitive, so if you don't know what you're doing you can end up with a dark spot in your gauges. There are work-arounds to this, but it takes even more time and skill.
You have been warned!!!
First off, the gauge cluster needs to be removed. Here is a good informative guide for getting the cluster out:
http://www.pelicanparts.com/techarti...96_Cluster.htm
I would HIGHLY recommend putting various towels, or blue tape over your leather bits surrounding the cluster, the bottom has sharp edges that WILL scratch stuff up.. (happened to me a bit
)The HVAC also needs to be removed, but this is rather simple. I used a credit card to pry the bezel away, then you will see the brackets holding it in.
My disassembly process is highlighted in the following photos (CLICK TO ENLARGE):
Reguarding the gauge needle position:
In order to get my guages to the original position they were, I gently pushed them onto the shaft of each motor, but not all the way.
The motors stop turning to their far left and far right positions (which is usually 7-8 o'clock at the very bottom, and when rotated to the right, most go all the way to 3'oclock).
I would gently rotate the gauges until I felt the motor lock up and the needles begin to spin on top the shaft. I would then spin them a full counterclockwise to the OEM position (slightly below 0). I would then press them all the way down to lock the position in. I may make a video of this if lots of people request it.
If none of these images are working for you, let me know. In the meantime heres a link to the gallery:
http://postimg.org/gallery/1g5ug23y/
My soldering technique is demonstrated HERE:
Feel free to post questions below and I'll do my best to awnser them as speedy as possible! If you'd like me to change the color of your dash, pm me and we can talk!

Thanks for reading!! Sorry about any bad spelling/grammar! Hopefully the guide was easy and fun to read.
I'll get some better photos of the final result eventually. The LCDs are green because I didn't remove the filter from those. To get the LEDs color on the LCDs I would have had to replace those filters too. This isn't hard, but when I first tested them I liked the green...
Feel free to post questions below and I'll do my best to awnser them as speedy as possible! If you'd like me to change the color of your dash, pm me and we can talk!
FINAL RESULT:
Thanks for reading!! Sorry about any bad spelling/grammar! Hopefully the guide was easy and fun to read.
I'll get some better photos of the final result eventually. The LCDs are green because I didn't remove the filter from those. To get the LEDs color on the LCDs I would have had to replace those filters too. This isn't hard, but when I first tested them I liked the green...
Last edited by TabooPc; 08-28-2013 at 02:45 PM. Reason: Updated disclaimer


Trending Topics
#9
08-28-2013, 01:02 PM
I actually thought about doing a DIY (or atleast a photo progress) in the future when I switch to watercooled turbos!
Glad you guys like the guide.
#13
08-28-2013, 02:43 PM
Start to finish this takes about 6 hours for someone who knows what to do and is well organized and focused.
This is not for the faint of heart. If this is your first time soldering, its not a good project to start on... I should probably add this to the disclaimer. The contacts on the PCB are sensitive and can break off if you're not careful, leaving you with a dark spot.
This is not for the faint of heart. If this is your first time soldering, its not a good project to start on... I should probably add this to the disclaimer. The contacts on the PCB are sensitive and can break off if you're not careful, leaving you with a dark spot.
#15
08-28-2013, 04:12 PM
I do tons of graphic design, so it actually only took me about 4 hours to do the whole thing!
Trying to raise the bar. Haha