DIY: 997 OEM Trunk Mounted Collapsible Spare Tire – C4S
#1
 05-01-2011, 04:20 PM


Join Date: Sep 2010
Location: Hotel Room & Airplanes
Posts: 56
Rep Power: 28 

DIY: 997 OEM Trunk Mounted Collapsible Spare Tire – C4S
As commented in several other thread unbelievably Porsche didn’t offer 997 owners the option of a trunk mounted spare. My car is a 4 season daily driver and personally I would prefer to change a flat tire myself and be back on the road then to wait for a service truck to arrive. So I knew as soon as I bought my car this would be one of the first projects I’d complete.
Several measurements quickly confirmed mounting a spare tire in the floor of the trunk was not possible due to the AWD system so this was the method I settled on. Hopefully this write-up will help someone else looking for a similar option.
Configuration
'06 997 C4S with Nav & 6 Disc CD Changer
Note: CD changer was discarded in this install.
Note: This method will work for C2, C2S & C4 997 as well.
OEM Parts
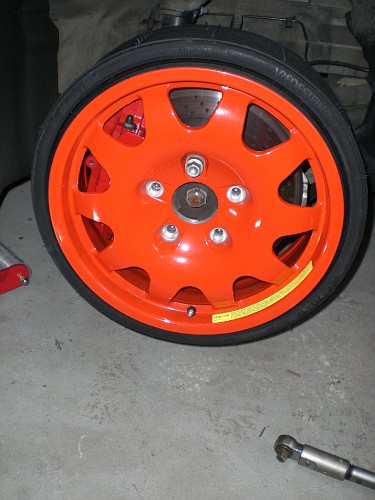
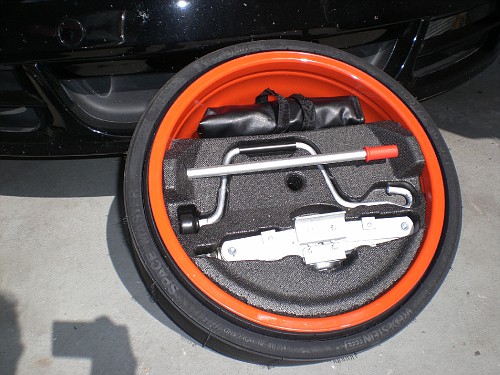
996-362-150-00 Collapsible Spare Tire (996)
996-722-101-00 Jack and Tool Holder Insert
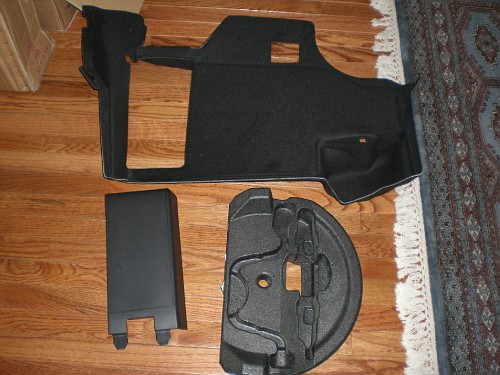
997-551-108-00-02A Bose Amp Cover
997-551-051-20-A31 Trunk Liner (Black) Bose Amp Only
Non-OEM Parts
(2) Sealed Rivets----------- McMaster: 97524A046
(1) Easy Align Weld Nut ---McMaster: 90955A129
(1) 6” Threaded Rod-------McMaster: 90557A650
(1) Wing Nut---------------McMaster: 92239A250
(4+) Blind Rivets----------- (Your choice)
Major Steps:
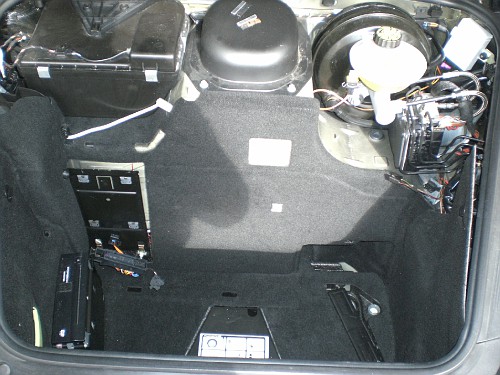
Disassemble Trunk, Remove CD Changer and All Liners
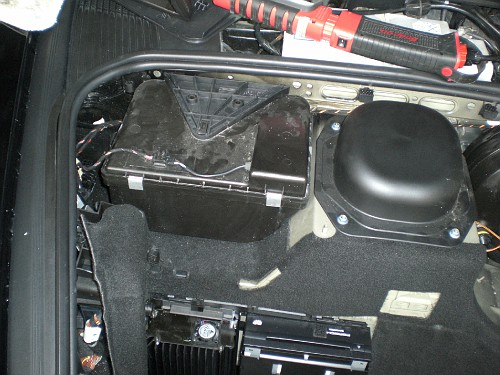
Remove DVD/NAV Drive from Mounting Bracket.
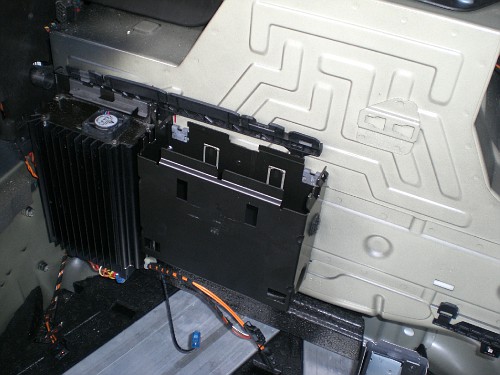
Rivet CD Changer Bracket to NAV/DVD Drive Mounting Bracket

Mount Weld Nut In Raised Sheet Metal (Do Not Drill Through the Trunk!!!)
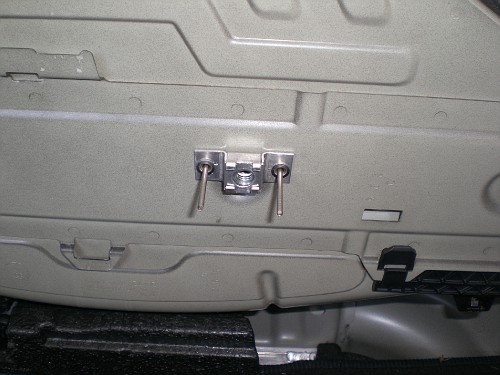
Test Fit of Assembly (Note Location of Weldnut)

Cut Hole for Spare Tire Mounting Rod, Install Carpet
Mount Insert and Tool Kit
Finished Product

More pictures & additional steps/ details can be found here: CLICK
Several measurements quickly confirmed mounting a spare tire in the floor of the trunk was not possible due to the AWD system so this was the method I settled on. Hopefully this write-up will help someone else looking for a similar option.
Configuration
'06 997 C4S with Nav & 6 Disc CD Changer
Note: CD changer was discarded in this install.
Note: This method will work for C2, C2S & C4 997 as well.
OEM Parts
996-362-150-00 Collapsible Spare Tire (996)
996-722-101-00 Jack and Tool Holder Insert
997-551-108-00-02A Bose Amp Cover
997-551-051-20-A31 Trunk Liner (Black) Bose Amp Only
Non-OEM Parts
(2) Sealed Rivets----------- McMaster: 97524A046
(1) Easy Align Weld Nut ---McMaster: 90955A129
(1) 6” Threaded Rod-------McMaster: 90557A650
(1) Wing Nut---------------McMaster: 92239A250
(4+) Blind Rivets----------- (Your choice)
Major Steps:
Disassemble Trunk, Remove CD Changer and All Liners
Remove DVD/NAV Drive from Mounting Bracket.
Rivet CD Changer Bracket to NAV/DVD Drive Mounting Bracket
Mount Weld Nut In Raised Sheet Metal (Do Not Drill Through the Trunk!!!)
Test Fit of Assembly (Note Location of Weldnut)
Cut Hole for Spare Tire Mounting Rod, Install Carpet
Mount Insert and Tool Kit
Finished Product
More pictures & additional steps/ details can be found here: CLICK
Last edited by stilljester; 05-03-2011 at 06:33 PM. Reason: Added part numbers for non-OEM parts
#2
05-01-2011, 05:21 PM
Registered User
Join Date: Mar 2011
Location: Haddon Heights, NJ
Posts: 232
Rep Power: 24
how much did you pay for the tire jack et al? I'm pondering purchasing for my 2006 C2S. Any recommendations on the best place to purchase?
#3
05-01-2011, 07:04 PM
Nice job. And they said it couldn't be done. Did you discard the CD player because there was no room for it with the spare in place ? Could the CD have been piggy backed with the +NAV and still allow room for the spare ? Thanks for posting as I have contemplated getting the spare for road trips as I don't trust the goop or the tiny compressor that came with the car.

#5
05-02-2011, 04:25 AM
Join Date: Sep 2010
Location: Hotel Room & Airplanes
Posts: 56
Rep Power: 28 CD changer was mainly removed because I substituted an IPod to perform the same function. I could have mounted it in tandem with the +NAV drive but I wanted to keep as much trunk space as possible.
#6
05-02-2011, 05:19 AM
Could you post how the sealed rivets were placed on the raised sheet metal? You state not to drill here (due to location of the gas tank, I'm sure).
Your set up looks great. I have the Boxster bicycle tire in my frunk.
thanks
Your set up looks great. I have the Boxster bicycle tire in my frunk.
thanks
#7
05-02-2011, 06:12 AM
Join Date: Sep 2010
Location: Hotel Room & Airplanes
Posts: 56
Rep Power: 28 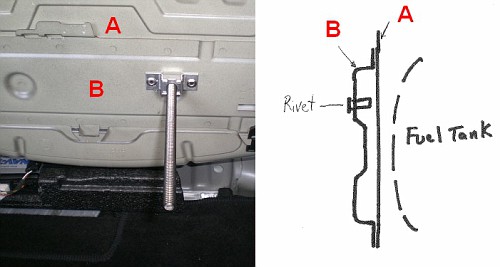
Trending Topics
#9
05-02-2011, 01:26 PM

Don't count on your skill with a drill to not go through both 'A' and 'B' above. Tape the drill bit to a depth that would allow only penetration of 'A' or use a collet on the bit to control depth. Once the bit goes through the first wall it may pull itself through the second. you are dealing with thin sheet metal.
To the OP thanks for the post. I often think about this as I sometimes find myself a day's drive from home.
To the OP thanks for the post. I often think about this as I sometimes find myself a day's drive from home.
#10
05-03-2011, 09:43 AM
Could you post where you sourced the rivets and well nut? Part numbers for those would be helpful.
thanks
thanks
#11
05-03-2011, 10:06 AM
Good job. I just recently bought the Suncoast kit - been looking around for that wheel (17in collapsible) used for a while and finally gave up - 16's are easy to find - 17s are very rare. The tire alone is almost $700. If you did all this for under $500, kudos big time.
I just have mine propped up like yours but not secured, although it is sitting with two wheel chocks on each side and is probably very close to contact with the Das Schild liner - doesn't look like it is going anywhere and I also have now the option of putting it in the rear seat. I still want to explore putting on the floor, but that looks like it will be very tight or not possible.
I just have mine propped up like yours but not secured, although it is sitting with two wheel chocks on each side and is probably very close to contact with the Das Schild liner - doesn't look like it is going anywhere and I also have now the option of putting it in the rear seat. I still want to explore putting on the floor, but that looks like it will be very tight or not possible.
Last edited by stevepow; 05-03-2011 at 10:08 AM.

#15
05-03-2011, 06:42 PM
Join Date: Sep 2010
Location: Hotel Room & Airplanes
Posts: 56
Rep Power: 28 Don't count on your skill with a drill to not go through both 'A' and 'B' above. Tape the drill bit to a depth that would allow only penetration of 'A' or use a collet on the bit to control depth. Once the bit goes through the first wall it may pull itself through the second. you are dealing with thin sheet metal.

Yes it will fit in the back seat. My tool kit contains a plastic bag to place the flat in to prevent marring interior surfaces.