High Mileage '06 Carrera S Journal [Equinox]


#47
 01-08-2012, 06:20 AM
I would like to here more about the cable also. I bought a 2006 Carrera s with 77000 miles and have the same starting problems. Weak start up and if I should stall the car, it barley wants to start. The traffic behind start to blow there horns.")
#48
01-09-2012, 05:43 PM
Join Date: Dec 2011
Location: Beaumont, TX
Posts: 123
Rep Power: 26 

How to DIY replace trunk switch on door sill
Parts you need:
Bought a new switch module from suncoastparts.com
http://www.suncoastparts.com/product...7S_electronics
About $63.00
Tools you need:
(1) Short 5mm allen wrench
(1) Wide flat head screwdriver
*(4) Paperclips, optional, to hold open the clips to release the switch module, see below.

ABOVE: Here is what is holding it in. Two bolts, and some clips. Note that you do not have to remove the bolts, just loosen them, as the bracket coming off the door sill is open on the bottom.

ABOVE: Here is my lovely beat up door sill, with my broken trunk release switch.

ABOVE: Here is the snapped rocker switch I would like to replace.

ABOVE: Due to the tight spaces between the seat and door sill, you will need a 5mm allen wrench that is shorter than standard. This one I was lucky I had from "assembly required" furniture. Shown on the switch module for scale.

ABOVE: First step is to remove the small little rubber plugs that hide the allen head cap bolts, attaching the door sill to the car. You can remove these with your fingernail, or a plastic interior tool wedge. There are two of these.
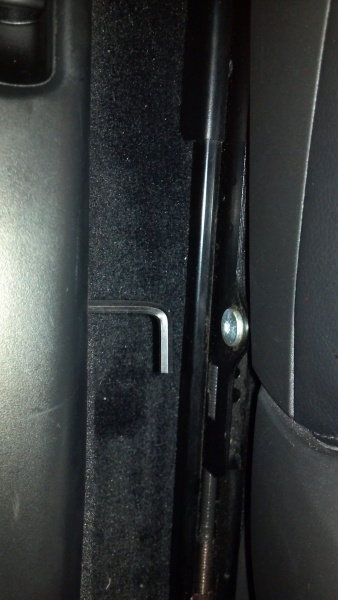
ABOVE: Here is my 5mm allen wrench in the now open hole that the plugs were hiding. Loosen both bolts several turns. No need to completely remove the bolts, as they only hold the sill when tight. (See first diagram above)

ABOVE: Once you have loosened both allen head cap bolts, pull up on the door sill to release the clips holding it in.

ABOVE: Once you pull the sill free, you can access the electrical squeeze connector under it. Just squeeze the springy portion of the clip together and slide free of the female harness.

ABOVE: Here one of the 5mm bolts that was holding the door sill down. The washer was squeezing an open "C" shaped extension off the door sill, pressing it to the jamb. When the bolt is loosened (not removed) it will allow you to pull up on the door sill, and remove it.

ABOVE: The underside of the switch module inside the door sill. Release all four clips holding the switch module, with a wide flat-head screwdriver, and push the module up and out of the door sill. You may need to wedge a paperclip in each clip as you release it, to prevent it from re-engaging. Note, the module can only come out one way, and that is towards the finished part of the door jamb.

ABOVE: Here is a close up picture of the space recently inhabited by the switch module. Note how you can see why the module only comes out one way.

ABOVE: Here is the new switch module clicked into the old door sill. It simply slides down into the recess.

ABOVE: New module with original door sill back in the car. Don't forget to put the plugs back over the bolt holes, and make sure when sliding the door sill back in, that you loosen the allen head bolts enough that your brackets will slide behind the washer. Doesn't take long.
Bought a new switch module from suncoastparts.com
http://www.suncoastparts.com/product...7S_electronics
About $63.00
Tools you need:
(1) Short 5mm allen wrench
(1) Wide flat head screwdriver
*(4) Paperclips, optional, to hold open the clips to release the switch module, see below.
ABOVE: Here is what is holding it in. Two bolts, and some clips. Note that you do not have to remove the bolts, just loosen them, as the bracket coming off the door sill is open on the bottom.
ABOVE: Here is my lovely beat up door sill, with my broken trunk release switch.
ABOVE: Here is the snapped rocker switch I would like to replace.
ABOVE: Due to the tight spaces between the seat and door sill, you will need a 5mm allen wrench that is shorter than standard. This one I was lucky I had from "assembly required" furniture. Shown on the switch module for scale.
ABOVE: First step is to remove the small little rubber plugs that hide the allen head cap bolts, attaching the door sill to the car. You can remove these with your fingernail, or a plastic interior tool wedge. There are two of these.
ABOVE: Here is my 5mm allen wrench in the now open hole that the plugs were hiding. Loosen both bolts several turns. No need to completely remove the bolts, as they only hold the sill when tight. (See first diagram above)
ABOVE: Once you have loosened both allen head cap bolts, pull up on the door sill to release the clips holding it in.
ABOVE: Once you pull the sill free, you can access the electrical squeeze connector under it. Just squeeze the springy portion of the clip together and slide free of the female harness.
ABOVE: Here one of the 5mm bolts that was holding the door sill down. The washer was squeezing an open "C" shaped extension off the door sill, pressing it to the jamb. When the bolt is loosened (not removed) it will allow you to pull up on the door sill, and remove it.
ABOVE: The underside of the switch module inside the door sill. Release all four clips holding the switch module, with a wide flat-head screwdriver, and push the module up and out of the door sill. You may need to wedge a paperclip in each clip as you release it, to prevent it from re-engaging. Note, the module can only come out one way, and that is towards the finished part of the door jamb.
ABOVE: Here is a close up picture of the space recently inhabited by the switch module. Note how you can see why the module only comes out one way.
ABOVE: Here is the new switch module clicked into the old door sill. It simply slides down into the recess.
ABOVE: New module with original door sill back in the car. Don't forget to put the plugs back over the bolt holes, and make sure when sliding the door sill back in, that you loosen the allen head bolts enough that your brackets will slide behind the washer. Doesn't take long.
Last edited by Equinox; 01-09-2012 at 06:12 PM.
#49
01-09-2012, 06:15 PM
Join Date: Dec 2011
Location: Beaumont, TX
Posts: 123
Rep Power: 26
Note to all about my alternator cable issue. The battery is brand new in the car, and without performing a drop test (which I will do before replacement.) I can tell this cable needs replacement.
Either way, I will be doing the cable install this weekend, as I am waiting on a Air Oil Separator part as well, and will do them at the same time. Probably will just drop the engine. Does anyone know where I can get the TSB on the alternator cable?
Either way, I will be doing the cable install this weekend, as I am waiting on a Air Oil Separator part as well, and will do them at the same time. Probably will just drop the engine. Does anyone know where I can get the TSB on the alternator cable?

#53
01-15-2012, 10:09 PM
Join Date: Dec 2011
Location: Beaumont, TX
Posts: 123
Rep Power: 26
AOS Air Oil Separator / Alternator Cable Install
Air Oil Separator PN 997.107.038.00 (Used)
Purchased at www.dcauto.com, price is 133.00 but you can place a bid for less. I did not pay $133.00.
Alternator Cable Assembly PN 997.607.019.03 (newer part number)
Purchased by calling Suncoastparts.com, $89.10
(997.607.019.02 appears to be the older cable)
Here we go...
NOTE: Some of the pictures are taken out of order, so you will notice parts I have previously taken off, back in the engine bay. That is because I performed this fix, and then realized the most advantageous order of attack in hind sight. Please do not be confused by magically appearing parts in the engine bay.
TOOLS:
Medium Philips head screw-driver (not misspelled)
Female E-12 Torx Socket
Female E-14 Torx Socket
Torx T-20 Bit
24mm Socket
12" Breaker bar to fit 24mm socket
10mm Socket
6" 60 degree wobble 3/8" extension (Recommended by Porsche Service, and myself)
13mm Open end wrench
13mm socket
Small/Medium Pry bar (or large flat-blade screw driver)
Fingers of steel, or just mega lobster pincher thumb and forefingers.

ABOVE: Put the car up on ramps, or lift the rear section up. Ensure you chok the front tires, put the car in gear, and pull the e-brake. I prefer to use ramps because you can use the e-brake to hold the car as well.

ABOVE: Disconnect the negative post of your battery in the front trunk. Use a 10mm socket, and protect the cable from arcing.

ABOVE: Remove the air box. There is plenty of information out there on how to do this (link pending)

ABOVE: Remove this filler box by turning the mid neck black cap 90 degrees anti-clockwise down the feed tube and remove the single bolt holding it in place on the passenger side with a 10mm socket. The box should pull straight up and out of the tube section.

ABOVE: Here is the filler box removed. Check the O-ring for damage, and put aside.

ABOVE: Remove the drive belt by turning the tension-er pulley bolt anti-clockwise with a 24mm socket and breaker bar. Remove belt.

ABOVE: Your belt-less accessories.

ABOVE: Remove the leftmost mounting bolt for the Air conditioning compressor with an E12 female socket. (You will not disconnect the lines, just move the compressor.)

ABOVE: Remove the second of three bolts holding the air conditioning compressor with an E12. The Bolt is semi-hidden behind hoses. (ignore scary tattoo)

ABOVE: The wobble extension with 60 degrees of play as recommended by Porsche for services. E14 female torx socket shown attached. (Link for purchase to come)

ABOVE: Remove the last (third) bolt holding in the A/C Compressor. Between the near intake runners on the passenger side, you will need the wobble extension with an E14 socket to tackle this job due to placement. NOTE THAT I SAY E14 AS THIS BOLT IS LARGER THAN THE OTHER TWO.

ABOVE: This is the bolt you are trying to remove. I could not see it without using my Droid X2 phone camera view finder. It's not important, as you should be able to find it with your extension. NOTE You will not be able to actually pull out the bolt, just unscrew it and leave it there.

ABOVE: Remove the ground wire for the A/C Compressor (The long translucent brown dirty box, not the black connector). It is located to the passenger side of the intake manifold, near where you are using your ratchet to get the third and final bolt of the unit. It just pulls apart. Now pull/turn the A/C unit towards the rear of the car and give yourself room to work, behind it. Be careful with it, and don't bend or break and hoses or hard-lines. The rubber hoses leading to the compressor should allow you enough flex to put it beside the passenger tail light inside the engine bay (see below).

ABOVE: Placement of my compressor to pull it out of the way to make room to work on the AOS/Alternator cable.

ABOVE: Remove the throttle body between the two intake manifolds using an E12 female socket. There are four bolts. Also, remove the single electrical connector that controls the throttle servo. (Silly 997)

ABOVE: Now, on the black plastic distribution tube, pinch the attached hose, connecting to the tube face, with your fingers and disconnect. Loosen all four hose clamps on the distribution tube with a philips head screw driver. You may need to use a flat bladed screw-driver to pry the rubber couplings to make them moveable, once so, slide the couplings towards the center of the distribution tube, "loading" it on to the piece in order to pry it off the manifold. Pull the tube free once you have enough of the rubber couplings loaded on it. Place aside. NOTE: I broke a small intake oil separator tube that was under it, so please be careful. (See below.)

ABOVE: Removed tube, and broken oil separator tube shown. Loosen all four hose clamps on the tuner tube with a philips, and move the rubber couplings onto the intake manifold. Pull roughly on the tube towards the rear of the car to remove. Remove couplings as well once done for room. Because the solenoid is still connected to the tuning tube, place aside in engine bay within slack of the solenoid vacuum line. (i.e. hang near pulleys and such.)

ABOVE: Tuning tube hung on water pump with solenoid still attached, but tube is out of the way.

ABOVE: Your $90,000 car is knackered. Scratch your brass ***** and grab a Shiner bock (or local brew), as it is probably noon by now.

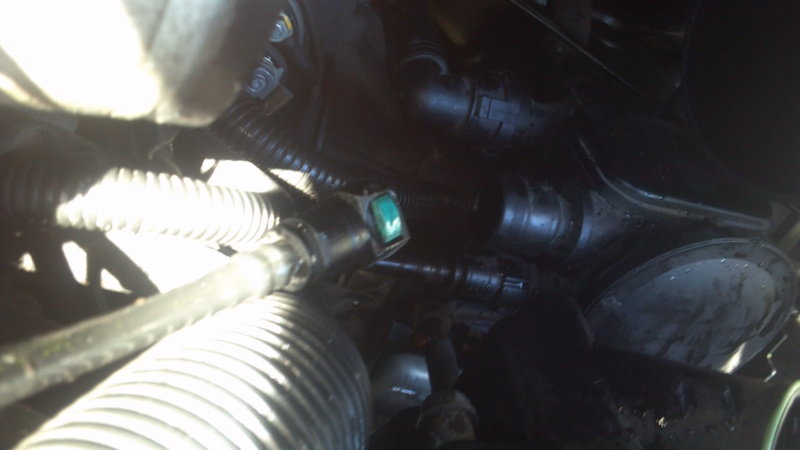
ABOVE: Best view of the AOS. Do you see it?

ABOVE: Because you moved the A/C Compressor, you now have access to the AOS mounting bracket. Un-bolt two screws using the T20 torx bit.

ABOVE: Pull the AOS straight up and out of the block. Your new AOS should come with new o-rings, if not, check your seals on the used item and save if needed.
By far, the biggest headache on this job are the connecting hoses to the AOS. The lowest hose is a coolant feed. Press the green button down as hard as you can to remove. Have a towel ready as you will spill about 8 ounces of fluid (a slim red bull can worth.) Also, go ahead and remove the rest of the hoses, except for the rear one. Like I said this is a headache, but just stick with it, you've gone too far gentleman. All hoses are clamped by finger clamp fits, exempli gratia, squeeze them, very hard.

ABOVE: 8oz of fluid shown. Screw the environment apparently.

ABOVE: The rear hose snakes around the intake manifold and ends on the passenger side near where the A/C Compressor was.

ABOVE: The the rear most tube ends on the passenger side very near the A/C Compressor. Disconnect it here, and remove the AOS by snaking this tube behind the intake manifold.

ABOVE: Here is the AOS with tube still attached. I would suggest removing the tube, and re connecting it to the car. Discard the AOS in a loathing fashion. NOTE: Scavenger lower o-rings if needed.
NOTE: AOS REPLACERs YOU ARE FINISHED, GO AHEAD AND SCROLL THIS THREAD BACKWARDS AND DO THE OPPOSITE OF WHAT I DO, OTHERWISE CONTINUE TO REPLACE ALTERNATOR CABLE AS WELL.
ESTIMATED INSTALL / REPLACE TIME 4 HOURS

ABOVE: I see a starter! (For Alt Cable replacers only)

ABOVE: Pull rubber shroud boot back to reveal the nut holding the alternator cable to the starter. Remove with a 13mm open end wrench.

ABOVE: Remove nut with 13mm open end socket as previously stated.

ABOVE: Remove lower driver side bolt on the alternator (3-phase generator) with E14 female torx socket

ABOVE: Remove the second of two bolts holding the generator on the upper passenger side portion. NOTE: This will also remove the idler pulley. Place a side.

ABOVE: Pictured is a medium to small pry bar, with a ratchet for scale. Use a pry bar, or large flat blade screw driver to pry the generator out of the hanger/passenger-side most bolt space. This area you are prying is called the "hanger bolt" and should be the first bolt you hang the alternator on when replacing. NOTE: DO NOT PRY INSIDE THE HOUSING AS YOU MAY DAMAGE THE GENERATOR. PRY ONLY ON THE OUTSIDE PORTION OF THE CASTING.

ABOVE: Spin the generator clockwise to access the rear post. Un-bolt the nut on the post with a 13mm socket and ratchet. Leave alternator hanging in a safe position.

ABOVE: Pictured is the rear post and 13mm nut still attached.

ABOVE: Remember where the AOS was? Well you can see your cable is routed here. It is attached to plastic risers to another cable. To be honest... I just pulled the cable up and off, snapping the plastic risers. There are three, shown in the picture is the first one, the other two lead down towards the front of the car, but are otherwise easily accessible with the parts you have already removed. I don't really know how to disconnect these suckers. It was easy to break, but good luck being nice about it. I intend to use black cable ties to re-attach the new cable.

ABOVE: Remove the rear-most drag coefficient tray under the motor. It has four bolts using a T20 bit.
Purchased at www.dcauto.com, price is 133.00 but you can place a bid for less. I did not pay $133.00.
Alternator Cable Assembly PN 997.607.019.03 (newer part number)
Purchased by calling Suncoastparts.com, $89.10
(997.607.019.02 appears to be the older cable)
Here we go...
NOTE: Some of the pictures are taken out of order, so you will notice parts I have previously taken off, back in the engine bay. That is because I performed this fix, and then realized the most advantageous order of attack in hind sight. Please do not be confused by magically appearing parts in the engine bay.
TOOLS:
Medium Philips head screw-driver (not misspelled)
Female E-12 Torx Socket
Female E-14 Torx Socket
Torx T-20 Bit
24mm Socket
12" Breaker bar to fit 24mm socket
10mm Socket
6" 60 degree wobble 3/8" extension (Recommended by Porsche Service, and myself)
13mm Open end wrench
13mm socket
Small/Medium Pry bar (or large flat-blade screw driver)
Fingers of steel, or just mega lobster pincher thumb and forefingers.
ABOVE: Put the car up on ramps, or lift the rear section up. Ensure you chok the front tires, put the car in gear, and pull the e-brake. I prefer to use ramps because you can use the e-brake to hold the car as well.
ABOVE: Disconnect the negative post of your battery in the front trunk. Use a 10mm socket, and protect the cable from arcing.
ABOVE: Remove the air box. There is plenty of information out there on how to do this (link pending)
ABOVE: Remove this filler box by turning the mid neck black cap 90 degrees anti-clockwise down the feed tube and remove the single bolt holding it in place on the passenger side with a 10mm socket. The box should pull straight up and out of the tube section.
ABOVE: Here is the filler box removed. Check the O-ring for damage, and put aside.
ABOVE: Remove the drive belt by turning the tension-er pulley bolt anti-clockwise with a 24mm socket and breaker bar. Remove belt.
ABOVE: Your belt-less accessories.
ABOVE: Remove the leftmost mounting bolt for the Air conditioning compressor with an E12 female socket. (You will not disconnect the lines, just move the compressor.)
ABOVE: Remove the second of three bolts holding the air conditioning compressor with an E12. The Bolt is semi-hidden behind hoses. (ignore scary tattoo
)ABOVE: The wobble extension with 60 degrees of play as recommended by Porsche for services. E14 female torx socket shown attached. (Link for purchase to come)
ABOVE: Remove the last (third) bolt holding in the A/C Compressor. Between the near intake runners on the passenger side, you will need the wobble extension with an E14 socket to tackle this job due to placement. NOTE THAT I SAY E14 AS THIS BOLT IS LARGER THAN THE OTHER TWO.
ABOVE: This is the bolt you are trying to remove. I could not see it without using my Droid X2 phone camera view finder. It's not important, as you should be able to find it with your extension. NOTE You will not be able to actually pull out the bolt, just unscrew it and leave it there.
ABOVE: Remove the ground wire for the A/C Compressor (The long translucent brown dirty box, not the black connector). It is located to the passenger side of the intake manifold, near where you are using your ratchet to get the third and final bolt of the unit. It just pulls apart. Now pull/turn the A/C unit towards the rear of the car and give yourself room to work, behind it. Be careful with it, and don't bend or break and hoses or hard-lines. The rubber hoses leading to the compressor should allow you enough flex to put it beside the passenger tail light inside the engine bay (see below).
ABOVE: Placement of my compressor to pull it out of the way to make room to work on the AOS/Alternator cable.
ABOVE: Remove the throttle body between the two intake manifolds using an E12 female socket. There are four bolts. Also, remove the single electrical connector that controls the throttle servo. (Silly 997)
ABOVE: Now, on the black plastic distribution tube, pinch the attached hose, connecting to the tube face, with your fingers and disconnect. Loosen all four hose clamps on the distribution tube with a philips head screw driver. You may need to use a flat bladed screw-driver to pry the rubber couplings to make them moveable, once so, slide the couplings towards the center of the distribution tube, "loading" it on to the piece in order to pry it off the manifold. Pull the tube free once you have enough of the rubber couplings loaded on it. Place aside. NOTE: I broke a small intake oil separator tube that was under it, so please be careful. (See below.)
ABOVE: Removed tube, and broken oil separator tube shown.
Loosen all four hose clamps on the tuner tube with a philips, and move the rubber couplings onto the intake manifold. Pull roughly on the tube towards the rear of the car to remove. Remove couplings as well once done for room. Because the solenoid is still connected to the tuning tube, place aside in engine bay within slack of the solenoid vacuum line. (i.e. hang near pulleys and such.)ABOVE: Tuning tube hung on water pump with solenoid still attached, but tube is out of the way.
ABOVE: Your $90,000 car is knackered. Scratch your brass ***** and grab a Shiner bock (or local brew), as it is probably noon by now.
ABOVE: Best view of the AOS. Do you see it?
ABOVE: Because you moved the A/C Compressor, you now have access to the AOS mounting bracket. Un-bolt two screws using the T20 torx bit.
ABOVE: Pull the AOS straight up and out of the block. Your new AOS should come with new o-rings, if not, check your seals on the used item and save if needed.
By far, the biggest headache on this job are the connecting hoses to the AOS. The lowest hose is a coolant feed. Press the green button down as hard as you can to remove. Have a towel ready as you will spill about 8 ounces of fluid (a slim red bull can worth.) Also, go ahead and remove the rest of the hoses, except for the rear one. Like I said this is a headache, but just stick with it, you've gone too far gentleman. All hoses are clamped by finger clamp fits, exempli gratia, squeeze them, very hard.
ABOVE: 8oz of fluid shown. Screw the environment apparently.
ABOVE: The rear hose snakes around the intake manifold and ends on the passenger side near where the A/C Compressor was.
ABOVE: The the rear most tube ends on the passenger side very near the A/C Compressor. Disconnect it here, and remove the AOS by snaking this tube behind the intake manifold.
ABOVE: Here is the AOS with tube still attached. I would suggest removing the tube, and re connecting it to the car. Discard the AOS in a loathing fashion. NOTE: Scavenger lower o-rings if needed.
NOTE: AOS REPLACERs YOU ARE FINISHED, GO AHEAD AND SCROLL THIS THREAD BACKWARDS AND DO THE OPPOSITE OF WHAT I DO, OTHERWISE CONTINUE TO REPLACE ALTERNATOR CABLE AS WELL.
ESTIMATED INSTALL / REPLACE TIME 4 HOURS
ABOVE: I see a starter! (For Alt Cable replacers only)
ABOVE: Pull rubber shroud boot back to reveal the nut holding the alternator cable to the starter. Remove with a 13mm open end wrench.
ABOVE: Remove nut with 13mm open end socket as previously stated.
ABOVE: Remove lower driver side bolt on the alternator (3-phase generator) with E14 female torx socket
ABOVE: Remove the second of two bolts holding the generator on the upper passenger side portion. NOTE: This will also remove the idler pulley. Place a side.
ABOVE: Pictured is a medium to small pry bar, with a ratchet for scale. Use a pry bar, or large flat blade screw driver to pry the generator out of the hanger/passenger-side most bolt space. This area you are prying is called the "hanger bolt" and should be the first bolt you hang the alternator on when replacing. NOTE: DO NOT PRY INSIDE THE HOUSING AS YOU MAY DAMAGE THE GENERATOR. PRY ONLY ON THE OUTSIDE PORTION OF THE CASTING.
ABOVE: Spin the generator clockwise to access the rear post. Un-bolt the nut on the post with a 13mm socket and ratchet. Leave alternator hanging in a safe position.
ABOVE: Pictured is the rear post and 13mm nut still attached.
ABOVE: Remember where the AOS was? Well you can see your cable is routed here. It is attached to plastic risers to another cable. To be honest... I just pulled the cable up and off, snapping the plastic risers. There are three, shown in the picture is the first one, the other two lead down towards the front of the car, but are otherwise easily accessible with the parts you have already removed. I don't really know how to disconnect these suckers. It was easy to break, but good luck being nice about it. I intend to use black cable ties to re-attach the new cable.
ABOVE: Remove the rear-most drag coefficient tray under the motor. It has four bolts using a T20 bit.
Last edited by Equinox; 01-19-2012 at 07:05 AM.
#54
01-16-2012, 12:13 AM
Join Date: Dec 2011
Location: Beaumont, TX
Posts: 123
Rep Power: 26 ABOVE: Picture of the bolts.
ABOVE: With the rear tray removed, you will be able to see the lower portion of the alternator cable assembly. The lower end is bolted to the passenger side of the transmission. Pictured above.
ABOVE: The end of the cable is a junction box with three cables connected. Remove with a 10mm socket. Open the box with your thumb, and the interior has one post with a 10mm nut; above the box are two 10mm bolts holding it to the transmission housing.
ABOVE: 10mm post shown inside the box once open, with socket placed upon.
ABOVE: The cable is held onto the transmission housing using two 10mm bolts. Remove in order to release the cable. One of the two is pictured here, however, both are easily accessible under the car.
ABOVE: Cable shown removed. I pulled the cable through under the car from above. I had to stand up and guide it through from above, twice, during the process, as it caught both times. This would work better with two people, but who has time for friends?
NOTE: ALTERNATOR / GENERATOR 3-PHASE CABLE ASSEMBLY REPLACERS SHOULD FOLLOW THIS THREAD IN REVERSE AND DO THE OPPOSITE OF WHAT I SAY IN ORDER TO FINISH.
ESTIMATED TIME OF INSTALL FOR CABLE - 6 HOURS OF FUN AND BEER.
Last edited by Equinox; 01-19-2012 at 06:30 AM.
#56
01-16-2012, 07:47 AM
Registered User
Join Date: Mar 2011
Location: Haddon Heights, NJ
Posts: 232
Rep Power: 24
Simply put Equinox, you are THE MAN. I cannot thank you enough for your thorough approach and sharing your experiences with the team.

