How To - '09 DB9 Battery Replacement
#1
 10-05-2014, 08:01 PM

Join Date: Nov 2011
Location: Houston-ish
Posts: 389
Rep Power: 71 

How To - '09 DB9 Battery Replacement
Greetings,
Today I replaced the original battery in my 2009 DB9 Volante and figured I'd take pictures and post instructions for future first-time-owners.
Although replacing a battery isn't among the most difficult of things with which we can be faced, I wanted to take some of the uncertainty out of the task for those who've not done one on a DB9.
My car is a US spec (left hand drive) car, so the term "passenger" or "right" side both represent the passenger seat in a US spec vehicle.
1) The battery is under the rear, passenger seat squab
2) Lower the top (if a convertible) and the windows
3) Move or tilt the passenger seat forward
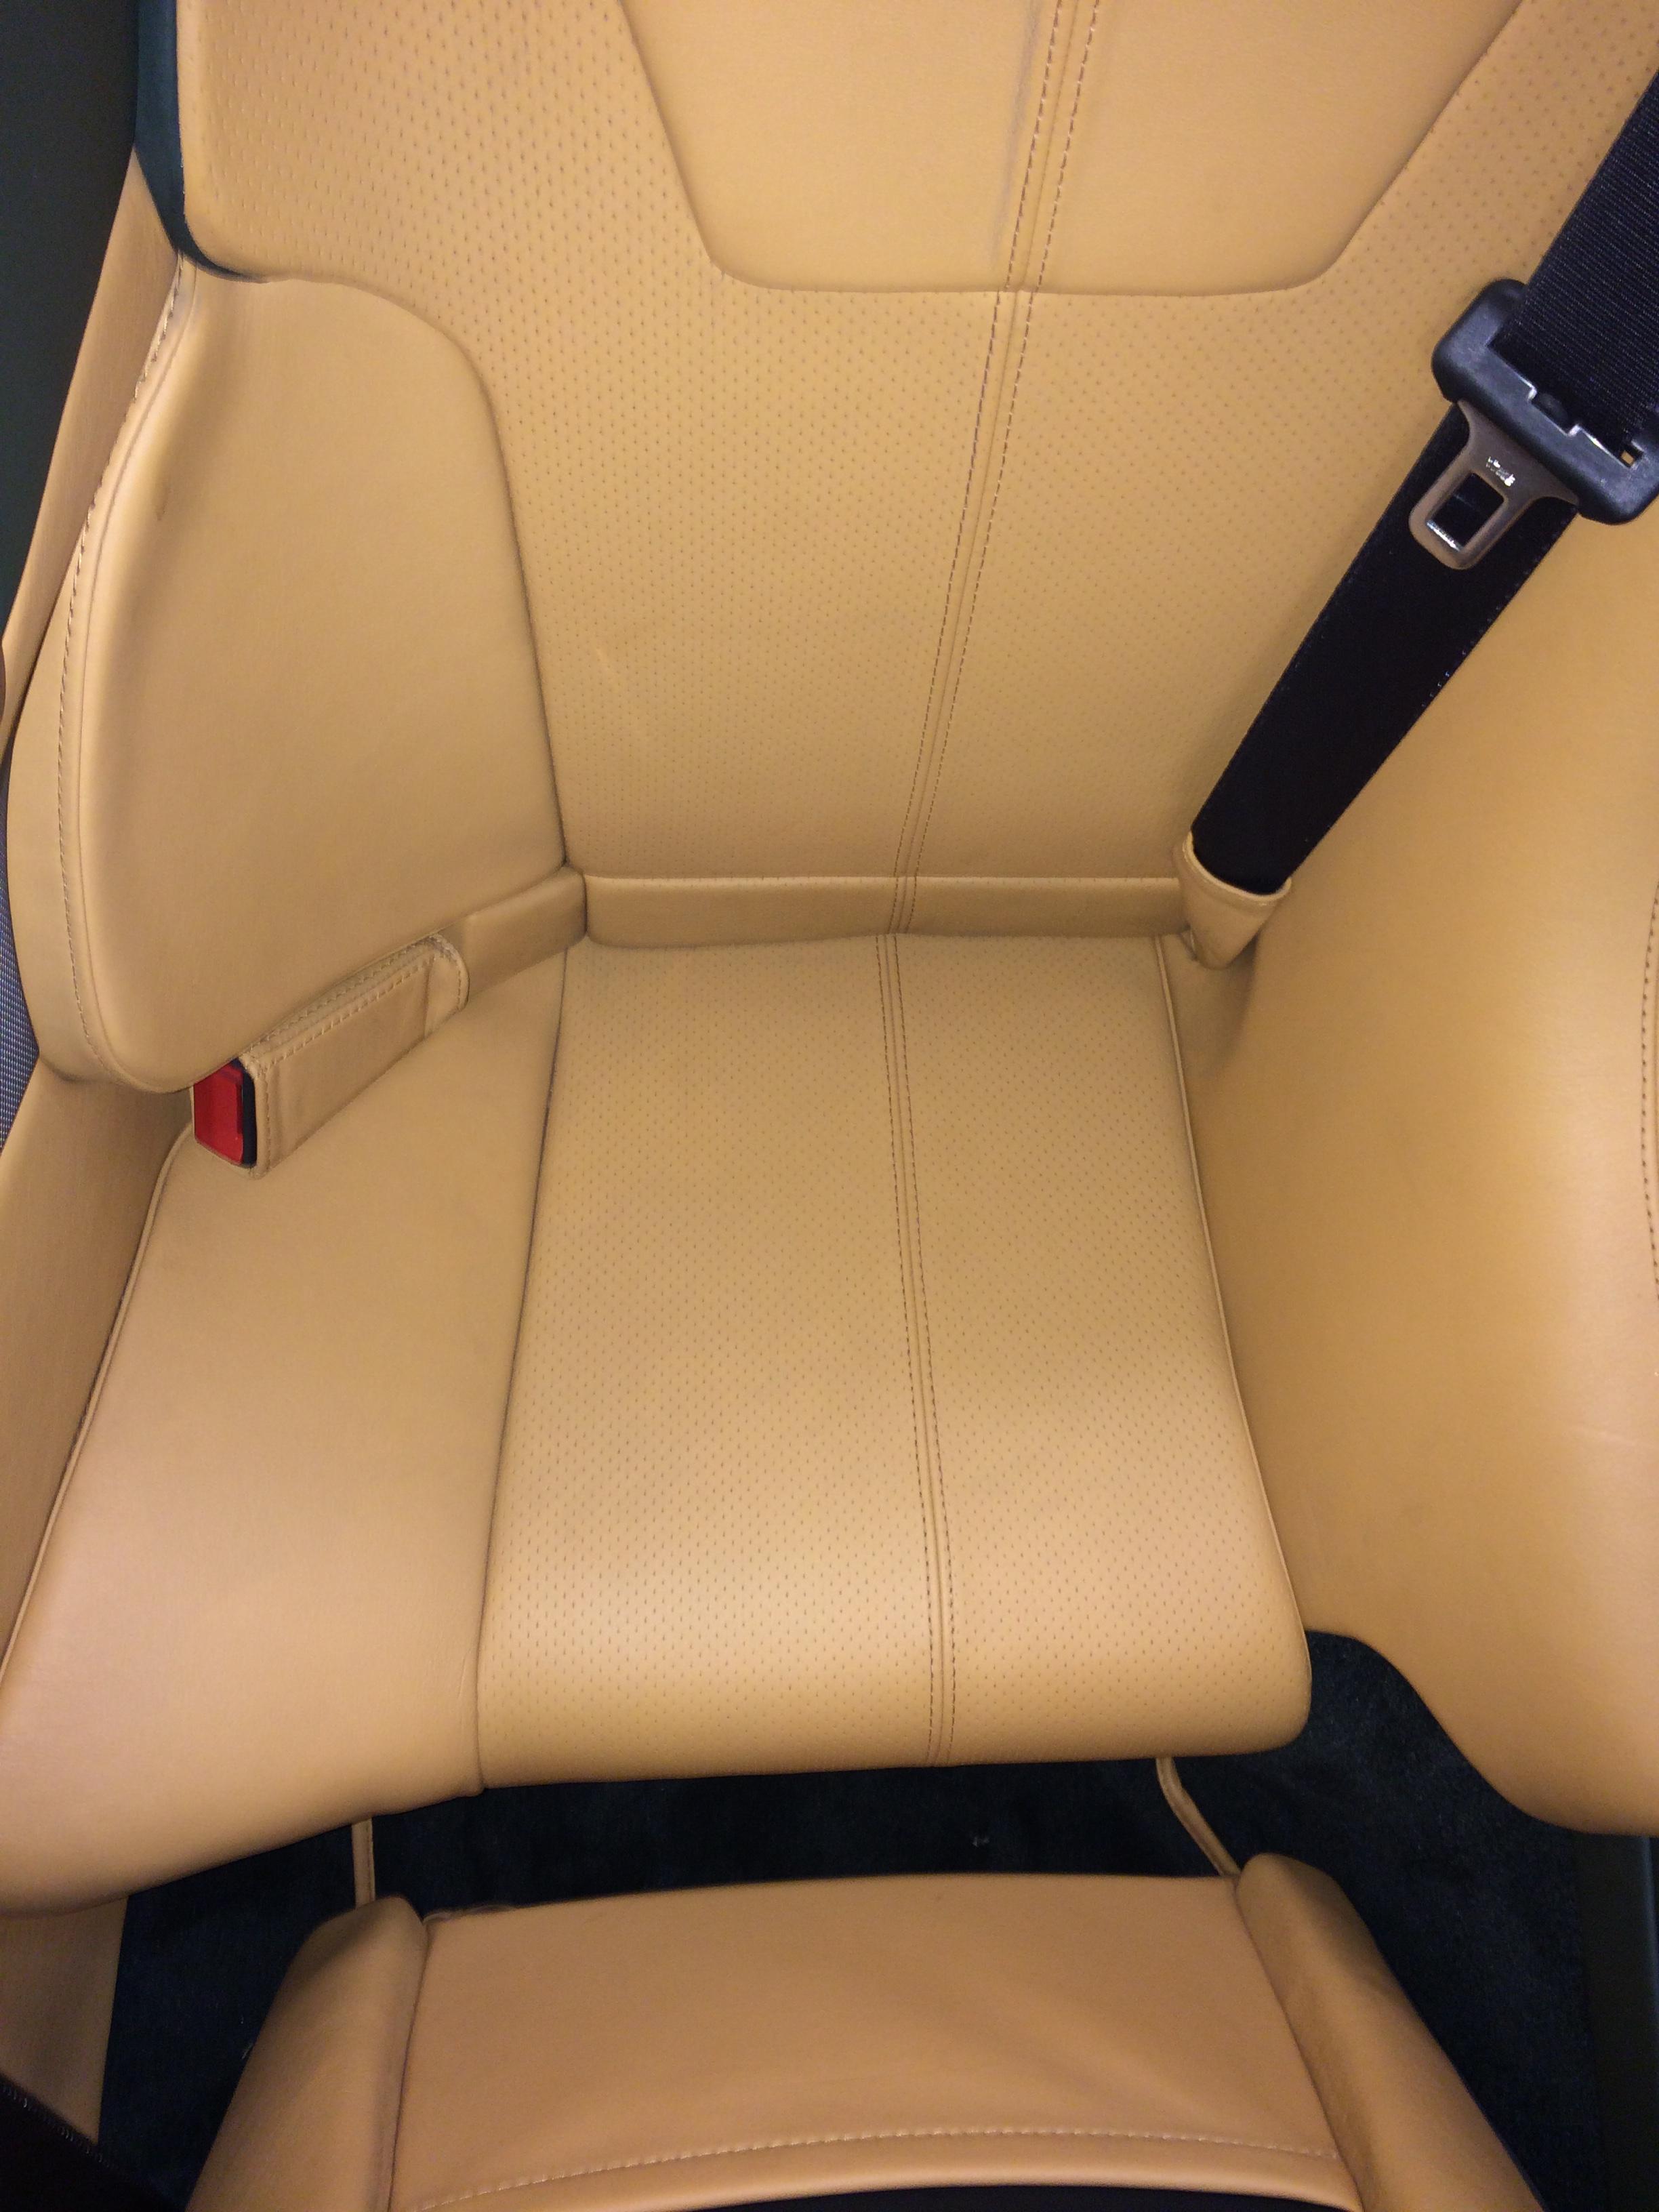
4) Grab the bottom seat squab from the front, and lift up and towards the front seat to remove
(replace next photo with one showing bolts still in place)
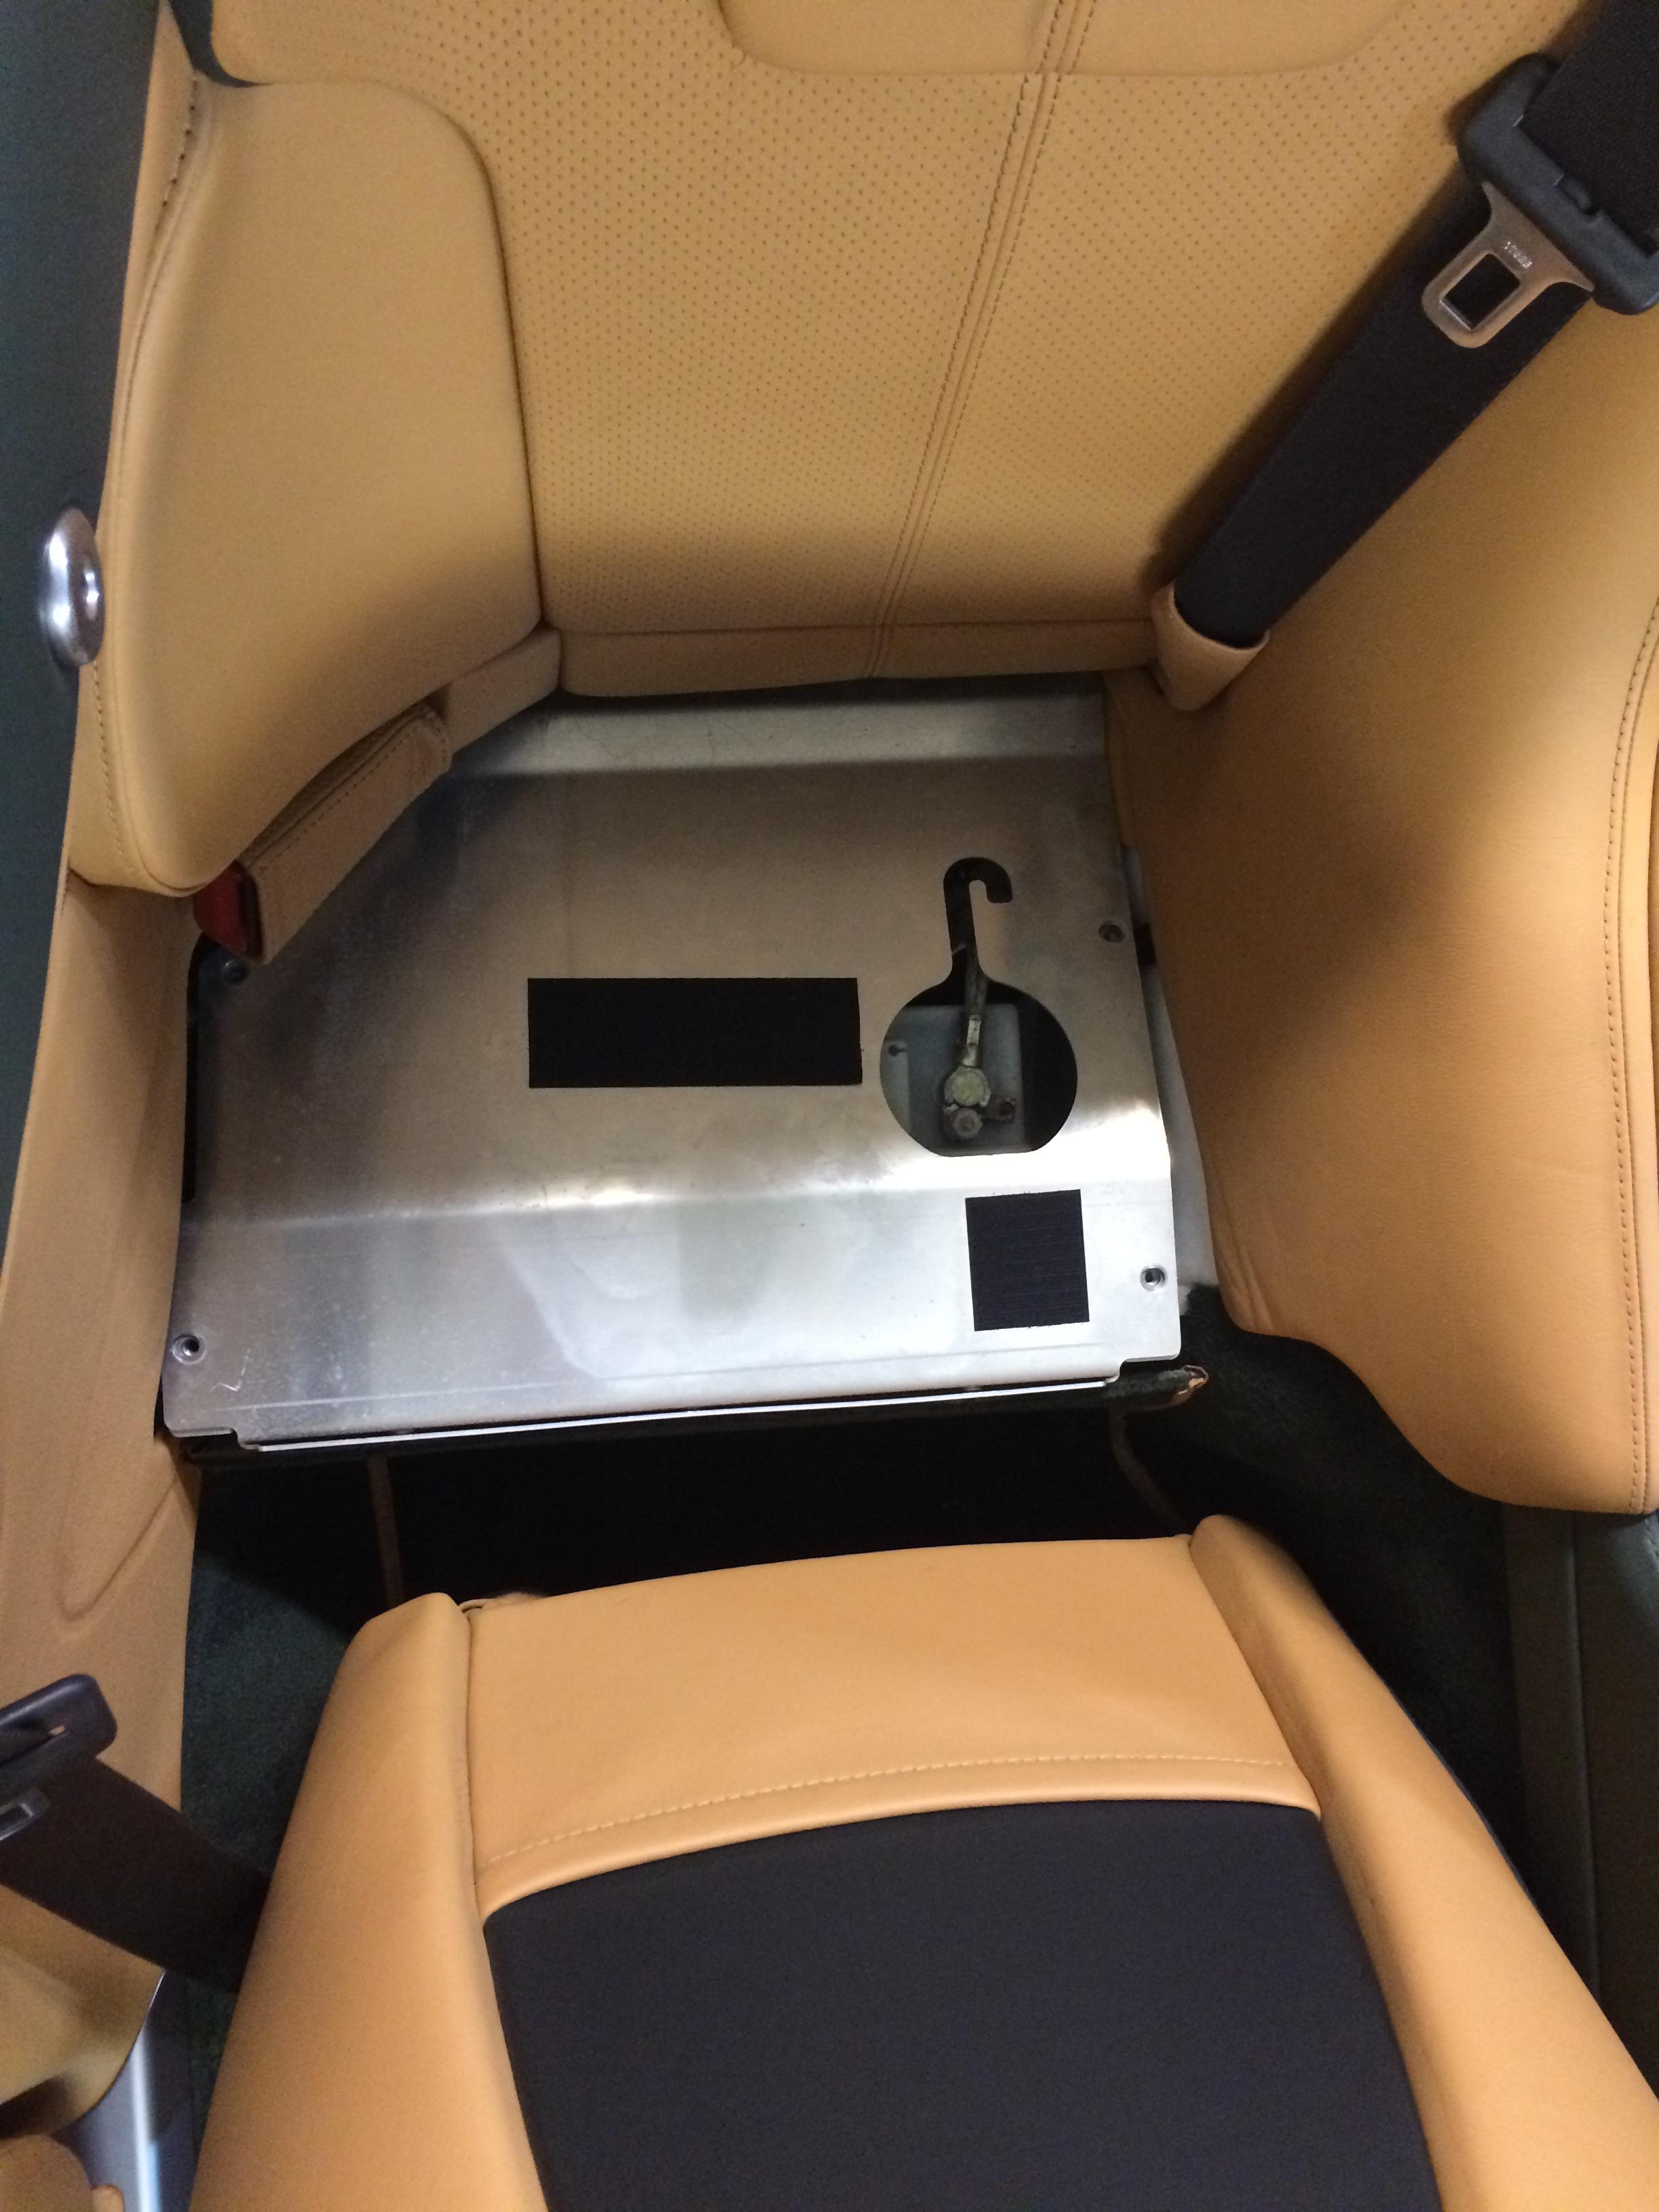
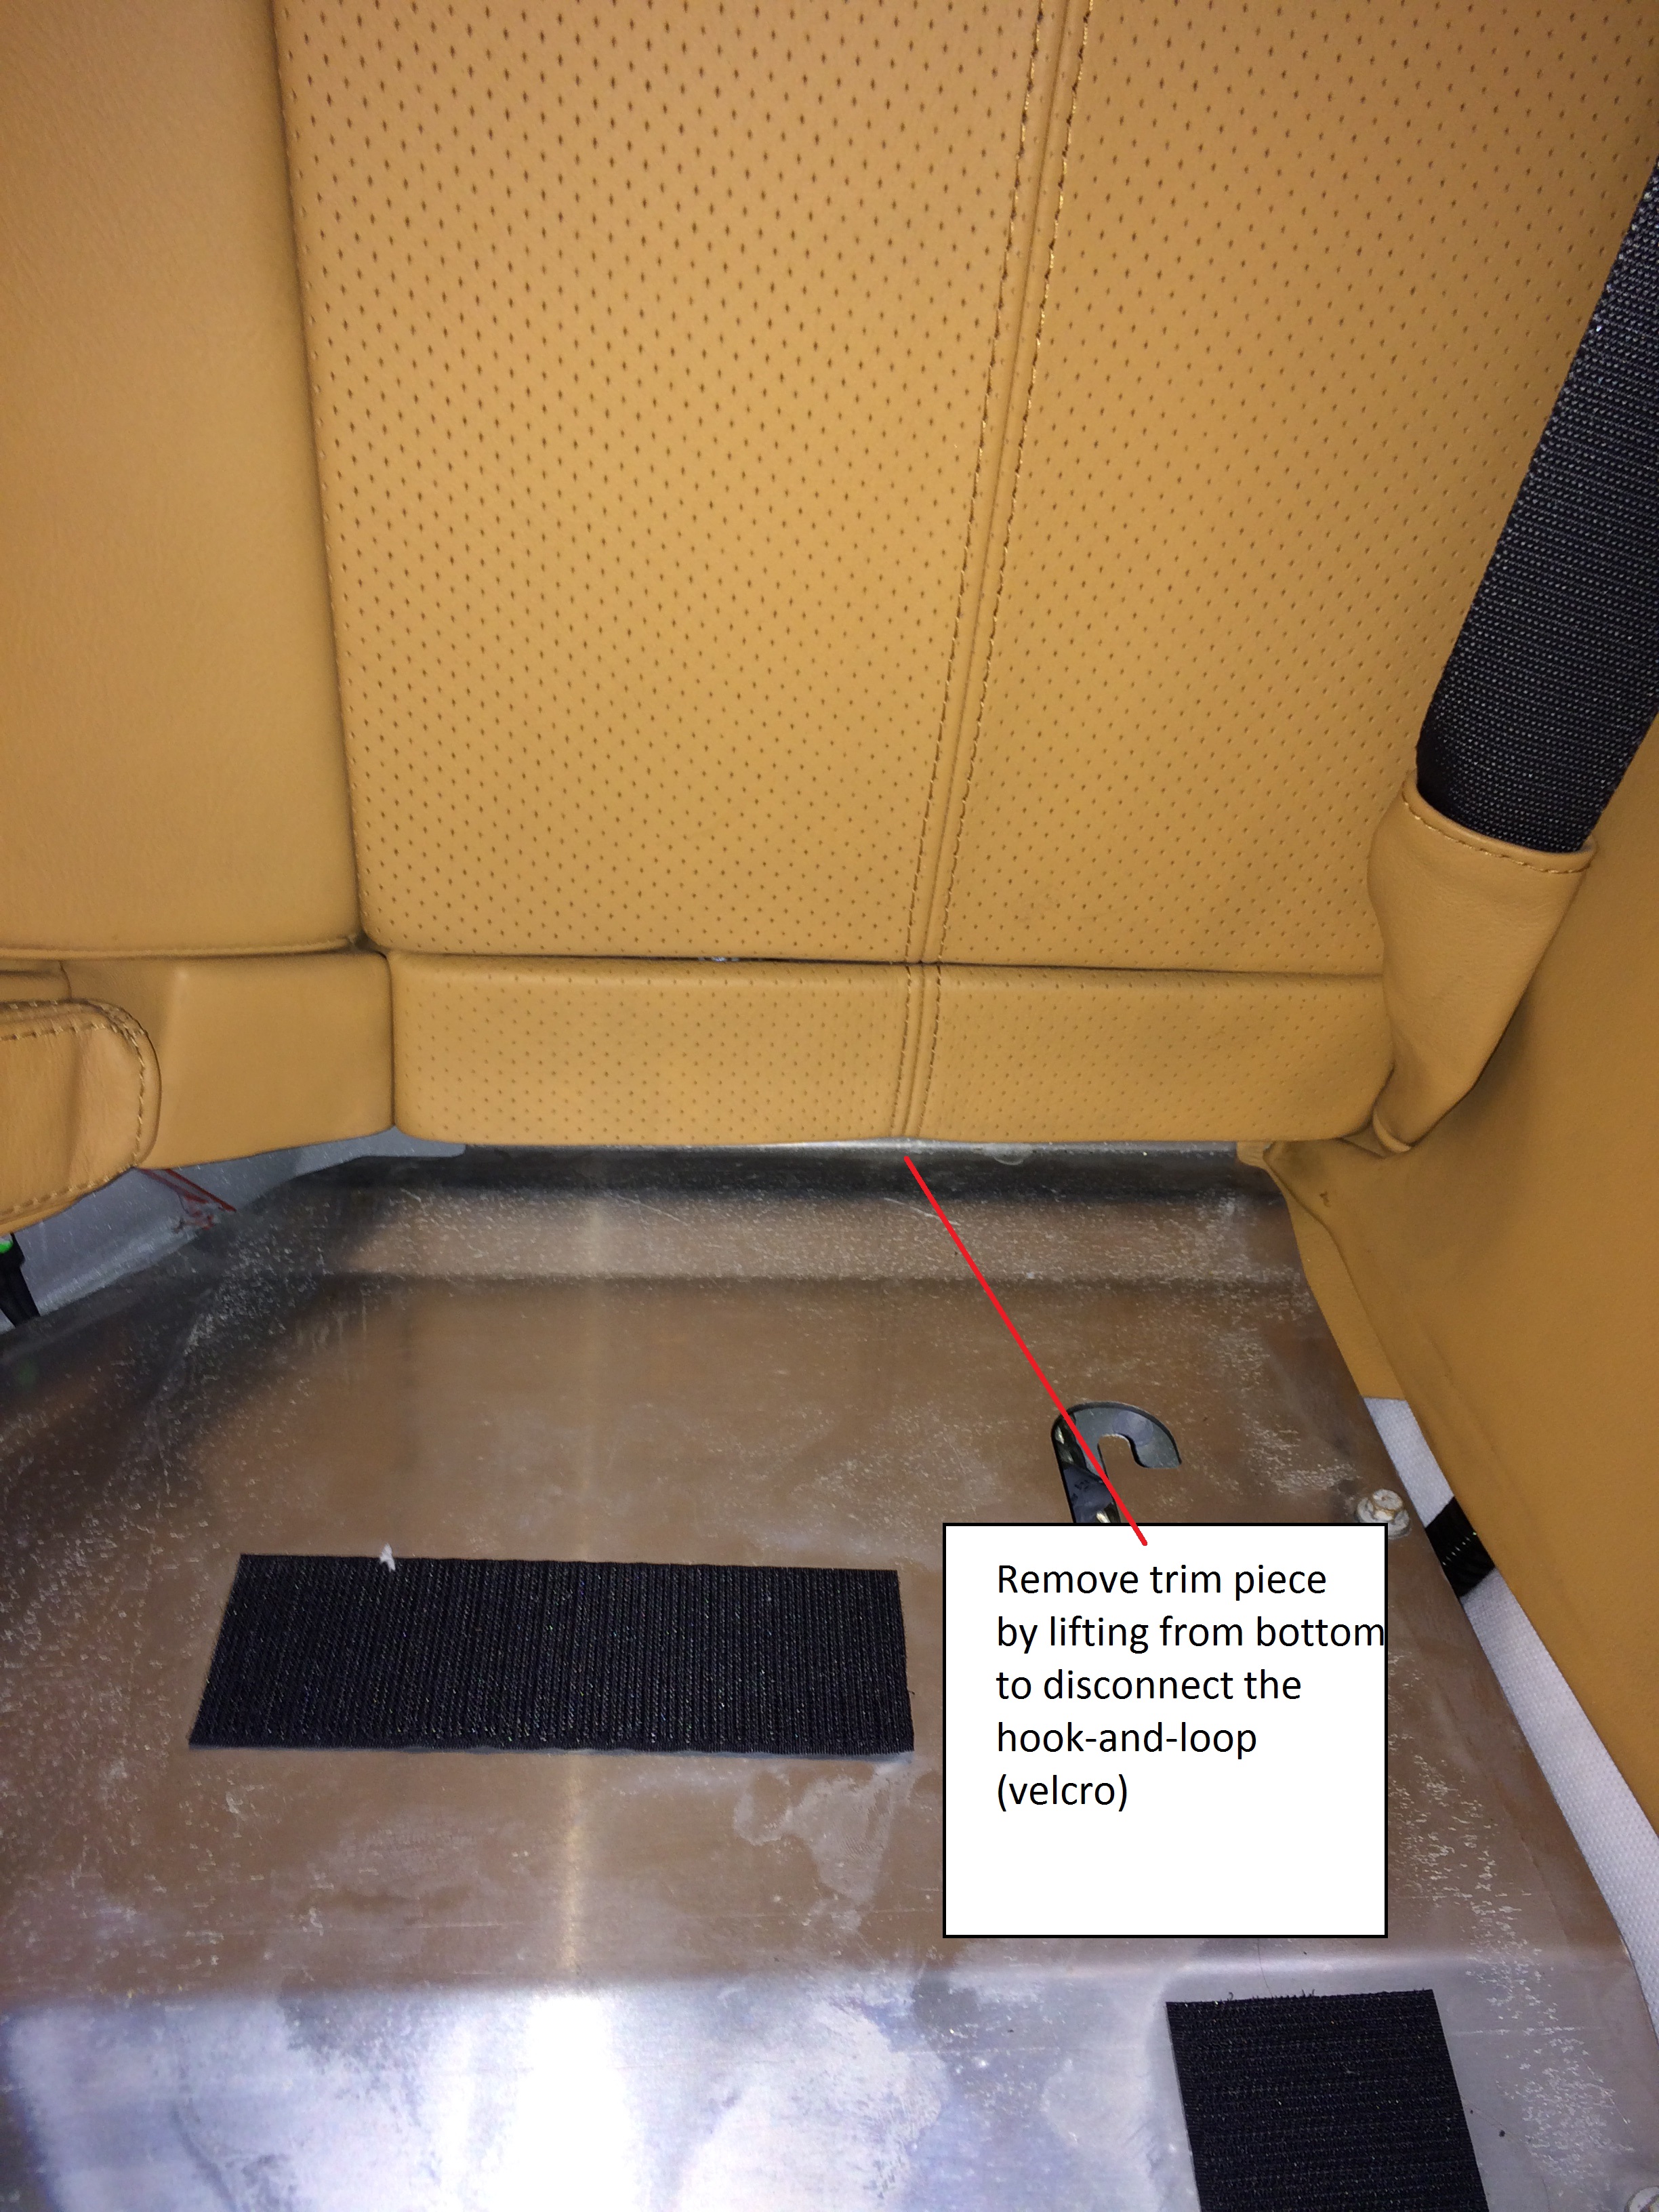
5) Remove the lower trim piece by pulling it away from the car. It is held on by hook-and-loop (velcro)
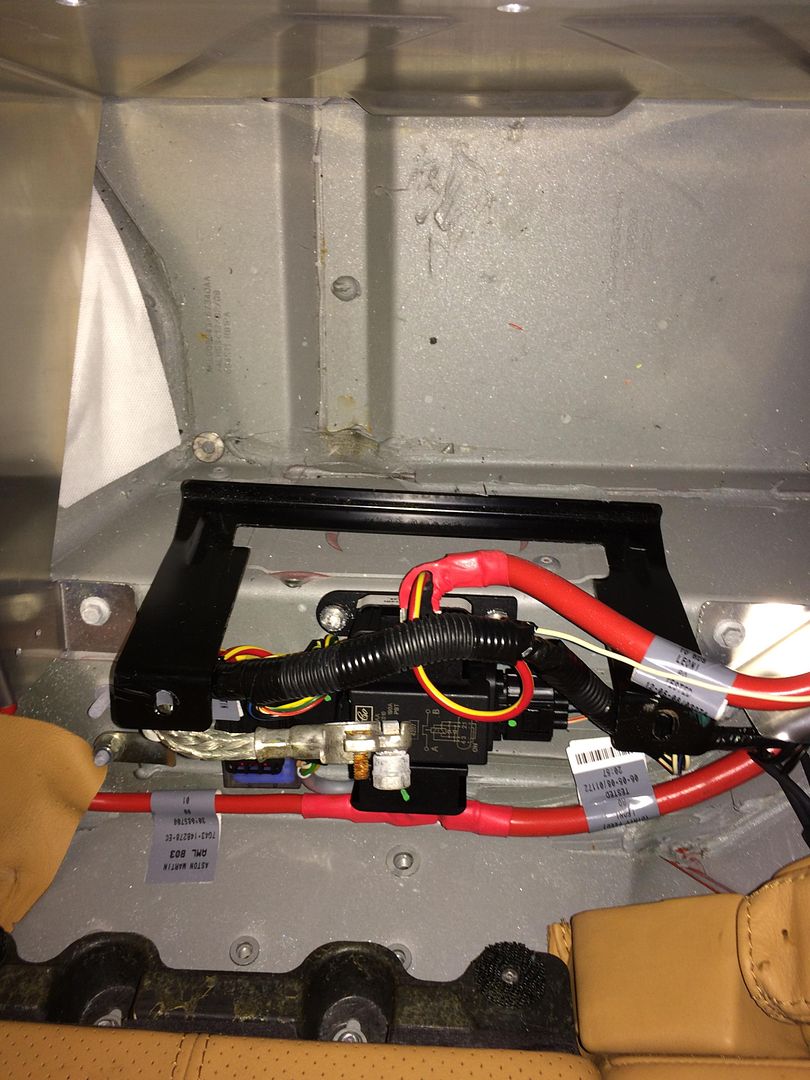
6) Remove the 10, 8 MM bolts that hold the aluminum panel in place
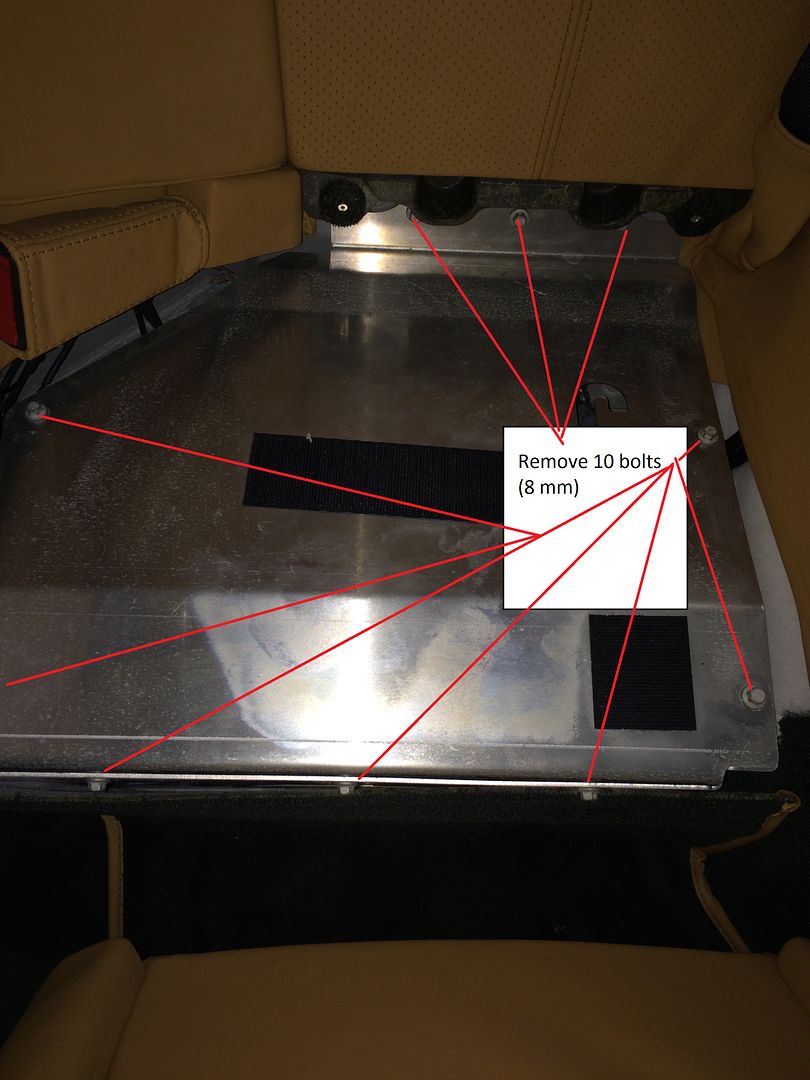
7) 3 of the bolts are hidden behind that trim
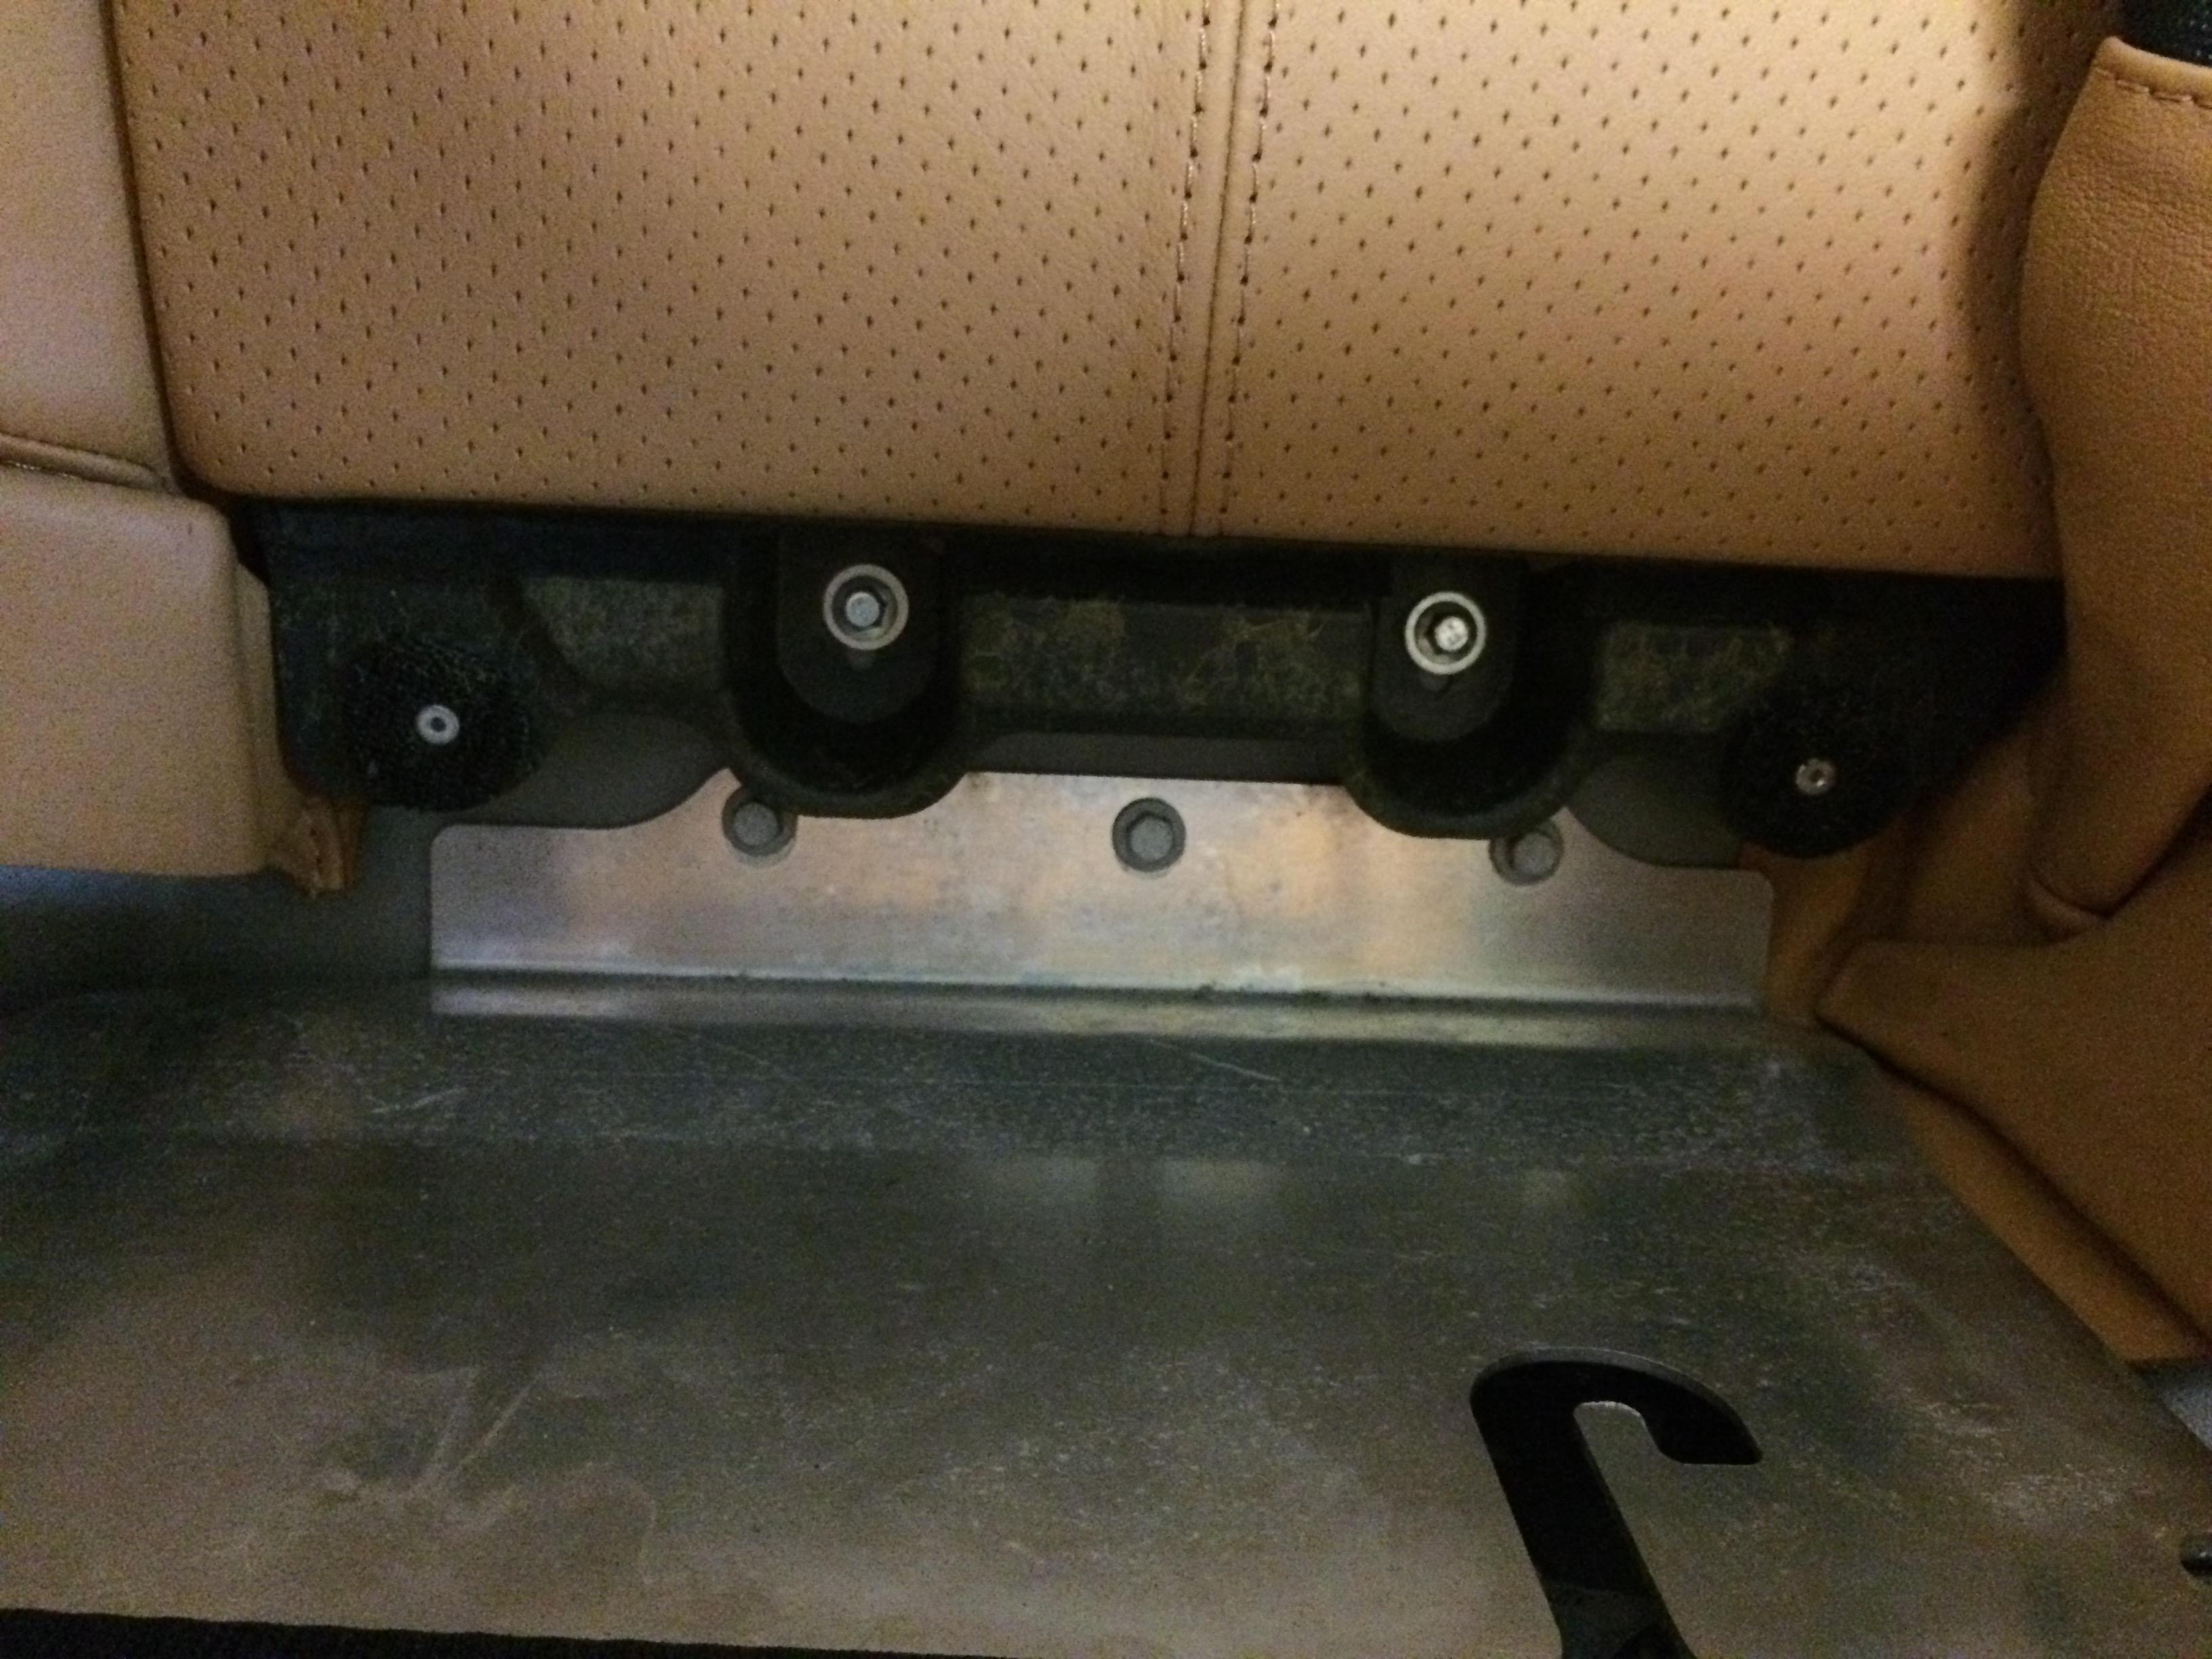
8) Remove the aluminum panel by sliding forward and lifting up, being careful not to damage the surrounding leather

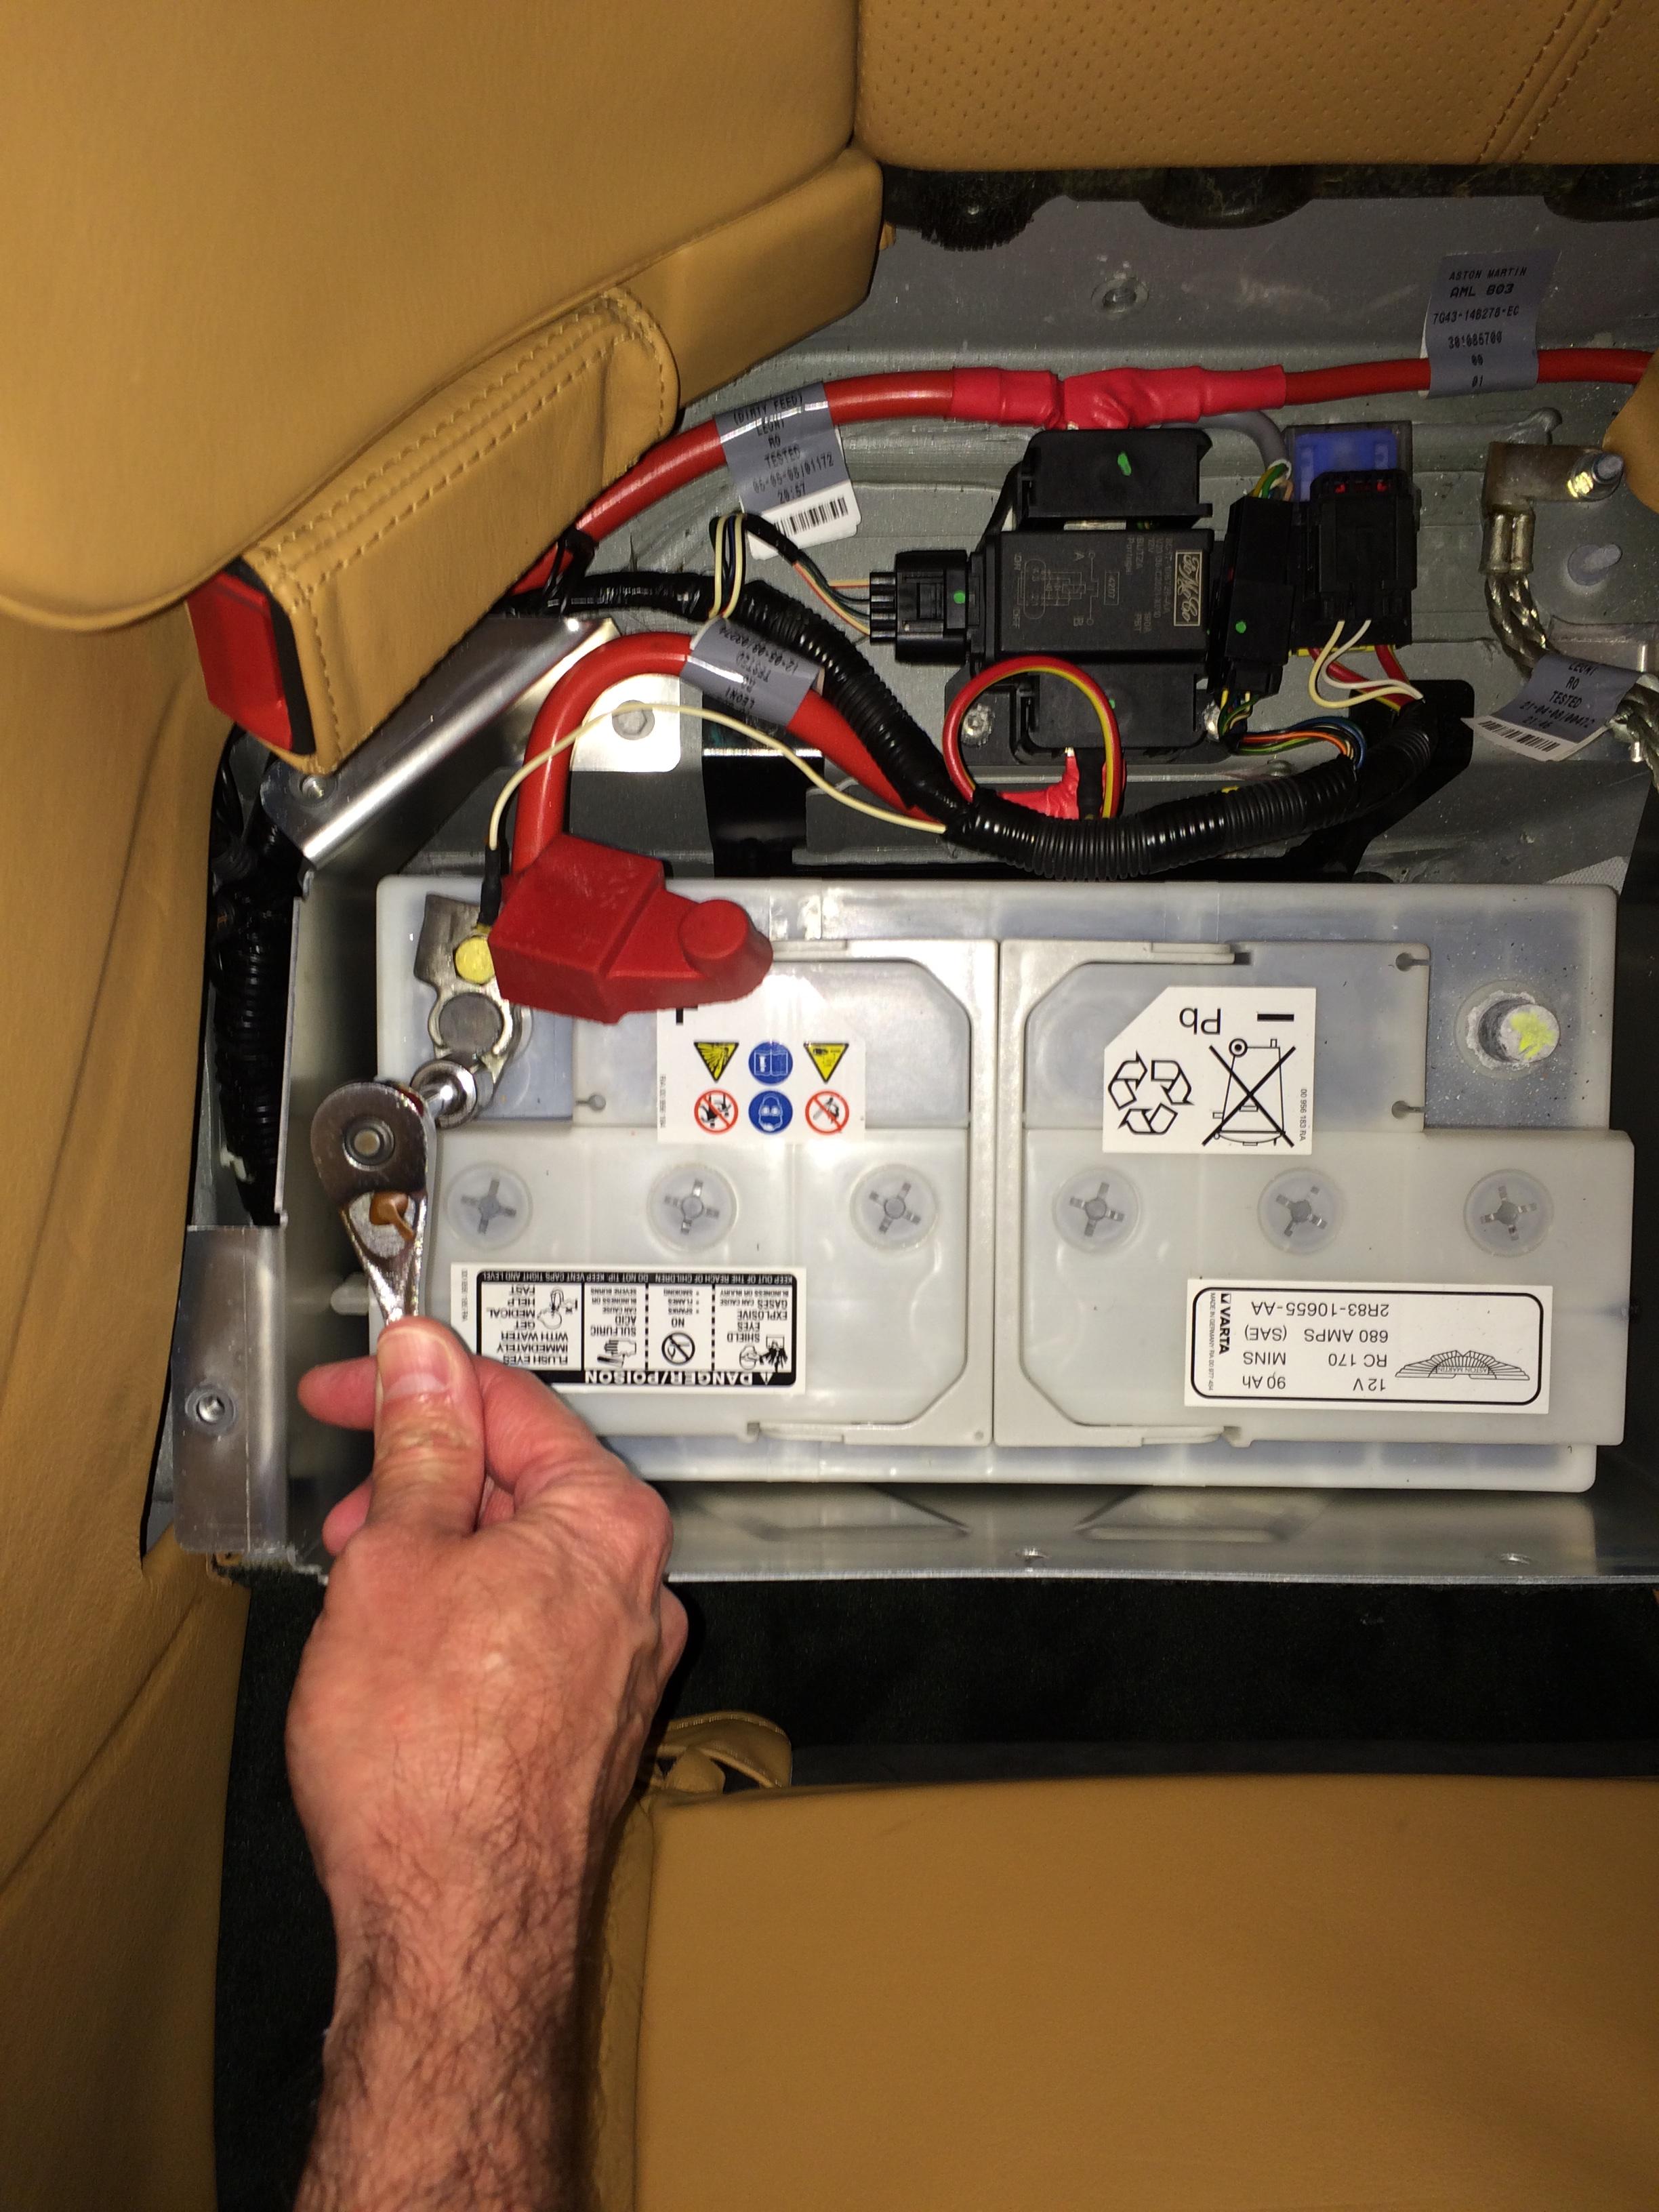
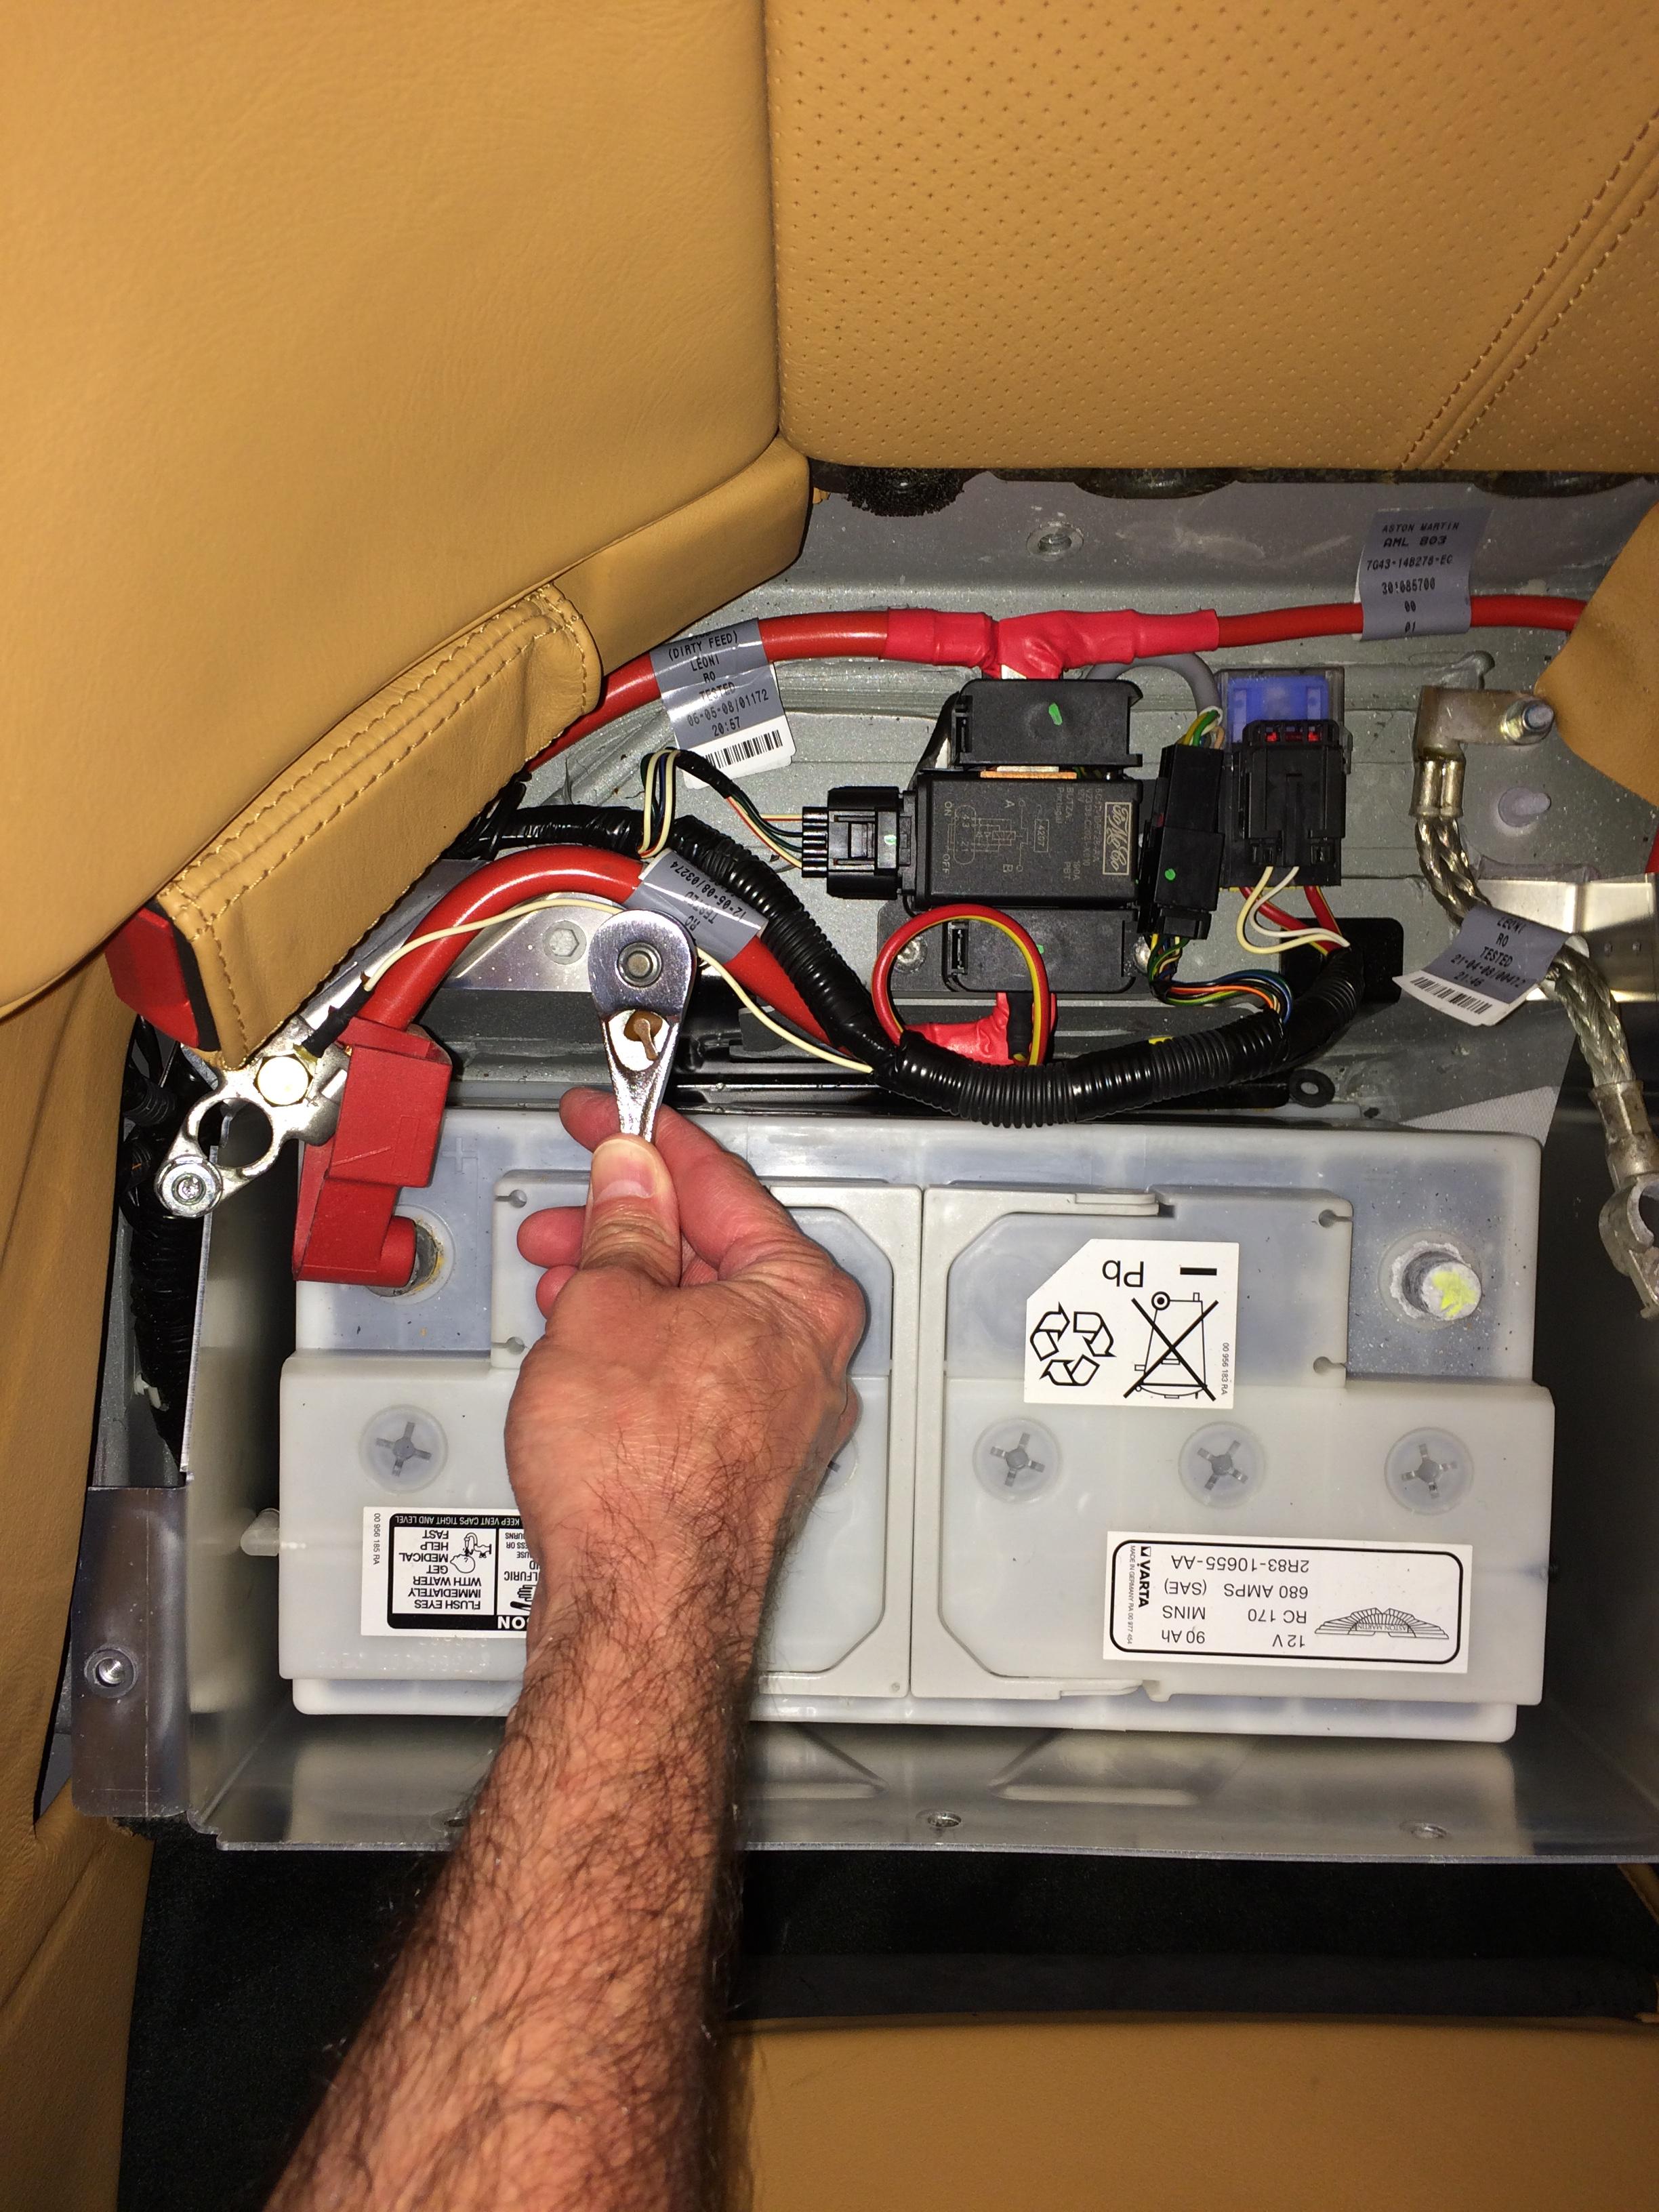
9) Disconnect the negative strap (13 mm nut)
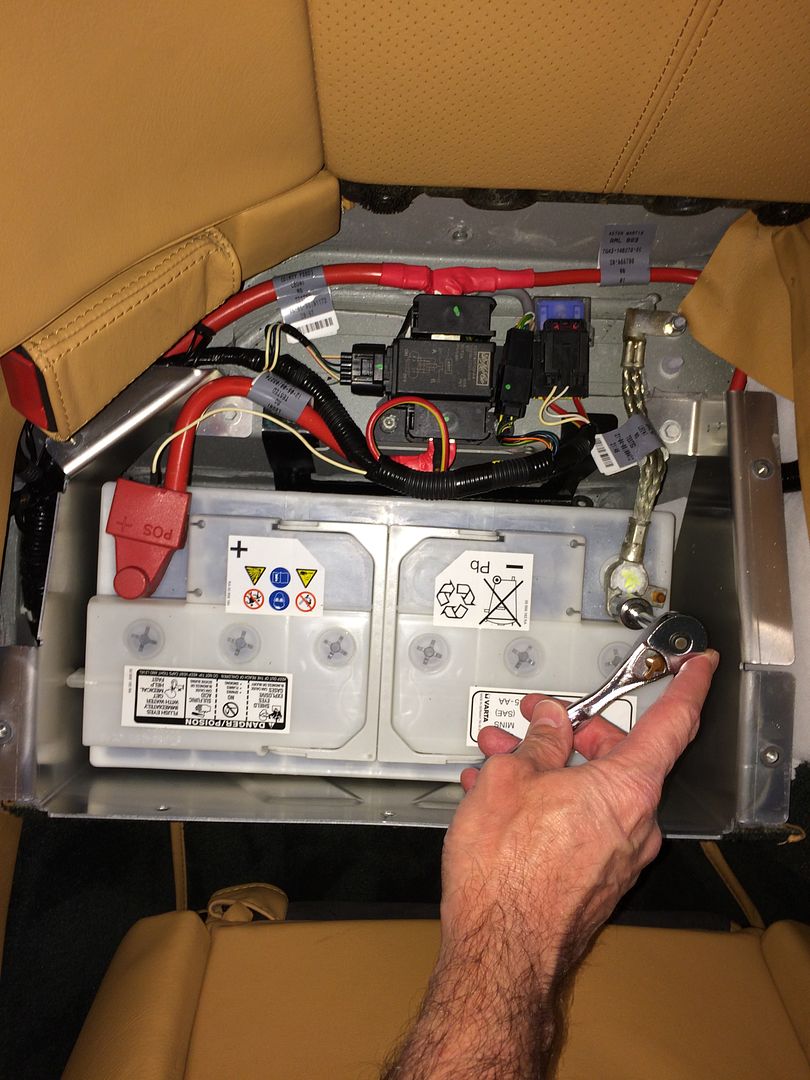
10) Move the red boot aside and disconnect the positive cable (13 mm nut)
11) Remove the 2 battery hold-down bracket bolts (8 mm)

12) Lift up the battery hold-down bracket. Prepare to use foul language as it comes up a very specific way, and then remove the battery
13) This is the hold-down bracket. Note that it is in the "up" position with the gray body tabs threaded through the opening near the bottom of the bracket. Getting the bracket up while snaking those tabs through the slots, using ungloved hands on sharp metal, was "fun".
14) Install new battery, don't forget the vent tube!
15) Press the battery hold-down bracket down into place, and secure with 2 bolts (8 mm)
16) Connect the positive battery cable, and reposition the red boot
17) Connect the negative battery strap
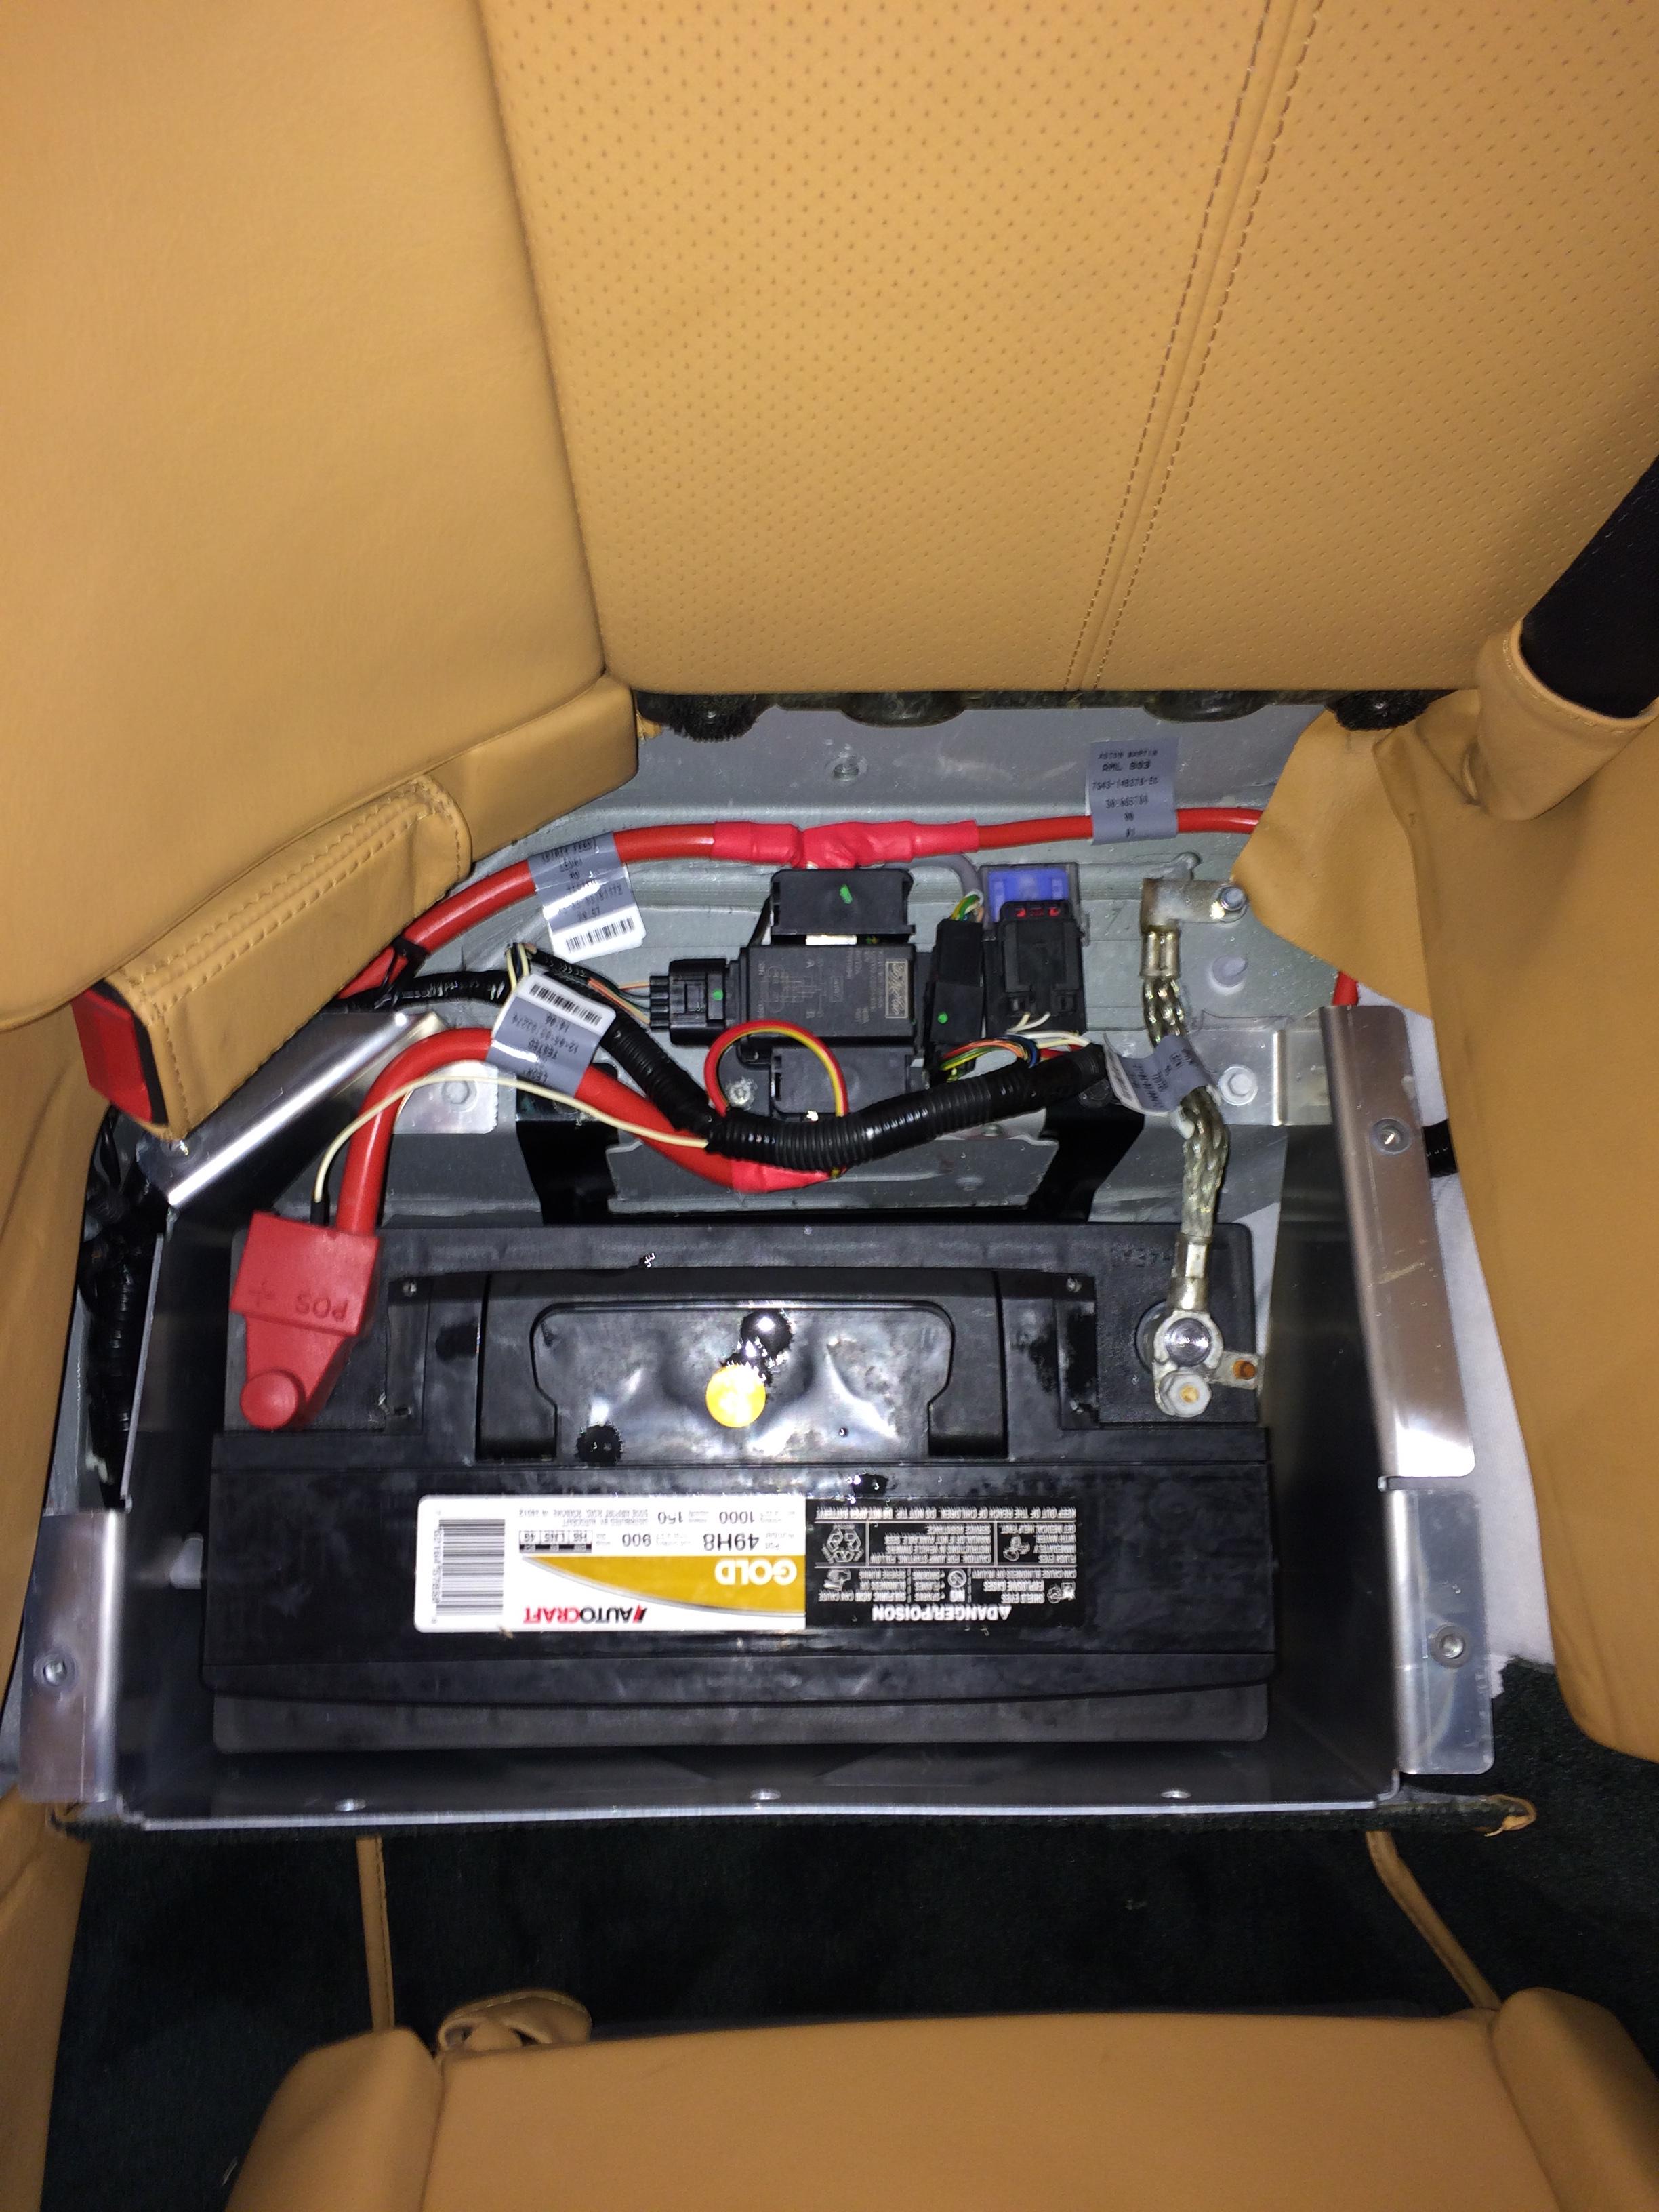
18) Install the aluminum plate and fasten the 10 bolts (8 mm)
19) Install the trim at the bottom of the seat by pressing it in place
20) Install the bottom seat squab by inserting the rear under the trim from step 19 and then pushing into place
21) Start car
22) Execute window upper/lower limit reset procedure
23) Reset clock
I did not lose my radio pre-sets. I've not yet tested the seat memory functions, but will update once I confirm what else may require resetting.
Jeff
Today I replaced the original battery in my 2009 DB9 Volante and figured I'd take pictures and post instructions for future first-time-owners.
Although replacing a battery isn't among the most difficult of things with which we can be faced, I wanted to take some of the uncertainty out of the task for those who've not done one on a DB9.
My car is a US spec (left hand drive) car, so the term "passenger" or "right" side both represent the passenger seat in a US spec vehicle.
1) The battery is under the rear, passenger seat squab
2) Lower the top (if a convertible) and the windows
3) Move or tilt the passenger seat forward
4) Grab the bottom seat squab from the front, and lift up and towards the front seat to remove

(replace next photo with one showing bolts still in place)

5) Remove the lower trim piece by pulling it away from the car. It is held on by hook-and-loop (velcro)

6) Remove the 10, 8 MM bolts that hold the aluminum panel in place

7) 3 of the bolts are hidden behind that trim

8) Remove the aluminum panel by sliding forward and lifting up, being careful not to damage the surrounding leather

9) Disconnect the negative strap (13 mm nut)

10) Move the red boot aside and disconnect the positive cable (13 mm nut)

11) Remove the 2 battery hold-down bracket bolts (8 mm)


12) Lift up the battery hold-down bracket. Prepare to use foul language as it comes up a very specific way, and then remove the battery
13) This is the hold-down bracket. Note that it is in the "up" position with the gray body tabs threaded through the opening near the bottom of the bracket. Getting the bracket up while snaking those tabs through the slots, using ungloved hands on sharp metal, was "fun".

14) Install new battery, don't forget the vent tube!
15) Press the battery hold-down bracket down into place, and secure with 2 bolts (8 mm)
16) Connect the positive battery cable, and reposition the red boot
17) Connect the negative battery strap

18) Install the aluminum plate and fasten the 10 bolts (8 mm)
19) Install the trim at the bottom of the seat by pressing it in place
20) Install the bottom seat squab by inserting the rear under the trim from step 19 and then pushing into place
21) Start car
22) Execute window upper/lower limit reset procedure
23) Reset clock
I did not lose my radio pre-sets. I've not yet tested the seat memory functions, but will update once I confirm what else may require resetting.
Jeff
#2
10-06-2014, 07:39 AM

Excellent write up!
Don't you just love the 'razor' blades that manufacturers install in cars to keep you from goin' back in there? Should wear gloves, but never do...
Don't you just love the 'razor' blades that manufacturers install in cars to keep you from goin' back in there? Should wear gloves, but never do...

#4
10-06-2014, 02:23 PM
Registered User
Join Date: Aug 2010
Location: Incline Village, NV
Posts: 599
Rep Power: 41
And be sure to disconnect/connect the battery cables in the order shown in the pictures. Disconnect the Neg cable first when removing battery and connect it last when installing battery. This keeps you from Arcing your wrench to the Aluminum.
#5
10-06-2014, 05:57 PM
Join Date: Nov 2011
Location: Houston-ish
Posts: 389
Rep Power: 71
Thanks guys.
Yes, the razor-sharp edges are wonderful. What seemed like a slam-dunk battery replacement turned into far too much time wrestling with that evil hold-down bracket. Seems for the money they spent on 5 of the 10 bolts for the battery cover, they could have paid for labor to file the edges of the hold down!
Jeff
#7
12-27-2018, 09:23 AM

Greetings,
Today I replaced the original battery in my 2009 DB9 Volante and figured I'd take pictures and post instructions for future first-time-owners.
Although replacing a battery isn't among the most difficult of things with which we can be faced, I wanted to take some of the uncertainty out of the task for those who've not done one on a DB9.
My car is a US spec (left hand drive) car, so the term "passenger" or "right" side both represent the passenger seat in a US spec vehicle.
1) The battery is under the rear, passenger seat squab
2) Lower the top (if a convertible) and the windows
3) Move or tilt the passenger seat forward
4) Grab the bottom seat squab from the front, and lift up and towards the front seat to remove
Attachment 493371
(replace next photo with one showing bolts still in place)
Attachment 493372
5) Remove the lower trim piece by pulling it away from the car. It is held on by hook-and-loop (velcro)
Attachment 493373
6) Remove the 10, 8 MM bolts that hold the aluminum panel in place

7) 3 of the bolts are hidden behind that trim
Attachment 493374
8) Remove the aluminum panel by sliding forward and lifting up, being careful not to damage the surrounding leather
Attachment 493375
9) Disconnect the negative strap (13 mm nut)

10) Move the red boot aside and disconnect the positive cable (13 mm nut)
Attachment 493376
11) Remove the 2 battery hold-down bracket bolts (8 mm)
Attachment 493377
Attachment 493378
12) Lift up the battery hold-down bracket. Prepare to use foul language as it comes up a very specific way, and then remove the battery
13) This is the hold-down bracket. Note that it is in the "up" position with the gray body tabs threaded through the opening near the bottom of the bracket. Getting the bracket up while snaking those tabs through the slots, using ungloved hands on sharp metal, was "fun".

14) Install new battery, don't forget the vent tube!
15) Press the battery hold-down bracket down into place, and secure with 2 bolts (8 mm)
16) Connect the positive battery cable, and reposition the red boot
17) Connect the negative battery strap
Attachment 493379
18) Install the aluminum plate and fasten the 10 bolts (8 mm)
19) Install the trim at the bottom of the seat by pressing it in place
20) Install the bottom seat squab by inserting the rear under the trim from step 19 and then pushing into place
21) Start car
22) Execute window upper/lower limit reset procedure
23) Reset clock
I did not lose my radio pre-sets. I've not yet tested the seat memory functions, but will update once I confirm what else may require resetting.
Jeff
Today I replaced the original battery in my 2009 DB9 Volante and figured I'd take pictures and post instructions for future first-time-owners.
Although replacing a battery isn't among the most difficult of things with which we can be faced, I wanted to take some of the uncertainty out of the task for those who've not done one on a DB9.
My car is a US spec (left hand drive) car, so the term "passenger" or "right" side both represent the passenger seat in a US spec vehicle.
1) The battery is under the rear, passenger seat squab
2) Lower the top (if a convertible) and the windows
3) Move or tilt the passenger seat forward
4) Grab the bottom seat squab from the front, and lift up and towards the front seat to remove
Attachment 493371
(replace next photo with one showing bolts still in place)
Attachment 493372
5) Remove the lower trim piece by pulling it away from the car. It is held on by hook-and-loop (velcro)
Attachment 493373
6) Remove the 10, 8 MM bolts that hold the aluminum panel in place
7) 3 of the bolts are hidden behind that trim
Attachment 493374
8) Remove the aluminum panel by sliding forward and lifting up, being careful not to damage the surrounding leather
Attachment 493375
9) Disconnect the negative strap (13 mm nut)
10) Move the red boot aside and disconnect the positive cable (13 mm nut)
Attachment 493376
11) Remove the 2 battery hold-down bracket bolts (8 mm)
Attachment 493377
Attachment 493378
12) Lift up the battery hold-down bracket. Prepare to use foul language as it comes up a very specific way, and then remove the battery
13) This is the hold-down bracket. Note that it is in the "up" position with the gray body tabs threaded through the opening near the bottom of the bracket. Getting the bracket up while snaking those tabs through the slots, using ungloved hands on sharp metal, was "fun".
14) Install new battery, don't forget the vent tube!
15) Press the battery hold-down bracket down into place, and secure with 2 bolts (8 mm)
16) Connect the positive battery cable, and reposition the red boot
17) Connect the negative battery strap
Attachment 493379
18) Install the aluminum plate and fasten the 10 bolts (8 mm)
19) Install the trim at the bottom of the seat by pressing it in place
20) Install the bottom seat squab by inserting the rear under the trim from step 19 and then pushing into place
21) Start car
22) Execute window upper/lower limit reset procedure
23) Reset clock
I did not lose my radio pre-sets. I've not yet tested the seat memory functions, but will update once I confirm what else may require resetting.
Jeff
Trending Topics
#8
12-29-2018, 10:16 AM

Do any of you DB9 owners follow the misfire correction procedure required after replacing the battery or is this procedure only necessary for early DB9s?
#10
01-06-2019, 07:59 AM
Join Date: Nov 2011
Location: Houston-ish
Posts: 389
Rep Power: 71
I'm afraid I do not know the answer to that question. Perhaps someone else will chime in.
#11
01-06-2019, 08:01 AM
Join Date: Nov 2011
Location: Houston-ish
Posts: 389
Rep Power: 71 This post suggests it should be done
https://www.6speedonline.com/forums/...rrections.html
Last edited by 62Jeff; 01-06-2019 at 08:07 AM.
#12
01-06-2019, 08:56 AM
I have an early DB9 (2006) and I make sure my misfire corrections are stored & redo the procedure when needed.
When I started having a lumpy idle (misfires) I realized the misfire corrections weren't stored. After doing the procedure it recognized many more misfires, which resulted in a new set of coil packs.
When I started having a lumpy idle (misfires) I realized the misfire corrections weren't stored. After doing the procedure it recognized many more misfires, which resulted in a new set of coil packs.
#13
01-06-2019, 10:30 PM
Registered User
Join Date: Sep 2017
Location: Rancho Mission Viejo
Age: 69
Posts: 194
Rep Power: 14 Then when driving the car aggressively using the paddle shifters, high rev shifts, the car lit up like a Christmas tree. Check engine red, slow down immediately, emission system warning, .....
I got an OBD 2 reader and found I was getting cylinder misfires, cleared the codes, problem re-occurred but different cylinders. Also found that misfire correction flag was not set.
So on an early Sunday morning on an open stretch of road, I performed the Misfire correction procedure. Figured it couldn�t hurt, worst case was it was time to replace spark plugs and cylinder coil packs. Since performing the misfire correction, the engine runs smoother and I haven�t had any error codes.
So so if in doubt, I would do it.
#14
11-06-2021, 06:40 PM

Thanks for the step by step
I have a 14 Vanquish with a dead battery. Everything looks the same as your car but I am having trouble removing the seat. It lifts up but I cannot pull it out. I am afraid to force it. Was your seat hard to remove? Does anyone know if the Vanquish is different.
Thanks Nick
Thanks Nick
#15
11-06-2021, 09:49 PM
Join Date: Nov 2011
Location: Houston-ish
Posts: 389
Rep Power: 71 I have a 14 Vanquish with a dead battery. Everything looks the same as your car but I am having trouble removing the seat. It lifts up but I cannot pull it out. I am afraid to force it. Was your seat hard to remove? Does anyone know if the Vanquish is different.
Thanks Nick
Thanks Nick
I do not know if the 14 Vanquish and 09 DB9 are similar. Regarding my seat cushion - it came out easily.
This doesn�t appear to add any clarity but here�s a 14 Vanquish Battery thread
https://www.6speedonline.com/forums/aston-martin/438299-14-vanquish-battery.html
Jeff
Last edited by 62Jeff; 11-06-2021 at 09:54 PM.