DIY - Replacing Rear Upper Control Arms (Track Arms)
#1
 04-17-2008, 11:57 AM

Join Date: Apr 2008
Location: Los Angeles
Posts: 72
Rep Power: 19 
986 BOXSTER ONLY
As a new member with a good amount of automotive experience under my belt. I'd like to contribute my DIY write-up on replacing OEM Rear Upper Control Arms (Track Arms).
DISCLAIMER: Attempting to perform this repair is completely at YOUR OWN RISK. Neither me (The topic starter) nor this site (6speedonline.com) will be responsible for any mechanical failure, harm and/or damage to your car and yourself. Again, Proceed at YOUR OWN RISK. I strongly recommend you have a professional mechanic perform this repair rather than risk harm to yourself or your vehicle.
With that out of the way now...
Ok This is a DIY on how to replace your Rear Upper Control Arms (Track Arms), However I am not replacing the factory equipment with OEM Rear Upper Control Arms (Track Arms), I will be installing a Set of Adjustable Control Arms purchased from eBay vendor "DelubozParts". Adjustable Rear Upper Control Arms (Track Arms) are a MUCH LESS expensive alternative inlew of buying a set of OEM Rear Upper Control Arms (Track Arms).
If you have chattering or rattling noise coming from your rear suspension, Chances are that its a worn-out Bearing Cartridge on the Rear Upper Control Arms (Track Arms).
Ok Lets Start,
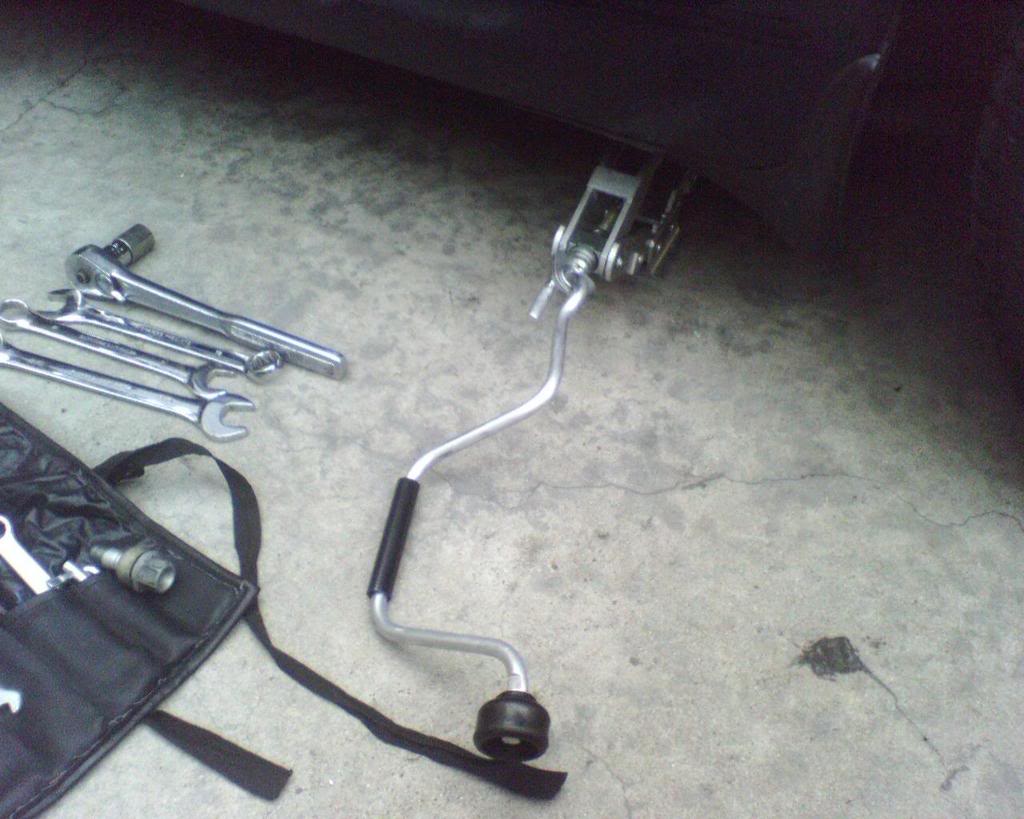
Tools list: Floor-jack, 18mm Ratchet, 21mm Closed-End Wrench, Torque Wrench, 2 Vise Grip Pliers.
1) Get your floor jack and tool set out. Break loose the lug nuts and security lug on the wheels.
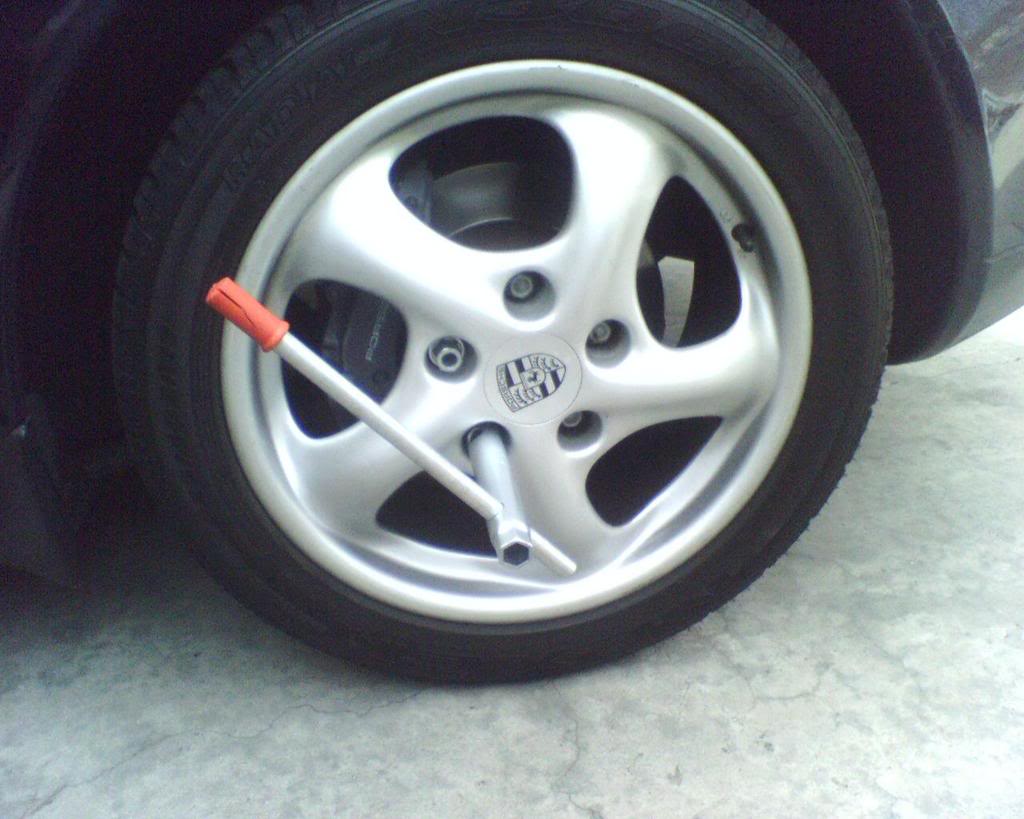
2) Remove the lug that is sitting higher than all others and insert/screw the threaded metal rod into that hole.

3) Now Jack the car up and once the rear wheel is off the ground, Remove the wheel and remove the Metal rod guide from the wheel hub
4) Remove the 2 plastic nuts that hold this plastic cover against the wheel well then remove Plastic cover.
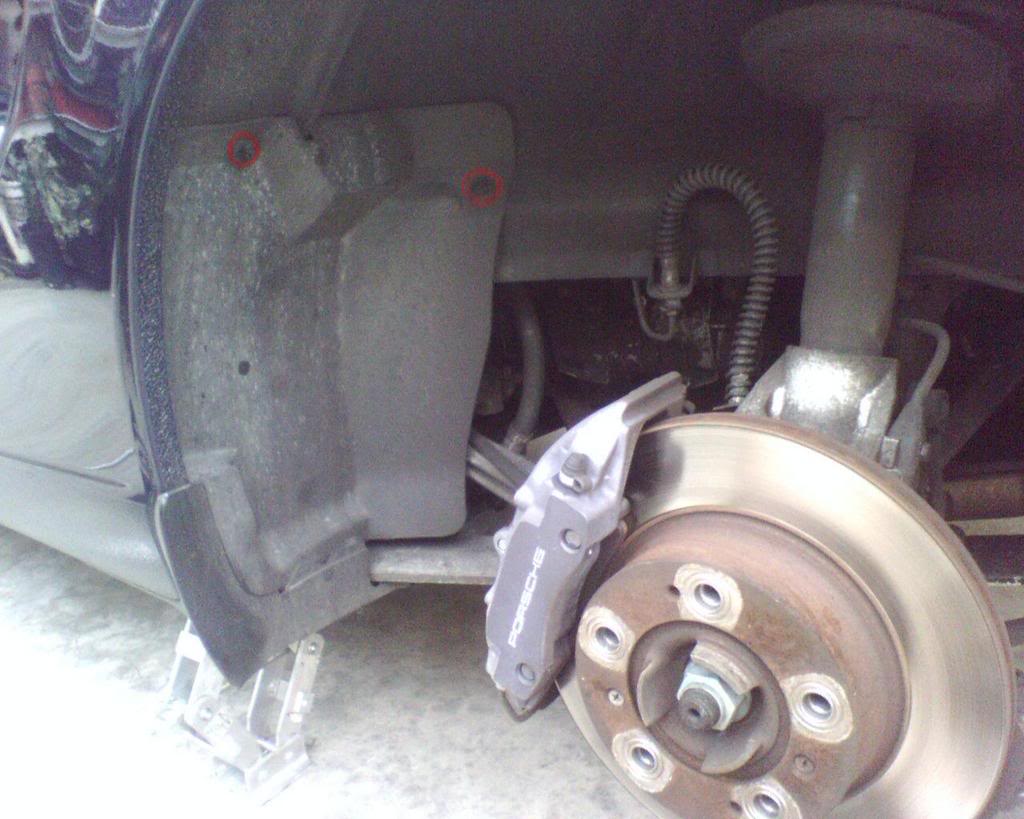
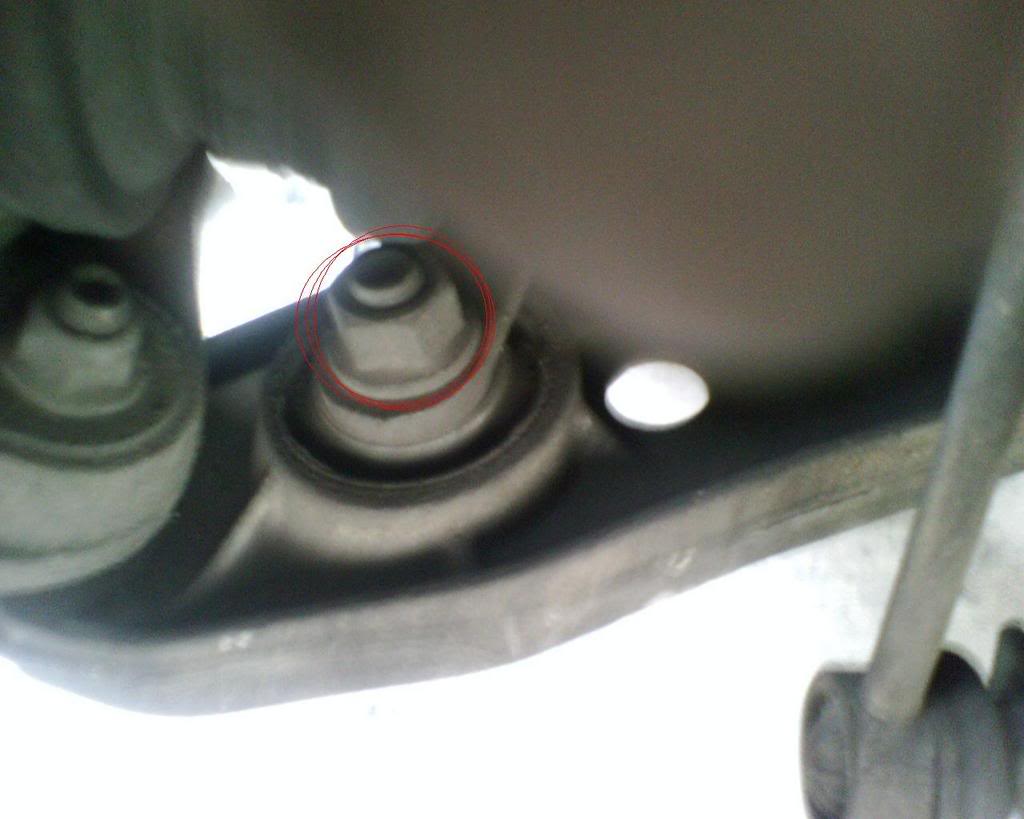
5) Now you can see the Rear Upper Control Arm circled in red. That is what we will be removing/replacing.
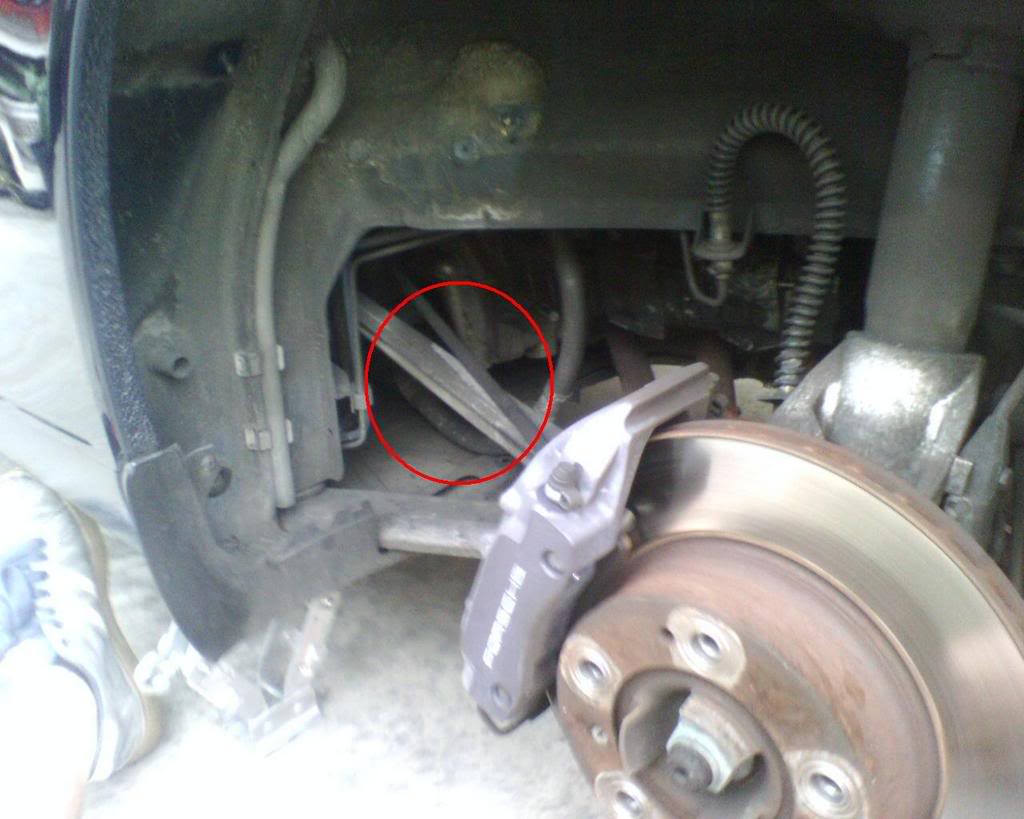
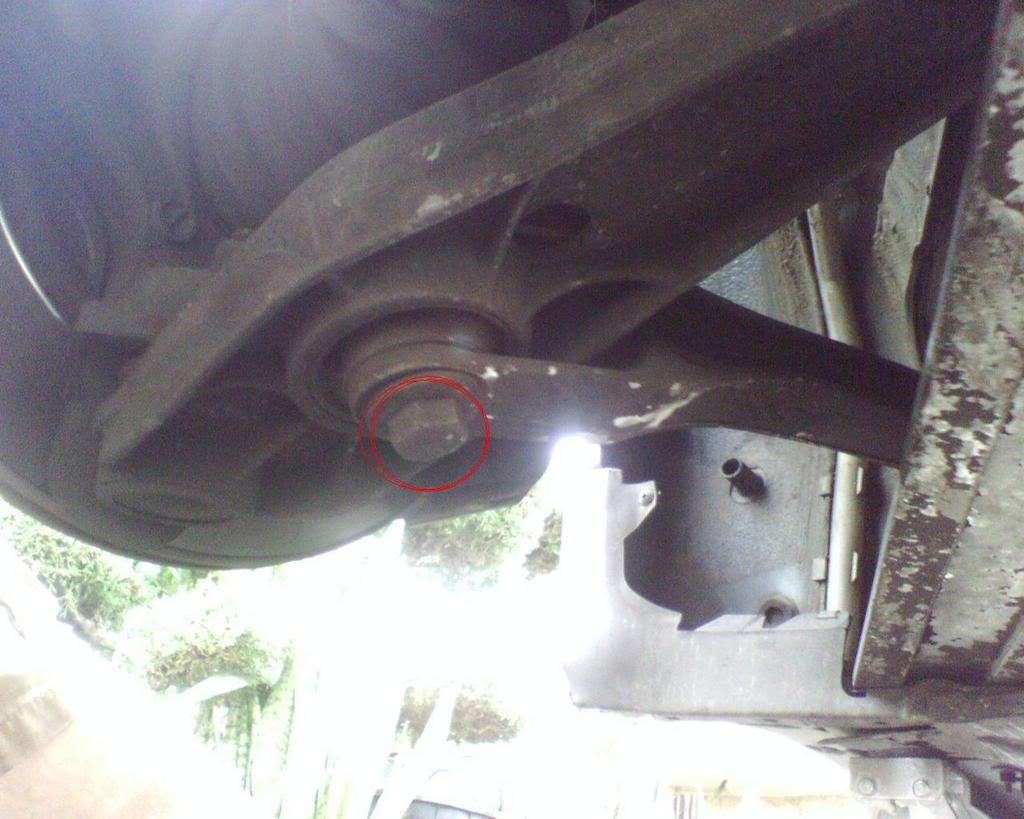
6) Time to locate the bolt & nut that secure the "Fork-end" of the control arm to the suspension. Just look behind the Wheel hub, on the lower control arm and you will see this nut and bolt on top and below the lower control arm.
7) Now unbolt these by using a 18mm ratchet socket and 21mm closed end wrench as pictured below. FYI- Never hit a ratchet with a hammer... the internals will shatter.

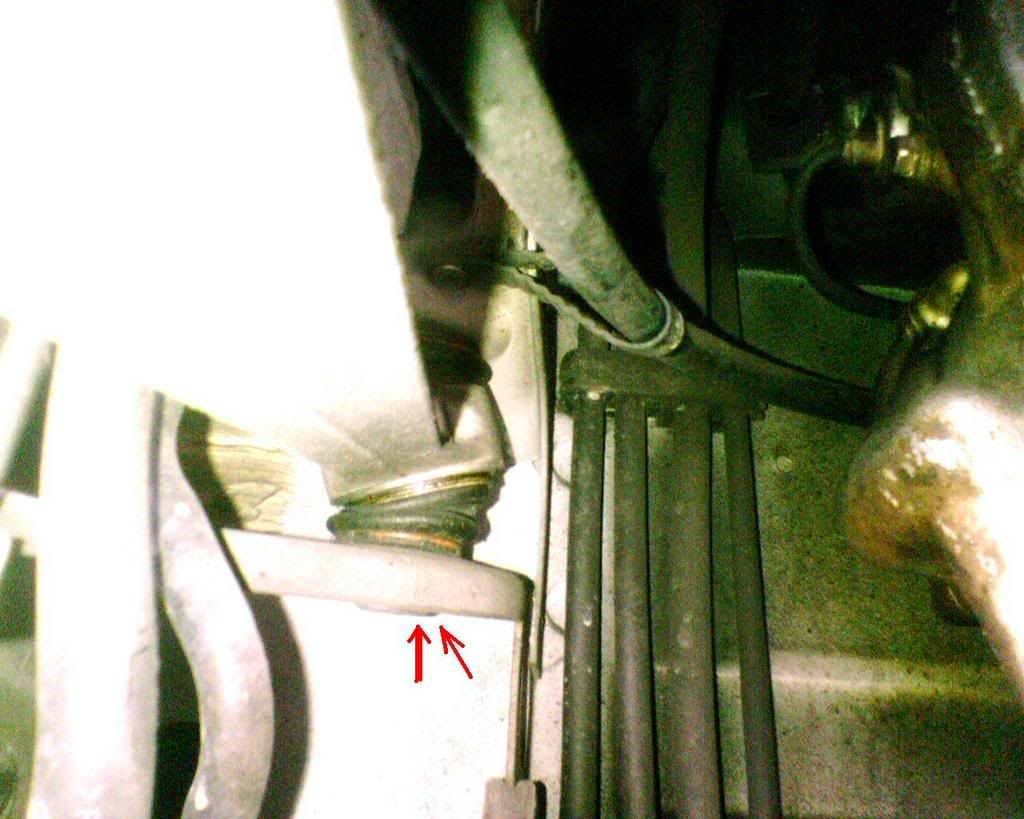
8) After the 18mm bolt and 21mm nut are removed, Use your 18 mm ratchet socket to remove the 18mm bolt that holds the Rear Control Arm to the chasis. FYI- Its very very tight, try holding the ratchet on the bolt and sliding the closed-end of your 21mm wrench over the handle of the ratchet, Hold it firmly so the socket doesnt slip off the bolt and manage to get your foot on the wrench holding the ratchet and pull or push (depending on drivers side or passenger side Control Arm) until the 18mm bolt loosens enough so that you dont require the leverage of the wrench attached to the ratchet.
As a new member with a good amount of automotive experience under my belt. I'd like to contribute my DIY write-up on replacing OEM Rear Upper Control Arms (Track Arms).
DISCLAIMER: Attempting to perform this repair is completely at YOUR OWN RISK. Neither me (The topic starter) nor this site (6speedonline.com) will be responsible for any mechanical failure, harm and/or damage to your car and yourself. Again, Proceed at YOUR OWN RISK. I strongly recommend you have a professional mechanic perform this repair rather than risk harm to yourself or your vehicle.
With that out of the way now...
Ok This is a DIY on how to replace your Rear Upper Control Arms (Track Arms), However I am not replacing the factory equipment with OEM Rear Upper Control Arms (Track Arms), I will be installing a Set of Adjustable Control Arms purchased from eBay vendor "DelubozParts". Adjustable Rear Upper Control Arms (Track Arms) are a MUCH LESS expensive alternative inlew of buying a set of OEM Rear Upper Control Arms (Track Arms).
If you have chattering or rattling noise coming from your rear suspension, Chances are that its a worn-out Bearing Cartridge on the Rear Upper Control Arms (Track Arms).
Ok Lets Start,
Tools list: Floor-jack, 18mm Ratchet, 21mm Closed-End Wrench, Torque Wrench, 2 Vise Grip Pliers.
1) Get your floor jack and tool set out. Break loose the lug nuts and security lug on the wheels.
2) Remove the lug that is sitting higher than all others and insert/screw the threaded metal rod into that hole.
3) Now Jack the car up and once the rear wheel is off the ground, Remove the wheel and remove the Metal rod guide from the wheel hub
4) Remove the 2 plastic nuts that hold this plastic cover against the wheel well then remove Plastic cover.
5) Now you can see the Rear Upper Control Arm circled in red. That is what we will be removing/replacing.
6) Time to locate the bolt & nut that secure the "Fork-end" of the control arm to the suspension. Just look behind the Wheel hub, on the lower control arm and you will see this nut and bolt on top and below the lower control arm.
7) Now unbolt these by using a 18mm ratchet socket and 21mm closed end wrench as pictured below. FYI- Never hit a ratchet with a hammer... the internals will shatter.
8) After the 18mm bolt and 21mm nut are removed, Use your 18 mm ratchet socket to remove the 18mm bolt that holds the Rear Control Arm to the chasis. FYI- Its very very tight, try holding the ratchet on the bolt and sliding the closed-end of your 21mm wrench over the handle of the ratchet, Hold it firmly so the socket doesnt slip off the bolt and manage to get your foot on the wrench holding the ratchet and pull or push (depending on drivers side or passenger side Control Arm) until the 18mm bolt loosens enough so that you dont require the leverage of the wrench attached to the ratchet.
Last edited by Cj_boxster; 04-17-2008 at 12:00 PM. Reason: Forgot to disclose repair is for only 986 Boxsters
#2
04-17-2008, 11:58 AM
Join Date: Apr 2008
Location: Los Angeles
Posts: 72
Rep Power: 19
Final
9) Once the 18mm bolt is removed, Slide the control arm out of the car.
(Install in reverse order if replacing with OEM Control Arms, torque both bolts to 160NM / 118lb-ft. If installing Adjustables...Proceed to read rest of directions)
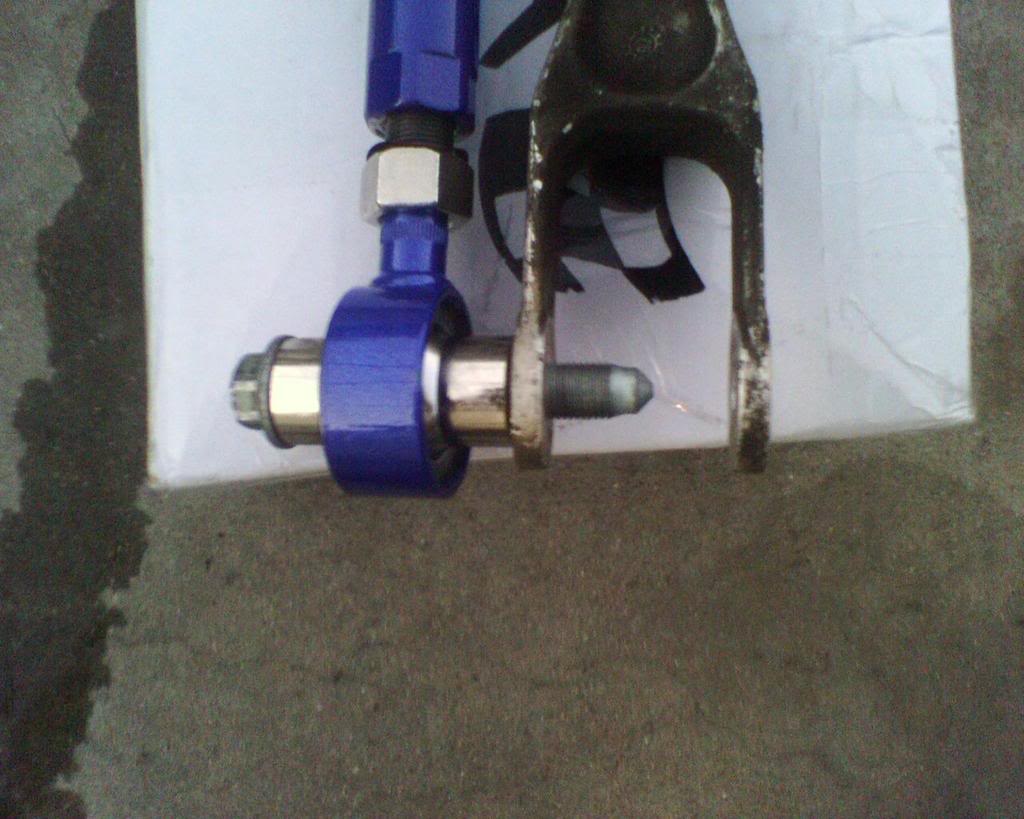
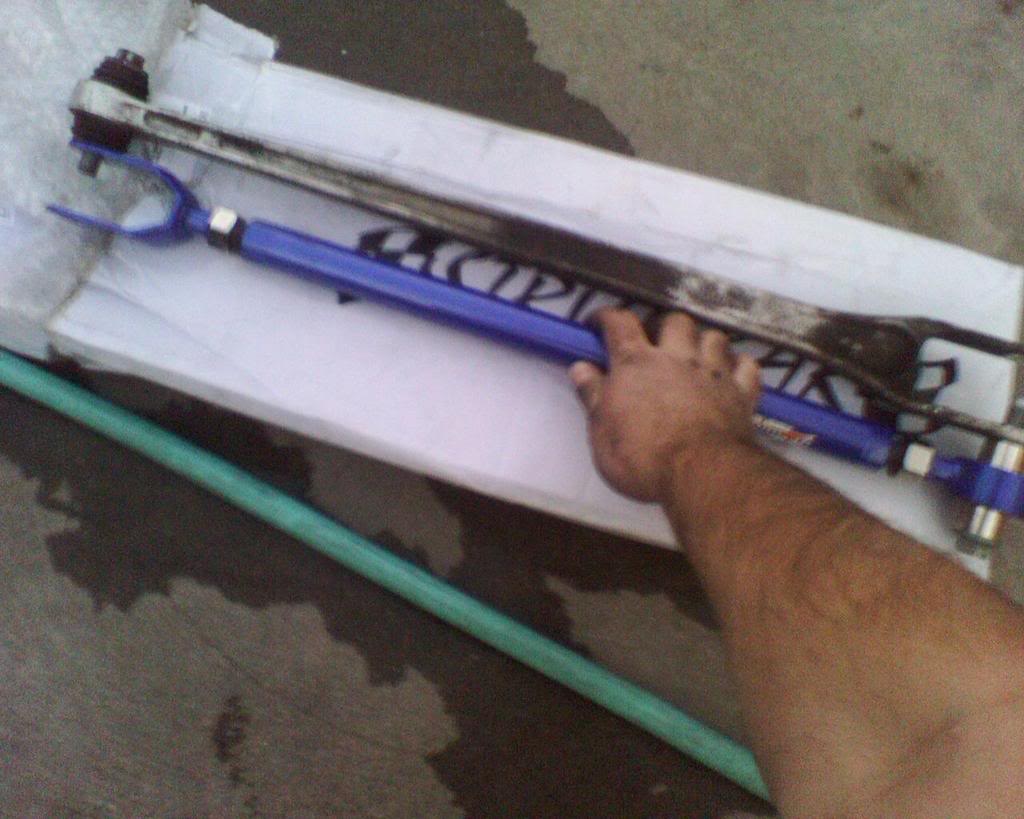
Now place old control arm and new adjustable Control Arm side by side and slide one of the 18mm bolts through the Bearing Cartridge of the adjustable Control arm and into the Fork-End of the OEM Control Arm. Rotate the Adjustment bar on the Control arm until the other end of the Control Arm bolt holes light up perfectly. Once they line up, slide other other 18mm bolt through the other end to keep them from rotating anymore and make any other adjustments as needed.
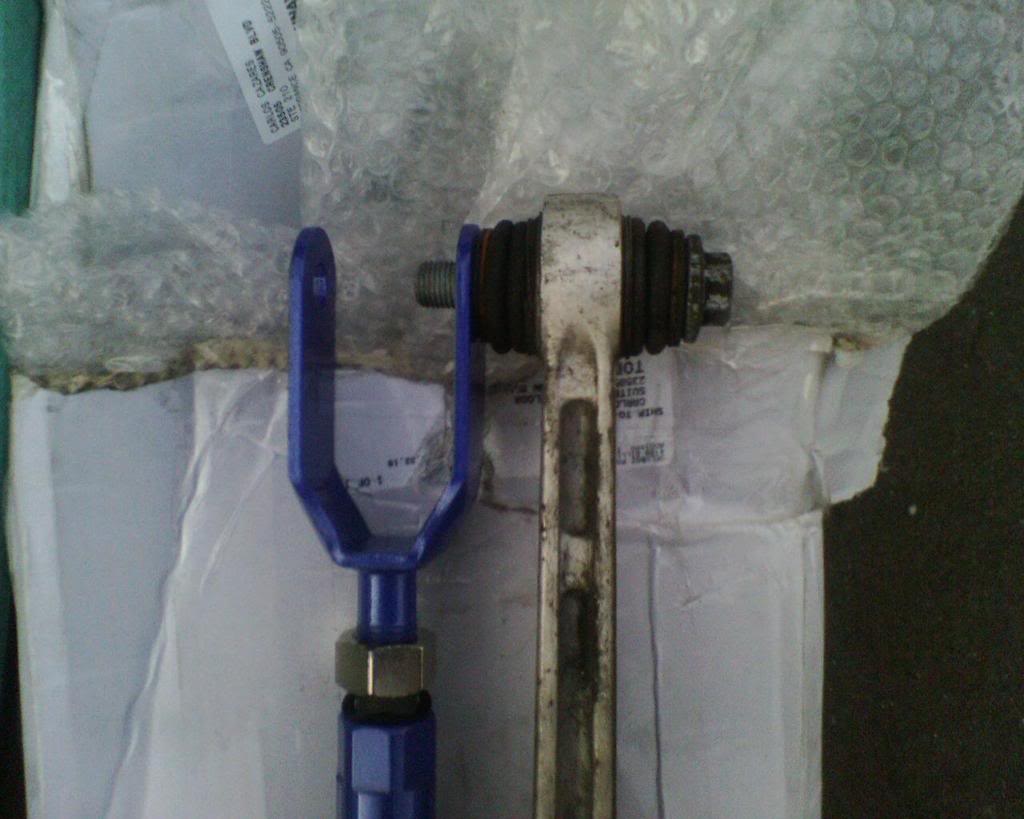
10) Now tighten the Adjustment Lock Nut on the the Bearing Cartridge side of the Adjustable Control Arm AS TIGHT AS YOU CAN to prevent it from loosening. If it loosens, it wont fall off but it will rattle and you will have to remove the entire Control Arm and re-tighten the Adjustment Lock Nut again. DO NOT tighten the Lock Nut on the FORK-END. Also rotate the Bearing Cartridge in the same angle that the OEM was while still in the car like so.
(FYI The Adjustment nuts are larger than 1inch wrench so I used 2 Vise Grip Pliers to tighten the nut.)
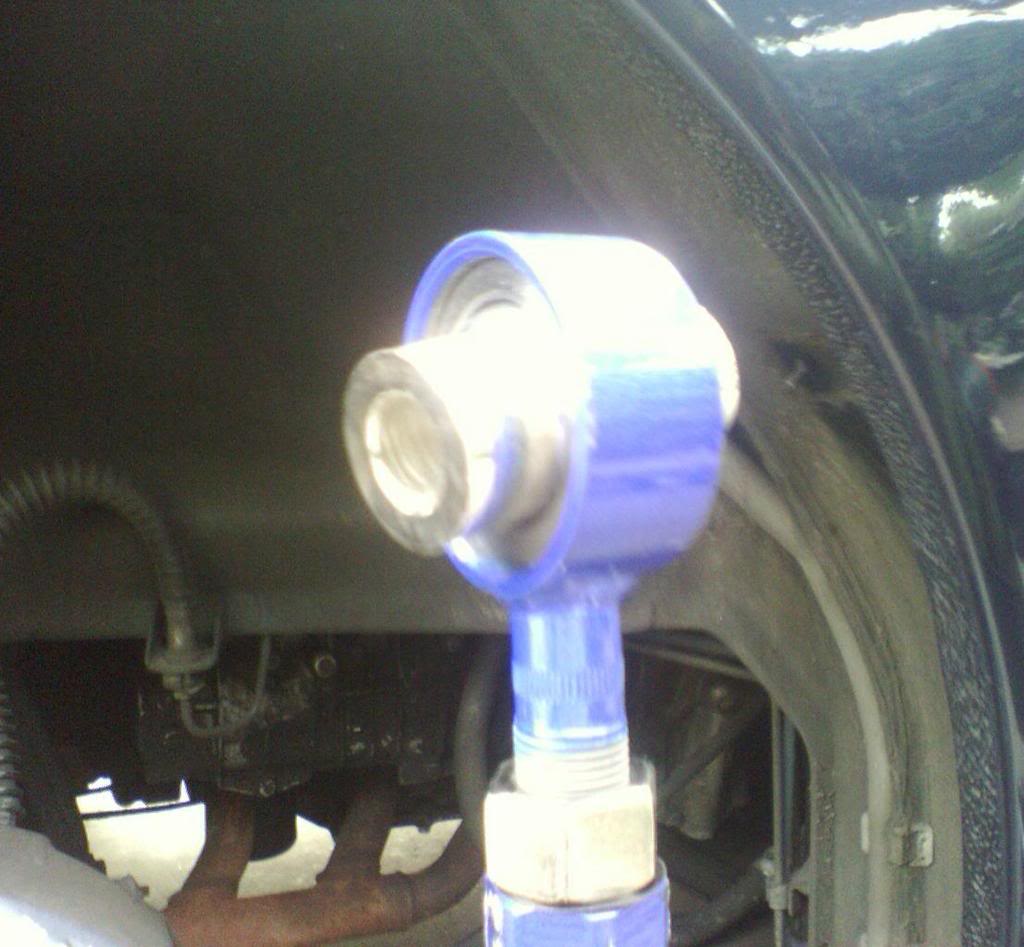
11) Now slide the Adjustable Control Arm into place by first aligning the Bearing Cartridge side first and screwing the 18mm bolt in only 4 turns. Now Slide the Fork-End over the mounting point and align it with the bolt hole. FYI- If the Fork-End appears to be too far back or forward, Remove the 18mm bolt from the Bearing-Side and Remove the arm and rotate the Fork-End in half turn intervals and re-install and repeat as needed until the Fork End is very close to perfect.
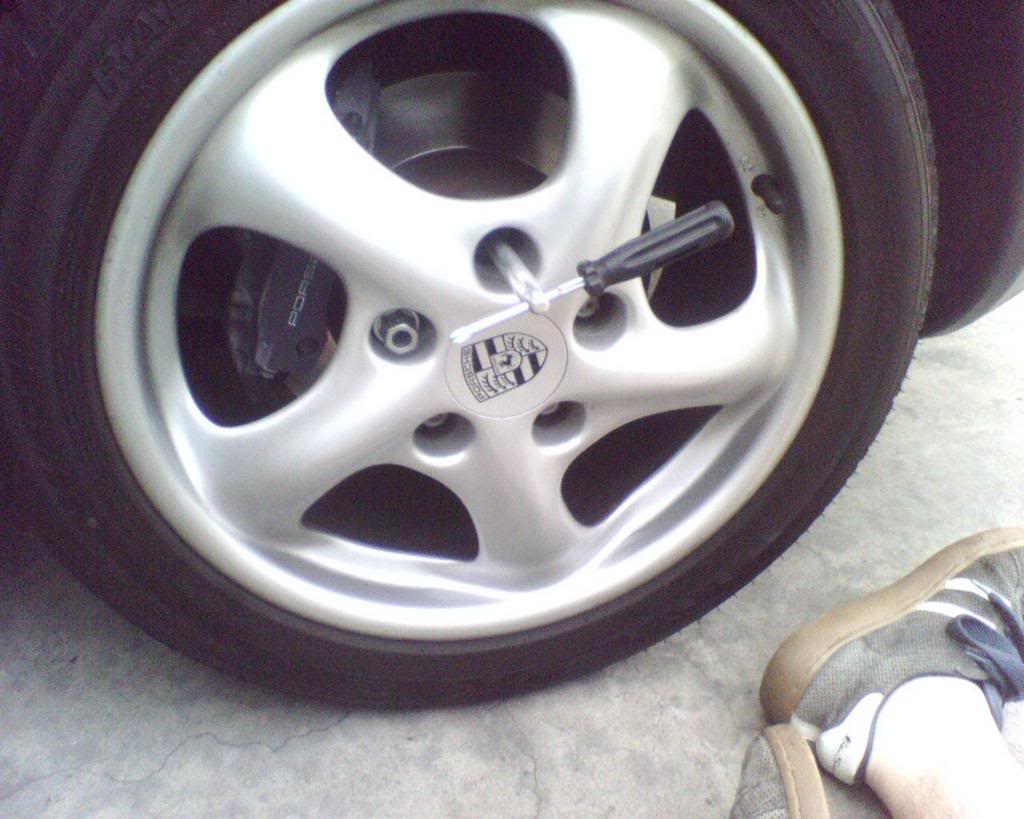
If needed, You may slide a screw driver into the hole to align the holes to better install the 18mm bolt.
12) Once the bolt is through the Fork-End, Install the 21mm nut and snug down the bolt, Dont torque it yet.
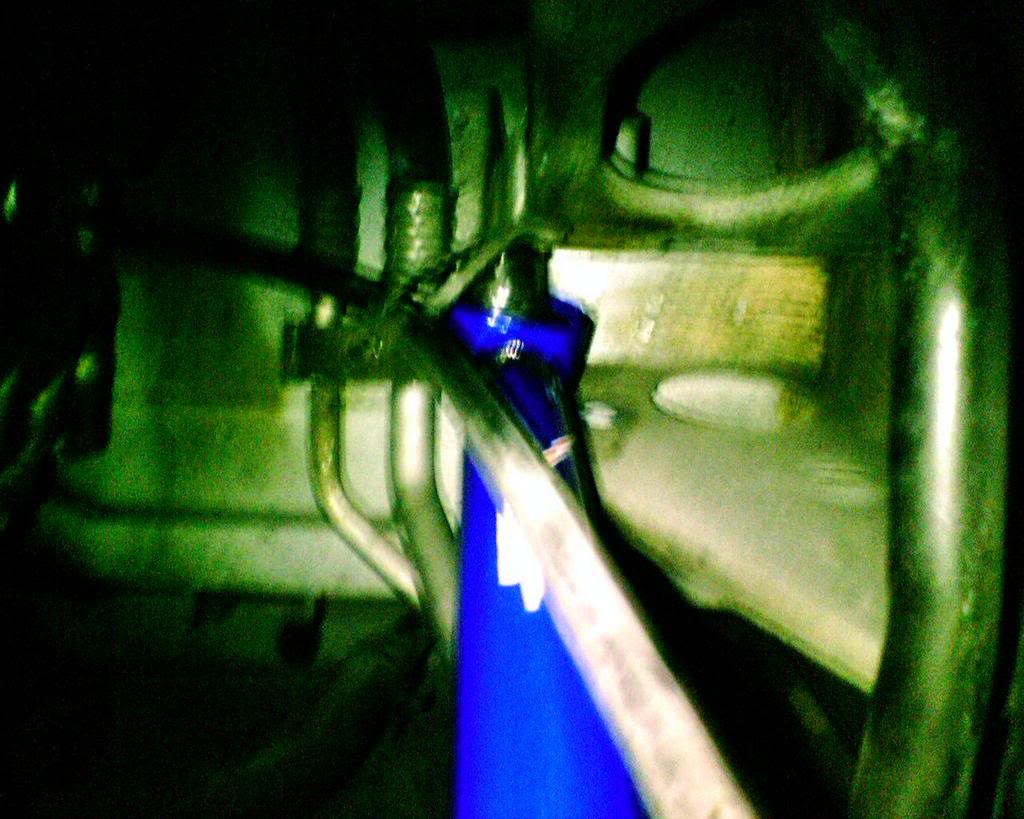
13) Use your Ratchet to tighten the 18mm bolt that is holding the Bearing-End of the Control Arm to the Chasis. Get it as close as you can to 160NM / 118lb-ft of torque with your ratchet cause you cannot get a torque wrench in that confined area.
14) Now using your 21mm closed wrench and 18mm socket on a torque wrench, tighten the bolt to 160NM / 118lb-ft of torque.
15) Now tighten the adjustment nut on the Fork-End of the Control Arm as tight as you can without having the Vise Grip Pliers slip off.
16) Now reinstall the Plastic Cover and its 2 plastic nuts and Place the Guide Rod back in the Top Lug Hole & Reinstall the Wheel with 130NM of torque on the lug bolts.


Now go for a drive and enjoy the sound of the other noises you have in your interior like rattling windstop, dash rattles, leaf in your ventalation system and convertible top rattles
Any questions or requests for more specific explainations, just reply to thread with your questions.
(Install in reverse order if replacing with OEM Control Arms, torque both bolts to 160NM / 118lb-ft. If installing Adjustables...Proceed to read rest of directions)
Now place old control arm and new adjustable Control Arm side by side and slide one of the 18mm bolts through the Bearing Cartridge of the adjustable Control arm and into the Fork-End of the OEM Control Arm. Rotate the Adjustment bar on the Control arm until the other end of the Control Arm bolt holes light up perfectly. Once they line up, slide other other 18mm bolt through the other end to keep them from rotating anymore and make any other adjustments as needed.
10) Now tighten the Adjustment Lock Nut on the the Bearing Cartridge side of the Adjustable Control Arm AS TIGHT AS YOU CAN to prevent it from loosening. If it loosens, it wont fall off but it will rattle and you will have to remove the entire Control Arm and re-tighten the Adjustment Lock Nut again. DO NOT tighten the Lock Nut on the FORK-END. Also rotate the Bearing Cartridge in the same angle that the OEM was while still in the car like so.
(FYI The Adjustment nuts are larger than 1inch wrench so I used 2 Vise Grip Pliers to tighten the nut.)
11) Now slide the Adjustable Control Arm into place by first aligning the Bearing Cartridge side first and screwing the 18mm bolt in only 4 turns. Now Slide the Fork-End over the mounting point and align it with the bolt hole. FYI- If the Fork-End appears to be too far back or forward, Remove the 18mm bolt from the Bearing-Side and Remove the arm and rotate the Fork-End in half turn intervals and re-install and repeat as needed until the Fork End is very close to perfect.
If needed, You may slide a screw driver into the hole to align the holes to better install the 18mm bolt.
12) Once the bolt is through the Fork-End, Install the 21mm nut and snug down the bolt, Dont torque it yet.
13) Use your Ratchet to tighten the 18mm bolt that is holding the Bearing-End of the Control Arm to the Chasis. Get it as close as you can to 160NM / 118lb-ft of torque with your ratchet cause you cannot get a torque wrench in that confined area.
14) Now using your 21mm closed wrench and 18mm socket on a torque wrench, tighten the bolt to 160NM / 118lb-ft of torque.
15) Now tighten the adjustment nut on the Fork-End of the Control Arm as tight as you can without having the Vise Grip Pliers slip off.
16) Now reinstall the Plastic Cover and its 2 plastic nuts and Place the Guide Rod back in the Top Lug Hole & Reinstall the Wheel with 130NM of torque on the lug bolts.
Now go for a drive and enjoy the sound of the other noises you have in your interior like rattling windstop, dash rattles, leaf in your ventalation system and convertible top rattles
Any questions or requests for more specific explainations, just reply to thread with your questions.

Thread
Thread Starter
Forum
Replies
Last Post
COBB Tuning
Automotive Parts & Accessories For Sale/Wanted
5
11-09-2015 08:02 PM
r_matt_6
Automobiles For Sale
11
10-08-2015 06:07 PM