DIY: Modding front radiator brackets for big tires
#1
 03-14-2016, 02:10 PM


DIY: Modding front radiator brackets for big tires
It is no mystery that the problem with running wider and taller tires on the 996tt/GT2 is the interference as you turn the wheel between the front tire and front fender liner "bubble" which is there due to the radiator bracket. Running aggressive wheel offsets only makes the situation worse because the more aggressive the offset, the larger turning radius the wheel will have. Since this has come up recently in numerous threads, I figured I'd post up relatively simply DIY mod to create more clearance for running larger wheels and tires.
We modded the brackets in this fashion to make it very "OEM" and virtually impossible to tell there is any modding involved. There is no partial cutting and bending of the bracket. If you like doing things as close to OEM as possible, this may be the mod for you. First, you will need to remove both radiator brackets which is very simple btw. You just remove 1 nut, 2 bolts, unclip 3 clips that retain the radiator locating pins and the whole bracket comes off. The radiator assembly will remain in place held by the hoses. You can support the radiator with something while the bracket is removed but it's not necessary.
Once the bracket is out, you simply cut out the part of the bracket that takes up a majority of the room in the fender liner "bubble". This, in and of itself, will give you about 5/8" to 3/4" additional clearance. You can then "slot" the 3 holes in the radiator brackets a little bit to allow you to push the whole radiator/bracket assembly forward. We gained another 1/8" to 1/4" of room by doing that. I used a simple Harbor Freight 4" metal grinder and smoothed all the edges with a carbide bit. Clamp the bracket in a vice while you work on it. Once all is smooth, you can lightly sand the bracket and spray it with matte black paint for that "OEM" finish. For those that are questioning the integrity of the brackets after this mod, have no fear. The brackets are super beefy made of steel and you could practically hang and elephant from them. Even when trimmed they are super sturdy and more than enough to supper the radiators which only weigh about 10lbs including the fan.
The final step is to heat and flatten the fender liner "bubble" to make sure the liner is nice and snug up against the radiator bracket. Using GT2 fender liners makes this relatively easy as they are made out of a thinner material that is rather easy to mold. Besides this, the GT2 liners other benefit is that they vent radiator air to the back of the wheel (as opposed to out ahead of the wheel on the TT) where it can be diverted to the front brakes via brake ducts.
I will also note that the way to maximize room for big/wide tires in the front is to run a wheel offset that will minimize the wheel turning radius. A GT2 for example runs a rather aggressive ET40 offset but it only uses a rather skinny 235 tire. To run wide wheel/tire combos, you will need to choose an offset that puts the front wheel as snug as you can up against the front strut. Running small diameter 2.25" coil over springs with a wheel offset of ET47-50 on a 9" wheel or an ET43-44 on a 9.5" wheel is the key. This will effectively minimize the turning radius of the wheel. You can then shim the LCA to the max track that you can get for the wheel to clear the fenders. The exact amount will depend on the camber you are running. The more camber, the more shims and wider track you can run.
Here is a picture of the stock radiator brackets from behind and the side. I have marked out the "interference" area to be cut away with a silver majic marker.
[url=https://flic.kr/p/ESxCGx]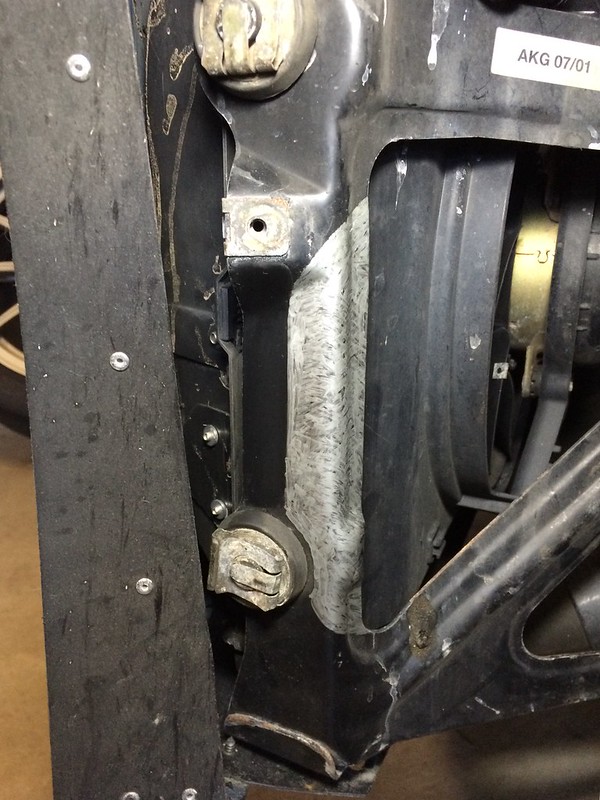
[url=https://flic.kr/p/E4mzfZ]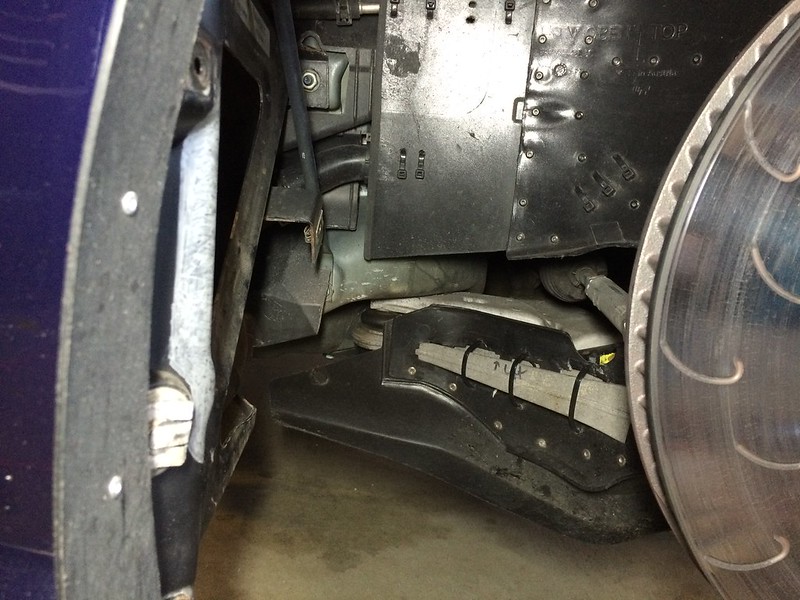
Here is a picture of the stock radiator brackets after the area in question above has been cut away and the bracket sprayed flat black.
[url=https://flic.kr/p/E4kRJx]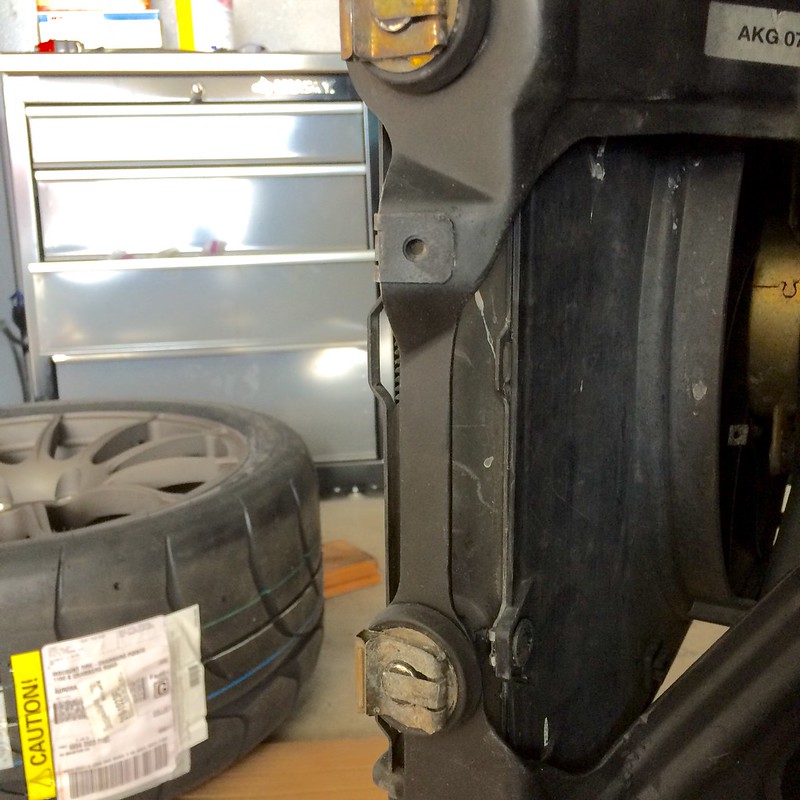
[url=https://flic.kr/p/E41vLW]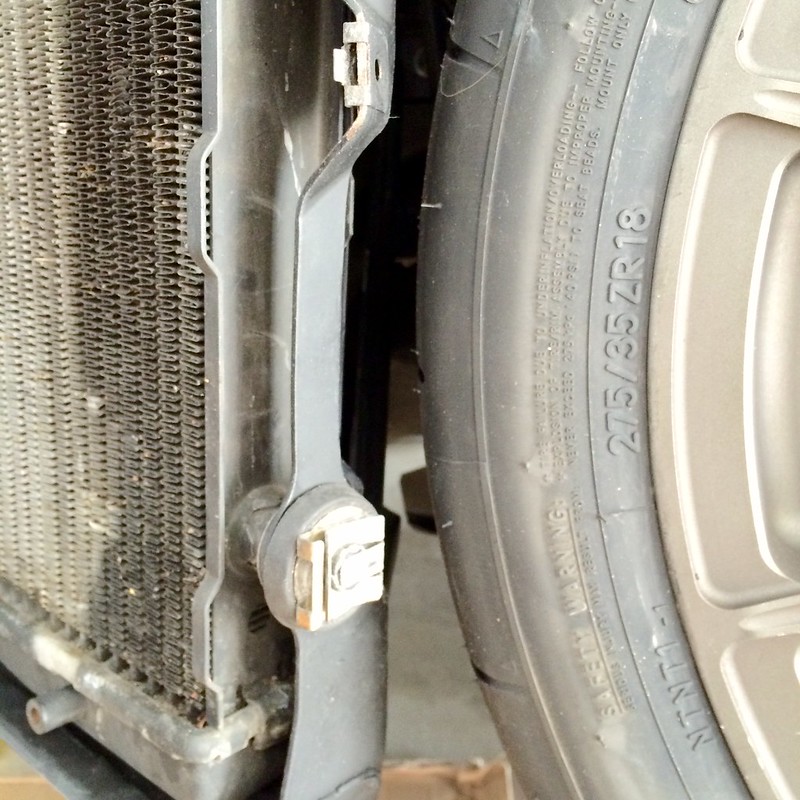
Here is a picture side by side of the stock (on the left) and the modded bracket (on the right). The difference is obvious. The brackets in the picture are flipped, the right side bracket is on the right and the left side bracket are on the right.
[url=https://flic.kr/p/E41vXY]
It goes without saying, perform all modding at your own risk...
Last edited by pwdrhound; 03-14-2016 at 02:49 PM.
#3
03-14-2016, 02:26 PM
Yep I was right, yours looks nicer than mine lol. Solid inch more room I got. Able to fit 255/35/19 tires which are very tall for a front tire but optimal size I'd still awd and running a 305/30/19 rear.
#4
03-14-2016, 02:37 PM
 I got just under 1" of extra room but can easily slot the bracket holes a little more to get another 1/8" to 1/4" or so. Look forward to seeing the rest of your project come together.
Last edited by pwdrhound; 03-14-2016 at 02:43 PM.
#5
03-14-2016, 05:58 PM
Just for reference guys. Here is how much taller a 255/35/19 is than a 225/40/18

#6
03-14-2016, 06:33 PM
Thanks for posting John, I've book marked this for future reference for when I go with 245/40/18 on front. From what I have read the 245 are a better match than 235/40 with 315/30 rears for AWD.
Last edited by JimTT; 03-14-2016 at 06:35 PM.
#7
03-14-2016, 11:22 PM
A 245/40/18 should be easy Jim. You might not have to mod anything unless your wheel offset is pretty aggressive. It varies from car to car however.
Trending Topics
#8
03-14-2016, 11:41 PM
I bent front liner brackets and heat molded liners, created a bit more space but it was still just touching at full lock with 235/40/18 on OZ racing wheels on right side only. So I'm guessing larger tires will rub.
Last edited by JimTT; 03-14-2016 at 11:44 PM.
#9
03-14-2016, 11:50 PM
If that's the case then yes. This mod will easily take car of it. Probably 4 hrs worth of work taking your time.

#11
03-15-2016, 07:32 AM
The liner you don't really have to do anything to. It gets pulled in with the bracket when you put the screws for it back in. I heated mine up and pushed it in further just a tad but for most that would be needed
#13
03-15-2016, 02:24 PM
I basically had the liners bolted in and heated up the bubble area of the liner with a heat gun until it was nice and pliable. I then took an ice cube and massaged the liner with it pressing it in tight against the radiator. As the ice quickly cools the liner it retains the new shape.
Last edited by pwdrhound; 03-15-2016 at 02:33 PM.
#15
03-15-2016, 03:01 PM

from my calculations a 255/35/19 tire is 26" diameter, that means we can run 660 slicks in front, there is a big variety of slicks in 660 available (more than 645 and 650) in wider sizes like 260 till 280. I know there are sizes available from pirelli, michelin, hankook,dunlop etc