DIY: 997 OEM Trunk Mounted Collapsible Spare Tire – C4S
#31
 06-08-2011, 03:15 PM


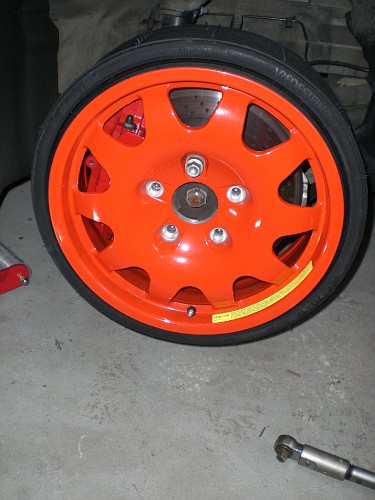
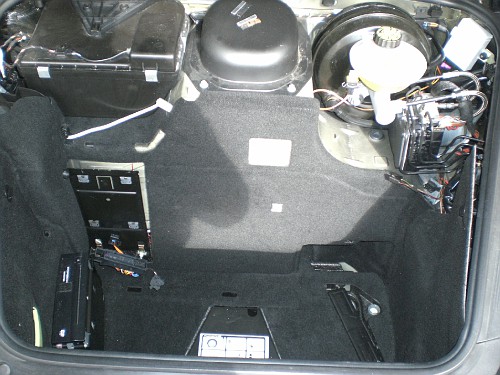
Pics below are of a 17" spare in the trunk of an '07 997 C4S. With the spare tilted as shown there are no clearance issues. Pic of the boot lid is fully closed with the spare inside. Last pic is with the top 2.5 inches from being fully closed as that was as far as I could get the boot closed and still take a picture.
I also suspect that with nav unit removed the wheel will sit upright against the bulkhead without and clearance issues but I am basing that on my own observations and those of the OP. I can not absolutely confirm it as I did not remove the nav unit when I test fit the spare. However, as I will only be using the spare on road trips out of town, tilting it works fine for my purposes. I plan to secure the spare to wind screen tie down point to limit the chances of it rolling/moving while the car is in motion.
I also suspect that with nav unit removed the wheel will sit upright against the bulkhead without and clearance issues but I am basing that on my own observations and those of the OP. I can not absolutely confirm it as I did not remove the nav unit when I test fit the spare. However, as I will only be using the spare on road trips out of town, tilting it works fine for my purposes. I plan to secure the spare to wind screen tie down point to limit the chances of it rolling/moving while the car is in motion.
Agreed, I should have been more specific in my previous response. "Tilting" is exactly what I do now to accommodate the 17" wheel (21" diameter of tire+Wheel) space-saver spare and it just fits..(Das Shield installed) Sorry for poor quality of pics (taken from phone) but was in a rush.
At one point I investigated possibly taking aluminum brace on floor of trunk out and having 1" cut off height but was hesitant as I could never determine the intended purpose. By reducing the aluminum triangle "brace" (part # 997.504.403.00) height by 1" (it's same thickness as Porsche air pump) would allow to store/mount space saver vertically and flush against back wall as OP did but he had a 16" wheel.
 , but felt better with the spare on board.
#33
06-13-2011, 03:27 PM
Hi Dadio,
Agreed, I should have been more specific in my previous response. "Tilting" is exactly what I do now to accommodate the 17" wheel (21" diameter of tire+Wheel) space-saver spare and it just fits..(Das Shield installed) Sorry for poor quality of pics (taken from phone) but was in a rush.
At one point I investigated possibly taking aluminum brace on floor of trunk out and having 1" cut off height but was hesitant as I could never determine the intended purpose. By reducing the aluminum triangle "brace" (part # 997.504.403.00) height by 1" (it's same thickness as Porsche air pump) would allow to store/mount space saver vertically and flush against back wall as OP did but he had a 16" wheel.
#34
09-11-2011, 11:25 AM

Collapsible Spare Tire available 996 362 120 03
I have a collapsible tire p/n 996 362 120 03
As commented in several other thread unbelievably Porsche didn’t offer 997 owners the option of a trunk mounted spare. My car is a 4 season daily driver and personally I would prefer to change a flat tire myself and be back on the road then to wait for a service truck to arrive. So I knew as soon as I bought my car this would be one of the first projects I’d complete.
Several measurements quickly confirmed mounting a spare tire in the floor of the trunk was not possible due to the AWD system so this was the method I settled on. Hopefully this write-up will help someone else looking for a similar option.
Configuration
'06 997 C4S with Nav & 6 Disc CD Changer
Note: CD changer was discarded in this install.
Note: This method will work for C2, C2S & C4 997 as well.
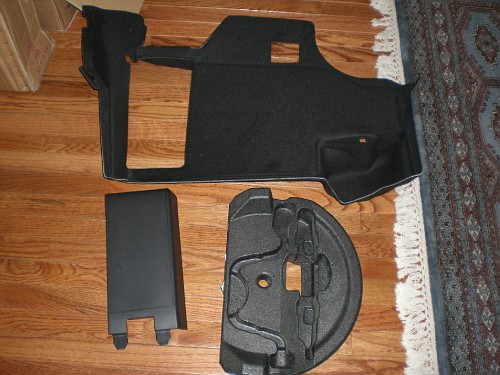
OEM Parts
996-362-150-00 Collapsible Spare Tire (996)
996-722-101-00 Jack and Tool Holder Insert
997-551-108-00-02A Bose Amp Cover
997-551-051-20-A31 Trunk Liner (Black) Bose Amp Only
Non-OEM Parts
(2) Sealed Rivets----------- McMaster: 97524A046
(1) Easy Align Weld Nut ---McMaster: 90955A129
(1) 6” Threaded Rod-------McMaster: 90557A650
(1) Wing Nut---------------McMaster: 92239A250
(4+) Blind Rivets----------- (Your choice)
Major Steps:
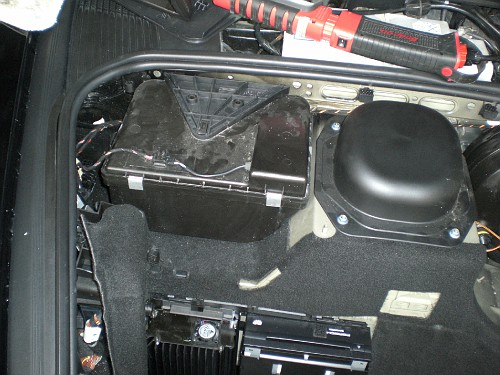
Disassemble Trunk, Remove CD Changer and All Liners
Remove DVD/NAV Drive from Mounting Bracket.
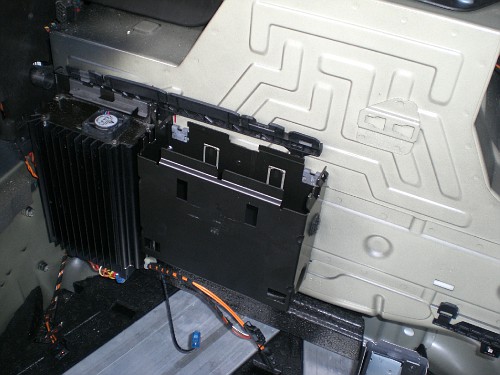
Rivet CD Changer Bracket to NAV/DVD Drive Mounting Bracket

Mount Weld Nut In Raised Sheet Metal (Do Not Drill Through the Trunk!!!)
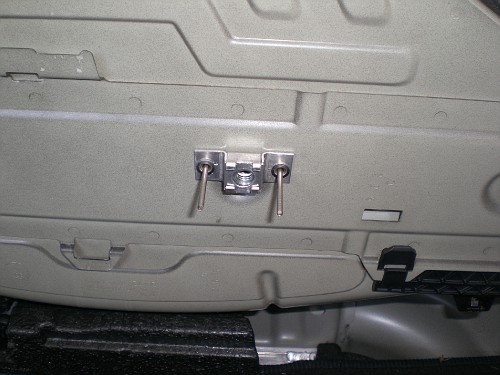
Test Fit of Assembly (Note Location of Weldnut)

Cut Hole for Spare Tire Mounting Rod, Install Carpet
Mount Insert and Tool Kit
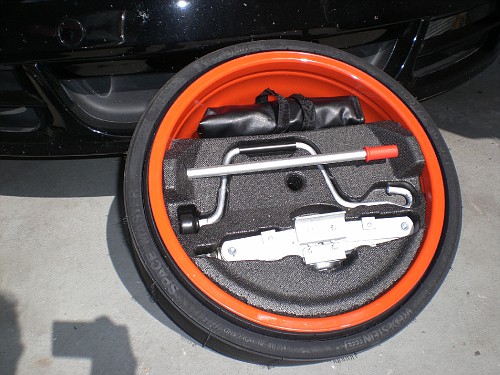
Finished Product

More pictures & additional steps/ details can be found here: CLICK
Several measurements quickly confirmed mounting a spare tire in the floor of the trunk was not possible due to the AWD system so this was the method I settled on. Hopefully this write-up will help someone else looking for a similar option.
Configuration
'06 997 C4S with Nav & 6 Disc CD Changer
Note: CD changer was discarded in this install.
Note: This method will work for C2, C2S & C4 997 as well.
OEM Parts
996-362-150-00 Collapsible Spare Tire (996)
996-722-101-00 Jack and Tool Holder Insert
997-551-108-00-02A Bose Amp Cover
997-551-051-20-A31 Trunk Liner (Black) Bose Amp Only
Non-OEM Parts
(2) Sealed Rivets----------- McMaster: 97524A046
(1) Easy Align Weld Nut ---McMaster: 90955A129
(1) 6” Threaded Rod-------McMaster: 90557A650
(1) Wing Nut---------------McMaster: 92239A250
(4+) Blind Rivets----------- (Your choice)
Major Steps:
Disassemble Trunk, Remove CD Changer and All Liners
Remove DVD/NAV Drive from Mounting Bracket.
Rivet CD Changer Bracket to NAV/DVD Drive Mounting Bracket
Mount Weld Nut In Raised Sheet Metal (Do Not Drill Through the Trunk!!!)
Test Fit of Assembly (Note Location of Weldnut)
Cut Hole for Spare Tire Mounting Rod, Install Carpet
Mount Insert and Tool Kit
Finished Product
More pictures & additional steps/ details can be found here: CLICK
#38
09-25-2011, 09:54 AM
Awesome. Is there a problem just putting the wheel kit unsecured in the "frunk?" I'd like the option to take it in and out of the car based on length of the trip. I told my 16 year old son that he and his Honda Fit are my "roadside assistance." He knows what to load into his car if I call!
#39
09-26-2011, 09:45 AM

Awesome. Is there a problem just putting the wheel kit unsecured in the "frunk?" I'd like the option to take it in and out of the car based on length of the trip. I told my 16 year old son that he and his Honda Fit are my "roadside assistance." He knows what to load into his car if I call!
I think so. If you have to brake hard you might mess up your hood as the tire could hit the inside and really do a number on the paint job of your hood.
#40
04-01-2012, 04:50 PM

actual removal of the CD Changer
Can anyone comment on how to actually remove the CD Changer in one piece? I cannot find any reference on how it is actually done. Everything else seems to snap off, but I can't figure out the CD Changer "magic key".
Any advise would be greatly appreciated.
EH
Any advise would be greatly appreciated.
EH

#43
03-22-2013, 05:59 PM

I'd love to see a group buy from Suncoast on the Spare Tire Kit with the Jack, wrench, bag, etc.. I would think there would be demand from this forum for a better deal on the package than the $1250 that its listed at.
#44
03-25-2013, 01:44 PM

This will likely be the dumbest question of this thread but I have a 2006 C4 and this is very relevant to me. I have 19" lobsters on now with the standard black calipers - will this 17" wheel fit and be the same size to lug me home?