When you click on links to various merchants on this site and make a purchase, this can result in this site earning a commission. Affiliate programs and affiliations include, but are not limited to, the eBay Partner Network.
installed the SB Acoustics SB15MFC30-4, sounds the same as stock
After 3 hours of break-in, my focal integration 8" + 4" overall sound very clear, but everything together is seriously lacking bass and midbass. Going to take apart the doors again and check polarity on all the door speakers
installed the SB Acoustics SB15MFC30-4, sounds the same as stock
After 3 hours of break-in, my focal integration 8" + 4" overall sound very clear, but everything together is seriously lacking bass and midbass. Going to take apart the doors again and check polarity on all the door speakers
Something must be wrong. My system is much better than stock. For the invested cost it is a huge improvement. You might have the wrong polarity. The 8" focals provide excellent mid base. The SB acoustics is a quality woofer compared to the crap paper cone Bose.
Last edited by florindi; 08-26-2017 at 07:56 PM.
Reason: Grammar error
Something must be wrong. My system is much better than stock. For the invested cost it is a huge improvement. You might have the wrong polarity. The 8" focals provide excellent mid base. The SB acoustics is a quality woofer compared to the crap paper cone Bose.
subwoofer polarity should be correct on my end. white +, black -. grey-, grey/red +
Door woofers could be messing with everything if they're backwards though. Speaker wires are cut short by previous owner, so I can't tell if the door speakers are red stripe or brown stripe. Which polarity is the solid color on both door speakers?
Started into this upgrade over the weekend with the rear subwoofer box - Alpine KTP-190U Alpine mono amp and Focal Utopia 5.25" subs. I have the subs and amp mounted in the enclosure and am to the wiring piece and have a primary question and a couple secondary questions I thought maybe someone here could answer.
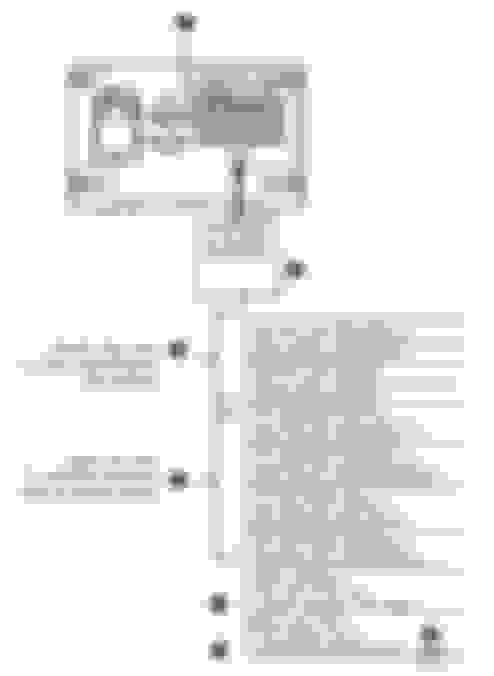
1. The Amp hook-up instructions say to connect both the left & right + & - input wires, and that it will sum the signals and convert them for mono output. It also says that if you don't connect both that the base sound may not be accurate. The factory Bose setup only has 1 + and 1 - input to the Bose amp.
Can I connect both the Left - and Right - input wires coming out of the amp harness to the single - signal input from the car while connecting both the Left + and Right + input wires coming out of the amp harness to the single + signal input from the car? Will this effectively sum the left & right signals like the amp wants for the input or cause some type of signal issue. If I can't do it this way and can only use one pair of input signal wires to the amp wiring harness, should it be the left or right side ones. This amp has a signal sensing turn-on, not a remote lead turn on, so my other concern is that with only half the signal coming in that it's looking for, that might cause it to not turn on.
Here are shots from the Installation Manual that have raised the concern.
2. Second question is to which position should I set the Low Pass Filter crossover frequency switch - 80, 100, or 120 Hz? I figured with the quality of these Focal subs and having a greater range at the low end than others, I'd set it at 80, but is that too low. Frequency range from the subs spec sheet is 36-1,500 Hz
Another note on this Alpine Amp, I was a little worried about the size of the wires coming into the multi-pin connector as being too thin, but when I went back to the connector where the car harness plugs into the sub harness, they're much larger gauge, especially the power and ground, actually larger than the power and ground wires that are coming out of the Alpine amp harness, so I'm going to make my connections back there, not at the small pin connector that was originally on the Bose sub amp. With this amp, I only need 4 wires - sub input signal + & - and then power, and ground.
Once I get it all done this week, I'll post my install photos into the thread for others to reference, but here's where things stand currently.
The upgrade is complete - in order to do it the way I like to do my projects, it took me significantly longer than I thought it would - probably 20 hours in it all together, but the test listen today makes it seem totally worth it compared to the "muddy" Bose system sound I had previously.
What I installed were:
2 x IS 200 - 8" Woofers with tweeters
4 x IC 100 - 4" Co-Axial speaker set with positionable center tweete
3 x TIS 1.5 tweeters for top of dashboard, including center speaker
2 Focal Utopia Be WS 13 5.25" subs driven by an Alpine KTP-190U Mono Amp
Here's the photo documentary with some comments of my install. I started in the rear with the Bose Sub and worked my way forward. I'm going to do each section in a separate post to not risk losing it. Captions are under each photo
Here is a photo of all the OEM Bose equipment that was replaced - not shown here is the small subwoofer amp
I went with this Alpine amp because it was rated more powerful than the OEM Bose unit, but did not need heavier gauge wire than what is in the plug on the outside of the subwoofer box.
To start with, I made a mounting plate for the replacement subwoofer amp out of a piece of Lexan. Drilled holes to line up with the old mounting hole posts and then new holes for the amp mounting holes. I purposely shifted the mounting to the right a bit to allow space for the wiring to exit on that side.
I used some stainless washers between the amp and the plate to isolate the metal amp body from the Lexan plate to prevent the possibility of melting the plate.
The mounting holes of the Focal subs were close, but did not align to the existing holes in the Bose sub box, so I fabricated adapter rings out of a polymer Kitchen cutting board. The plate mounts to the original holes and then I drilled new holes into the plate for the subs.
I used foam weatherstripping to seal the speaker circumference to the mounting plate (the oem hole already has an integrated similar sealing ring). I wanted to make sure all the air pushed through the port and there weren't any losses or vibration between the pieces.
First Focal sub installed and wired
Comparison between the Focal sub on the left and the OEM Bose sub on the right - too bad noone can see the quality of the Focal unit since it's sealed up in a box.
Completed and wired rear sub box.
Subs were wired in this fashion from the single output from the Alpine Amp. This creates a 2 Ohm load - same as the OEM setup.
This is the OEM connector on the outside of the sub box. The Red wire is 12v + in, the Brown Wire is Ground, white is the Remote turn on lead for the amp (not used with this Alpine unit as it has signal sensing for auto turn on), and then the yellow wires are the signal input wires. Solid yellow for + and striped for -. The Amp needs bass signals on both the L & R + and - inputs (4). Crutchfield advised me to tie together both + inputs to the solid yellow & both - inputs to the striped one.
I traced the shape of the OEM mounting plate onto a piece of Lexan than then cut it out with my band saw and hole saw in a drill press. I had to break off one of the 4 speaker mounting tabs to prevent interference with the speaker grill mounting slots. I used a bracket I have for mounting things into slatwall which fit into the slot in the car to hold it perfectly. Once I had the plate built, I covered it with some black vinyl so it would look good through the speaker grill.
On the backside of the mounting plate I used more of the foam weatherstripping to make the plate seal with the opening which pushes all the sound forward (OEM plate has this molded in).
This particular model of Focal Speaker has the extended tweeter with can be rotated & aimed. I went with these because being able to point the tweeter at the listener's ears makes for clearer highs in the music. You also want to try not to obstruct the tweeter with a grill in order to achieve the cleanest sound, so I modified the OEM speaker grill to allow the tweeter to protrude through.
I used a 1.75" hole saw in the drill press, which was just about perfect, then used a thick rubber o-ring around the circumference of the tweeter before attaching the grill in order to give it a nice finished look. Now you can tell there's an upgrade in there, but I think it looks pretty clean and sounds great.
At this point, I did a test listen to the system, and honestly, wasn't that impressed - grrrr.
In hindsight, what was happening is that it takes more power (volume) to drive these Focal speakers than it does the Bose, so the Bose speakers remaining in the system were still overpowering both the Subs and the rear speakers and not working all that well together.
On to the Front Doors where I'd be replacing the 6" Bose units with 8" Focals and another set of the IC100 Coaxial versions for the 4" midrange
The holes of the Focal 8" speaker lined up perfectly with the OEM speaker mount, however, because they're much higher quality and have a larger magnet, they're quite a bit deeper than the plastic vented panel would allow. I used a razor knife and some wire cutters to remove the plastic vented area from the speaker mount.
I then placed a Boom Mat speaker baffle into the opening, which encapsulates the speaker. These do 2 things - they protect the speaker from any moisture that gets inside the door and the foam acts as a seal to the mounting surface (same thing I'd been doing with the weatherstripping during the other installations). Tip: there is not enough clearance around the 8" speaker to get the mounting bolts in once the speaker is mounted so those need to be in the holes first.
Note the bolts in the mounts already. Once I had the speaker wired up through the baffle, and mounted to the mount with the baffle sandwiched between, I trimmed off the protruding corners of the foam with a razor knife.
Speaker attached to mount with baffle, ready to install back into the door.
There is just enough room to get a ball end allen key into the socket caps of the gold bolts. Tighten each one a little and keep moving around until all of them are tight.
Pleasantly, the 4" coax speakers also line up with the mounting holes in the door panel. I broke off 2 of the 4 mounting tabs, and used the thin foam ring that came with the Focal speaker grills for the face of the speaker to press against once mounted in the door panel.
In test fitting the speaker mounting screws, I noticed they were bottoming out in the door panel holes before securing the speaker well. I put the screw through a metal washer then decent thckness rubber washer to not only cushion the speaker mount and prevent vibration, but also allow the screw to securely attach the speaker to the door panel without bottoming out.
4" speaker installed in door panel
Then on the back side I adhered some foam rubber drawer liner to the back of the speaker with a couple of glue dots. The purpose is toe make sure the metal magnet doesn't come in contact with the metal inner door panel, causing a metallic vibration or noise.
Once I removed the OEM center speaker, I realized it was in a fairly deep hole. Tweeters sound best when they're as far up as possible so I didn't want to just set the tweeter in the bottom of the cavity. I happened to have a perfectly sized rubber stopper on-hand so I mounted the tweeter mount to the top of the rubber stopper. This would allow me to securely mount the tweeter in the center cavity, but have it up near the top of the dashboard for the best sound.
Top view of the mount screwed into the top of the rubber stopper. You can see the hole drilled through the stopper at about 10 o'clock for the tweeter wires to pass through.
Fully assembled tweeter on the mount
In looking into the speaker cavity, there is a section that has a bottom support. I used some 3M trim tape in the corresponding position of the rubber stopper and adhered the bottom of the stopper to this support.
Tweeter installed in center hole. Wires are from the sensor on the speaker cover.
Wanted to do something similar on the 2 side tweeters to keep them from being too low in the cavities. These rubber pieces I had fit the bill perfectly - don't know what they came from. I did the same thing with the 3M trim tape on the bottom side.
Rubber spacer adhered into side tweeter opening
I then wrapped the circumference of the tweeter with thin silicone adhesive weatherstripping so that once I squeezed it into the clips it would be held securely and not vibrate or rattle.
This time when I fired up the system, everything was much clearer, better balanced, and sounded so good.
When I purchased the Alpine Mono Amp for the Sub, I also bought their Rux-2 **** which lets you adjust the gain on the amp remotely. Many reviewers on Amazon said the amp isn't powerful enough to need this and that without it, it would just run at full power, which was fine. I bought it just in case and am glad I did, because what I found is that the optimal setup is to turn the Bass setting on the PCM all the way up to +9 which then drives the 8" door speakers with decent low-range sound, and then with the Rux ****, I can optimize the fill bass from the Subwoofer to get the sound just right for the source or song I'm listening to. You can definitely hear the difference in bass as you turn the **** from Min to Max and in most cases, I think it will be set at around 2/3rds.
I spent a good bit of time figuring out where to mount the Rux ****, and after trying a couple different locations, decided on the driver's seat near the seat controls was a nice out-of-the way location, yet easily accessible with my left hand while driving. Mounted it with the 3M Trim adhesive again on the same angle as the seat recline switch.
The other settings I'm using on the PCM are a Treble of -3. With the number of tweeters installed and the clarity from them, a lower treble setting provides for the right sound balance to my ears.
I turned off the Surround Sound feature as the speakers seemed to be much clearer and I could adjust the sound and balance from the whole system much better with it turned off - it was probably optimized for the Bose speakers. I haven't driven the car yet, so AudioPilot is still engaged as I like the volume compensation, but I'll play around with it on and off to see if the sound is better one way or the other.
I'm also Faded a bit to the rear and to the right so that in the Driver's seat, I can hear sound from all the speakers.
With the limited listening time I've had since the install, I think I'm going to be really pleased with the overall result, plus I plan to keep this car forever so the variable cost on the time invested will be reduced over the years
To this post, I've also added a PDF of the 5 posts compiled in sequence in case it's easier to read or print out for reference during installation.
If anyone has questions, feel free to ask. Thanks to all those who blazed this trail before me as I probably would not have undertaken the project without prior success stories from you.
subwoofer polarity should be correct on my end. white +, black -. grey-, grey/red +
Door woofers could be messing with everything if they're backwards though. Speaker wires are cut short by previous owner, so I can't tell if the door speakers are red stripe or brown stripe. Which polarity is the solid color on both door speakers?
Here are the photos of my removed stock Bose setup where you can see the color of all the factory wires and how the speaker connectors are oriented. If the speaker has a red wire from the connector to the cone, that's the + and black is the -. If the speaker doesn't have colored wires, like the door woofers, the larger connector should be + and smaller -. The Bose system seemed to consistently use the striped wire for - and solid wire for + (best seen on the rear seat speakers in these pics). In the installed door photo you can see that the striped wire connects to the grey speaker wire, which is the smaller of the 2 speaker connectors and normally - so that's consistent. It's confusing in this case because there are only solid wires going from the connector to the speaker and black is normally the - , but for these door speakers, it looks to be the + with the grey wire being the -.
still confused, and would help to have it broken down specifically by driver. Previous owner chopped the midrange speaker wires and didn't use oem speakers, so I'm correcting the install. With everything chopped up, I can't follow. Is this accurate?
8" door speaker - green/brown --> solid grey --> (NEGATIVE)
4" door speaker - ??
rear subwoofers - solid grey (NEGATIVE) / solid black (NEGATIVE)
Your front 8" door speaker statement is correct. I can't enlarge the other photos big enough to see the wire colors on my phone, but from my statement in the post below, the wire with the stripe was always the negative and the solid color wire was always the positive, just like you can see on the 8" door speaker.
For the rear sub, trace the wires further back, between the small Bose Amp and the 5-wire connector mounted to it. The striped wire coming in there is negative also. Since I replaced that Amp, I didn't figure out the wires going from the main plug to the Amp or from the Amp to the subs, but the OEM wire at the sub with the larger connector should be the positive.
Best buy confirmed that my 8" woofer polarity was wrong on one speaker, and corrected. Sounds so much better. Listening with bass +3 and highs - 2
The sb15mfc30-4 subwoofers I installed sound as weak as stock. I'll double check the polarity. I’m gonna explore the option of changing the oem subwoofer amp. Petza914 has the right idea. I was also told that you can keep the oem amp, take the speaker wires and plug them in as an input on the new amp. I think that’s what Petza914 did but deleted the original amp.
Last edited by 997TurboTom; 10-06-2017 at 07:43 PM.
Best buy confirmed that my 8" woofer polarity was wrong on one speaker, and corrected. Sounds so much better. Listening with bass +3 and highs - 2
The sb15mfc30-4 subwoofers I installed sound as weak as stock. I'll double check the polarity. I�m gonna explore the option of changing the oem subwoofer amp. Petza914 has the right idea. I was also told that you can keep the oem amp, take the speaker wires and plug them in as an input on the new amp. I think that�s what Petza914 did but deleted the original amp.
I'm surprised you feel the sb15mfc30-4 subwoofers are weak. You must have the polarity wrong. The subs are wired backwards compared to the rest. Although adding a more powerful amp can't hurt.

 08-25-2017, 09:10 PM