When you click on links to various merchants on this site and make a purchase, this can result in this site earning a commission. Affiliate programs and affiliations include, but are not limited to, the eBay Partner Network.
Hey many thanks as my left front turn signal is intermittent. This is something I will have to try on mine.
Had a rear turn signal go out but got a good deal from a person on here for a complete used light assy. I did get the old unit a apart and I'm looking for some info on the rear circuit board as I want to get it fixed as a spare.
Dave
I thought the whole point of the turn indicator was that it was intermittent. ... 😉
I'm having the same problem on my 06 Vantage. I know it was a while back but do you remember the website where you found the inductor/resistor/solenoid for sale? I'm taking out the headlight of my car this weekend but i'd like to order the parts prior to opening the headlight. Any insight would be helpful...thanks!
Originally Posted by cadman
hi troyboy
yes i did find out,, in my case with the car not being a daily driver
i had time to investigate, i took the headlight unit out. i opened it
up removing the lens cover carefully.it is a permenant seal but it
will come apart,this is the only way to get at the inner workings,
most times it is the circuit board underneath the led light strip that
fails,due to condesation,i am not in any way an electronic expert,just looking for any visible broken parts, i did bench tested the leds first,they were all ok.i found on the circuit board that one of the components had come loose from its base,probably due to vibration, (see pic of the new part inplace), with a little search and the number off the loose part (102) , i bought two just incase it happens again on the right turn signal,i also bought two of part (221) as they are the same type of part,just a different value..the 4 components cost $10 thats including shipping..i had no clue
what would happen when i put it all back together,but figured it was worth the effort,because of the cost of a new or used unit. (big bucks).
to my delight it worked,and i have had no problem since, call it luck if you will..ive added some pics lens cover removed -inner workings board location-new component soldered on board
I followed Cadman's process and was able to repair mine also, though on mine I didn't have to replace any components but I did resolder a lot of larger components. I'd also want to thank Ms. Asher for training me in Mil-Spec soldering way back in the day while at GEC/Marconi Avionics.
When I thought I had everything done on the board I put the light assembly back in place but without the lens and mounting bolts just hand tight. This allowed me to push on the board and wiggle the wire harness and connector with the indicator on. Glad I did as I forgot to resolder the connector pins and found this was where mine was intermittent. Well worth a test before fully assembling.
in my case ,i didnt have to use heat at all to separate the lens from the unit,
after carefully prying the tabs on the lens i was able to pull it apart by hand,
with a little effort.it is possible that a previous owner had taken it apart before
.if that is the case, he did a good job, nothing broken or scratched..
Did you happen to notice any manufacturer's part numbers on the clear lens? I purchased a car that spent many years in the Florida sun and as a result the clear lenses are crazed. It would be a huge cost savings if I could replace the lens only. Aston Martin DCS only lists the complete assembly:
in my case ,i didnt have to use heat at all to separate the lens from the unit,
after carefully prying the tabs on the lens i was able to pull it apart by hand,
with a little effort.it is possible that a previous owner had taken it apart before
.if that is the case, he did a good job, nothing broken or scratched..
Great photos, nice work. Did you have to apply new sealer to the headlight lens when you reassembled the lens? If not are you confident that water cannot get into the light assembly?
Great photos, nice work. Did you have to apply new sealer to the headlight lens when you reassembled the lens? If not are you confident that water cannot get into the light assembly?
I followed Cadman's instructions a month ago and have not had any water issues with the headlamp I opened up. There is a black sealer that is an absolute pain to open up and to close back in place with the clips.
hi troyboy
yes i did find out,, in my case with the car not being a daily driver
i had time to investigate, i took the headlight unit out. i opened it
up removing the lens cover carefully.it is a permenant seal but it
will come apart,this is the only way to get at the inner workings,
most times it is the circuit board underneath the led light strip that
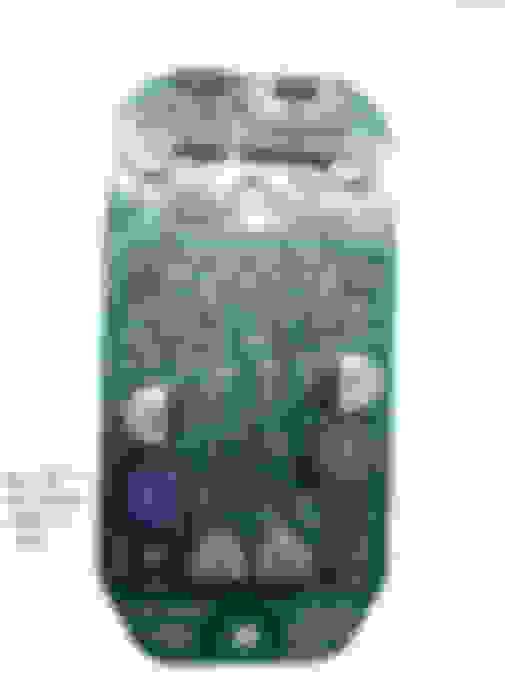
fails,due to condesation,i am not in any way an electronic expert,just looking for any visible broken parts, i did bench tested the leds first,they were all ok.i found on the circuit board that one of the components had come loose from its base,probably due to vibration, (see pic of the new part inplace), with a little search and the number off the loose part (102) , i bought two just incase it happens again on the right turn signal,i also bought two of part (221) as they are the same type of part,just a different value..the 4 components cost $10 thats including shipping..i had no clue
what would happen when i put it all back together,but figured it was worth the effort,because of the cost of a new or used unit. (big bucks).
to my delight it worked,and i have had no problem since, call it luck if you will..ive added some pics lens cover removed -inner workings board location-new component soldered on board
Hey Cadman. Trying your technique later when I get the part. Do you remember how you searched for the number or do you remember the number? Thx
Last edited by MarcS; May 25, 2018 at 02:17 PM.
Reason: Misspelling
hey MarcS
heres the part number 445-16662-1-ND this is for the blue 102 inductor on the picture.
mine was visibly broken off its base,this is the third summer since i did this and still no issues with headlight assy. i also bought the other inductor 221 to the right of picture,just incase in future, part number 445-3844-1-ND. i got them from digikey.com.
good luck
Big thanks!! I�m attempting it once I get the part. My signal problem is intermittent. May not happen for a week or so. I�m thinking it may be a loose connecting. But we�ll see for sure. Can�t tell you enough how much I appreciate your help!
hey MarcS
heres the part number 445-16662-1-ND this is for the blue 102 inductor on the picture.
mine was visibly broken off its base,this is the third summer since i did this and still no issues with headlight assy. i also bought the other inductor 221 to the right of picture,just incase in future, part number 445-3844-1-ND. i got them from digikey.com.
good luck
Hey, are you in the US? I can�t seem to order from the company unless I live in the UK.
Guys- I had taken apart my headlamp three times before I figured out my issue. At first I assumed it was the same issue as cadman so I replaced the part he suggested. Light appeared to work but then had issues one week later so I opened it up thinking it was a similar issue as the greetings from Niagara thread and I followed his step-by-step instructions and again it worked for a week only to fault later.
This last time I took the entire board to a computer repair shop where they went through each bit and found one part I had a very loose connection and re-soldered it. Knock on wood the light has performed flawlessly over the past few hundred miles since.
My recommendation is there are numerous parts that can fault so take it to a computer repair store or similar and have them go through each bit.