When you click on links to various merchants on this site and make a purchase, this can result in this site earning a commission. Affiliate programs and affiliations include, but are not limited to, the eBay Partner Network.
Did you happen to notice any manufacturer's part numbers on the clear lens? I purchased a car that spent many years in the Florida sun and as a result the clear lenses are crazed. It would be a huge cost savings if I could replace the lens only. Aston Martin DCS only lists the complete assembly:
4G43-13W029-CD and 4G43-13W030-CD
@drivergmx I don't know if you're still visiting the site. In case you are, the plastic lenses on these cars (and all others) have a UV protective coating on them. Over time and exposure, the coating can turn yellow or crack. Without the coating, the plastic would yellow and turn foggy very quickly.
Aston only offers the complete headlight assembly.
It's much less expensive to refinish the lenses. This is done through first masking off the car or removing the headlights. Then wet sanding off all of the old clear coat with 1000 grit paper. You can see the old clear coat as you remove it. It will be obvious that there's a line between the coated and uncoated plastic of the lens. It looks kind of like the peeling clear coat on a car's paint finish.
Once the clear is completely removed, continue wet sanding with gradually finer paper at 90 degrees from the grit before until reaching 3000 grit. I used 4 different grit levels. Then repainting the lenses with a UV clear coat paint. There are 2 part UV clear coats that you can purchase from an aerosol can that actually provide a pretty nice finish if done correctly. A fine wet sand after completely dry and then polish will result in better than new lenses that will last a long time.
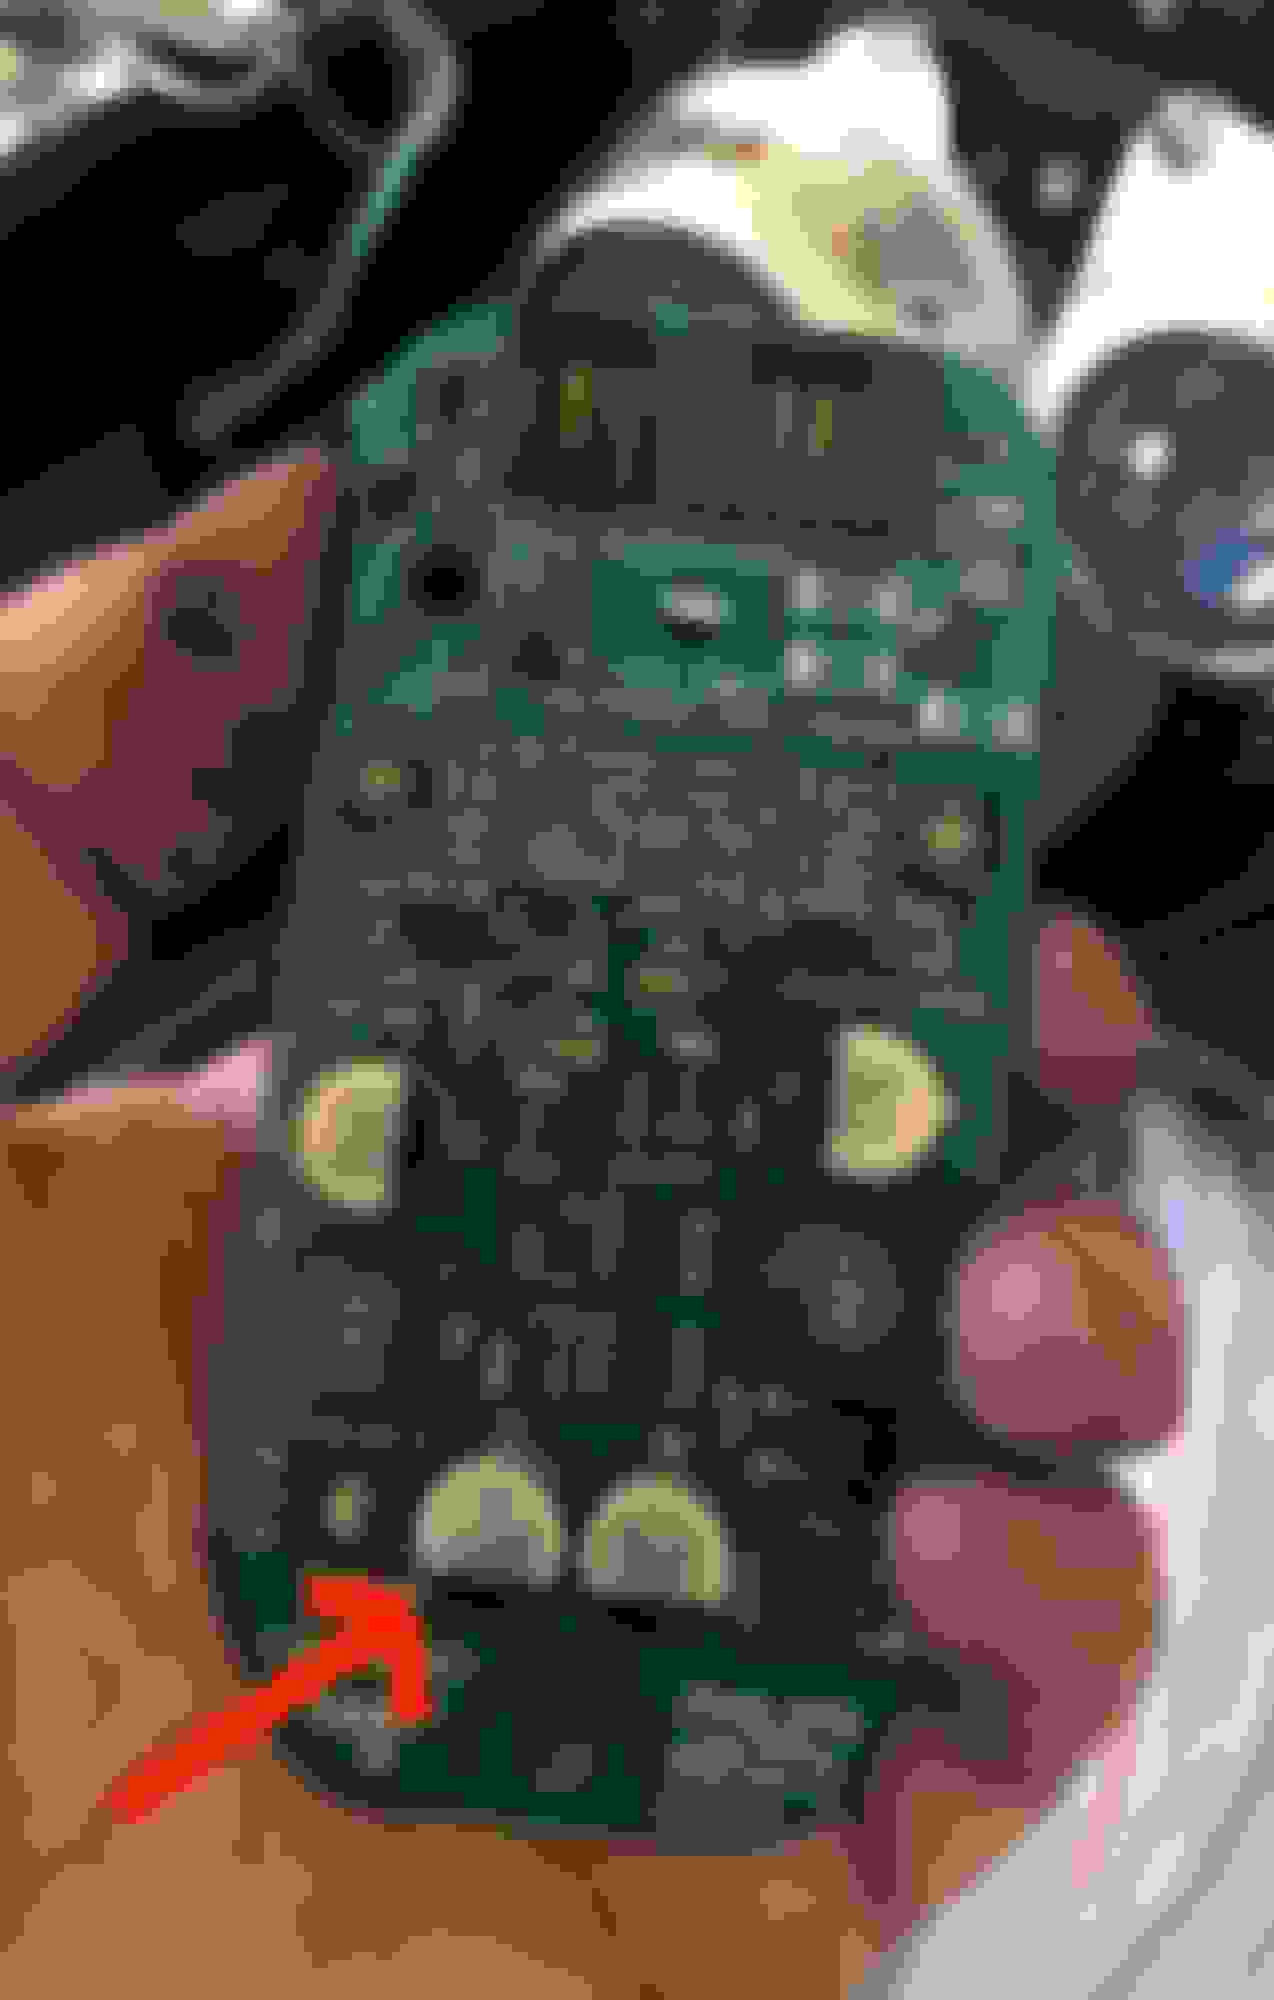
hey detomaso
any chance you can add an arrow to the loose part that was found on your board ,on my posted picture . it might help someone else for future troubleshooting.
I wanted to follow up on this thread as previously I used it to trouble shoot the front turn signal problem on the left hand side. I solved this by removing the solder from the connector pins on both connectors and re-soldering.
Just recently the right front turn signal had started to fail intermittently and then last week failed 100% of the time, or would that be 100% of the 50%. Anyway I raised the car, removed the front wheel, the inner liner, and then the airbox. This gave me access to the 3 screws for the headlamp and then the ability to slide the red locking mechanism on the connector.
With the headlamp removed I was able to slowly undo the clear bezel clips and remove the bezel. While others have used heat I was able to remove both bezels with no heat.
I did the same as the other side re-soldering all the connector pins and larger inductors though this did not solve the issue on the right hand side. I place the headlamp frame on the suspension using a towel to give it a place to rest, then plug in the connector. This allows me to push on the board and it would sometimes work. I decided I still had a bad solder joint and it seemed worse near the multi-pin connector. I went to re-solder the large light blue components which I assume are caps and one of them moved while soldering the one end which shouldn't happen. That was the problem. I re-soldered as many caps as possible and tested again and it works. Tried to push on the board and it still worked.
The factory reflow of this board did not put enough solder on the bigger components.
Tomorrow I reassemble. Hope this is helpful. Don't give up on the board fix and always test before reassembly.
The circuit board is assembled in Mexico, and then the tail light assy. is completed in Belville, Ontario by a subsidiary of Magna Intl. My right rear went wonky a year or so ago; moisture was the culprit- the sealant that was supposed to seal the two halves of the unit was almost non-existent . I have been trying to source out that circuit board for over a year, and have been completely stonewalled by Magna, and I have good connections within the company! Good luck. I wound up buying a pair of OEM assys. from an owner who went with the clear lenses, at about half what AM wants for one new one.
Thanks for the information Dave! My left headlight turn signal was intermittent and has just failed the last 3 drives. Now the right one has started acting up. I am going to pull the left one soon and start there. I was thinking of re-soldering all joints and will take note on the larger components.
What are you going to use to reseal the lights, RTV?
I didn't reseal the lights as the factory sealant or gasket stayed on the lens cover in perfect condition. I want to be able to have access in the future if needed and so far no issues with the right side repair a few years ago.
Make sure you use painters tape to cover the lens before removing to reduce any scratches.
I had my lights out 2 years ago for the upgrades to my car. At that time, both of them were just fine. It was only in the last 6 months that I started seeing issues. I will report back what I find.
Thanks for the help. I took mine apart and found that one of the other capacitors was bad. However, I don't have a part number for it and Digikey doesn't seem to be able to find it either. I highlighted the part that tested as bad. How did you go about finding your part numbers?
Actually on it right now. I dod some searching, but I'm having a bit of trouble. I guess I should have paid more attention in my high school electronics class. Lol!! BTW, taking off the headlamp cover was easy...compared to getting it out of the car.
Actually on it right now. I dod some searching, but I'm having a bit of trouble. I guess I should have paid more attention in my high school electronics class. Lol!! BTW, taking off the headlamp cover was easy...compared to getting it out of the car.
What technique did you use to get the cover separated?
I took the advice of putting it in a closed box and running a hair dryer for a few minutes. The most difficult were the clips. I was afraid to break them. However, they're stronger than they appear.
Once you pull it off, remember to remove the hex screw located underneath the headlamp. I have no idea why it's designed that way. Also, you will need to remove the washer "plunger" (At least I believe that's what it is) and the sliver screw holding the silver signal indicator. Once you remove that, you can slide the black interior forward. You'll have to do that or it will not come out. The circuit board is easy to remove.
I took the board and had it tested. they the one on the bottom left was "raised" and blown. The others tested okay. However, as it's intermittent, I'm not sure if it's reliable. So, I'm replacing the two that were suggested, and the one he said was bad (according to him simply looking at it.).
That's if I can figure out this parts numbering system....
Okay... I figure I'd give my experience with the headlight issue including the steps I took. I'll go into some detail as it might help some. It really isn't as difficult as it seems, and you'll learn a lot about your car.
Remove your front tire and put the car on a jack stand.
Remove the entire liner. Yes, it has a LOT of screws, and you WILL need to remove it. Makes it much easier. It will wrap around the front of the car and even under the undercarriage. You will need a phillps and a hex screwdriver. However, If you don't have a right-sized hexdriver, you can use a blade...but carefully. You don't want to strip out the screw.
Remove the air intake filter. I was able to take out all the bolts to the headlight without removing the hose. However, it made it a lot more difficult. I didn't remove it simply because I didn't know how the clamp to the hose worked and didn't want to break it.
Remove the clip to the hose for the washer fluid connected to the headlight. (Actually, I didn't know it had a washer fluid connection) The clip is super easy to remove. Just push it out of the slot, but make certain to hold it tightly as it will slip and is easy to lose.
Remove the electrical connector to the headlight. Now, this is a bit tricky. Behind the connector and facing toward the engine, you will see pink plastic. Simply put a screw driver and push it away toward the engine. It's not a snapping piece, but more of a slider. Push it all the way and the connector will come out.
Remove the two screws pointing upwards.
Remove the third hexscrew up toward the grill also facing upwards. This is the last screw.. If you took out the air filter it will be easy. If not, you will have to cram you hand up into the space and hope for the best. It's a tight fit and hard to turn the
Once the screw is removed, the headlight should come out extremely easy.
As for removing the headlamp, I simply did what the others advised.
Put it in a closed box and run a hair dryer for a few minutes.
Take it out and pry the plastic clips very carefully. Yes, they are plastic and can break. However, they're tougher than I thought they would be. I used two screwdrivers; one to pry the seal VERY carefully, and the other to push in the clips. Take your time. I was surprised how easy it was to separate.
Once the housing is off, remove the silver screw holding the silver indicator. You can't miss seeing it.
Remove the hex screw UNDER the entire headlight assembly. I have no idea why they put one there.
Remove the two little bolts holding the plunger that operates the washer fluid device. (I still have no idea how it even works) You have to remove this piece or you won't be able to get to the circuit board.
Once those are removed, slide the black interior liner forward. It should slide out easily.
Once it's removed you will see the circuit board. Removing it is easy. Two black bolts and two connectors.. Easy to remove those too.
Once you have the circuit board out, take it to a computer repair store and have them test all of the capacitors. The ones I thought were bad were actually good. The testor immediately identified by sight the bad one as it had "bubbled" a bit on the top. However, I am still going to replace the ones cadman replaces as I don't want to mess with it again.
Like the Cadman and Blue2000s mentioned, Digikey has a geat selection of parts. Thanks to Cadman for posting the method, pics, and the part numbers. That's a HUGE help. Also, to Blue2000s for his help in finding the some other part numbers. Don't let the search for parts scare you. It's not as daunting as it seems. DigiKey has a great system of narrowing down parts. Blue2000s posted the link and it is great!
Good luck! It's really not as daunting as it seems.
Last edited by MarcS; 05-20-2019 at 07:33 PM.
Reason: Typos
Has any one ever had one of the LED�s on the LED strip of the front headlight
Stop working? Is the individual LED replaceable or the whole strip of LEDs?
Just bought the car and noticed it looks like one of the bulbs is missing on the LED strip in the front passanger side headlight
 06-10-2018, 03:28 PM