When you click on links to various merchants on this site and make a purchase, this can result in this site earning a commission. Affiliate programs and affiliations include, but are not limited to, the eBay Partner Network.
Don't have before pictures, but in case you are wondering how you know it needs to be fixed its very obvious, here is an example of via Google search and mine looks just like that:
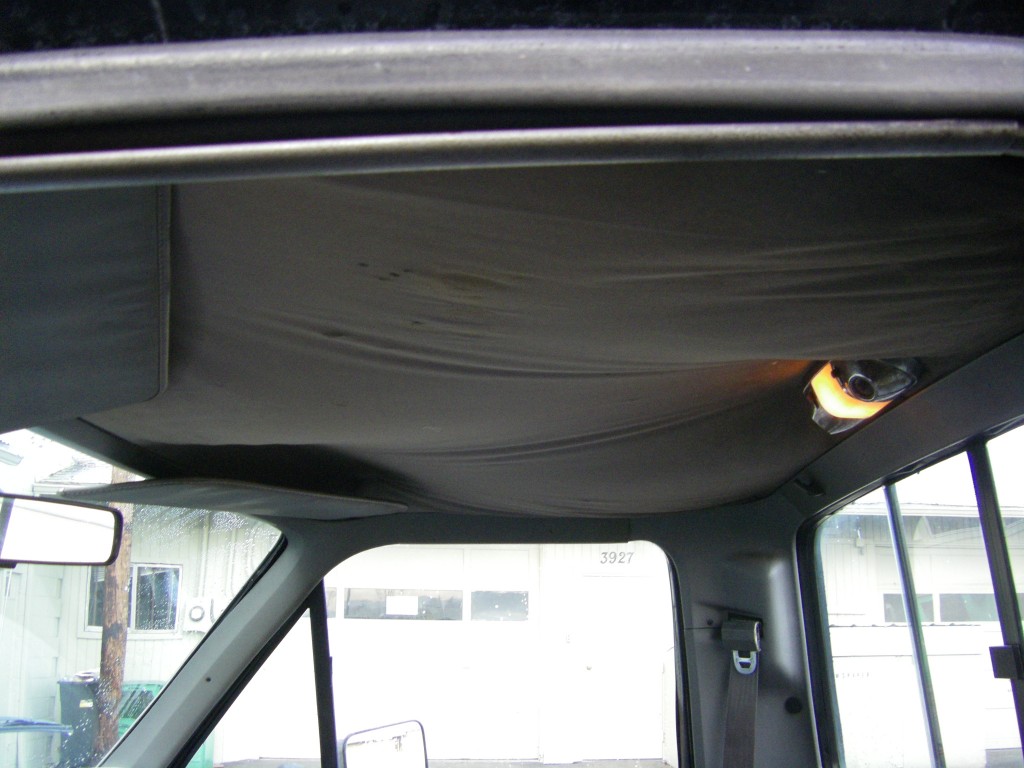
Here is the finished product after I put the interior back together:
Reviving an old thread since I used the majority of this to remove my headliner yesterday. Took just over one hr, a straightforward job!
A couple of suggested changes that I learned while going through the process:
You do not need to pull out any of the dash trim as suggested here and in the workshop manual. Simply remove the 4 Alcantara covered fur trees, then remove the 4 T20�s behind where the fur trees were. The back portion of the trim above the window will now be loose up to the windshield.
Next remove the 2 T 15�s on either side of the rear of the cam rail. These will be exposed when you move the rear of the window trim away that you just loosened. Then you will find four fur trees to pull back and you can remove the rear cam tail. The fur trees slide out and are replaceable for cheap at your dealer or online.
After you have removed the rear cam tail, pull off three saucers as explained below.
Now grab a T30 and remove the single bolt under the review mirror, set aside. Now you can pull down the front of the camtail a bit. My alcantara at this point started to fall down. It was so badly degraded that I pulled it out first, and the headliner mold second (huge mess of old glue and foam).
Headliner was extremely easy to pull out the passenger door. I have a local shop here picking up the headliner and they will put a new piece of foam on it and glue back on the Alcantara. $160 and probably 1.25hr!
Thank you Mark and Aston 1936 for some guidance!
Headliner drooping and loose Just fell right off the board... Removed! Ready to head out for new foam and a reglue!
Originally Posted by mkzhang
Okay here is the DIY walk through on how to take out the headliner in the vantage so that you can get it fixed / do diamond quilt patterns and what not.
Before I start, I just want to thank speedracer800 for sending me detailed instructions and pics from his DB9 headliner removal, irish07 for a detailed walkthrough from his experience as well. Finally KarlFranz for his other DIY threads that came in handy.
Difficulty:
Not very, just time consuming and some what nerve wrecking the first time. The most I've ever done on any car is jacking it up, taking off the wheel, and changing the headlight bulb. So this is a huge under taking for me and it just takes a lot of time because I wanted to be careful. No special tools required or techniques.
Tools
1x philips screw driver
2x torx head screw driver (different sizes, sorry don't know the size)
1x set of interior panel removal tools (I got a set on amazon for like $25)
The uninstall process (install is just reverse)
1.01 Taking out instrument cover
Remove the instrument panel cover (binnacle?). It's very easy, grab the back of it (the side towards the nose of the car) and very gently pull up towards the windshield. Once that is done, work your fingers around the side towards the actual gauges, and pull up as well.
As you can see from the pics, the tabs are all straight downward pointing meaning they have to be pulled up to be worked lose. The back tabs comes out first, the side most are the next easiest to go, then the top. Once that is done unscrew the leather strap holding the thing in place.
1.02 taking out the driver side dash trims
Next is to take out the driver side vent trim. There is 4 clips holding it in. Very careful here, they break. I was being very careful and broke 2 clips so I will need to double side tape the trim piece when reinstall haha.
Use a pry tool and pry from the bottom (where the headlight controls are). The bottom left hand clip is the easiest to get out. Then pry towards you, the bottom right hand one (by the turn signal stalk). Then pry towards you, the middle left clip. Remember they will only come out towards you, any excessive upward prying motion will snap the clip immediately. The last top clip can pivot a bit when coming up, so you can lift the trim upward a bit to work it lose.
Now do the same for the driver, right hand side trim. 5 clips this time. Again start from the very bottom and work your way up. Pry and pull towards you. The top two can pivot a bit as it comes out.
From here you need to remove the driver side top dash piece. Its held in by 3x philips head screws. Remove those.
Once the screws are gone work your finger under and pull up. This part is a pain in the *** as the clip only goes straight up, and I am pretty small so I can reach my arms in, but its hard to get a good lever point but you just gotta pull up. The Right hand side, the very last clip by the edge of the center water fall was the biggest pain in the ***. I almost wanted to break that tab but it finally came out.
And now you're done with the dash!
2.01 Taking out the pillar trim
The next thing to remove is the driver side A pillar trim. First you need to remove those two fir tree clip holding the pillar trim in place. They are those two alcantera covered circles on the trim.
What I did was to use a snap, small pry tool to get it a bit lose so I can use a bigger pry tool to pry it out. Again, can not under state how much a pain in the *** this is.
Once that is done, this bit is the trickiest part of the whole process. So beware
According to speedracer800's DB9 removal, and irish07's feedback, the pillar trim is being held on by fir clips (there is place for 4 of them). But mine is held on by 2x torx screws and no clips. Which meant it might be different from car to car, and you definitely don't want to go yanking hard on the trim when its held on by screws
You can work the trim from the rear of the car, right by the aluminum bracing, but once you get close to the screw points it won't come lose anymore. So what you need to do is pry it a bit from the weather seal, and look inside to see where the screw is holding the trim on. This bit is a bit tough as the trim won't flex enough so your finger will hurt until you get the screw out.
Take a torx screw driver, put it through the hole where the alcantera fir free clips came out, and use that hole to unscrew the screws (2x per side) holding the trim in. Once that is done, there is (or should be) nothing else holding the driver A pillar trim in place.
The trim is very flexible so you can flex and bend it to work it out of the other trims, but note that there are some wiring that is velcro-ed to the trim down by the dash, so be sure to free them from the trim before you yank the whole thing out.
Now do the same for the passenger side, but don't take the trim out. Note that you didn't take the dash out from the passenger side either, you can undo the pillar trim down to the sun visor and just leave it hanging.
3.01 taking out the camrail (front and rear)
Let's tackle the rear first (you will see why later).
There are 2x torx screw holding it in, one on each side by the rear cross bar, remove that. They are the same size as the screw holding the pillar trim.
The rest of the rear camrail is held on by 4x fir tree clips. Use some muscle and yank the trim piece out. It will sound pretty bad, and the clips will be destroyed but those are one use items anyways.
3.02 taking out the rear view mirror
This link (from Karl) tells you exactly how to remove the rear view mirror.
Hint: its one screw, slightly larger torx screw than the ones we've been using. Helps to have someone hold it because mine has a wire for the garage door opener.
Once that is done, you can actually pry back the front camrail a bit and see that this is how the headliner is held on from the front. No need to take the front camrail off, once the rear view mirror is off it loosen the trim enough that you can slide the headliner out and back in the same.
4.01 take out the headliner
Almost done!
There are three of those saucer things that you can spin with your fingers, holding the headliner to the roof from where the rear camrail is, simply unscrew them by hand and the headliner is free.
You can grab the headliner from the back, or driver side, lose it out, then take it out from the driver side door. The only places the headliner is being held on now is the partially removed passenger side and the front camrail.
Install is the reverse, hope that was helpful and thanks for all the helps from the other forum members for giving me the courage to tackle this myself.
 12-26-2015, 05:14 AM


 so I will need to double side tape the trim piece when reinstall haha.


