Aston Martin DB7, DB9, DBS, Vantage V8, Vanquish, and Classic models

Greetings from Niagara, Ontario, Canada

Thread Tools
 
Search this Thread
 
Rating: Thread Rating: 4 votes, 5.00 average.
 
  #16  
Old 04-23-2017, 05:57 AM
cadman's Avatar
Registered User
Join Date: Aug 2015
Location: ontario canada
Age: 65
Posts: 208
Rep Power: 19
cadman is a jewel in the roughcadman is a jewel in the roughcadman is a jewel in the rough
so ryan,was that taillight done medium rare LOL
i like your approach to things, reminds me of me
 
  #17  
Old 04-23-2017, 12:07 PM
Ron Avery's Avatar
Registered User
Join Date: Aug 2014
Location: Oxnard, Ca
Posts: 1,025
Rep Power: 60
Ron Avery is a splendid one to beholdRon Avery is a splendid one to beholdRon Avery is a splendid one to beholdRon Avery is a splendid one to beholdRon Avery is a splendid one to beholdRon Avery is a splendid one to beholdRon Avery is a splendid one to beholdRon Avery is a splendid one to behold
Good to see you are jumping on your repair list. I look forward to your next post.
Ron
 
  #18  
Old 04-23-2017, 05:57 PM
handyman2009's Avatar
Registered User
Join Date: Oct 2015
Location: Ottawa, Ontario, Canada
Age: 59
Posts: 1,471
Rep Power: 90
handyman2009 has a reputation beyond reputehandyman2009 has a reputation beyond reputehandyman2009 has a reputation beyond reputehandyman2009 has a reputation beyond reputehandyman2009 has a reputation beyond reputehandyman2009 has a reputation beyond reputehandyman2009 has a reputation beyond reputehandyman2009 has a reputation beyond reputehandyman2009 has a reputation beyond reputehandyman2009 has a reputation beyond reputehandyman2009 has a reputation beyond repute
Once you take car of all those little things you will have an awesome machine... Did you purchase a new front valance as I replace mine with a carbon fiber piece and mine could be good for you if you want... Let me know I can send you a picture of it, free of charge only shipping from Ottawa :-)
 
  #19  
Old 04-23-2017, 09:44 PM
skeena river rove's Avatar
Registered User
Join Date: Dec 2015
Location: Terrace BC
Age: 46
Posts: 212
Rep Power: 17
skeena river rove is on a distinguished road
Congrats with your Vantage! And respect for doing all the work your self!
 
  #20  
Old 04-24-2017, 12:10 AM
007V8Vantage's Avatar
Registered User
Thread Starter
Join Date: Apr 2017
Location: Niagara Region
Age: 52
Posts: 400
Rep Power: 28
007V8Vantage is a glorious beacon of light007V8Vantage is a glorious beacon of light007V8Vantage is a glorious beacon of light007V8Vantage is a glorious beacon of light007V8Vantage is a glorious beacon of light
Post A little curve-ball today...

I'm late to page 2 but glad some of you have the popcorn out - very motivating for me to keep up the pace.

Originally Posted by handyman2009
... Let me know I can send you a picture of it, free of charge only shipping from Ottawa :-)
Hi Handyman, sounds good to me as long as the shipping isn't more that the part is worth, otherwise I'll pick it up next time I go to Montreal on business.

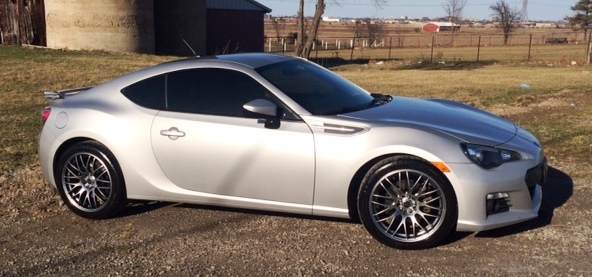
So the curve ball is I sold my Subaru BRZ today when a young enthusiast showed up with a box full of cash for it. I honestly didn't think it would sell so fast but it was a one of a kind machine and nice weather has arrived.
Here's a pics:


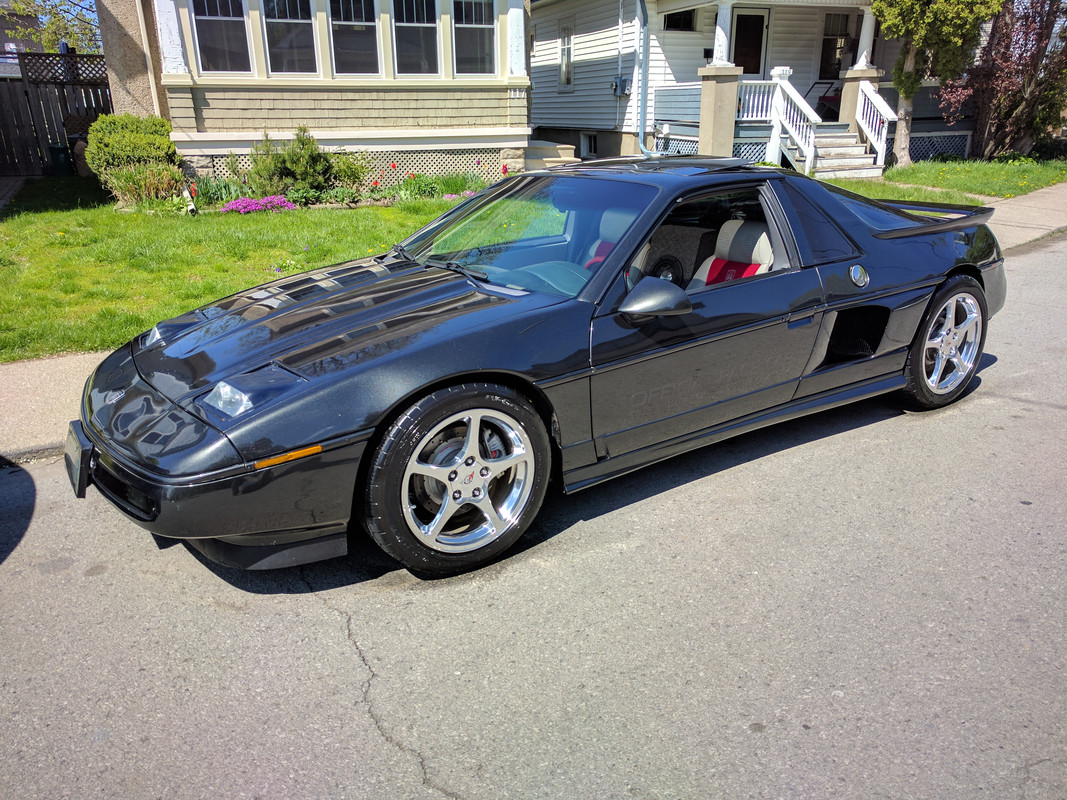
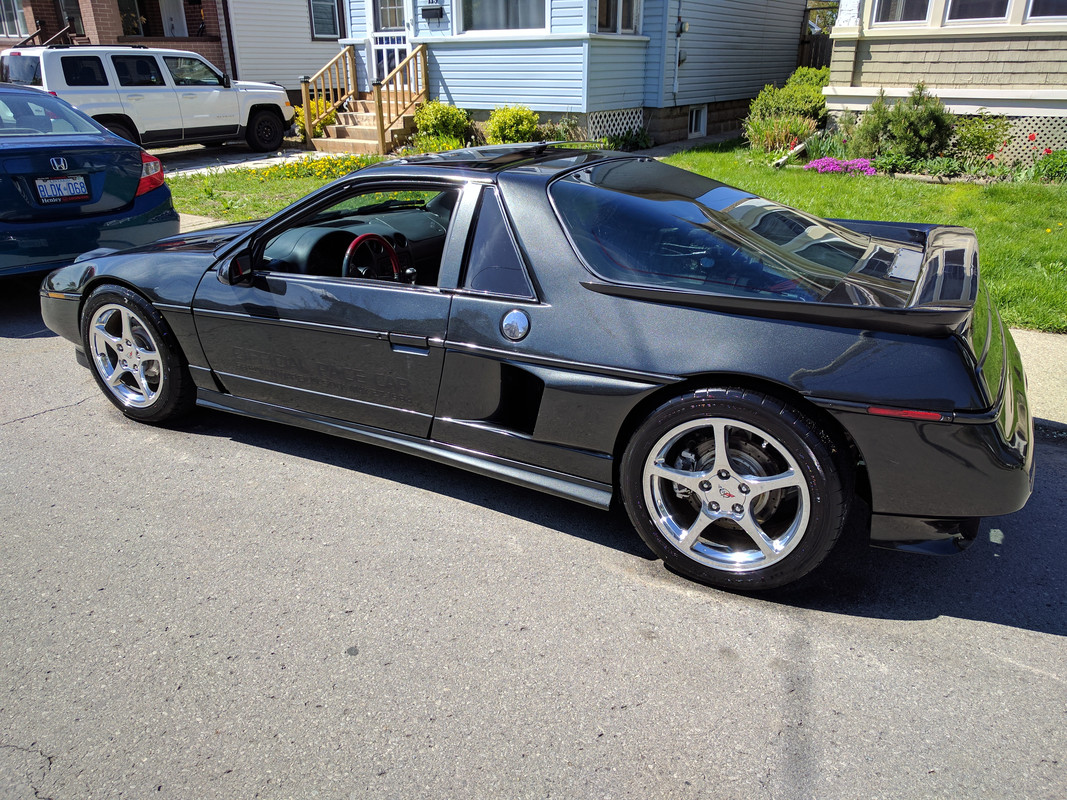
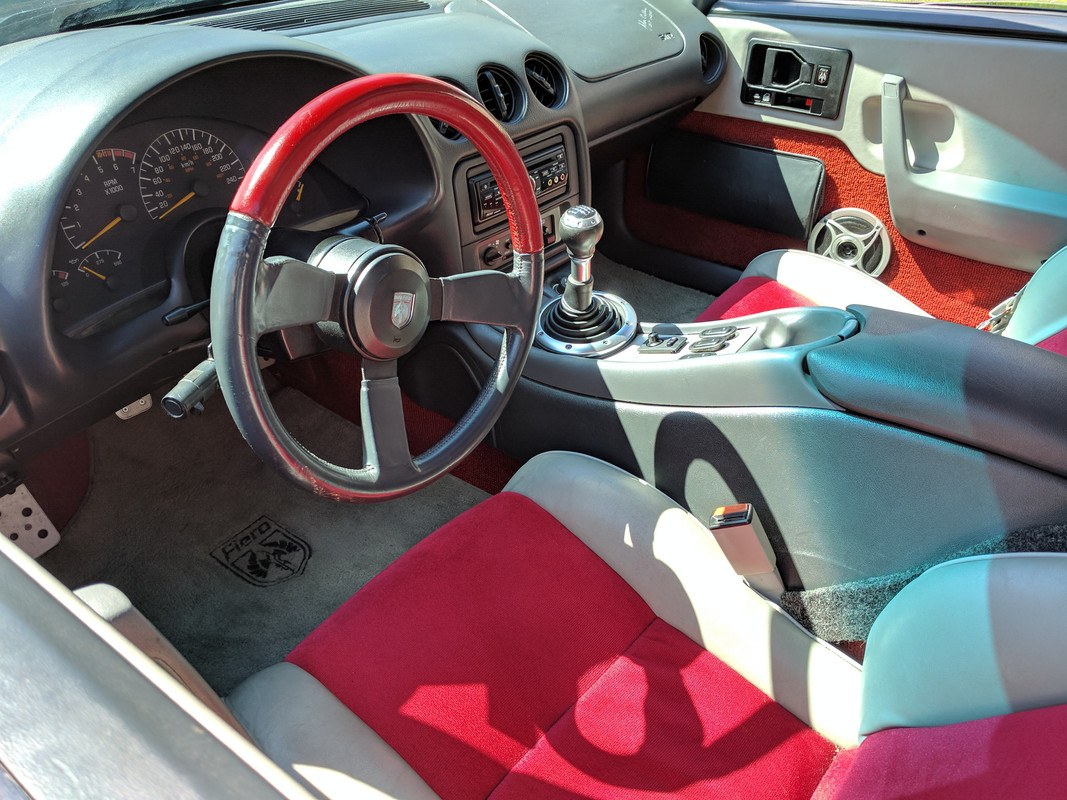
So that means since the Aston isn't ready for the road yet, I'm driving my Mid Engine "Exotic" Hot Rod this week.
It' a highly modified Fiero to represent what a mid engine Corvette could be like - years prior to the launch of the C8.
Here's a link and a few pics:
http://www.fiero.nl/forum/Forum3/HTML/000007-78.html


So it's not all bad news, plus now I have cash to pay my Visa bill for Vantage parts
Okay, now with the side story out of the way, here's the Vantage update:

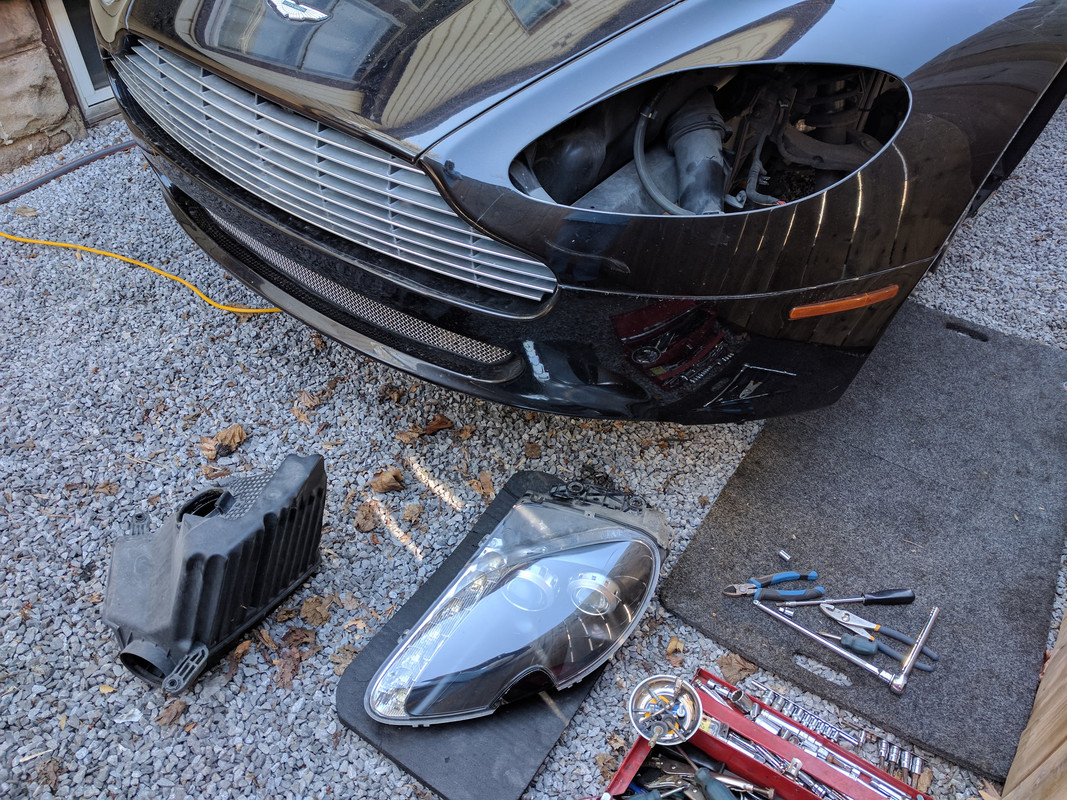
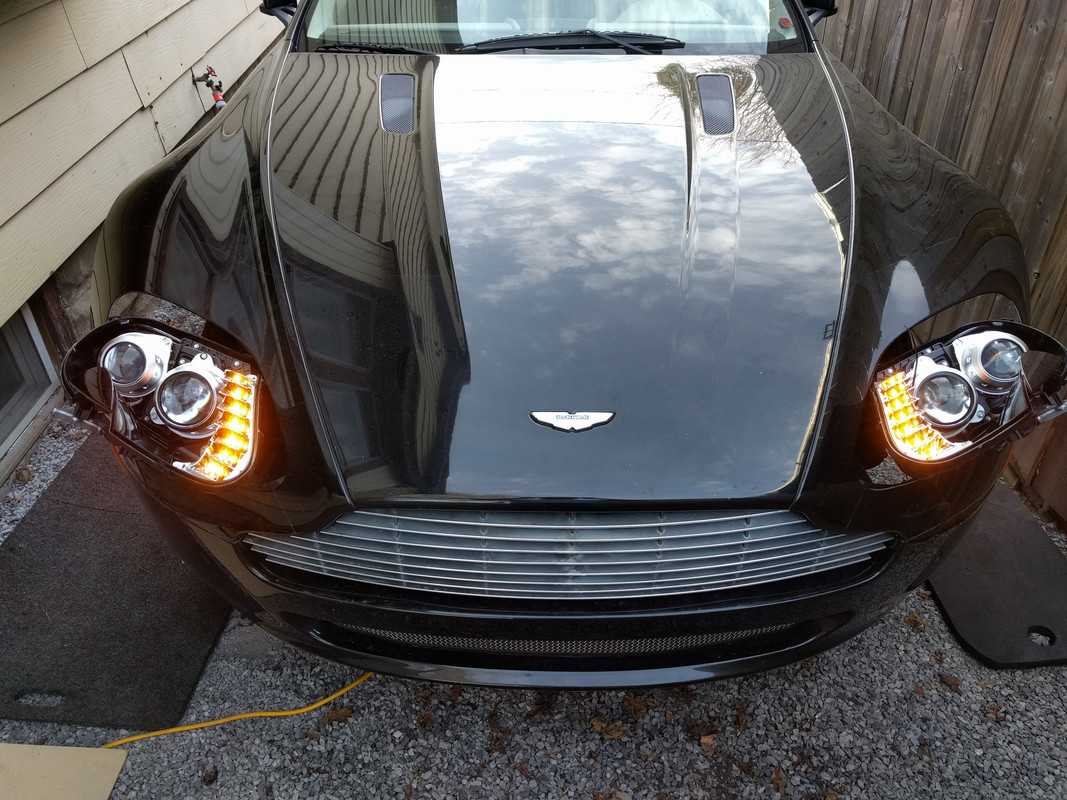
Vantage now pointing nose first in driveway (so I can work in relative peace without every sidewalk passerby consuming my time). It's on 4 jack stands, but no need to show that process on this forum as I'm sure it's been covered.
Now I have easy access to work on car from underneath plus a side benefit of it being a theft deterrent, lol.
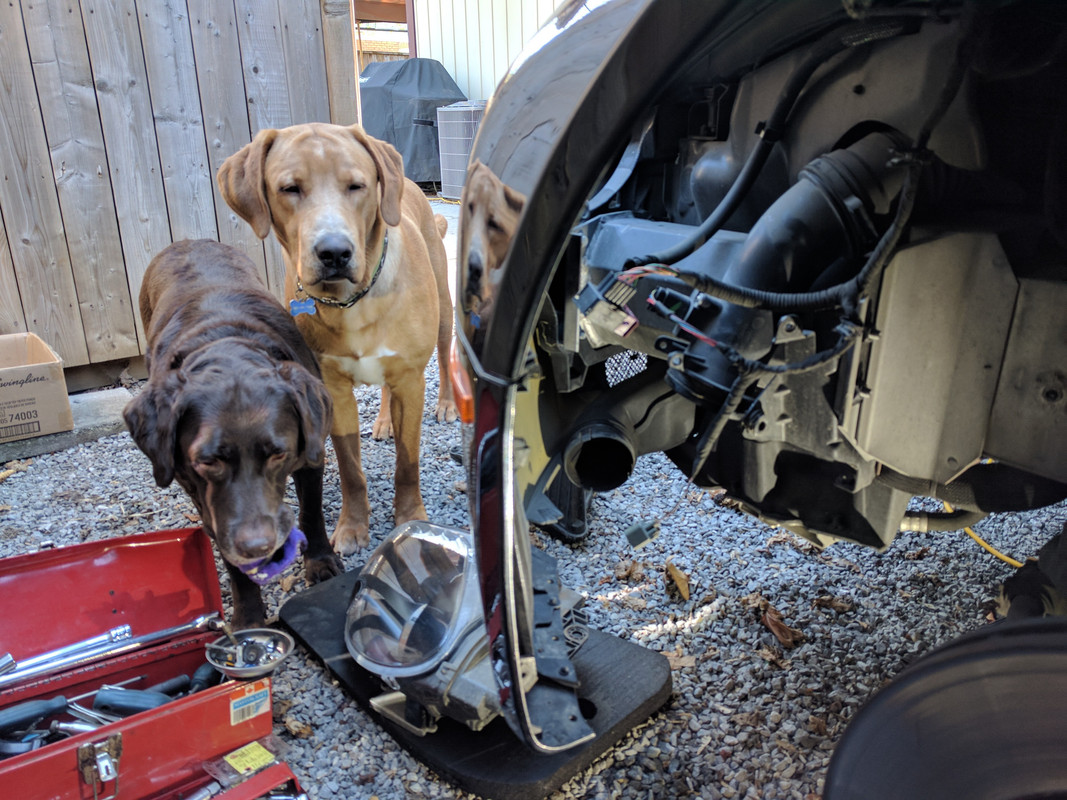
Next I removed front wheel wells liners (pretty much like other cars just bigger and nicer quality). Then the Air boxes as whole, so I could remove the front headlight assemblies which are only held in by 1 front and 2 rear screws. Just unplug the electrical connector and quick disconnect the washer hose:


You don't need an assistant but I did have two spectators


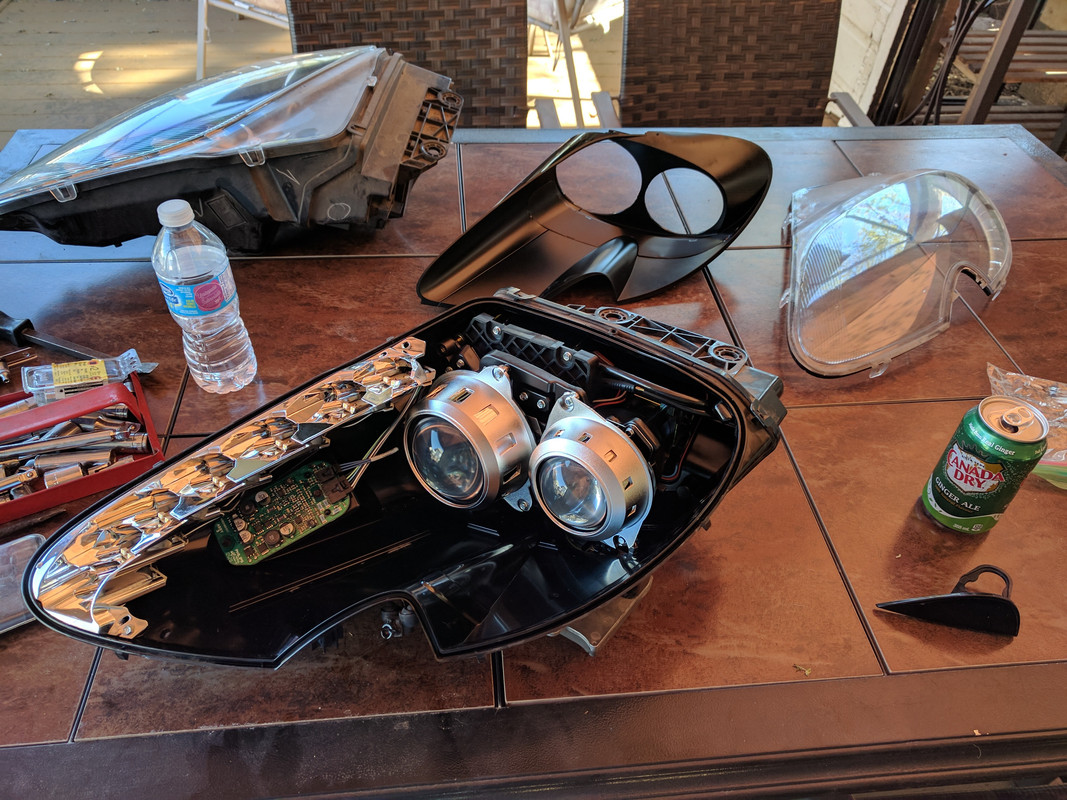
Next up will be disassembly of the light clusters to find out why flashers are not working...
 

Last edited by 007V8Vantage; 03-29-2021 at 09:16 PM. Reason: remove broken link
  #21  
Old 04-24-2017, 04:26 AM
handyman2009's Avatar
Registered User
Join Date: Oct 2015
Location: Ottawa, Ontario, Canada
Age: 59
Posts: 1,471
Rep Power: 90
handyman2009 has a reputation beyond reputehandyman2009 has a reputation beyond reputehandyman2009 has a reputation beyond reputehandyman2009 has a reputation beyond reputehandyman2009 has a reputation beyond reputehandyman2009 has a reputation beyond reputehandyman2009 has a reputation beyond reputehandyman2009 has a reputation beyond reputehandyman2009 has a reputation beyond reputehandyman2009 has a reputation beyond reputehandyman2009 has a reputation beyond repute
Sounds good Ryan, I will send you a couple picture of it to show its quality and check how much shipping is to Niagara Falls.
 
  #22  
Old 04-24-2017, 10:59 PM
007V8Vantage's Avatar
Registered User
Thread Starter
Join Date: Apr 2017
Location: Niagara Region
Age: 52
Posts: 400
Rep Power: 28
007V8Vantage is a glorious beacon of light007V8Vantage is a glorious beacon of light007V8Vantage is a glorious beacon of light007V8Vantage is a glorious beacon of light007V8Vantage is a glorious beacon of light
Talking Headlight assembly DIY

As Homer Simpson would say "WOO-HOO!"


Quote from garage (before tax):
2.00 Front Headlight Assemblies (left & right) @ 3,835.95 = $7,671.90
8.00 Re/Re Front Left & Front Right Headlight Assembly (flashers) $880.00

Fixing them yourself for $0...priceless* (your results may vary)
 

Last edited by 007V8Vantage; 03-29-2021 at 09:52 PM.
  #23  
Old 04-25-2017, 04:27 AM
handyman2009's Avatar
Registered User
Join Date: Oct 2015
Location: Ottawa, Ontario, Canada
Age: 59
Posts: 1,471
Rep Power: 90
handyman2009 has a reputation beyond reputehandyman2009 has a reputation beyond reputehandyman2009 has a reputation beyond reputehandyman2009 has a reputation beyond reputehandyman2009 has a reputation beyond reputehandyman2009 has a reputation beyond reputehandyman2009 has a reputation beyond reputehandyman2009 has a reputation beyond reputehandyman2009 has a reputation beyond reputehandyman2009 has a reputation beyond reputehandyman2009 has a reputation beyond repute
Great work, haven't had time to snap a picture of the part or go to the post office to see shipping cost but I will try tonight
 
  #24  
Old 04-25-2017, 07:10 AM
007V8Vantage's Avatar
Registered User
Thread Starter
Join Date: Apr 2017
Location: Niagara Region
Age: 52
Posts: 400
Rep Power: 28
007V8Vantage is a glorious beacon of light007V8Vantage is a glorious beacon of light007V8Vantage is a glorious beacon of light007V8Vantage is a glorious beacon of light007V8Vantage is a glorious beacon of light
Originally Posted by handyman2009
Great work, haven't had time to snap a picture of the part or go to the post office to see shipping cost but I will try tonight
OK thanks, much appreciated. If the shipping is reasonable, I'll send you a PayPal or e-transfer etc.
 
  #25  
Old 04-25-2017, 08:29 AM
007V8Vantage's Avatar
Registered User
Thread Starter
Join Date: Apr 2017
Location: Niagara Region
Age: 52
Posts: 400
Rep Power: 28
007V8Vantage is a glorious beacon of light007V8Vantage is a glorious beacon of light007V8Vantage is a glorious beacon of light007V8Vantage is a glorious beacon of light007V8Vantage is a glorious beacon of light
Post Pictures of Headlight cluster disassembly

CAUTION - this is not telling you how to fix your lights, I am a proponent of "do whatever you want to your own car - it's your right". I am however sharing how I fixed my own and will make suggestions or provide tips from my experience. I had my fingers crossed and the pressure was on when I saw the housings were stamped MADE IN CANADA. I'm lucky to have been successful - SO FAR.

WARNING - Side effects may include broken parts or loss of temper

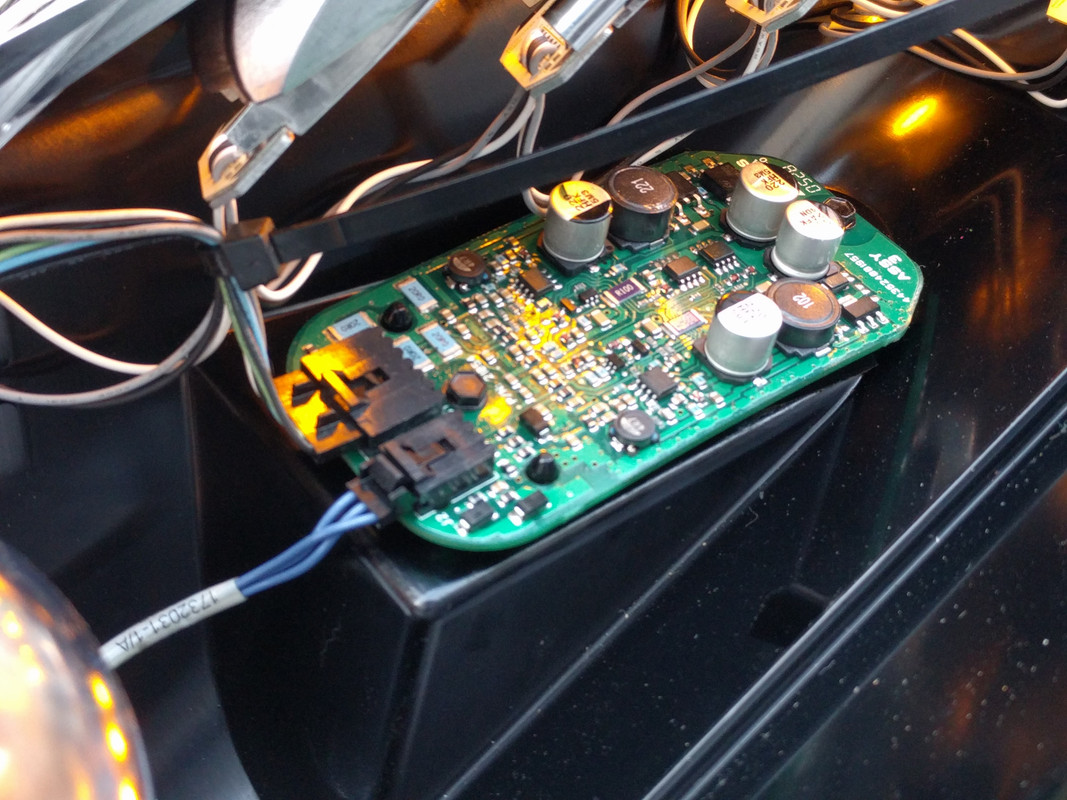
LED's are designed to last a long time so when they don't work, it's often the connections or the board causing the issue as they get exposed to vibration and/or moisture. Good news was mine was dry inside with no signs of water or previous water damage. So if they did condensate, the heat from the headlights kept things dry. Unfortunately with only a reverse bulb giving heat in the taillights, less chance for those to stay dry. Good news is that the headlight lens are relatively easy to remove and disassemble (i.e. good DIY project) as it uses a dry gasket instead of permaseal like the taillights.

1. Remove the headlight washer nozzle by hand or prop it fully extended away from the lens using shims (wire butt connectors are a perfect length).
2. Carefully pry the six clips open and the lens pulls off by hand.
3, Remove screw from bottom front and one at top of LED section.
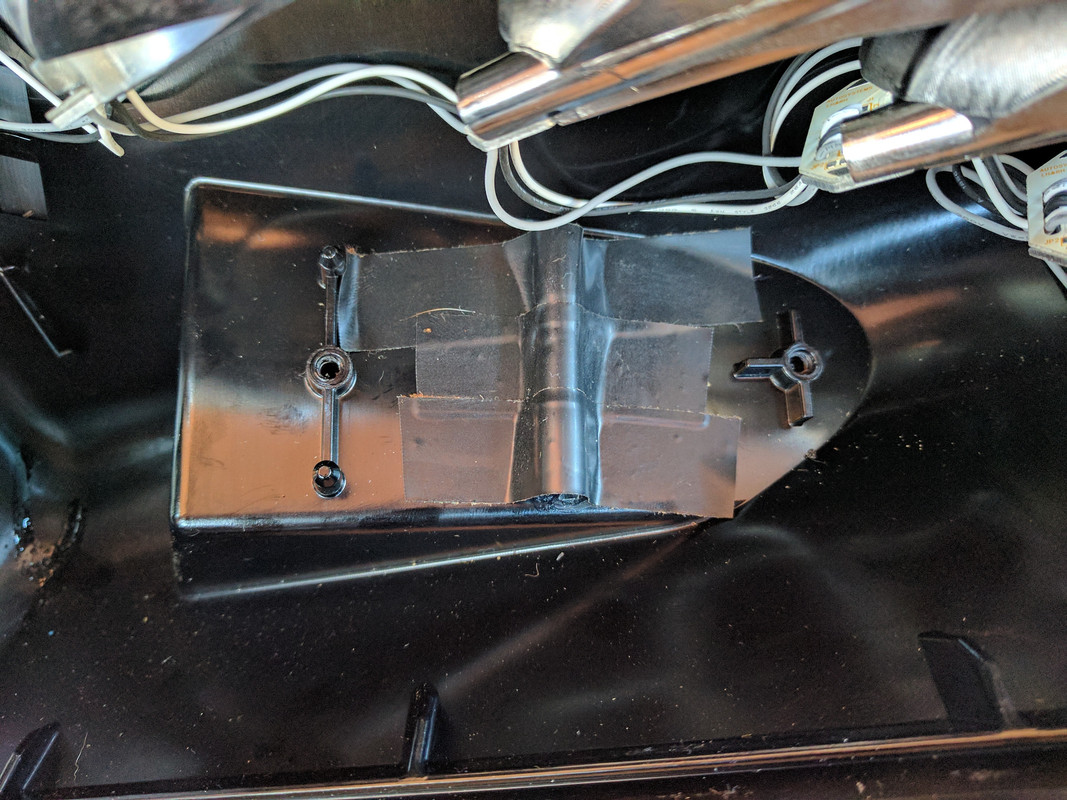
4. Remove black plastic headlight bucket to expose the wiring and board.
5. Board is removed with 2 screws and 2 connectors.


Take your time and you won't break stuff - I was working at a table under the gazebo on my backyard deck. Having some chill music on and a beverage is highly recommended

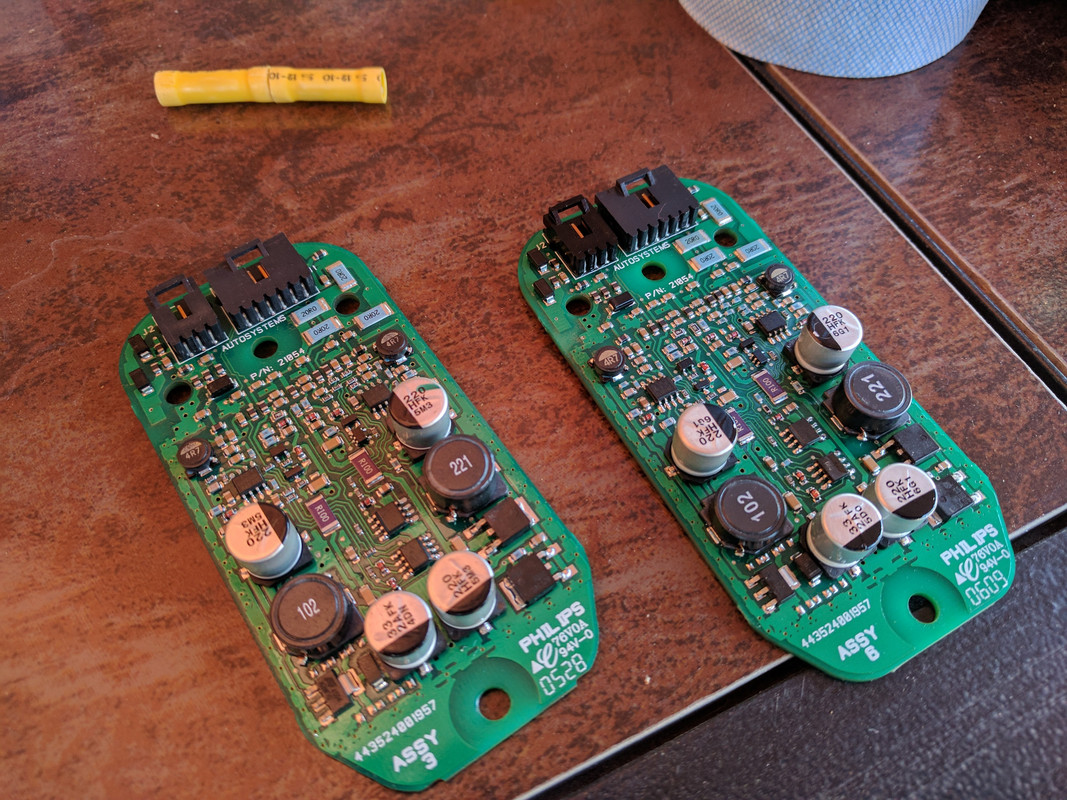
Next I suggest inspecting the board for anything that visually or feels loose or burnt (mine looked and felt fine). If you find problems re-solder, replace component or board (don't ask me where to buy a new board, but it you know please share as it would then be plug and play).
Clean the plug connector contacts especially if you have an intermittent issue. Then go back to the car and plug them in so you can do some testing.

Mine still didn't work with the boards loose. I tried swapping them out on both side of the car - nothing. With the hazard switch left on, I grabbed the board with my hand and blinkers came to life. After several trials, I noticed if either board was secure or slightly bent in either direction, they would flash successfully 100's of times consistently and repeatedly work on dozens of on/off attempts. I am keeping in mind this is on a stationary vehicle, but if I could remount the boards securely with tension, the risk of vibration or movement causing something to loosen with be minimized.

I found a few yellow size barrel style butt connectors, wrapped them in electrical tape and taped them halfway between the board screws where it will act as a fulcrum:


I carefully reinstall the board screws and worked from side to side tightening them in stages - do not over torque or you will crack the board. The plug that is related to the flashers is the large one, so as insurance, I use a Ty-Rap (that's a brand aka zip tie) to secure the wire and plug from being able to move or loosen. It actually puts slight tension on the contacts.
Success!

Cheers, Ryan
 

Last edited by 007V8Vantage; 03-29-2021 at 09:40 PM. Reason: grammar
  #26  
Old 04-25-2017, 09:01 AM
Redpants's Avatar
Banned
Join Date: Oct 2016
Location: Tampa, FL
Age: 40
Posts: 4,995
Rep Power: 356
Redpants Is a GOD !Redpants Is a GOD !Redpants Is a GOD !Redpants Is a GOD !Redpants Is a GOD !Redpants Is a GOD !Redpants Is a GOD !Redpants Is a GOD !Redpants Is a GOD !Redpants Is a GOD !Redpants Is a GOD !
That's too cool. Really enjoying seeing all this!
 
  #27  
Old 04-25-2017, 03:26 PM
007V8Vantage's Avatar
Registered User
Thread Starter
Join Date: Apr 2017
Location: Niagara Region
Age: 52
Posts: 400
Rep Power: 28
007V8Vantage is a glorious beacon of light007V8Vantage is a glorious beacon of light007V8Vantage is a glorious beacon of light007V8Vantage is a glorious beacon of light007V8Vantage is a glorious beacon of light
Lightbulb Airbox video

Originally Posted by Redpants
That's too cool. Really enjoying seeing all this!
Thanks Rich, much appreciated!
 

Last edited by 007V8Vantage; 04-25-2017 at 08:43 PM. Reason: double post
  #28  
Old 04-25-2017, 05:12 PM
handyman2009's Avatar
Registered User
Join Date: Oct 2015
Location: Ottawa, Ontario, Canada
Age: 59
Posts: 1,471
Rep Power: 90
handyman2009 has a reputation beyond reputehandyman2009 has a reputation beyond reputehandyman2009 has a reputation beyond reputehandyman2009 has a reputation beyond reputehandyman2009 has a reputation beyond reputehandyman2009 has a reputation beyond reputehandyman2009 has a reputation beyond reputehandyman2009 has a reputation beyond reputehandyman2009 has a reputation beyond reputehandyman2009 has a reputation beyond reputehandyman2009 has a reputation beyond repute
Here Ryan a few pictures of my old front valence, it has a few scratches but in one piece... I did a quick check with Canada Post and for a large 60x12x1 inches it would be around $30 cdn to Niagara Falls.


  #29  
Old 04-25-2017, 08:10 PM
007V8Vantage's Avatar
Registered User
Thread Starter
Join Date: Apr 2017
Location: Niagara Region
Age: 52
Posts: 400
Rep Power: 28
007V8Vantage is a glorious beacon of light007V8Vantage is a glorious beacon of light007V8Vantage is a glorious beacon of light007V8Vantage is a glorious beacon of light007V8Vantage is a glorious beacon of light
handyman2009;4629986]Here Ryan a few pictures of my old front valence, it has a few scratches but in one piece... I did a quick check with Canada Post and for a large 60x12x1 inches it would be around $30 cdn to Niagara Falls.
Sold.
Sent you a message.
Thanks, Ryan
 

Last edited by 007V8Vantage; 04-25-2017 at 08:47 PM.
  #30  
Old 04-25-2017, 09:07 PM
007V8Vantage's Avatar
Registered User
Thread Starter
Join Date: Apr 2017
Location: Niagara Region
Age: 52
Posts: 400
Rep Power: 28
007V8Vantage is a glorious beacon of light007V8Vantage is a glorious beacon of light007V8Vantage is a glorious beacon of light007V8Vantage is a glorious beacon of light007V8Vantage is a glorious beacon of light
Continued progress on headlight assemblies...Part 2

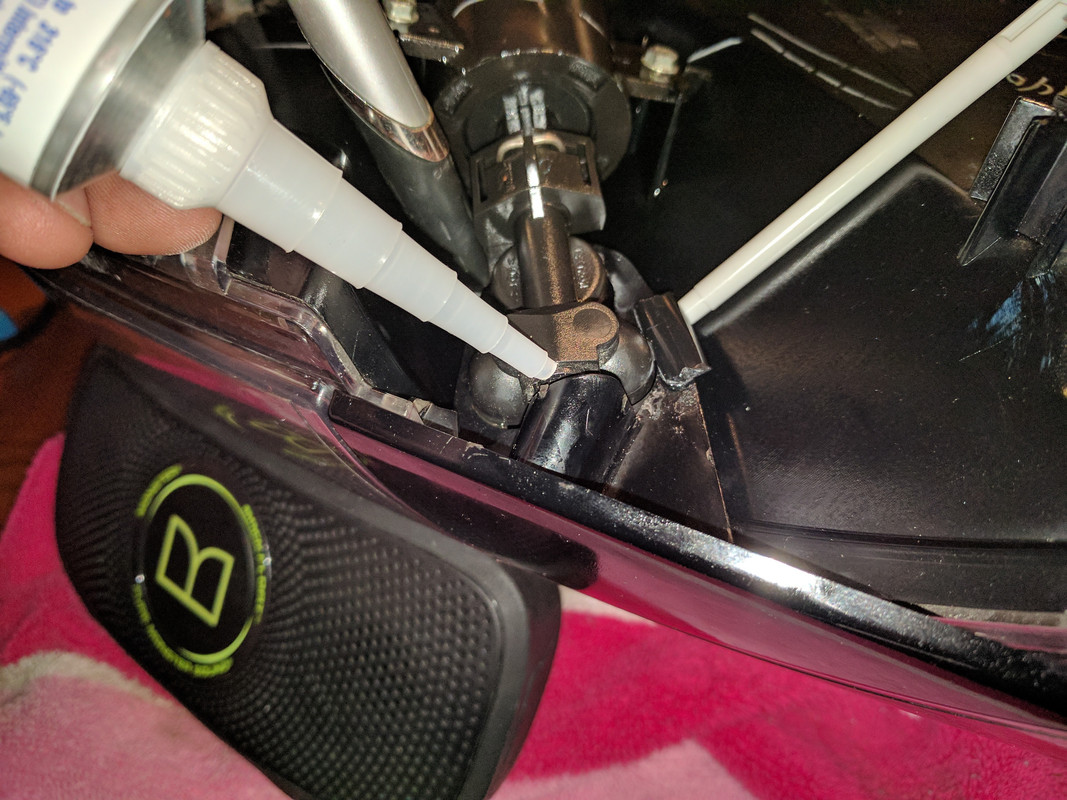
With lights working next was to fix headlight washers.
Passenger side was easy as all it needed was some lubricant to get it moving again since the car had likely been sitting around for quite a while. I used Seafoam gel spray on the actuator arm and now it moves freely.

The issue on the drivers side was broken plastic. I was able to crazy glue it back together with a plastic splint for strength and added some RTV around the nozzle just because there was some on the other side.

Here are the pictures:


Washer pumps both working perfectly after testing them on the car
 

Last edited by 007V8Vantage; 03-29-2021 at 09:59 PM.


You have already rated this thread Rating: Thread Rating: 4 votes, 5.00 average.

Quick Reply: Greetings from Niagara, Ontario, Canada


All times are GMT -6. The time now is 07:20 PM.