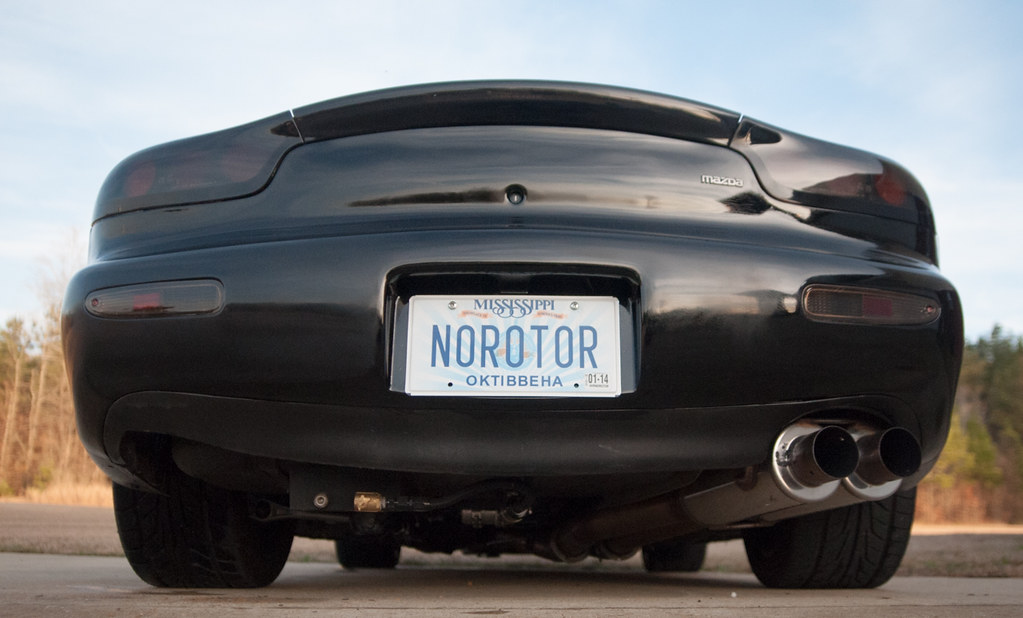
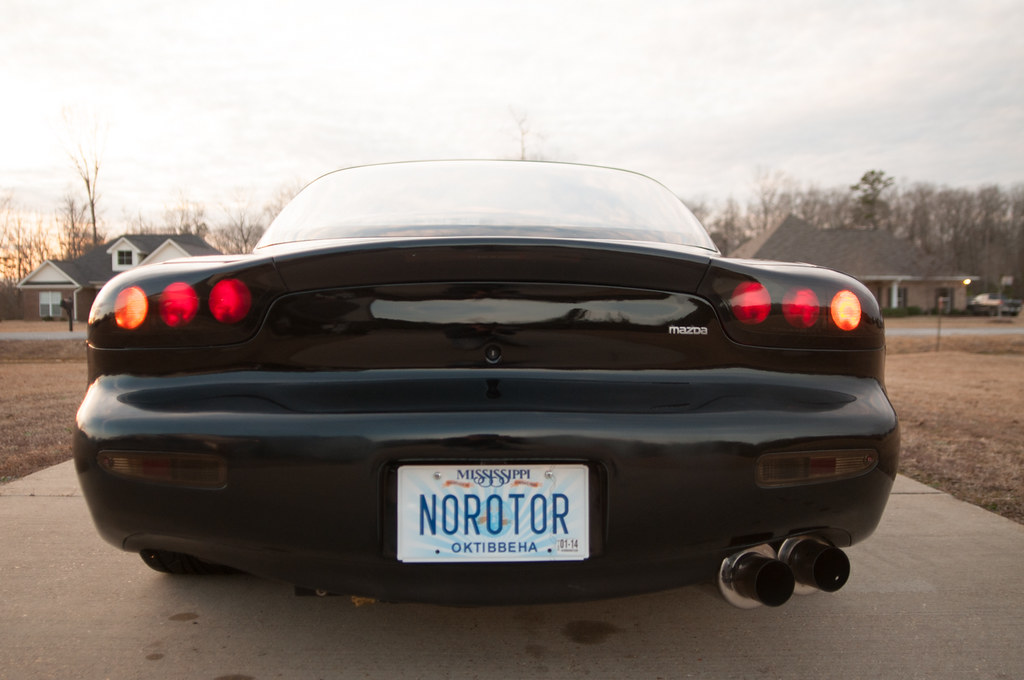
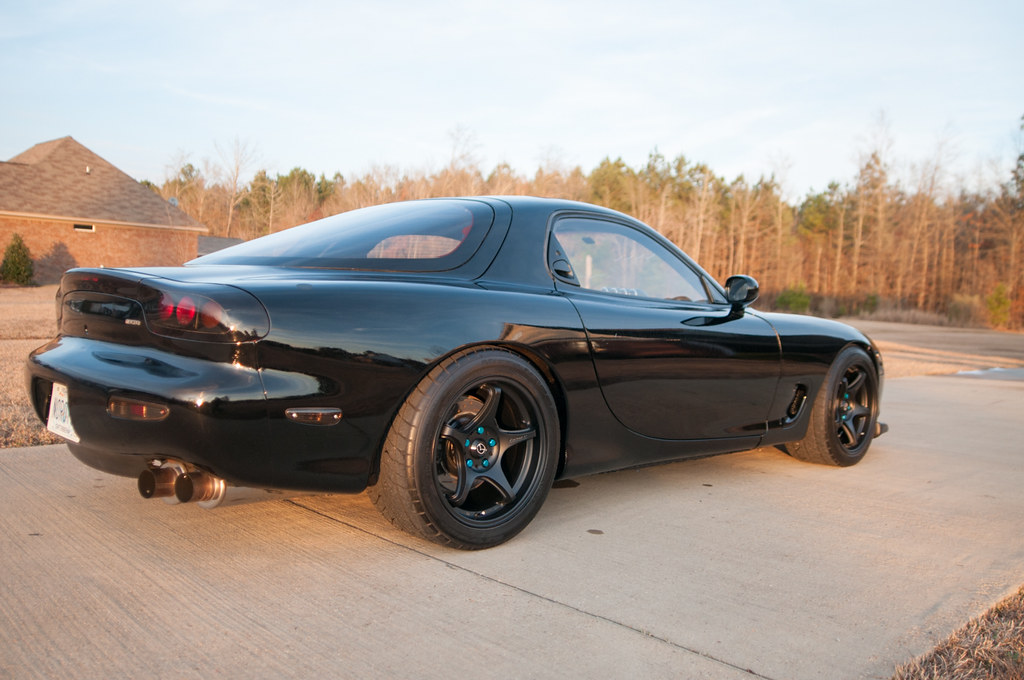
For Sale - Mississippi RX7 - 383CI Forged LS1 Stroker - $35k
#1
 01-09-2014, 08:57 AM


Join Date: Sep 2013
Location: Starkville, MS
Posts: 53
Rep Power: 13 
Year: 1993
Make: Mazda
Model: RX-7
Price: $35000
Mileage: 81804
Color: Black
Private or Dealer Listing: Private Listing
Location (State): MS
Transmission: Manual
Drivetrain: Rear Wheel Drive
I’ll try and keep this brief as I tend to ramble.
This car is the culmination of 5 years of work and >1000 of my personal hours in labor and research, and $42k+ in parts invested. It’s something I always took my time with and never traded sub-par work or parts in exchange for a quicker turn-around. I built this car to be a 500whp daily driver that could take serious abuse day in and day out and still get 29mpg on the highway. I built this car to be my forever toy haha. I won’t make wild and irresponsible claims saying this is the fastest and best LS swapped FD out there, but I will say it is an extremely well sorted swap that exhibits seamless integration at factory levels. The type of documentation that goes along with this car is second to none. While project cars usually come with a lot of unknowns, my car will come with my build thread, 1000’s of pictures, a full bound wiring diagram that has been completely re-written for this car, and receipts that document every nut and bolt used to build this monster. You can relax with the fact that every square inch of this car is documented and there won’t be ANY guess work on your part trying to figure out what the previous owner might have done to the car.
While pictures can be seen in my flickr gallery, for a full review of my car, please sees my build thread here:
http://www.norotors.com/index.php?topic=70.0
So, onto the main event:
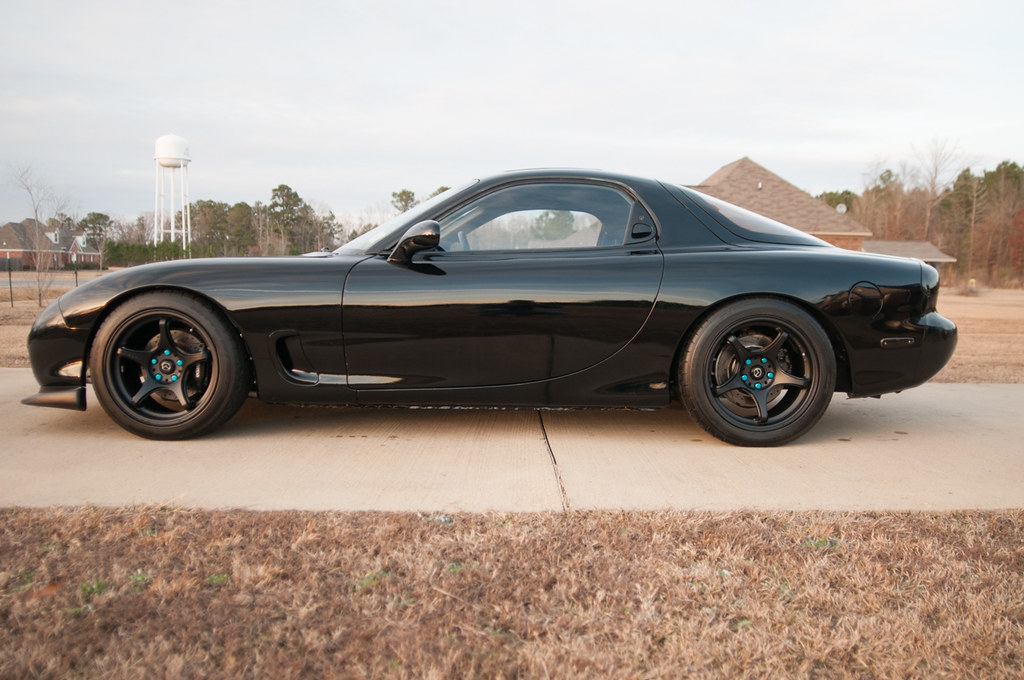
Chassis: This 1993 Touring Mazda RX7 started its life with me as an originally manual Montego Blue 80k mile roller here in Mississippi. It has a clear title and has never been wrecked. It was an excellent starting point for this build. Before swapping the engine, I stripped the car down to the bare chassis and prepped it using spray on Lizard skin sound control and ceramic insulation in the interior and sprayed POR15 + a UV protective top coat in the engine bay (black to prepare for the car’s future paint job). While on jackstands I also coated the wheel wells and transmission tunnel with 3M rubberized undercoating. To date I have only added 1,804 miles to the swap (total of 81,804 miles) which is approximately what the new parts on this car have seen mileage wise.
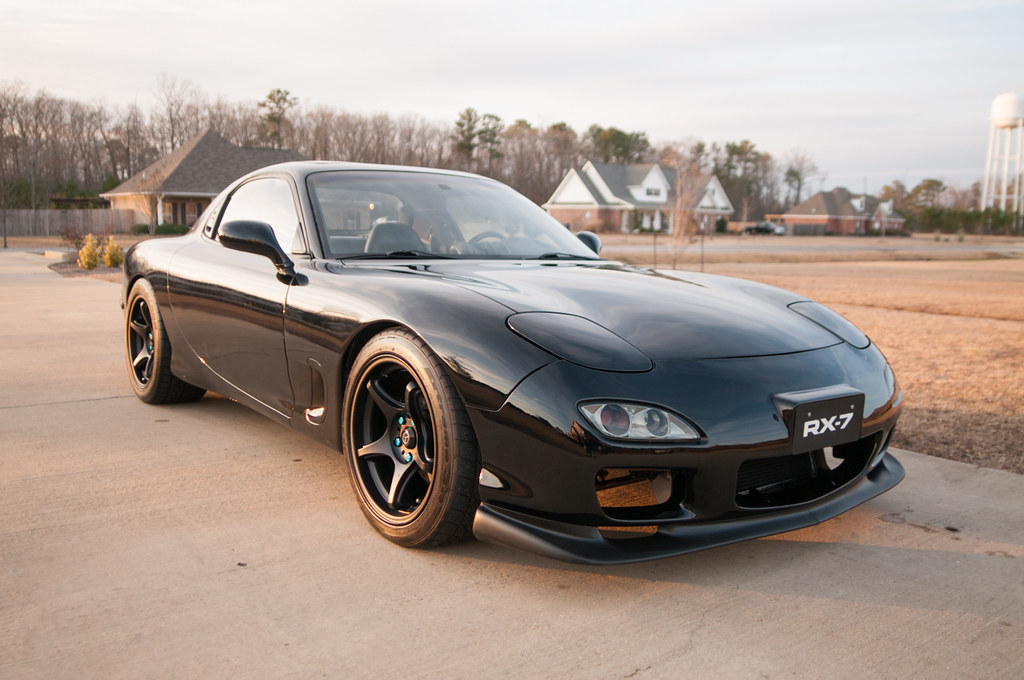
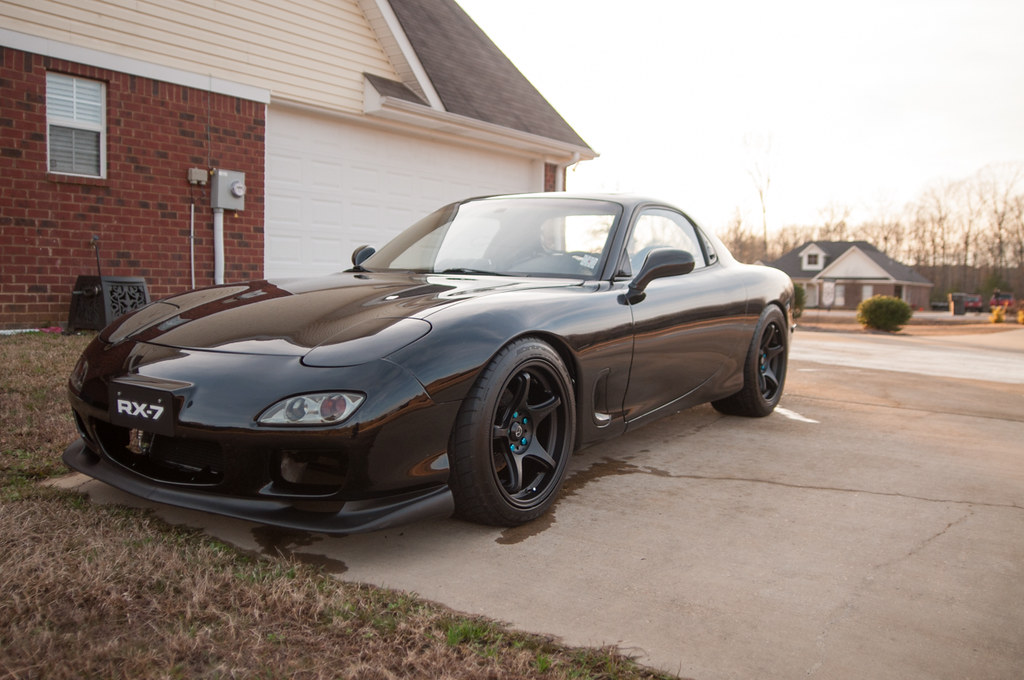
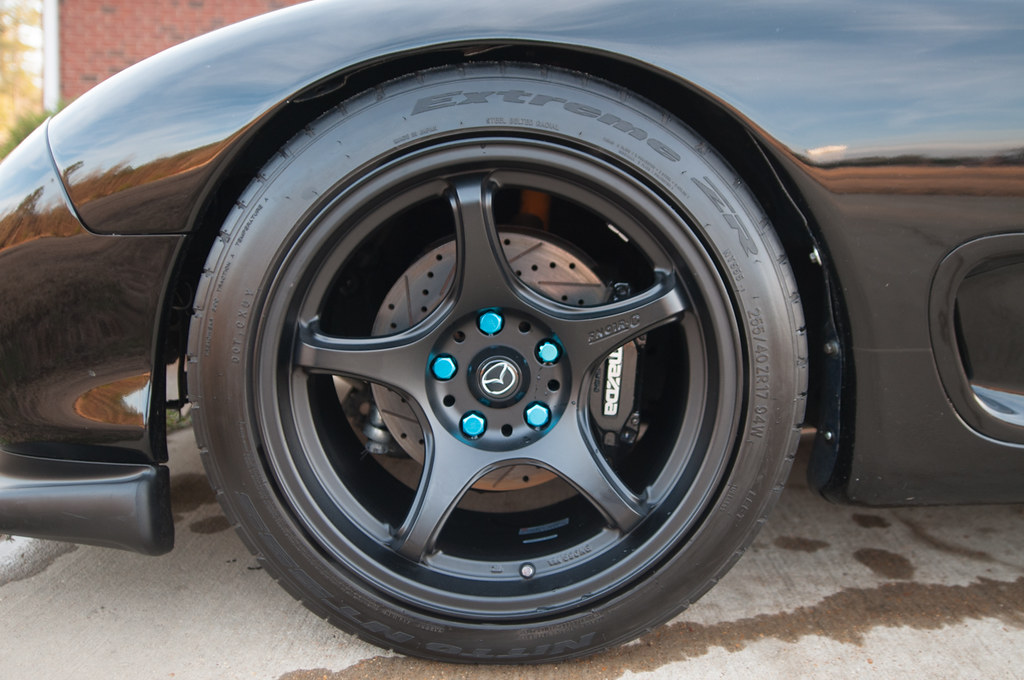
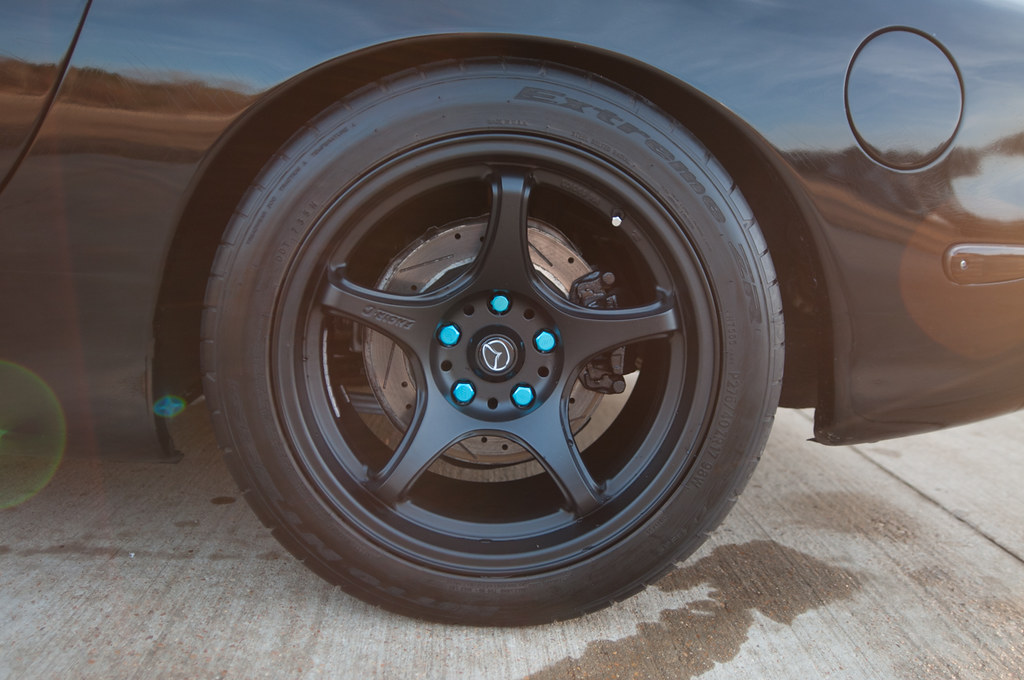
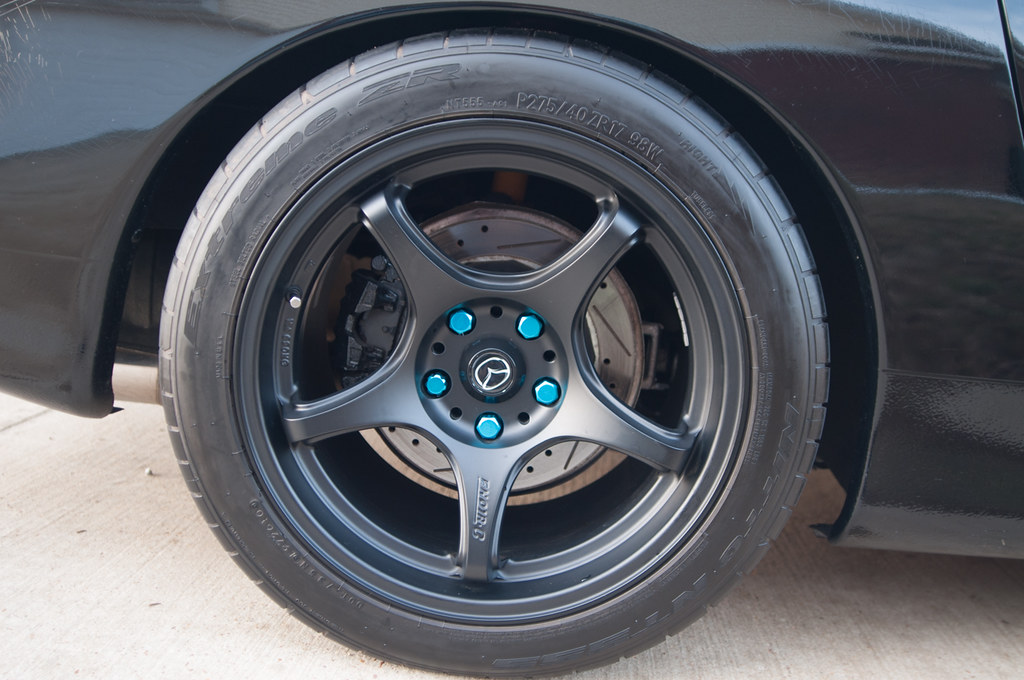
Suspension: As part of this conversion I upgraded the entire suspension setup. The four corners of the car sit on fully adjustable Koni shocks that incorporate KYB shock boots. The shocks are topped with Ground Control coilovers and aluminum perches to give fully adjustable height (currently 25” from the bottom of the tire to the top of the wheel well). I then went through and installed a 28 piece SuperPro bushing kit. Finally, things were topped off with a set of 5-Zigen FN01R-C Matte Black - 17" x 10" -35 wheels wrapped with Nitto NT 555 Tires (Front = 255/40ZR-17, Rear = P275/40ZR-17) and bolted on with Work lug nuts. Both the front and rear fenders were rolled flat (not pulled) with an eastwood fender roller. The current wheels and tires fit and do not rub even at full lock in motion with the current ride height.
(2) MGA5S-26-15X Front Bearing Assembly
(2) LA01-33-042B Axle Stub Nuts
(2) J001-26-151 Rear Wheel Bearings
(10) B455-22-062 Wheel Studs
(2) LA01-33-042B Rear Wheel Nuts
Pillowball Bushing Kit
(2) H260-34-313 - Front shock mount bolt
(2) B001-39-037B - Front shock mount nut
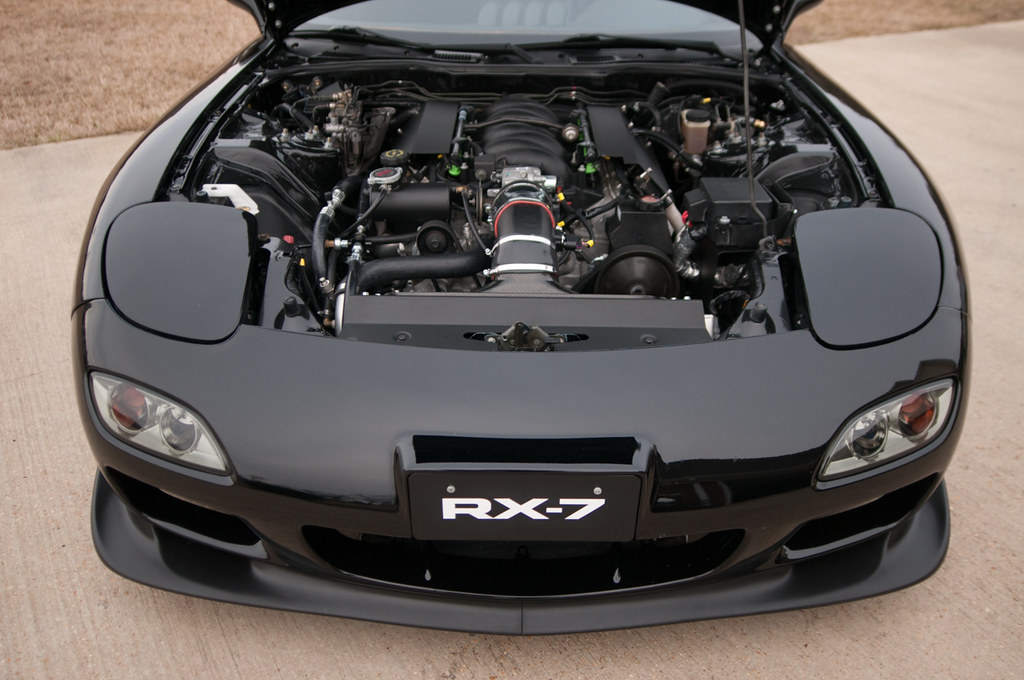
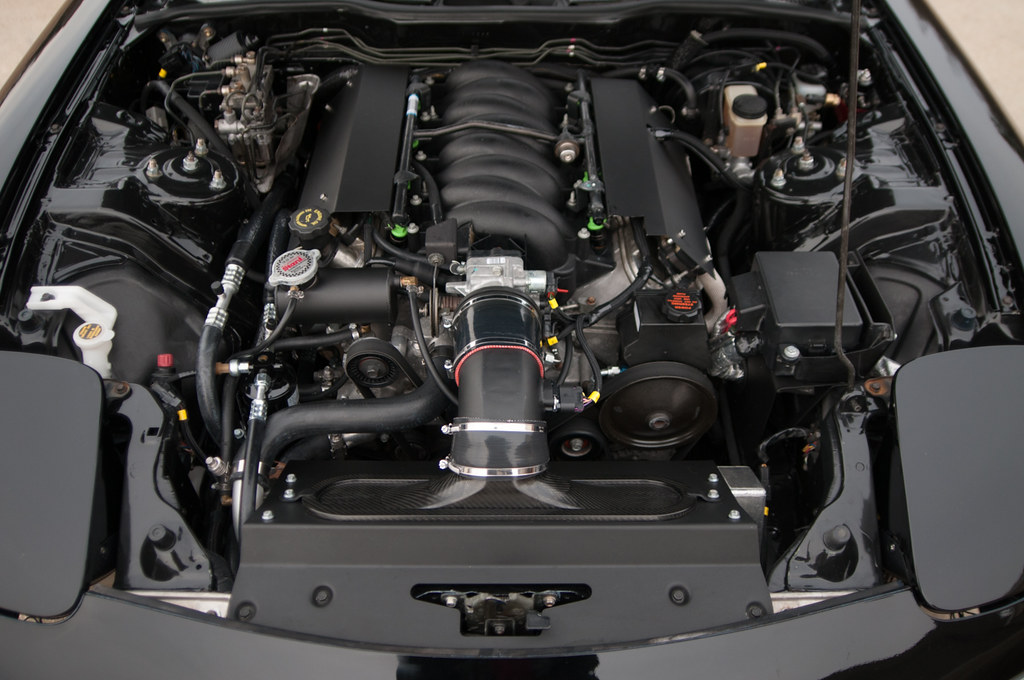
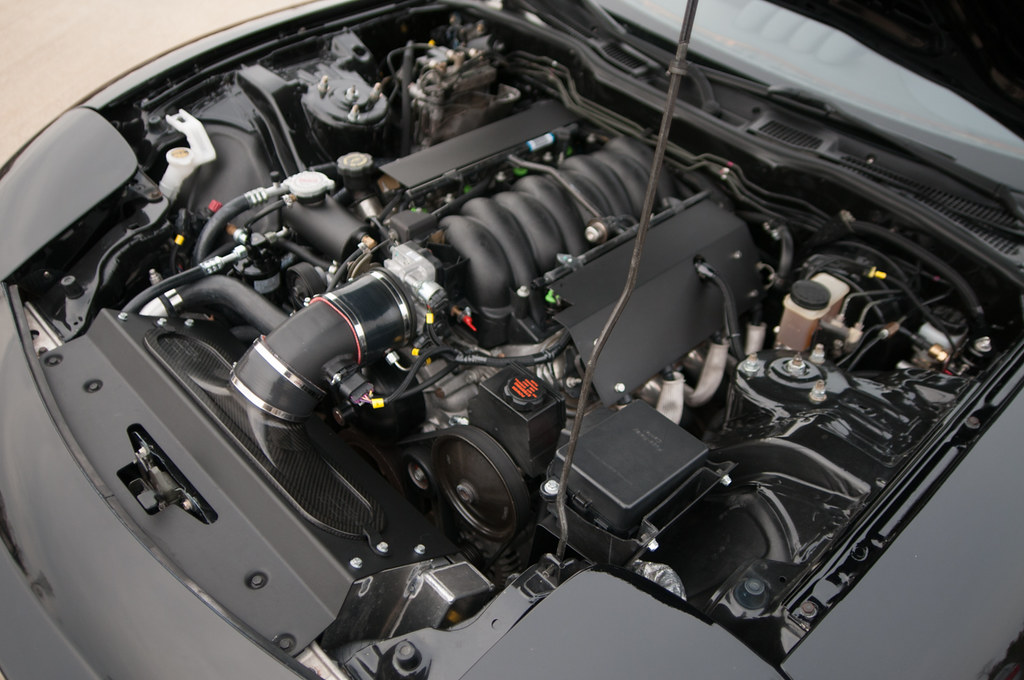
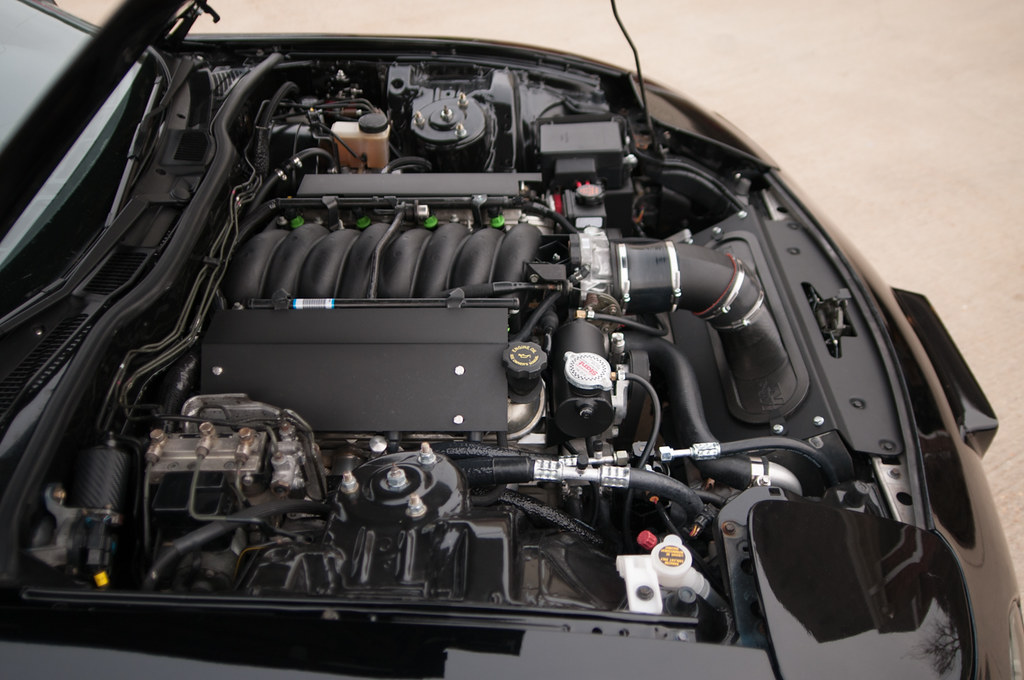
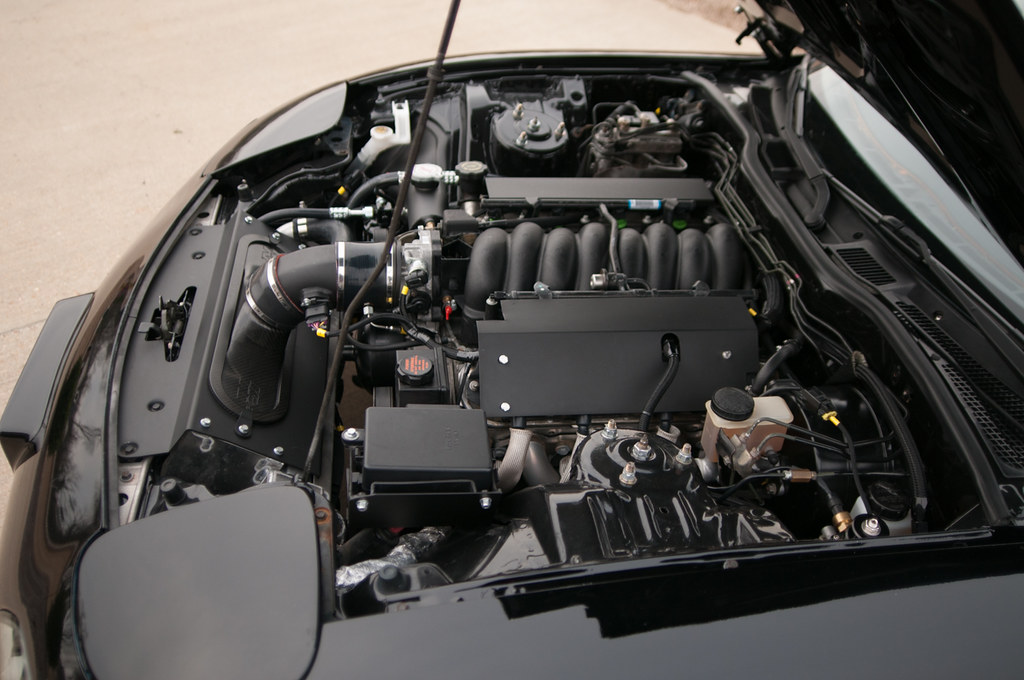
Engine:
The LS1 383CI stroker engine was originally built and purchased by a GM master tech who’s a friend of mine. The specs on the engine at the time of purchase were as follows:
Ls1 aluminum block built for 10.4:1 compression with only 4k miles on it as built.
Complete assembly is balanced
Forged flat top 3.90" Mahle pistons
Forged Eagle rods
Forged Eagle stroker crank with 4" stroke designed to displace 383CI.
Patriot LQ9 heads with 72cc chambers 2.055"/1.60" valves with harland sharp 1.7 roller rockers.
Comp pushrods and lifters.
GM performance oil Pump and chain
Arp rod and main bolts
Trick flow head gaskets
Patriot custom cam .585"/.585" lift, 226/226 duration and 112 lsa
Water pump, Ac Compressor and both tensioners (Brand new 0 miles)
Monster Stage 2.5 Clutch (Brand new 0 miles)
Since then I have added the following:
LS6 Intake + TB
LS6 PCV Conversion
Samberg LS7 MAF Intake Tube
Samberg TB Bracket
MSD Spark Plug Wires + Plugs
Lokar Dipstick
Low Mileage LS1 coil packs
Powdercoated Coil Covers
LS7 ACDelco 213-4222 MAF
Power Steering Pump
Brake Booster Check Valve
Pez Power Steering Line
New Duralast Starter
New rear cover seal and rear main seal installed 100 miles ago.
Transmission:
It started its life as a Dodge Viper T56. To mate it to my LS1 I swapped the bell housing, front plate, and bell housing (specially machined to work with the viper output shaft). Most recently the entire transmission was completely rebuilt by Texas Drivetrain Performance which included:
New Rear, 2nd, and 6th gears
Carbon kevlar synchro rings
Billet 1-2 keys
Billet 3-4 keys
Bronze 1-2-3-4 fork pads
Bronze shifter bushing
Steel 3-4 shift fork
All New Seals
All new bearings
Countershaft Extension
Brand new GM slave cylinder & throwout bearing
Brand new knurled GM pilot bearing
Brand new GM flywheel and pressure plate bolts
All in, it was a $2.1k rebuild that only has ~ 200 miles on it since the rebuild. It shifts like a dream now and is strong enough take anything thrown at it.
To control this beast I installed a new MGW short shifter. Recently I had my machinist at work turn the shifter handle in a lathe to take another 1” of length off of the shifter for an even sportier look and feel. To mate with the rear end I purchased and installed a custom aluminum Drive Shaft Shop driveshaft.
Rear End:
To hold the power of the engine and put it to the ground with a useable gear ratio I chose to use a 04 Mustang Cobra 8.8” differential with a 3.55 gear ratio. The completed setup uses the following parts
04 Cobra Differential with 3.55 gears, stock LSD, and 30k miles
Samberg modified rear cover
Driveshaftshop cobra to RX7 axle bars
04 Cobra CV inners
93 Mazda CV outers
Powertrain Mounts:
The engine and rear end are all bolted in with Samberg subframe mounts. The transmission mount was fabricated by Kevin Doe. The mounts were prepped and sprayed with gloss black POR15 before being installed.
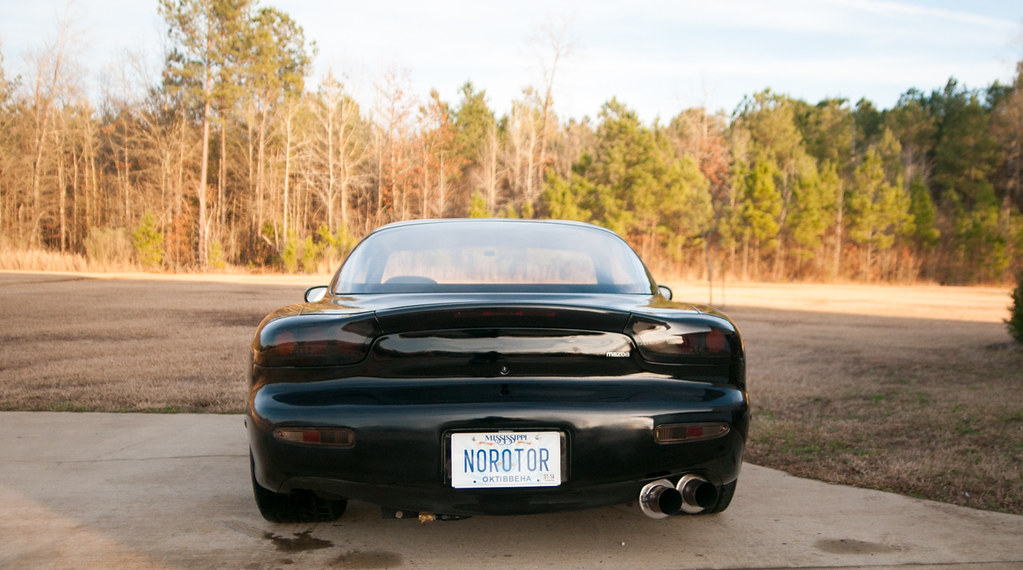
Exhaust:
The exhaust setup is wicked and loud on this car. I’m hoping my videos will give you an idea of what it sounds like. It includes:
1 7/8” JTR Longtube Headers with ceramic coating and vband flanges
True Dual 3” Stainless Steel header back exhaust with X-over and magnaflow mufflers. Built by Kevin Doe. Attaches with 3” v-bands and the headers and has another v-band disconnect halfway back.
Nothing else… It’s pretty much straight through with only sensors as restriction

Cooling / Heat Management:
Special attention was given to heat management and properly cooling the engine and the driver. Some highlights of the system include:
Samberg rev2 Radiator/CAI/Surge Tank (powdercoated black)
Brand new A/C condenser
Spark Plug Heatsleeve Boots
DEI Firesleeves for clutch line, brake line, fuel line, AC Hoses, heater hoses, and trunk release
20psi Stant Radiator cap
Custom Molded Heater Hoses
Custom factory grade A/C complete with R12 refrigerant to get you the one of the coldest blowing LS RX7’s in existence.
Fuel System:
The fuel system has seen 4 revisions since it originally went on my car. The entire system is tied together using Summit racing fuel rated black nylon -8AN and -6AN hose and fittings. Here are the main parts as it stands right now:
Sumped Fuel Tank (Absolutely zero fuel starvation) with -8AN outlet (one unused 1/2NPT port is currently plugged)
-8AN 100um pre-pump Summit Racing fuel filter
Exterior in-line Bosch 044 Fuel Pump
Jay Racing BFP-CV6 Check Valve
-8AN 25um post-pump Summit Racing fuel filter
Aeromotive 13101 FPR
Stock LS1 fuel rail
42lb SVO Injectors
Brakes:
What would an rx7 be without great brakes?
Front brakes rebuilt
Stoptech Stainless Brake Lines
Hawk HPS Brake Pads
Slotted and Drilled Brake Rotors
POR15 Caliper Painted front and rear calipers
(2) FB01-45-914 Brake Line Clip / Bracket
(2) J001-26-139A Retainer C Clips
FD01-45-280C Left Brake Hardline
(2) W023-43-635 - Brake Line Clip
(2) 0116-44-375 Handbrake Line Clips
Mazda Rebuilt Master Cylinder
(2) Front Bleeder Screws
(2) Rear Bleeder Screws
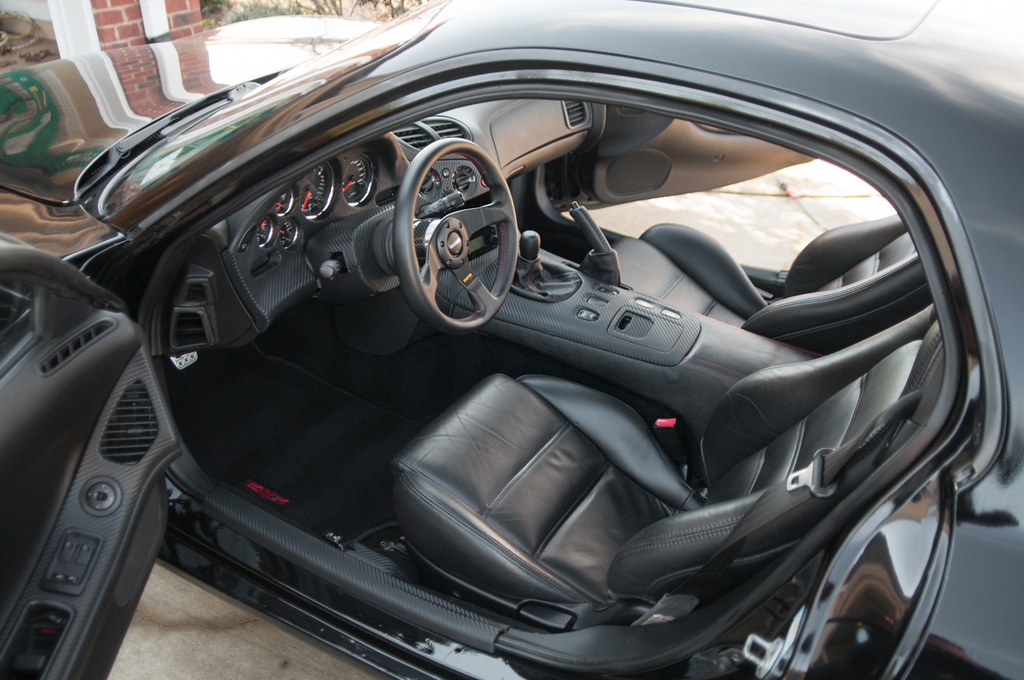
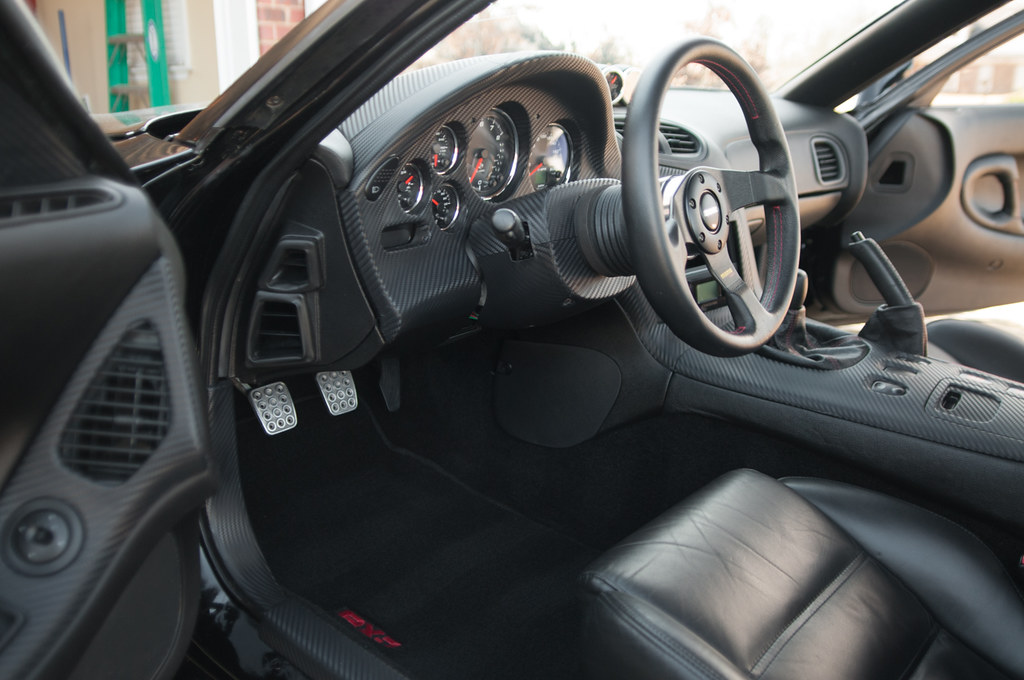
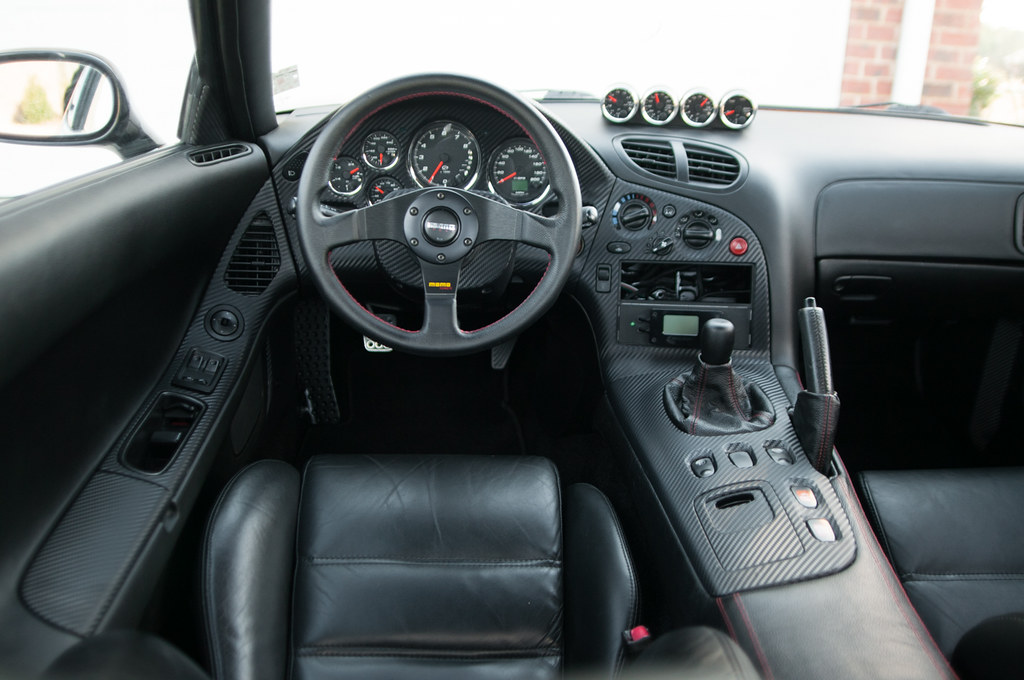
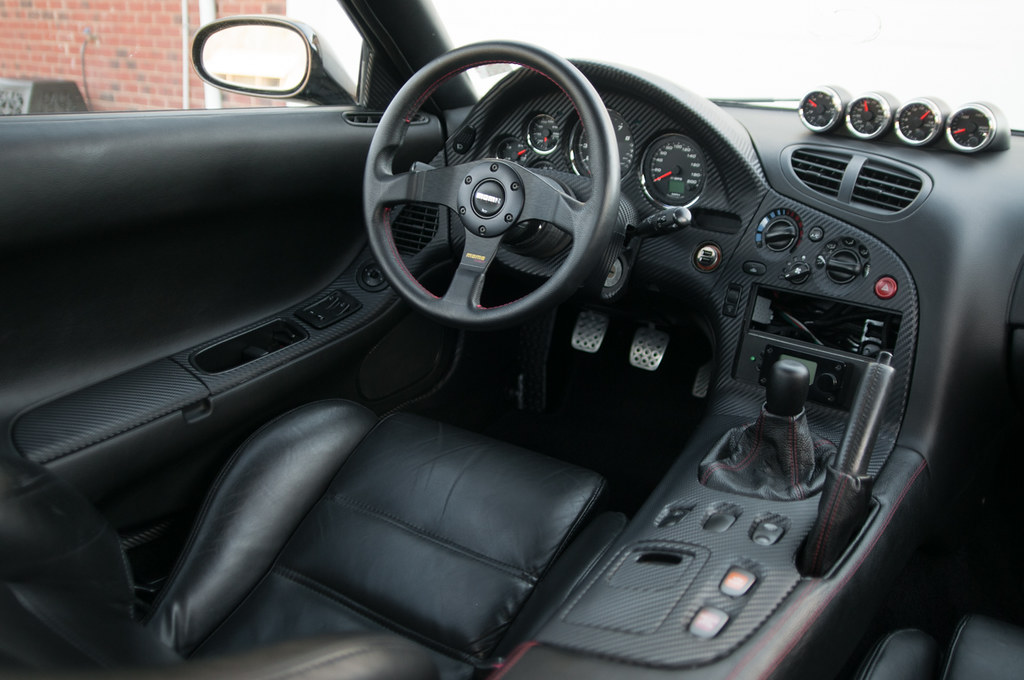
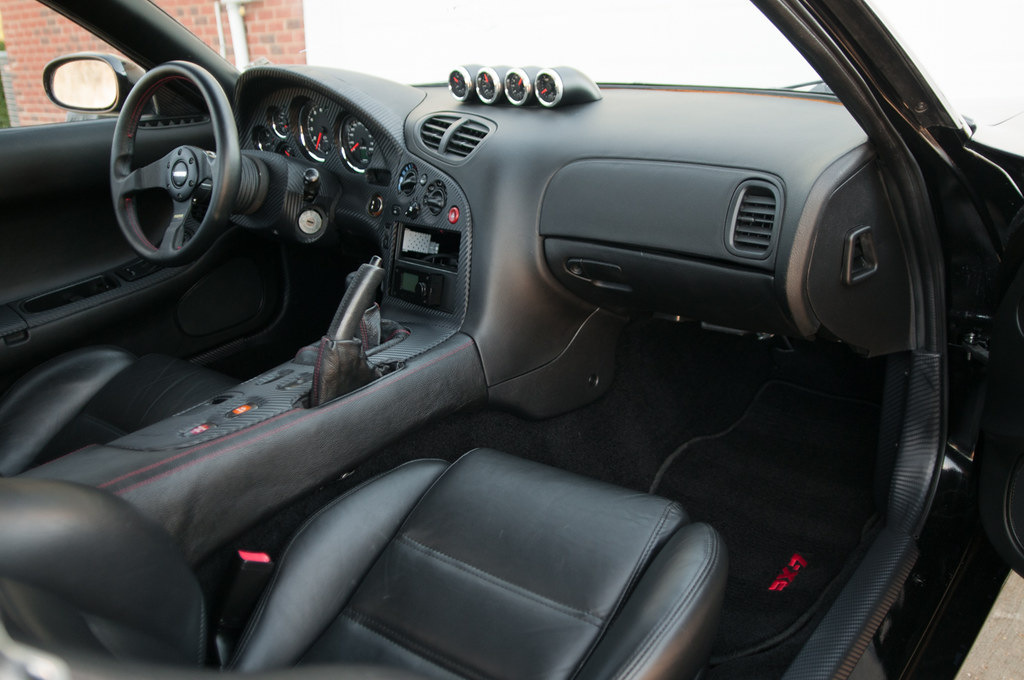
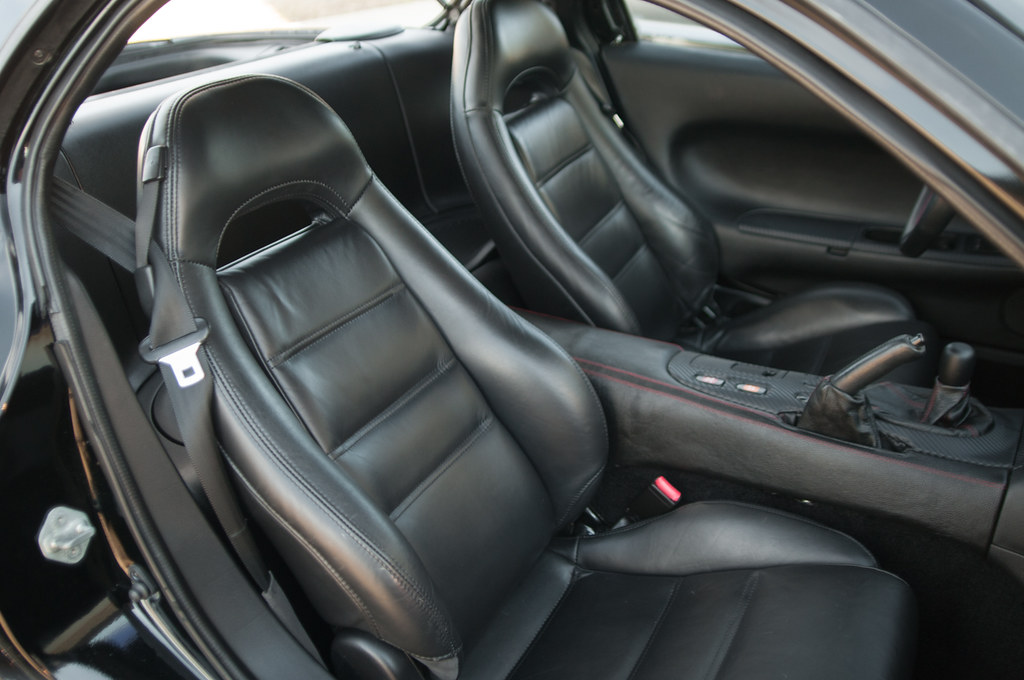
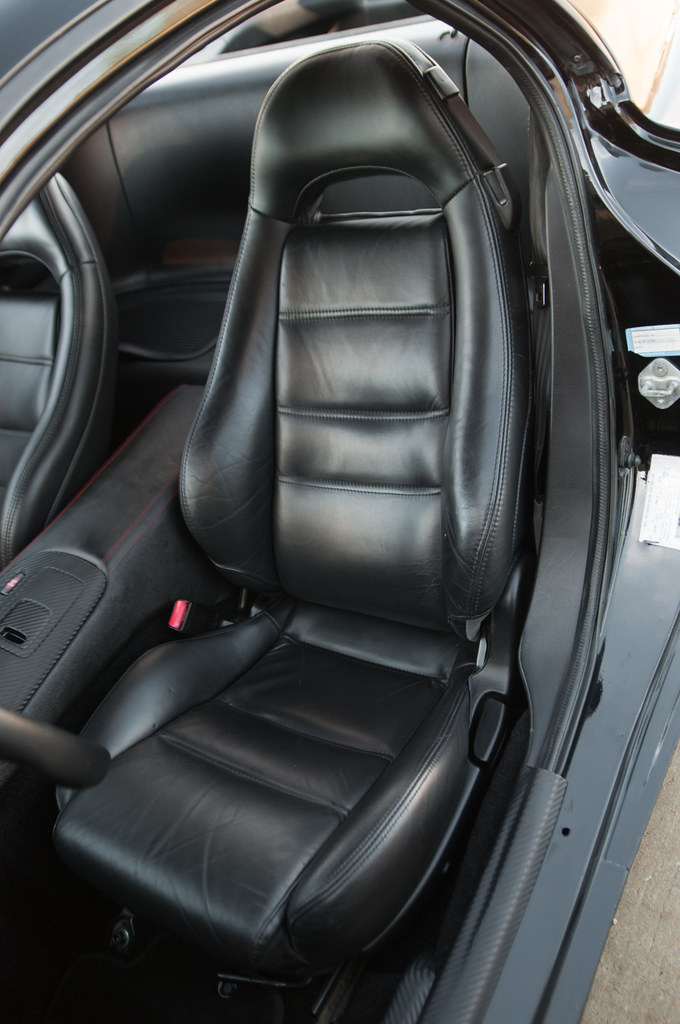
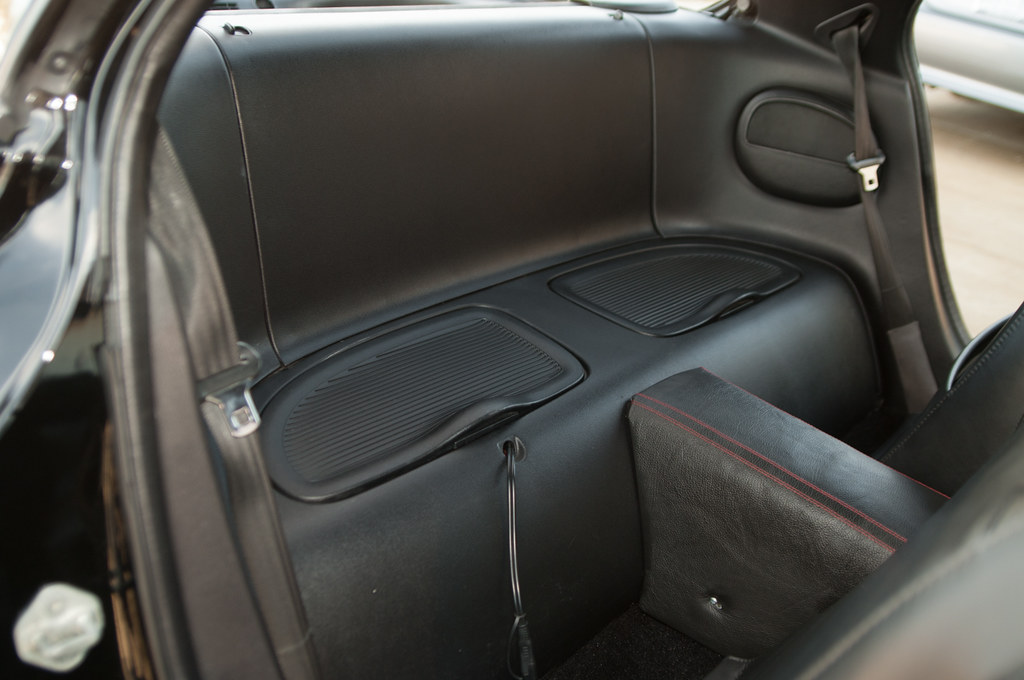
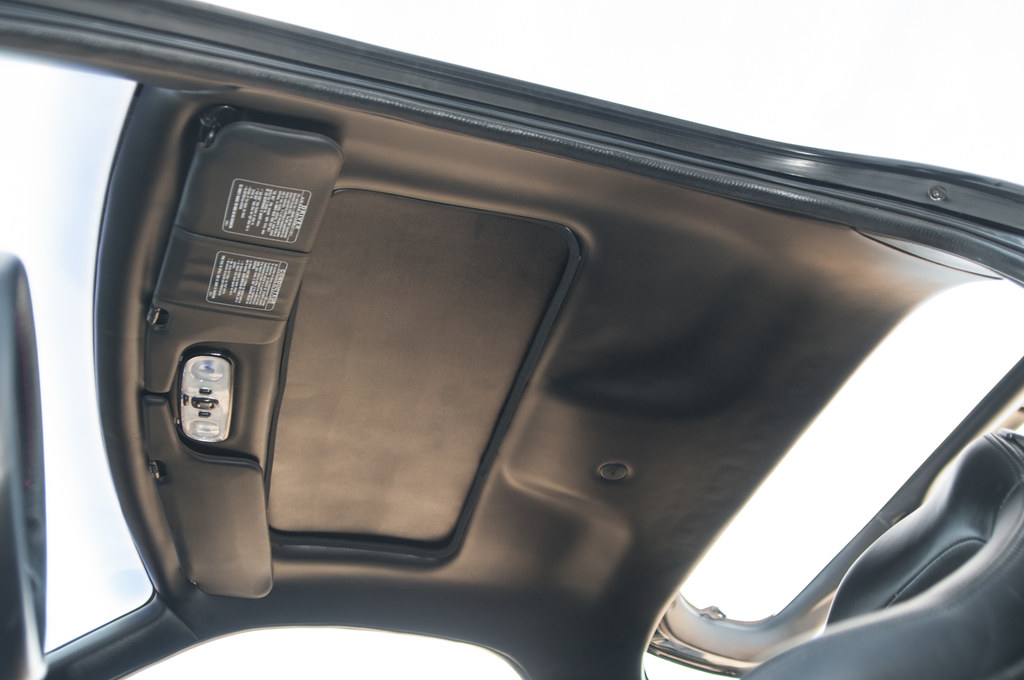
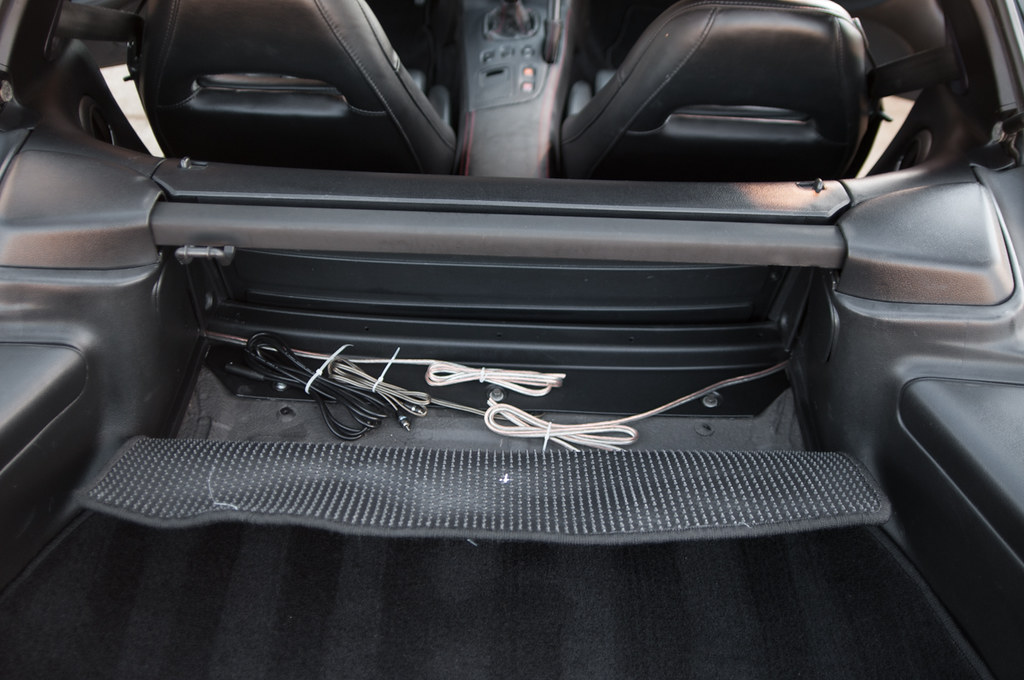
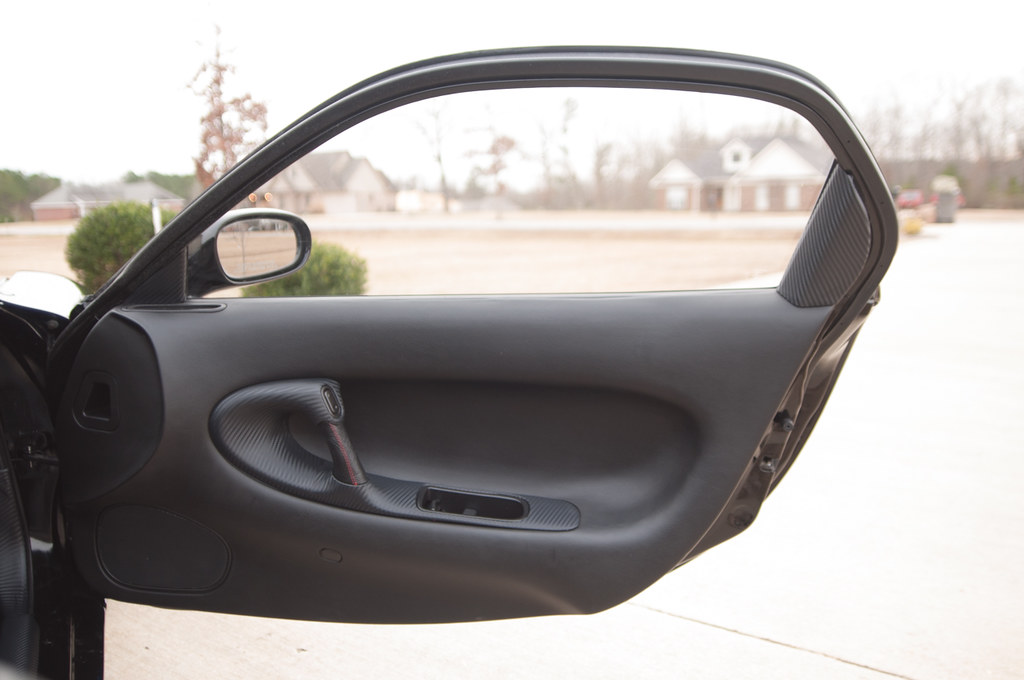
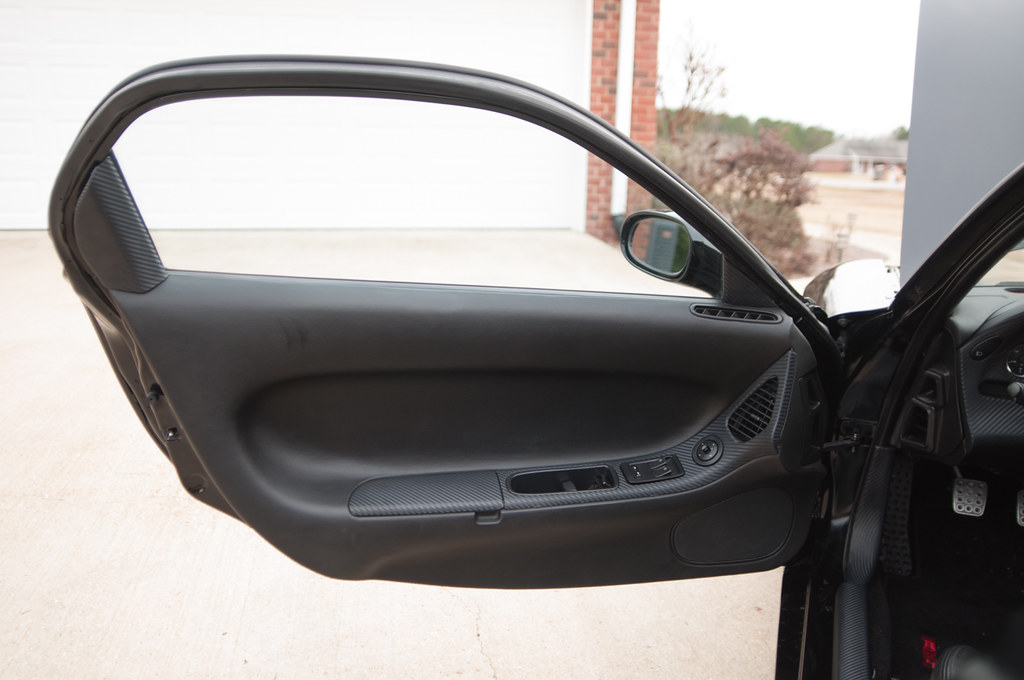
Interior:
No expense was spared for my interior. I am a firm believer that for a car to be ‘sorted’ the interior needs to sparkle

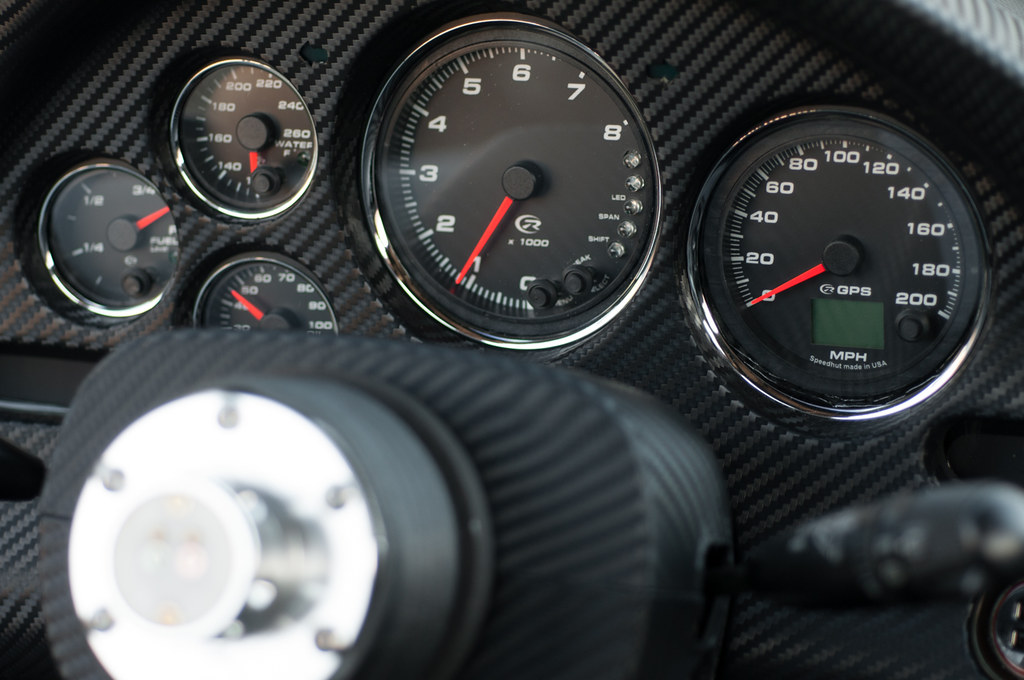
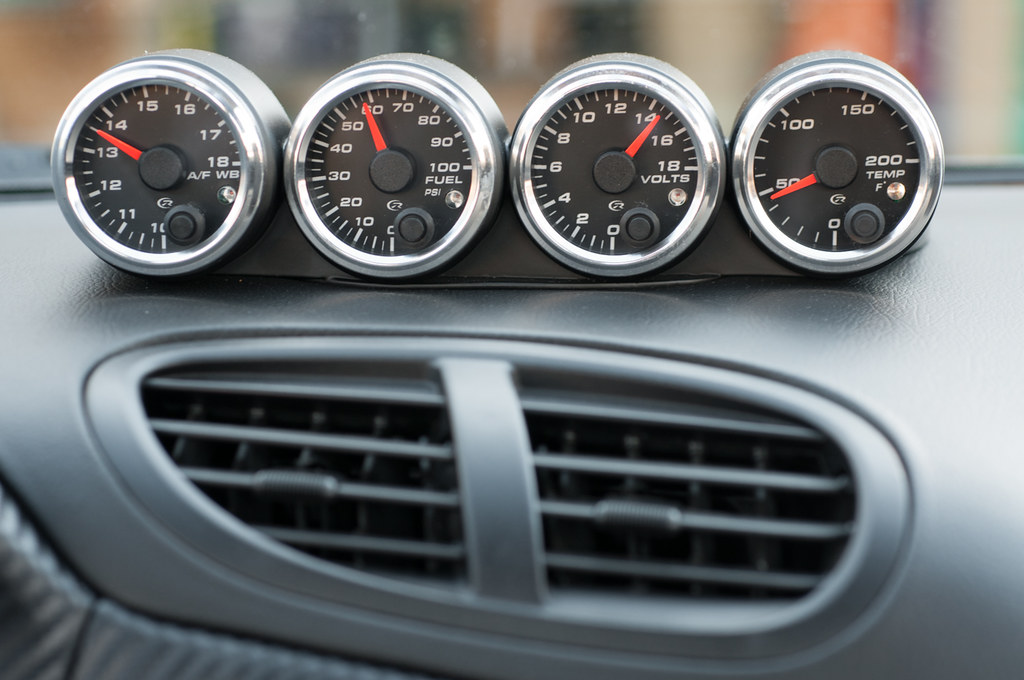
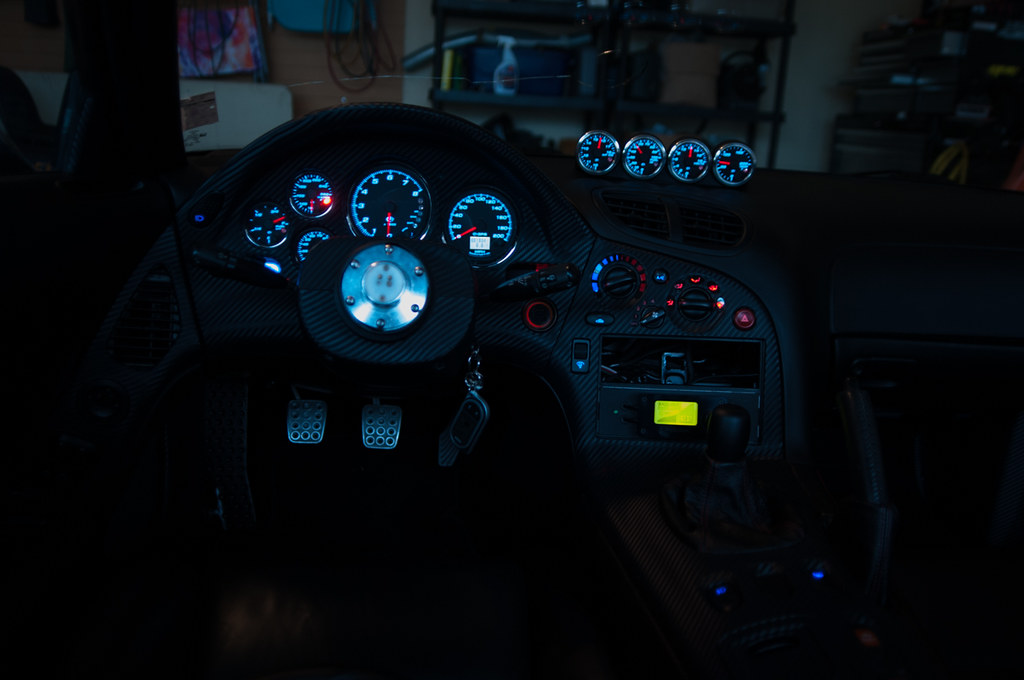
The original and very exclusive full Speedhut Gauge conversion
Momo Tuner Steering Wheel (with working horn)
Momo Hub Adapter
NRG Quick Release
Brand new black ACC Carpet
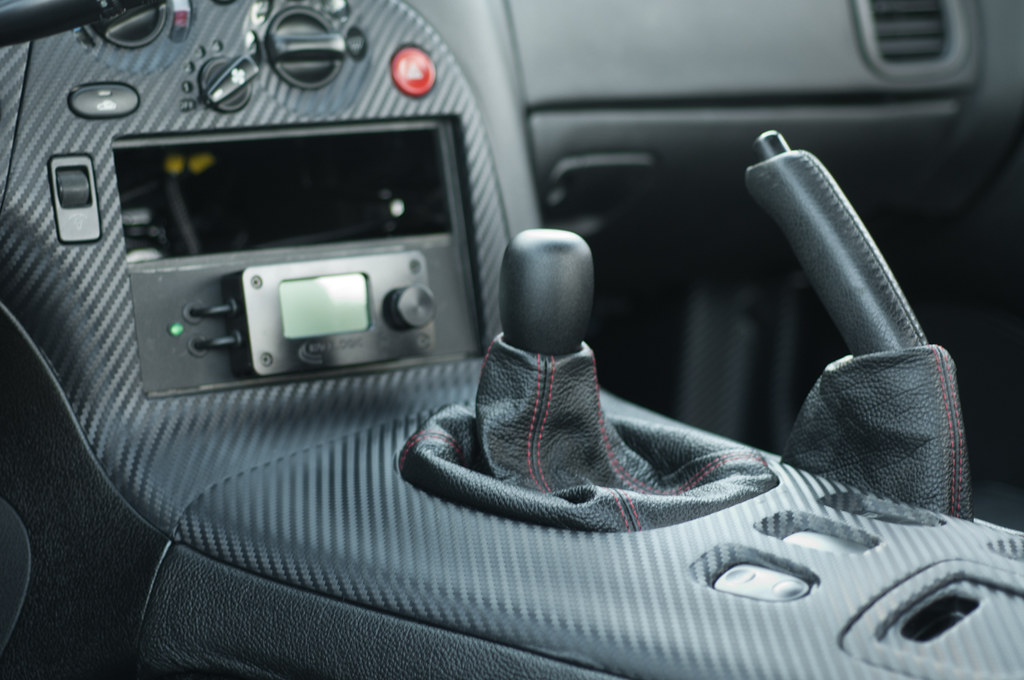
MGW Shift ****
MGW Trans Tunnel Plate with Boot
Redline Leather - Shift Boot
Redline Leather - Ebrake Boot
Redline Leather - Center Console
Redline Leather - Passenger Handle
Used Center Vent
flyrx7 - 4 Gauge Pod
SakeBomb Aluminum Passenger Handle
JasonS - Non Bose Cargo Mat with Red Logo
JasonS - Floor Mats with Red Logo
Fire85GSLSE - < 40k Miles Leather Seats
Fritz Flynn - Ebrake Handle + Boot
Fritz Flynn - Heater Core & Gauge Cluster Shell
Fritz Flynn - Floor Harness
Fritz Flynn - Map Pocket
Fritz Flynn - Brake Hardline
Fritz Flynn - Black Door Panels
Fritz Flynn - Black Sun Visors
Fritz Flynn - Seatbelt Buckle Anchor
Fritz Flynn - Drivers Leg AC Duct
Fritz Flynn - Lock Cylinder Grommet
Fritz Flynn - Glovebox Hinge/Bracket
Fritz Flynn - Dome Light Bracket
Dash, Door Sills, Kick Panel, Rear Trunk Valance, and Center Console wrapped with 3M Carbon Fiber Di-Noc vinyl wrap
Door 6.5” speaker adapters from car-speaker-adapters.com
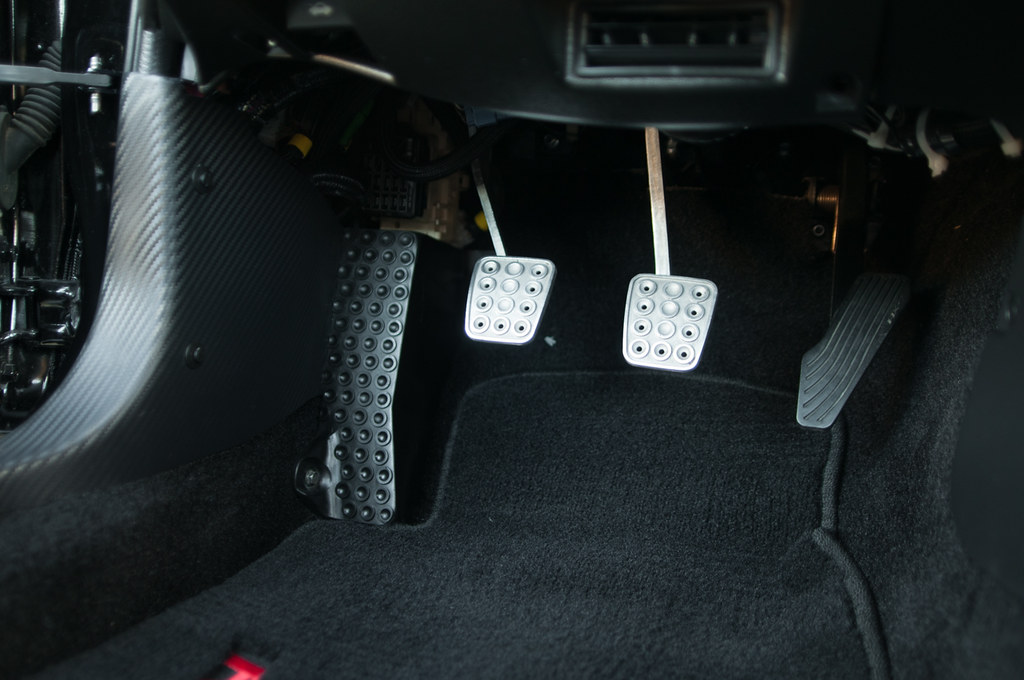
Sprayed Dash Support bar black with POR15
Sprayed Pedal supports Black
Sprayed steering shaft Black
Stripped down and rebuilt the entire heater box and evaporator box with new foam and seals.
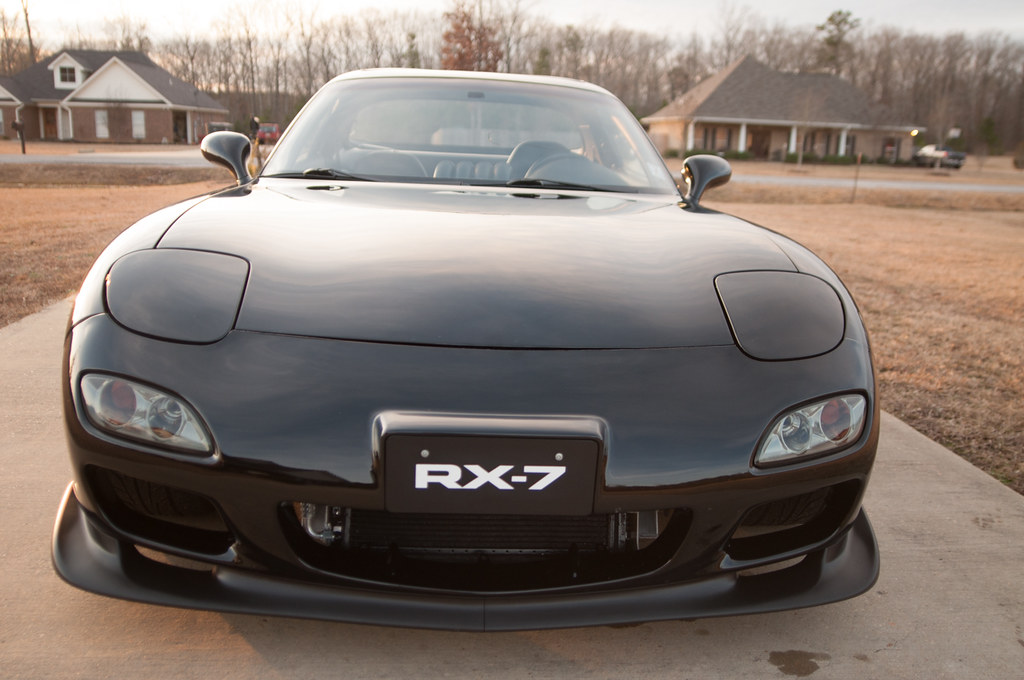
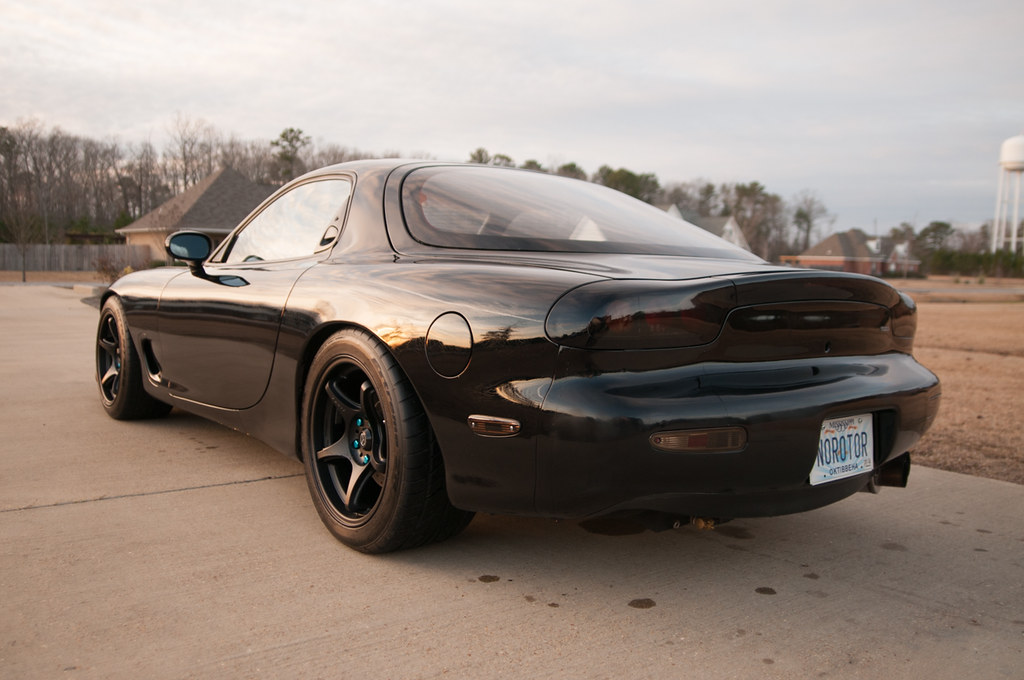
Exterior:
While the exterior isn’t as glitzy as my interior I think you’ll find that it’s an appropriate fit as well:
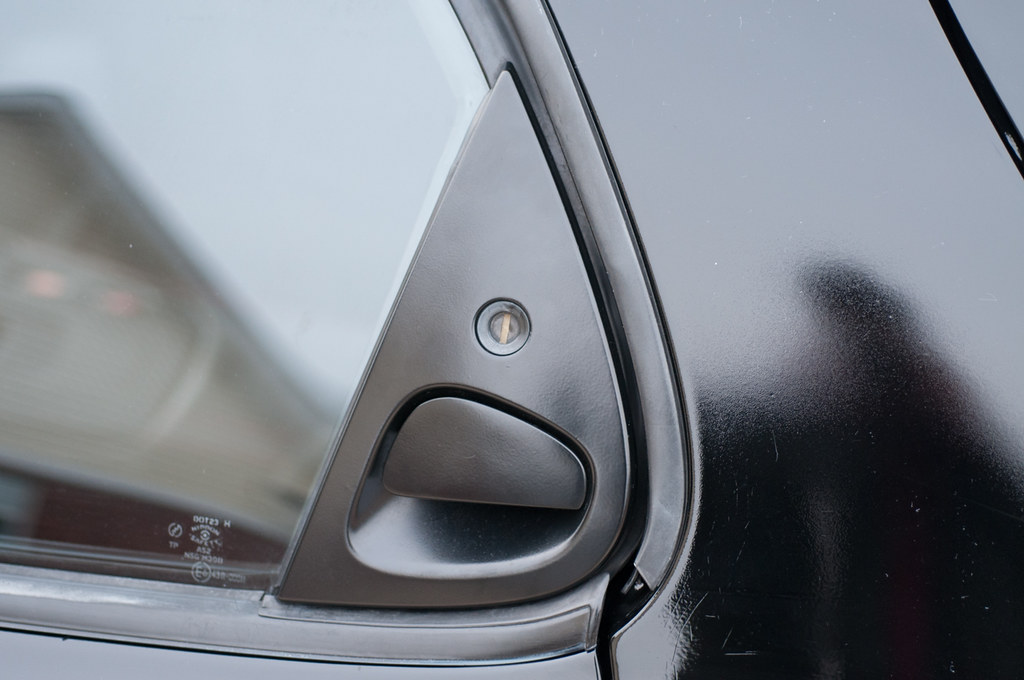
Aluminum Door Handles (completely rebuilt and powdercoated black)
99 Spec Bumper
99 Spec Lip
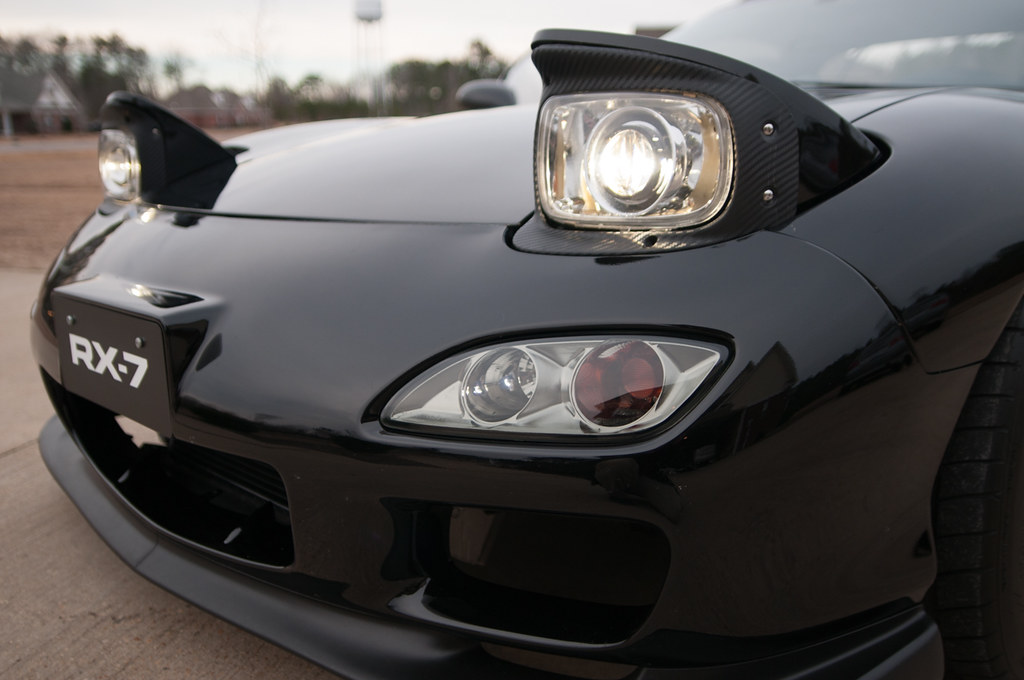
Smoked Running Lights
99+ Spec Black Combo Lights
99+ Spec tail lights
Factory popups converted using true clear lenses, D2S projectors, 4,300k HID Phillips bulbs, Morimoto ballasts, and E55 shrouds for a factory HID experience.
New Mazda / OEM Parts:
During my build I found various parts that either didn’t meet my standards in their current state/condition or just simply needed to be replaced:
Right Steering Rack Boots
FD01-56-83XA Gas Door Bracket
9WA60-1000B Gas Door Bracket Nut
FD01-56-870A - Cable Opener for Gas/Trunk Lid
FD01-43-443 Brake Booster Gasket
FD01-43-443A Brake Booster Seal
FD01-55-447 Gauge Lens
N3A1-15-350B - Coolant Overflow Tank
FD01-53-150A - Front Crash Bar
(4) FB01-50-133C Licence Plate Clips
(2) FD01-61-A18 Heater Core Clips
(2) FD01-61-A19 Heater Core O-Rings
FD01-69-981A - Interior Sunroof Trim
(2) B455-66-540 - Door Opening Switches
(2) J001-58-495 lock cylinder retainers
FD01-69-825A - Sunroof Weatherstrip
FD05-69-973 - Lens for Dome Light
GM09-68-049 - Sunroof Headliner Hole Plug
FD01-64-905 - Defroster center hole cover
(6) FB01-56-964 Rivet, Seal Plate Shroud
(2) 99910-0501 - Fender Liner Screw block
("8") B455-56-143 Rivet Mud Guard
(16) NA01-56-145 - Fastener
(2) B455-56-145 - Clip, Mud Gaurd
(6) FB01-50-133C - Nut Clips
(4) 99878-0516B - Screw
(2) FD01-51-143 - Screw
FD01-68-406-02 - Passenger Door Cap
FD02-67-321 - Windshield Wiper Arm Pass
FD01-67-321 - Windshield Wiper Arm Drive
(2) LA01-67-395A - Windshield Wiper Cover
(2) 99940-0801 - Windshild Wiper Arm Nut
(4) BR70-51-0E1 - Headlight fastener
(2) FD01-51-025 - Headlight fastener
("8") 90749-0516B - Headlight lid fastener screw
(2) FD01-51-248 - Rear Lamp fastener screw
Nissan DIN Cover
GM Floor Mat Clip
Seat Belt Buckles
Electrical:
Well, I saved the best for last. Here’s where I’ll toot my horn a little bit.
By trade I’m an electrical engineer, so giving the car a complete electrical makeover was a task I felt more than capable of doing and it’s what really sets my car apart from the crowd. Let me remind you that although some of these modifications may seem excessive and may worry future owners with thoughts of having to service it, every single thing I have touched is documented, diagramed, photographed, and tied together in my car’s new electrical manual. This is my gift to the next owner
http://www.ls1fc.com/pdfs/Halfspec_FSM.pdf
To start, I have gone through every inch of original wiring in my car and removed all rotary related wiring. All of the following mods were integrated into the stock and LS1 harnesses while the wire sleeve / wrap was removed. Any extra wiring added was always TXL crosslinked automotive grade wire and was terminated with automotive grade Delphi Packard connectors. All additional wiring and connectors were always fused and gauged for the maximum amount of current the wire would ever see. After modifying all of my harnesses I re-sleeved everything with black nylon sleeving.
Completely customized and integrated LS1 engine harness
Completely upgraded Speedhut gauge system including 4 pod mounted (top of dash) auxiliary gauges. Both sections of gauges can easily be removed with a single plug. All gauges work 100%
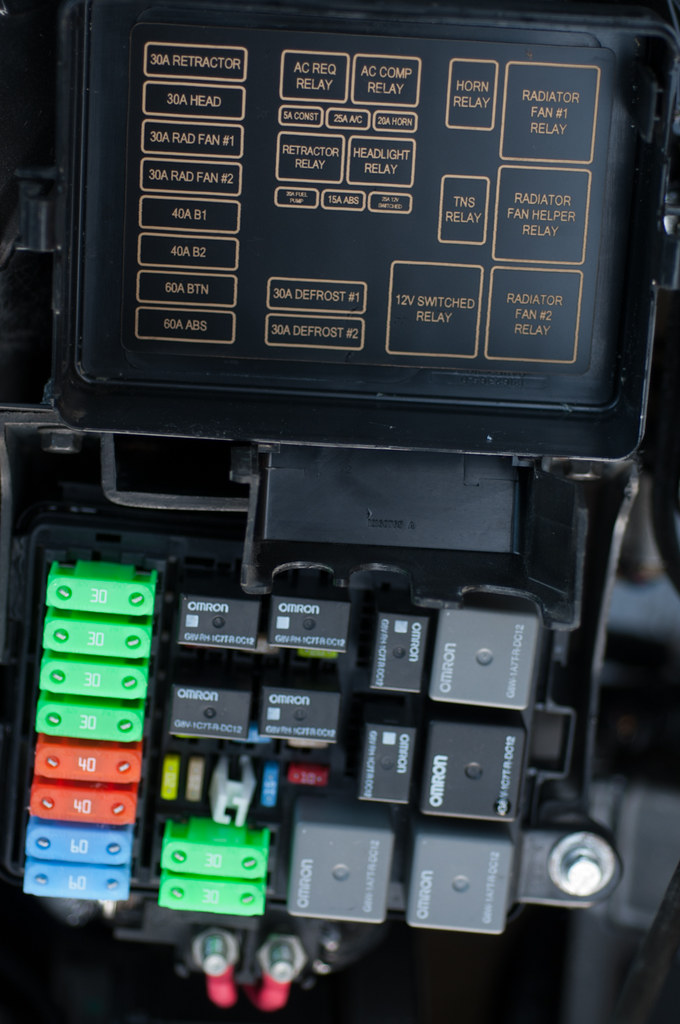
New consolidated, relocated, easily accessed (engine compartment), and labeled fuse and relay box.
Relocated Battery to passenger side rear bin.
Relocated LS1 PCM to passenger side rear bin
Installed AEM EUGO wideband sensor and controller in passenger side rear bin
Fully integrated RaceLogic Traction Control system with control panel mounted in the lower dash DIN. Its brain was installed behind the driver’s side rear bin with a small access panel in the bin itself. Hardwired bypass was integrated into the LS1 harness so it can quickly be disabled by unplugging it and terminating the LS1 harness with an included plug. The system can also always be turned off with the control panel.
Fully Integrated Viper 5901 2 way alarm. Functions include:
Wiring fully integrated with other harnesses so wiring cannot be traced to the brain which, by the way, is nowhere to be found under the driver’s side of the dash (location will only be disclosed to new owner).
Door, trunk, and hood triggers
Fully calibrated microwave sensor (senses movement inside the car without having to use a
vibration sensor (no more activated car alarms with thunder / loud car exhuast) )
Factory Alarm indicator light (upgraded with red LED inside)
Alarm siren mounted inside front bumper
Keyless entry (passenger AND driver’s side)
Rear Trunk Pop
Running lights chirp when arming disarming
Starter Cut (Does NOT use the factory starter cut relay)
˝ mile 2 way range to page the remote if someone activates the alarm
Hella Horns with a very minimized / optimized circuit tied to the Momo steering wheel. Works even though the steering wheel is removable.
Optima billet battery tray
Optimum red top battery
Prewired hookup for Battery Tender Jr.
AEM UEGO Wideband
Self Exciting Regulator for Alternator (makes the alternator have a cleaner install as it eliminates the need for any wiring)
Speaker wire, RCA wire, and antenna wire all pre-wired to the radio area and the front of the trunk area (for easy amplifier installation)
All interior and exterior bulbs were replaced with brand new http://www.autolumination.com bulbs.
All dash and console buttons switches and displays were upgraded with blue and red LEDs.
Rear relay box was added under the Driver’s side bin to facilitate the new functionality of the fuel pump, rear defrost, and trunk popper.
Integrated LS1 PCM Controlled Dual Stage Fan Control
Integrated LS1 PCM controlled A/C Compressor Control actuated with the stock A/C button.
Integrated LS1 PCM controlled Fuel Pump Control
Integrated LS1 PCM controlled MIL Light
Switched 12V Auxiliary Connector Located by Dome Light (for future install of radar detector or self dimming mirror).
Fully functional high and low HID control
The cleanest kickpanels you’re likely to ever see in a 7 (swapped or not)
I believe that’s it for the build list of my car. There are plenty of odds and ends that weren’t listed for the sake of brevity, but you can reference everything to your heart’s content by looking at my receipt excel sheet. Note – The version in this link is only a reference and is incomplete as it doesn’t actually include the scanned in receipts. The full version that will come with the car will include all the linked and scanned in receipts + the actual hard copies (giant stack).
http://www.halfspec.com/downloads/RX7/receipts.xls
Gotchas:
So, what’s the catch? Well, to be completely honest, the car needs a little more work to reach its full potential. In order of severity, these are the things that will need attention:
1. Paint. I originally had the car painted almost 2 years ago. Despite the attention and time spent prepping the car (7 months), the final outcome was tainted by an unexplainable paint defect. The defect raised its ugly head in the form of cracks or wrinkles in the paint. This occurred after the base and clear coat were applied and the car was in its baking process. The theory was that the original or resprayed paint expanded or contracted unusually under the new paint and caused the problem. The paint on the front bumper, front fenders, headlight covers, door jambs, hatch jambs, hood jambs, door inside, trunk underside, hatch underside is all very well done. The rest of the paint on the other hand, will need to be sanded back and painted again.
2. Tuning. I’ve been putting off tuning for years now simply because I have been unable to find good tuners that work on a dyno in Mississippi. My compromise was to tune on the road with HPTuners (not included with the car but I’ll make you a deal if you want it to). After many attempts, the car runs pretty well, but it could definitely use some help from a seasoned tuner. Right now the car runs best in speed density mode. Most of the issues I see are drivability issues. Popping / backfiring occasionally at idle, rpm dives when letting off the clutch (dive meaning, the rpm drops (which is normal) but the drop sometimes goes below idle levels which causes it to sputter a little until it comes back to idle levels). Spark advance is completely stock. The VE tables have been tuned, but they could use a lot more work. The MAF table needs to be completely redone. I have no doubt that getting these tables in line will allow the car to see its true 500whp+ potential.
3. Exhaust. The exhaust is about 90% done. The 10% that needs to be worked on is right under the transmission brace. I originally bought the header back exhaust from Kevin Doe. He built it to mount to his LS RX7 JTR headers like mine so I thought it would match. Well, it didn’t so I cut a 12” section out of each exhaust pipe and connected the exhaust with 1ft sections of 3” flex pipe. This section simply needs to be custom made and welded in between the transmission and its mount.
4. Front Windshield – It’s got a pretty nasty crack in it. I haven’t replaced it since I wanted to get the car painted first. I do have all of the brand new Mazda seals and moldings to install it and it’ll come with the car.
5. Rear hatch molding – This was removed for painting so it’s just bare urethane holding it in right now. I think it would be best to use aftermarket t-channel molding for this.
6. Door Windows. They roll up slowly, especially the passenger window. I have a suspicion that this is due to crusty 21 year old contacts in the door switch itself. I should be able to narrow it down over the next couple of weeks to give the future owner a better idea of what’s up though.
7. Rearview Mirror. This wasn’t purchased because I wanted to wait until the windshield was replaced. I believe I have the tan rear view if you want it, but I’d probably recommend an aftermarket self-dimming mirror and just use the pre-wired 12v switched plug by the dome light to power it
8. Sound System – Yeah, I never got around to installing one. Everything is pre-wired and the doors even have really nice 6.5” speaker brackets, but the car still needs a system if that’s your thing.
9. That’s it.
Pictures:
My main gallery is here along with highlight pics from my build thread:
http://www.flickr.com/photos/113141556@N07/sets
Why am I selling?
I got older, got married, have a child on the way, have zero time, have an ever shrinking budget, and my car needs have changed significantly now that I'm out of my 20s. I’m also actually planning on selling my 2004 E60 525i BMW. This decision falls into a second category for why I have decided to sell the RX7. I have officially caught the bug to live debt free. I know, it sounds crazy, but I want it and I'm willing to make some sacrifices to get it.
Willing to accept trades?
Yes, but only for two cars at the moment. I’m looking for a black 01-03 BMW e39 M5 with < 100k miles or a black 04-06 Mercedes Benz e55 AMG. If you’ve got one hit me up. I’m looking for a trade that has at least $16-20k on top.
Brass Tax:
Alright, so what do I want for it?
I am asking for $35,000 USD all in. You can offer me less, but I’ll just go ahead and tell you that this sale is already making me sick to my stomach so I don’t see it going for much less. Its steep no doubt, but I hope its value speaks for itself. My only timeline is to sell it before my child arrives in July, so I can wait for the right buyer. Still, I’m considering parting the car out if it doesn’t sell in a month (Please DO NOT post dibs here or PM/email me about parts until I post here officially)
I’m sure there will be 100s of things I’m forgetting. If you have questions or need a shot of something in particular, or want to make an offer please feel free to contact me.
Thank you for looking!
Lane Simmons
halfspec@gmail.com
Last edited by halfspec; 01-09-2014 at 09:09 AM.


Trending Topics


Thread
Thread Starter
Forum
Replies
Last Post
eclip5e
Automobiles For Sale
8
04-28-2022 12:38 AM
mizu20
Automotive Parts & Accessories For Sale/Wanted
0
08-20-2015 01:11 PM
ECS Tuning - VW
VW Vendor Classifieds
1
08-19-2015 10:43 AM
ECS Tuning - VW
VW Vendor Classifieds
1
08-19-2015 08:58 AM