DIY - How to Retrofit OEM Porsche LED License Plate Lights (error free way)
#1
 03-13-2014, 03:28 PM

DIY - How to Retrofit OEM Porsche LED License Plate Lights (error free way)
First thing first, a big shout out to ECS tuning for their fast shipping and awesome customer service, they remind me of Amazon, once you shop there, you don't go anywhere else 
After weeks of extensive research and searching for a solution, I know many people have tried the Racing Dash 18SMD kit from ECS with good results but it was just simply way too bright for me, and nothing beats the OEM solution so this guide is for those that feel the same
Now I don't know which Porsche models these license plate lights are for but many have retrofitted them on VW/Audi and now Porsche by me. They do it with custom resistors and VAG-COM tweak which is too complicated, my way should take around 30mins. I've been wanting to do this since I found these gems on ECS site
*disclaimer: please follow this guide at your own risk, this is purely for reference only
Tools:
Steps:
PIN EXTRACTION/REVERSING POLARITY
Thanks to a nice German fella that had a guide to do this in German, I extracted the images for this guide. Look at the socket, you'll need to use a flathead screwdriver to pull out the pink locking ring, it needs to be completely removed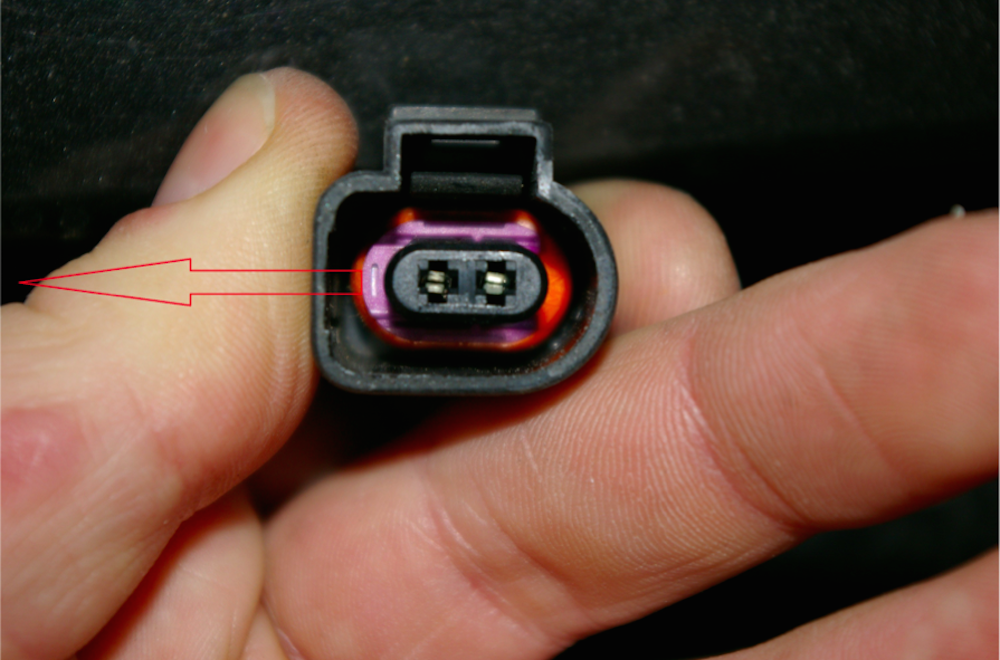
now comes the hardest part of this whole retrofit, you will need to extract both pins from the socket and reverse them so your LED will work. So insert the Pin extractor tool into the pin holes and pull them out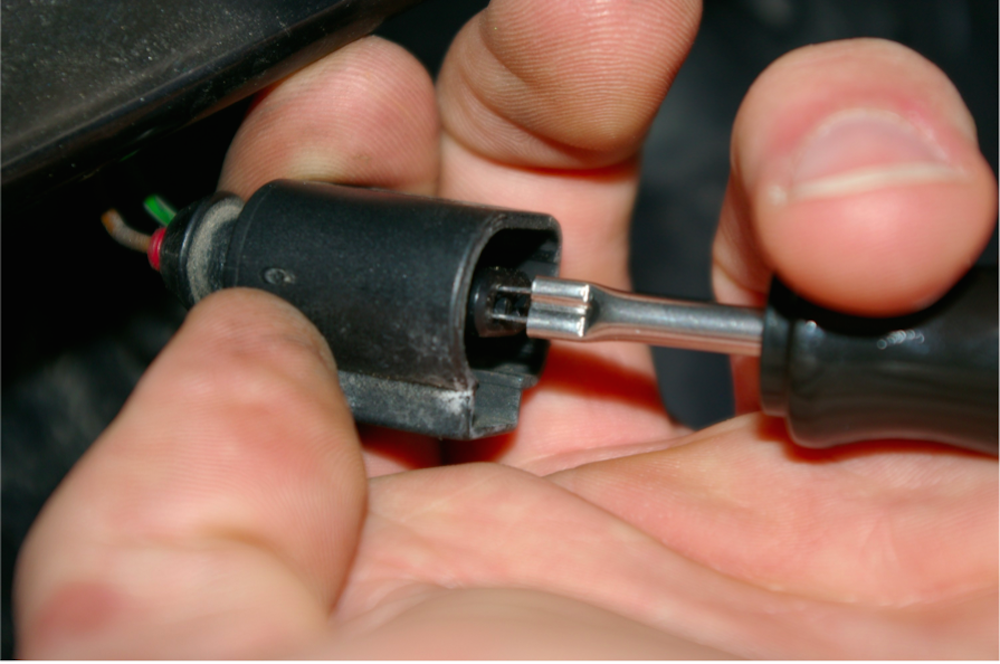
I did not have these extractor tool, I had to go to my audio installer friend who managed to pull out the pins by fabricating his own tool from a small piece of metal pin, what a genius. It's hard to explain it words/pictures, so here's a guide for your reference here
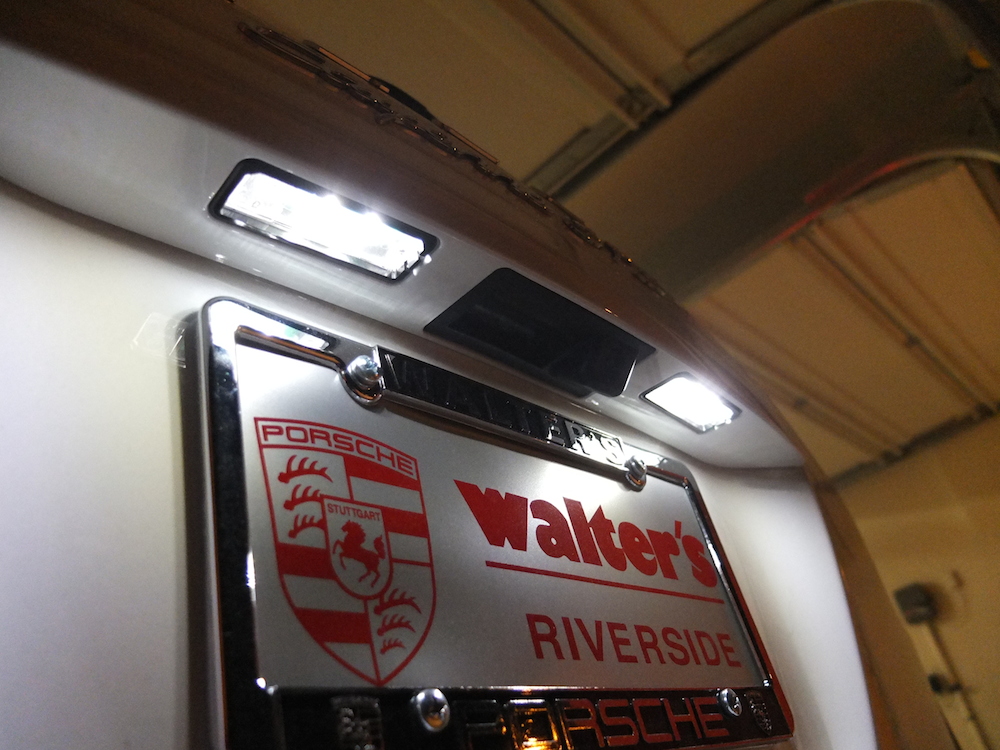
once the pins are out, just reverse them and put back the locking rings, plug in the LED lights and they should be on now.
I was hoping with the Comfort Lighting Package and Extended Comfort LED Package would somehow not trigger the Bulb Out Error but it still did (some VW owners did not need resistors and just worked on stock cars) but I'm sure our Porsche will need it so the next part of the guide will be how to wire up the Philips Warning Canceller which was designed specifically for this purpose
HOW TO BYPASS CANBUS LIGHT OUT WARNING LIGHT
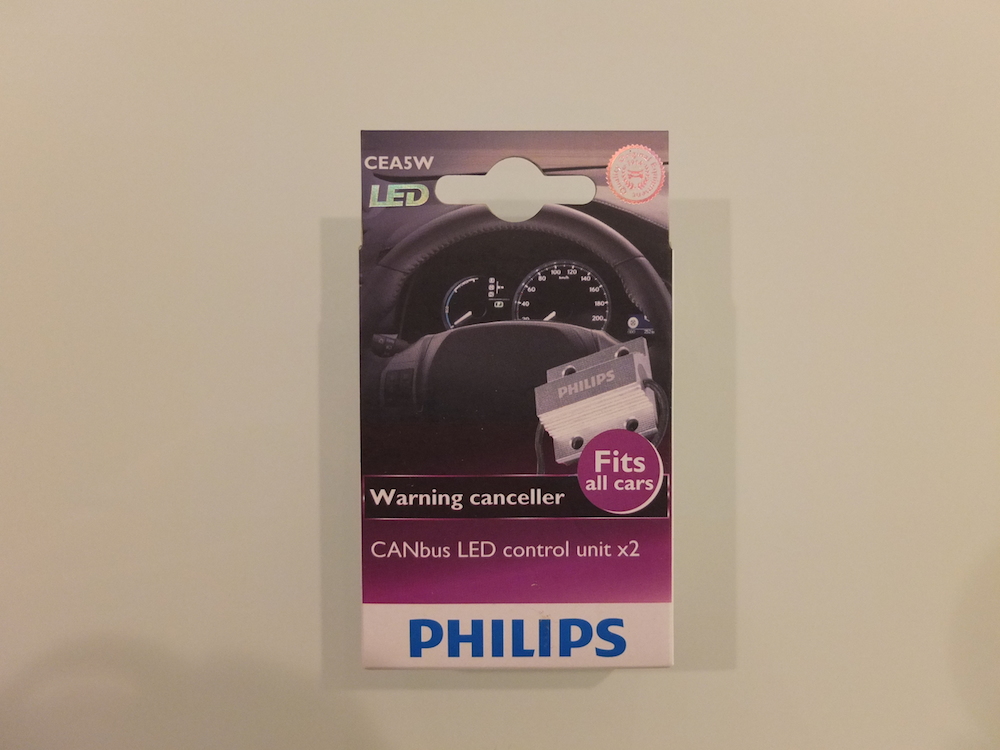
Thanks to Philips, there's no need to build your own resistors! The quality from Philips is unmatched in the industry
so let's see what's in the box, this is only one side, kit came with 2 sets. I never bothered with the double sided tape and zip ties
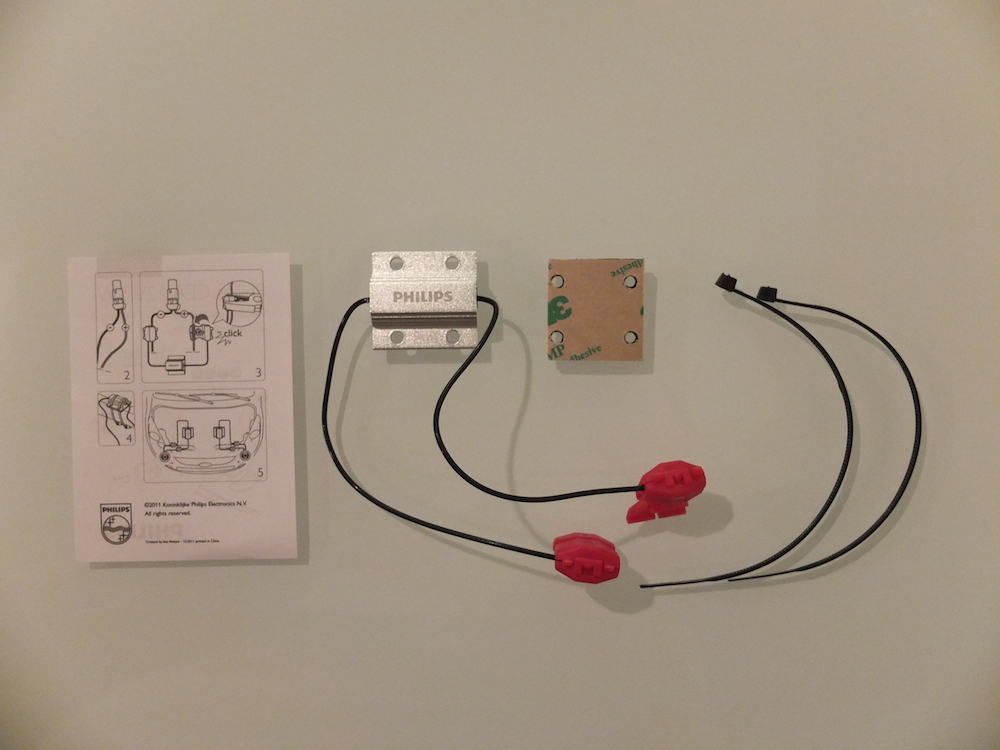
Following the illustrated guide, with "Philips" logo facing you, left wire clips onto the ground - (brown wire) and right clips to the power +. Seem simple enough
Doing it on left side first (I turned on the light after both sides are clipped)
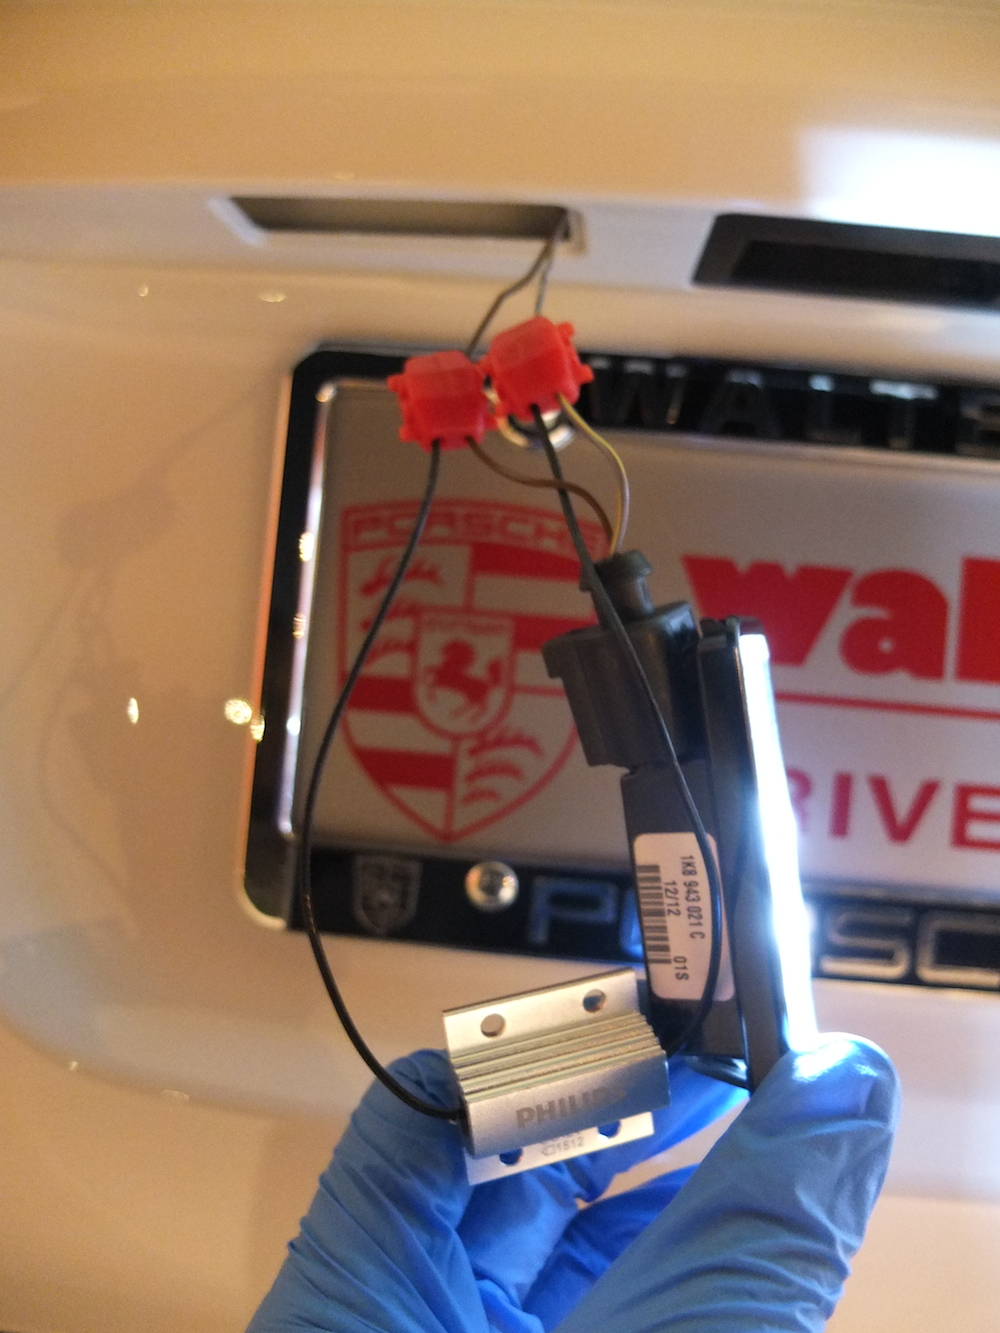
Right side and use the now working LED to check and make sure everyone's connected properly, after you put the wire in the clip, you'll need to use the plier to clip it shut
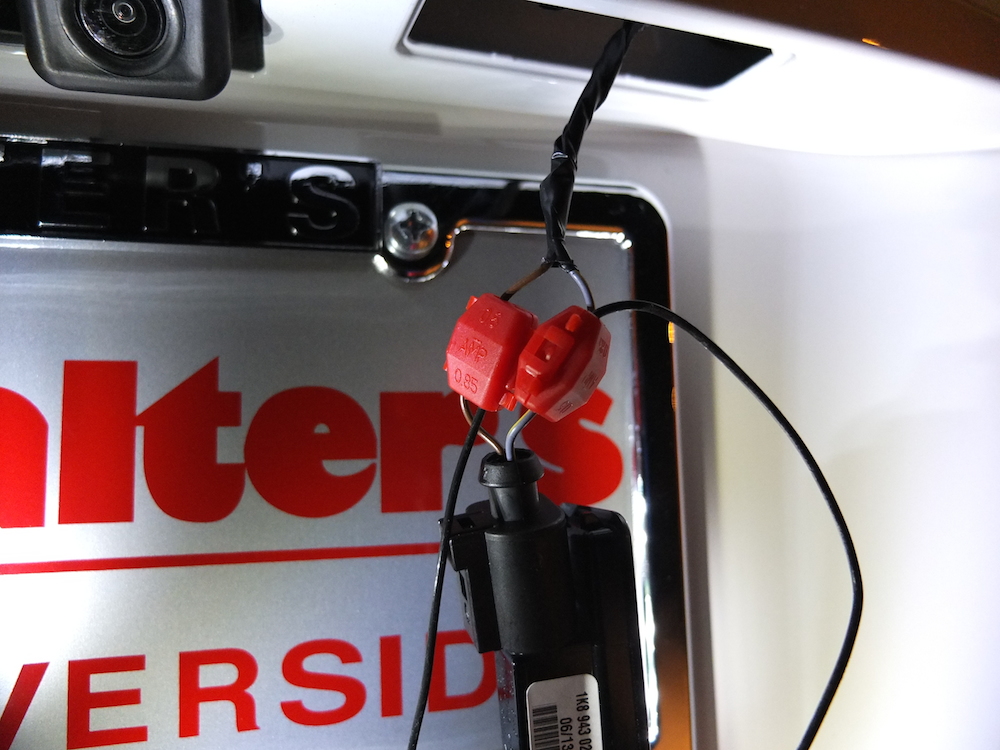
With both sides clipped, it's now time for the final test, turn on the car and see if it triggers the light out error
and VOILA! perfect and no error message! woohoo!

The resistors and clips aren't that big, so everything fits nicely inside the space, just wiggle it around and stuff everything in, should look extremely clean after you put everything back
Kudos to you if you see the lights produce different color! one is more white and one has a tint of blue, what happened to the QC Porsche!

One quick email to ECS and they apologized (how's this their fault) and shipped out a replacement the next day free of charge, WOW!!
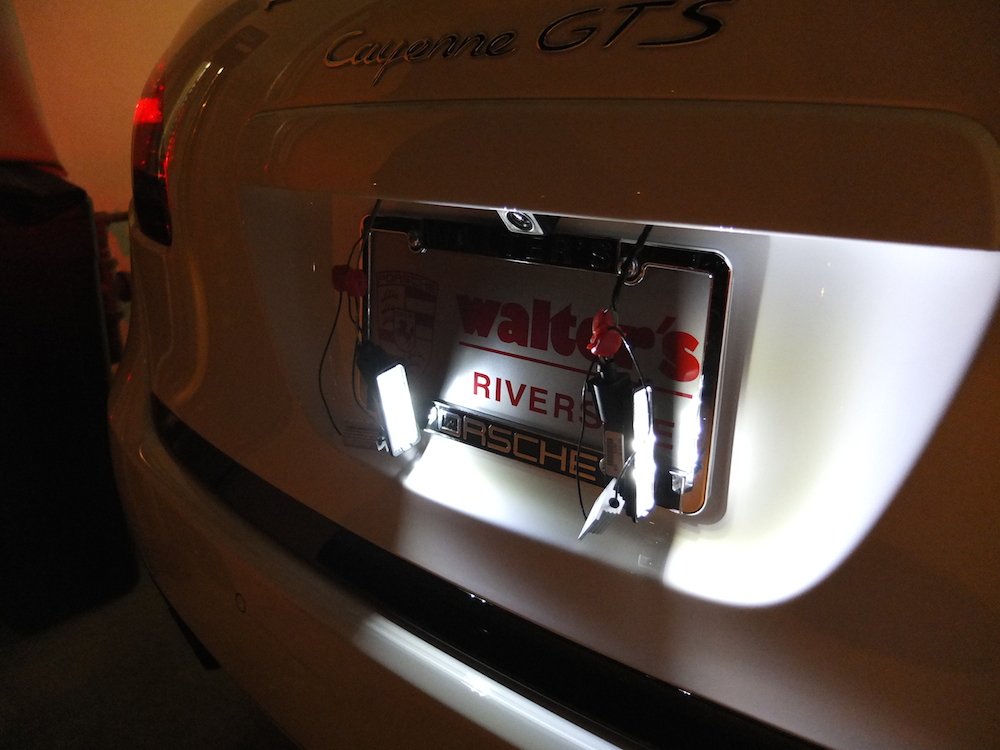
This is the final version with the replacement installed, it appears that the whiter version was the defective one, now both of these units have a very slight tint of blue, like the BMW/AUDI/VW one you see on the road, it looks so awesome!
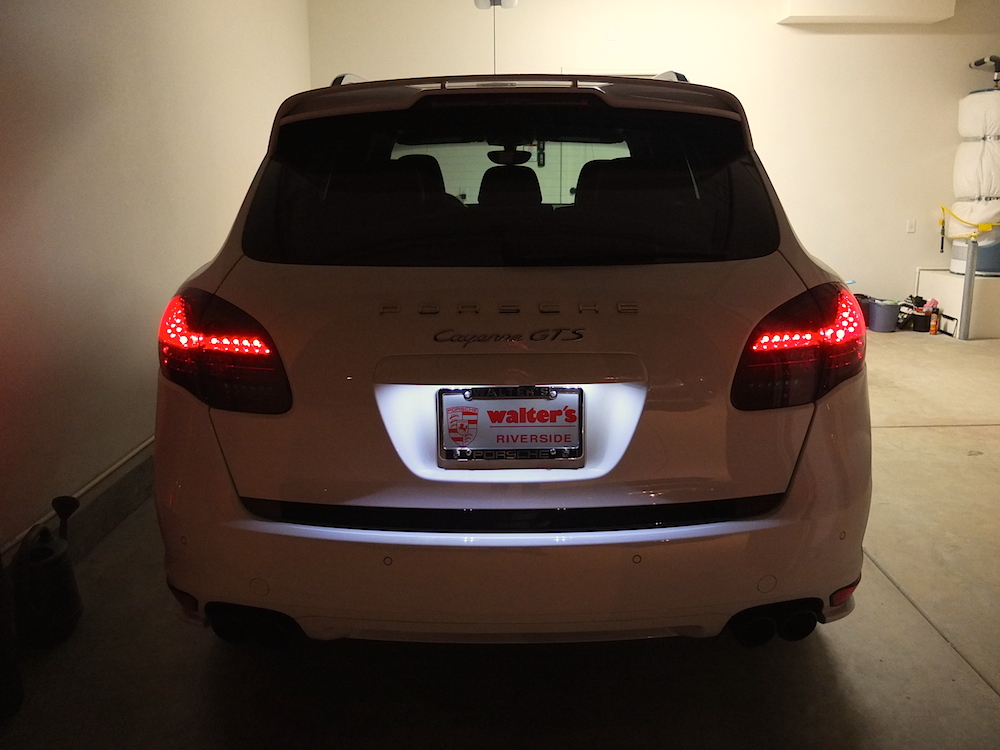
From far away

Straight back
With the OEM LED lights, the output is now perfect, lighted by 4 individual LEDs and diffused by the lens to provide a soft and widespread light. I'm a very happy man now I sincerely hope this guide will help some one in some way because it probably will take you longer to read this than to install them so thanks for reading! Feel free to ask questions.
Some Notes:
After weeks of extensive research and searching for a solution, I know many people have tried the Racing Dash 18SMD kit from ECS with good results but it was just simply way too bright for me, and nothing beats the OEM solution so this guide is for those that feel the same
Now I don't know which Porsche models these license plate lights are for but many have retrofitted them on VW/Audi and now Porsche by me. They do it with custom resistors and VAG-COM tweak which is too complicated, my way should take around 30mins. I've been wanting to do this since I found these gems on ECS site
*disclaimer: please follow this guide at your own risk, this is purely for reference only
Tools:
- Pins Extraction Tool (junior size) - if applicable
- Long Nose Plier
- Flat-head Screwdriver
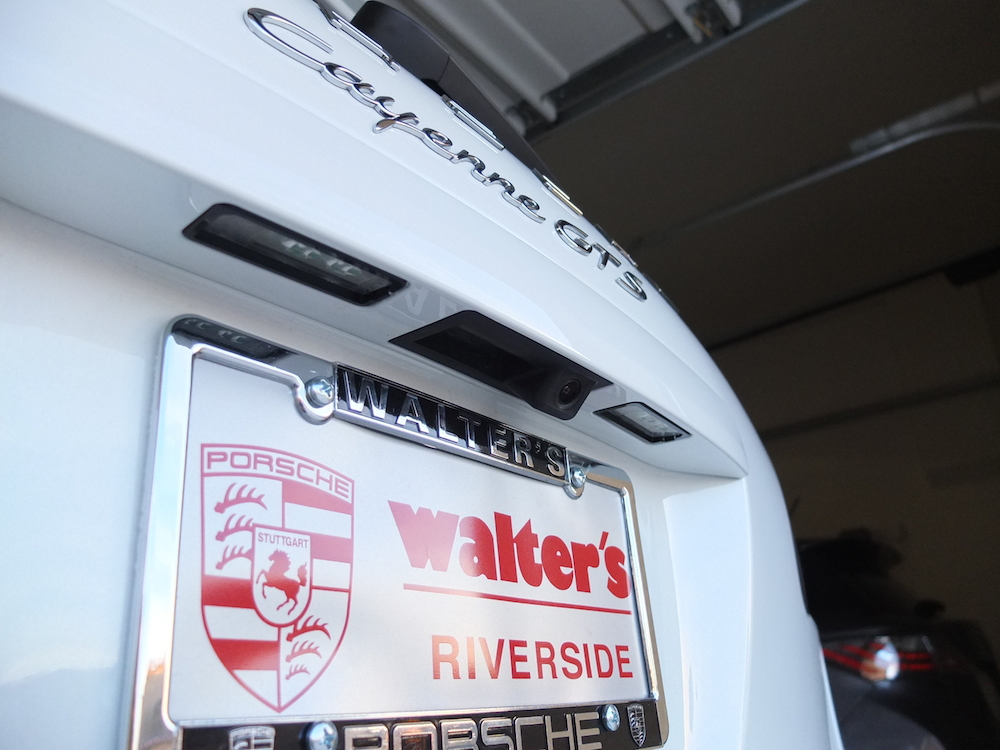
- OEM Porsche LED License Plate Lights (1K8943021C x2)
- Philips CANbus LED Control Unit (to cancel light out warning)
Steps:
- Make sure the car and lights are off
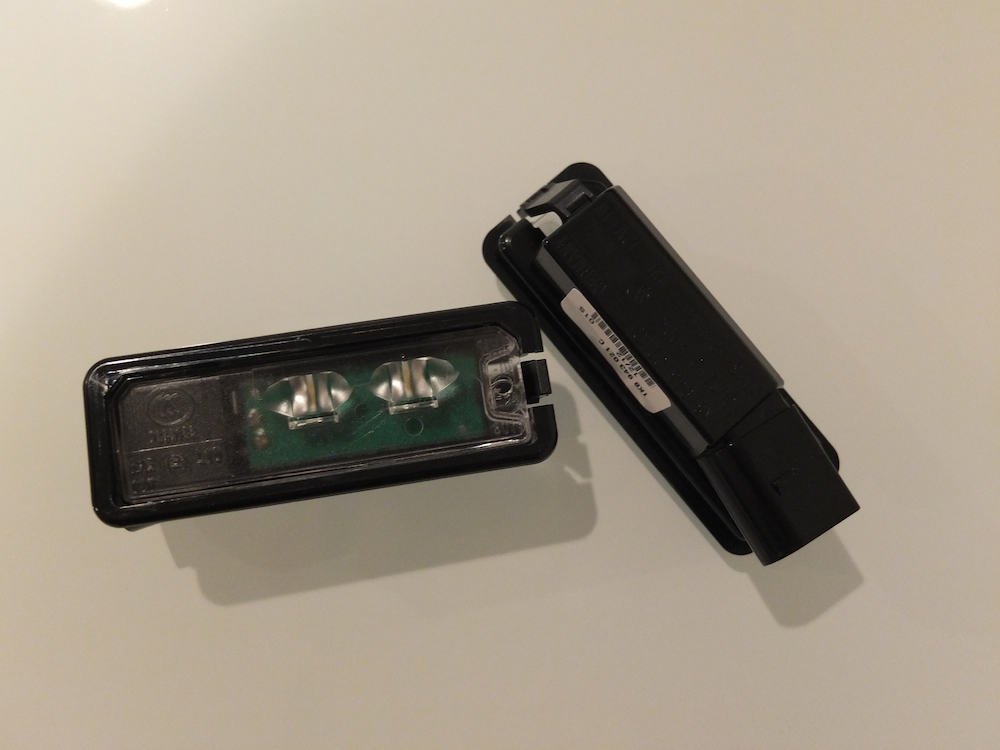
- Push the tabs in on the license plate light fixture and pull down (study the LED version to see, doing this the first time almost broke my nails, so use a thin flathead or use a plier to pull it off like I did)
- Push the tabs on the socket and the light housing should come right off, take off the stock housings on both sides and put in the new LED lights (it only goes in one way)
- Now turn on the light (this step is required to test the polarity) if they turn on, you are lucky, if not, don't worry, you just have to extract the pins to reverse the polarity
PIN EXTRACTION/REVERSING POLARITY
Thanks to a nice German fella that had a guide to do this in German, I extracted the images for this guide. Look at the socket, you'll need to use a flathead screwdriver to pull out the pink locking ring, it needs to be completely removed
now comes the hardest part of this whole retrofit, you will need to extract both pins from the socket and reverse them so your LED will work. So insert the Pin extractor tool into the pin holes and pull them out
I did not have these extractor tool, I had to go to my audio installer friend who managed to pull out the pins by fabricating his own tool from a small piece of metal pin, what a genius. It's hard to explain it words/pictures, so here's a guide for your reference here
once the pins are out, just reverse them and put back the locking rings, plug in the LED lights and they should be on now.
I was hoping with the Comfort Lighting Package and Extended Comfort LED Package would somehow not trigger the Bulb Out Error but it still did (some VW owners did not need resistors and just worked on stock cars) but I'm sure our Porsche will need it so the next part of the guide will be how to wire up the Philips Warning Canceller which was designed specifically for this purpose
HOW TO BYPASS CANBUS LIGHT OUT WARNING LIGHT
Thanks to Philips, there's no need to build your own resistors! The quality from Philips is unmatched in the industry
so let's see what's in the box, this is only one side, kit came with 2 sets. I never bothered with the double sided tape and zip ties
Following the illustrated guide, with "Philips" logo facing you, left wire clips onto the ground - (brown wire) and right clips to the power +. Seem simple enough
Doing it on left side first (I turned on the light after both sides are clipped)
Right side and use the now working LED to check and make sure everyone's connected properly, after you put the wire in the clip, you'll need to use the plier to clip it shut
With both sides clipped, it's now time for the final test, turn on the car and see if it triggers the light out error
and VOILA! perfect and no error message! woohoo!
The resistors and clips aren't that big, so everything fits nicely inside the space, just wiggle it around and stuff everything in, should look extremely clean after you put everything back
Kudos to you if you see the lights produce different color! one is more white and one has a tint of blue, what happened to the QC Porsche!
One quick email to ECS and they apologized (how's this their fault) and shipped out a replacement the next day free of charge, WOW!!
This is the final version with the replacement installed, it appears that the whiter version was the defective one, now both of these units have a very slight tint of blue, like the BMW/AUDI/VW one you see on the road, it looks so awesome!
From far away
Straight back
With the OEM LED lights, the output is now perfect, lighted by 4 individual LEDs and diffused by the lens to provide a soft and widespread light. I'm a very happy man now
I sincerely hope this guide will help some one in some way because it probably will take you longer to read this than to install them so thanks for reading! Feel free to ask questions.Some Notes:
- If you are OCD like me, you will notice that there's not a "left" and "right" version of these LED lights, both diodes are positioned toward the right of the housing when installed, thank god this design didn't affect the output coverage area, or it would've bugged me
- It's been several hundred miles since the install, no issues whatsoever
- There's an "earlier" version of these LED (1K8943021B) for VW/Audi that cost twice as much on ECS which makes zero sense considering these are probably the same. The one I bought (1K8943021C) came with a Porsche box. No Porsche tax added here

- Total parts cost is just a hair under $100 which is totally acceptable IMO, now all lights on my Cayenne is LED
- Why OEM? because nothing beats the quality of these parts and was designed specifically for its intended purpose on our vehicles
- Sorry for the long post, this is basically a combination of many people's contribution in one thread, so thanks to those that have helped!
- ECS Tuning is awesome!
Last edited by kechang; 03-13-2014 at 03:34 PM.

#3
03-14-2014, 08:13 AM

Beautiful! Appreciate all the support and kind words! I'm glad everything worked out!
Cheers!
Jason
Cheers!
Jason
#4
03-14-2014, 01:44 PM

yes, free shipping promo would be nice from ECS
looks like the 2015 Cayenne will come with LED license plate lights from this photo, it'll be interesting to see if these are similar to what I have
#5
03-15-2014, 04:23 AM
Great write up. Do the Philips bypass units get hot at all? Seeing that they look like heat dissipating / resistor units, are you worried that by just stuffing them in, something might melt?
#6
03-15-2014, 02:09 PM
Registered User
Join Date: Jun 2012
Location: Western Kentucky
Age: 75
Posts: 307
Rep Power: 29 

Given the inexpensive availability of T10 (wedge) CanBus LEDs now, I can't see where the extra lumens of this kit actually amortize anymore. Might have been good back in the day, but it just seems like too much work now. I just replaced my OE license plate bulbs with a pair of CanBus T10s that cost less than six bucks and took 1 minute (each) to install.
//greg//
//greg//
#7
03-17-2014, 11:40 AM
Given the inexpensive availability of T10 (wedge) CanBus LEDs now, I can't see where the extra lumens of this kit actually amortize anymore. Might have been good back in the day, but it just seems like too much work now. I just replaced my OE license plate bulbs with a pair of CanBus T10s that cost less than six bucks and took 1 minute (each) to install.
//greg//
//greg//
and believe me, I didn't get this for the lumens, my other iJDMtoys one/similar as the Racing Dash kit from ECS, 18SMD each side, that one is like 20x brighter than this one.
I'm merely going for the OEM look, if I had the right tools or didn't have to reverse the polarity, I could easily do both sides in under 5 mins

this guide is simply a solution to address the already heavily discussed topic from all across the brands, and in my very picky eyes, the only worthy solution.
Last edited by kechang; 03-17-2014 at 12:12 PM.
Trending Topics
#8
03-17-2014, 11:46 AM

I have all the LEDs from ECS Tuning on our Cayenne and have had the plate bulbs in for over a year now and they are still going strong.
The only issue I've had recently is that I keep getting a message on the dash that says check rear plate bulb. Oddly, it's been happening more frequently as of late.
Maybe Jason can tune in here and shed some 'light' on the issue.
The only issue I've had recently is that I keep getting a message on the dash that says check rear plate bulb. Oddly, it's been happening more frequently as of late.
Maybe Jason can tune in here and shed some 'light' on the issue.
#9
03-17-2014, 03:04 PM
Registered User
Join Date: Jun 2012
Location: Western Kentucky
Age: 75
Posts: 307
Rep Power: 29 //greg//
Last edited by grohgreg; 03-17-2014 at 03:07 PM.
#10
03-17-2014, 05:37 PM
Also remember that not all LEDs are created equal. There are new LED technologies out there with different SMD chips as well as newer plasma LED and 3D LED. Also new stuff like high temp gel coating which encapsulates the heat to prevent heat transfer.
#12
10-26-2014, 07:20 PM

I used LED bulbs from AZN optics, simple plug-and-play, no need for clumsy external resistor unit, no problem with overheating after almost one year with lots of long trips night time driving.
#13
10-27-2014, 12:29 PM

#14
10-27-2014, 03:26 PM
nothing aftermarket is going to match the OEM look so that's why I did the retrofit
I haven't looked at the new 2015 models up close yet so don't know if the enclosure is the same (I would assume so)
but for it to be plug and play? nah, pre-2015 models software is not equipped to handle LED load, it will trigger the fault code unless it's reprogrammed
I haven't looked at the new 2015 models up close yet so don't know if the enclosure is the same (I would assume so)
but for it to be plug and play? nah, pre-2015 models software is not equipped to handle LED load, it will trigger the fault code unless it's reprogrammed
#15
10-27-2014, 06:04 PM
nothing aftermarket is going to match the OEM look so that's why I did the retrofit
I haven't looked at the new 2015 models up close yet so don't know if the enclosure is the same (I would assume so)
but for it to be plug and play? nah, pre-2015 models software is not equipped to handle LED load, it will trigger the fault code unless it's reprogrammed
I haven't looked at the new 2015 models up close yet so don't know if the enclosure is the same (I would assume so)
but for it to be plug and play? nah, pre-2015 models software is not equipped to handle LED load, it will trigger the fault code unless it's reprogrammed
) and voil�. It'll be kinda of plug & play.