
Proud New '13 GTS Owner..My *Journal*
#1
 04-05-2018, 01:15 PM

Join Date: Feb 2018
Location: Ohio
Age: 34
Posts: 209
Rep Power: 15 
Proud New '13 GTS Owner..My *Journal*
Bitter sweet day, Panamera crew...
The time has come to sell my GTS...Here is the official sales thread: https://www.6speedonline.com/forums/...ml#post4864733
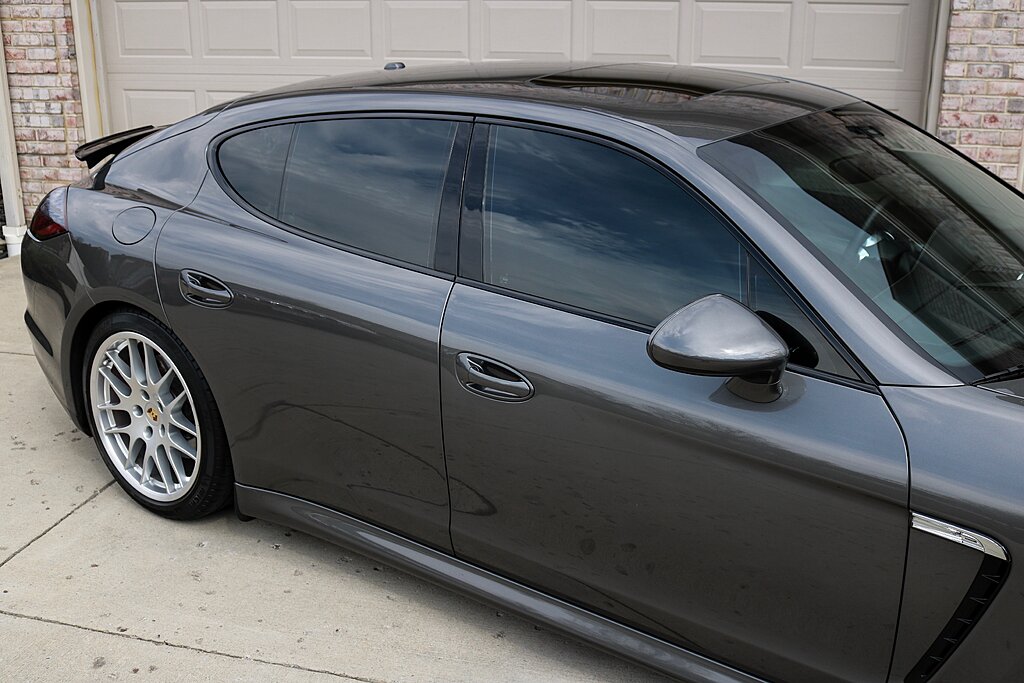
I added the most recent photos of the car to the top of this thread for new viewers. After this post, you can scroll through to see the beginning-to-end of my Panamera's journey.
Attachment 1
Attachment 1
Attachment 1
Attachment 1
Attachment 1
Attachment 1
Attachment 1
Attachment 1
Attachment 1
Attachment 1
__________________________________________________ ___
Hey Everyone!
I recently acquired a 2013 Agate Grey GTS on Good (Great!) Friday and have enjoyed every second of my short time with it. This forum was very useful during my searching period as I was debating between the GTS vs the Turbo...I won't go into the differences as of course you all already know, but I am more than pleased with my decision.
Although relatively new to this forum, I've been on car forums for many years, specifically MB-AMG, so I wanted to do something a bit different this time. I plan on kind of making this my "journal" if you will for different things I plan to do to the car oppose to creating multiple threads. Hopefully some of you guys will follow along!
These pictures are less than great as I've been very busy and have only had a chance to snap cell phone pics, but I promise to use my DSLR in the future to do this machine some justice.
Now lets get right into it...
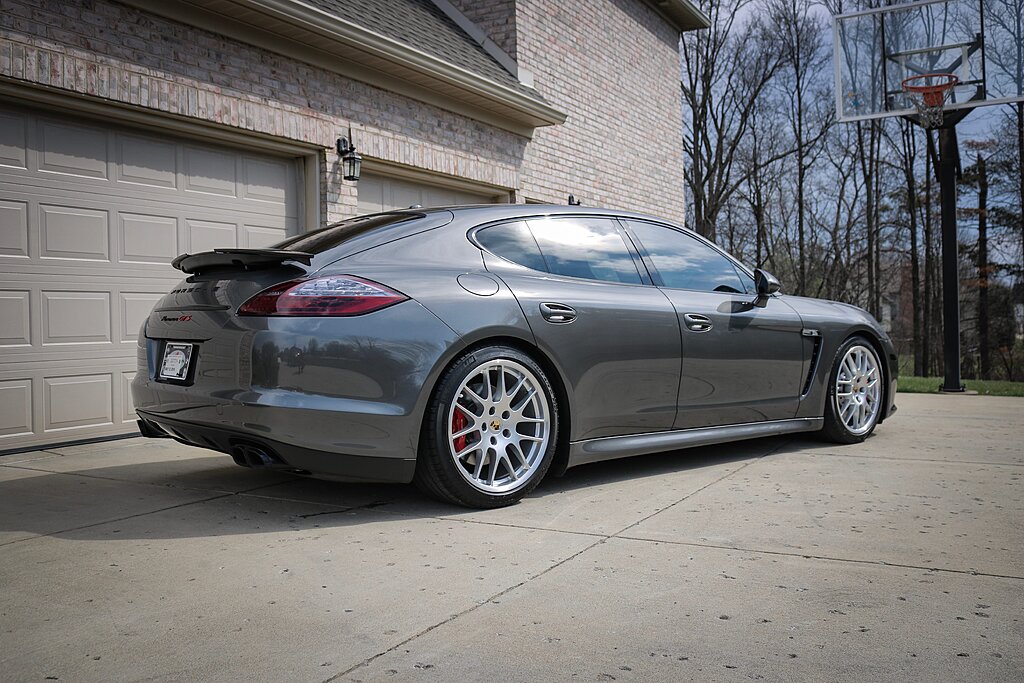
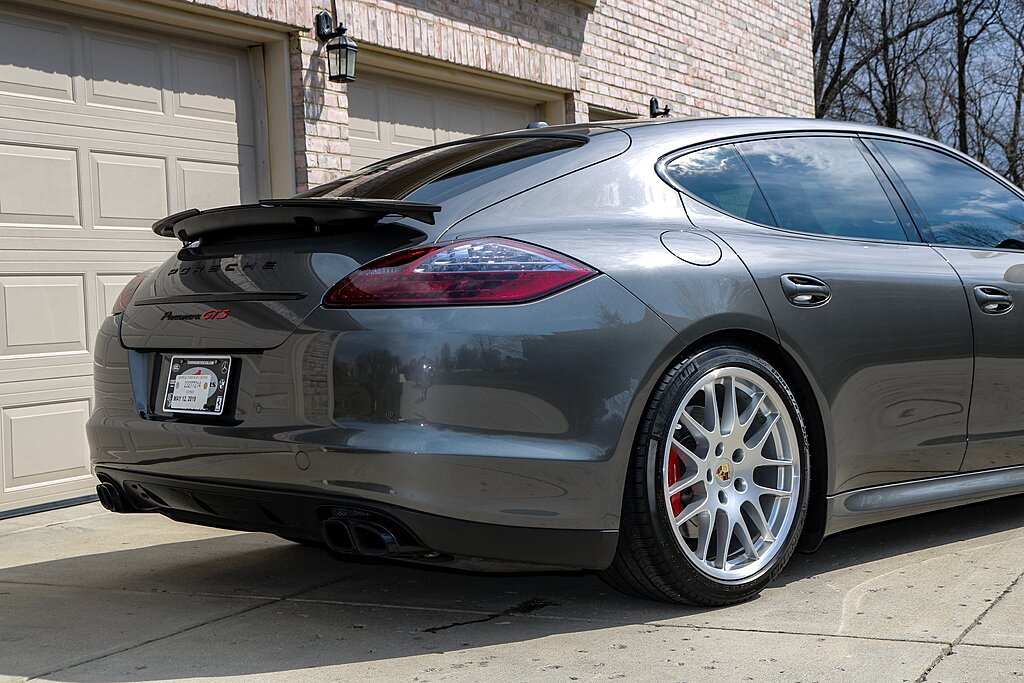
The first thing I did was change out the chrome badges on the rear bumper to a matte black and red using plasti-dip. IMO this combination works a LOT better with the agate grey + black trim throughout the car.
Stock dealer picture...
Attachment 537126
First coat...
Attachment 537127
Fifth coat...
Attachment 537128
Final...
Attachment 537129
The next thing in line was to take off all 4 wheels and remove all the rust/caked on dirt from the rotor hub. The process for doing this (for those interested) is to use a drill with a wire brush attached to fire off all of the rust. Once you do that, wipe down the entire hub with rubbing alcohol prior to coating. I used a high temp semi-gloss paint as my final step (2 coats). If you simply remove the rust without applying some sort of coating, the rust will come back 10x worse once the rotors get wet. Ask me how I know.
Before...
Attachment 537130
After...
Attachment 537131
Coming up...
-Next week the car goes in for 15% tint on all five windows, tinting the taillights to a ruby red color, and blacking out the orange side markers.
-Ordered black "Panamera GTS" decals for the lower panel of the driver doors.
-Paint Correction. This will likely be a 3-5 day project I take on doing a multistep correction to the paint. It's current condition is "okay" and would likely be good enough for most, but as you will soon realize, I'm a bit **** when it comes to cars being right, or what I feel is acceptable.
-BMC Air Filters
-22 inch Matte Black Savini staggered wheels
-Eurocharged ECU Tune. I know, I know - tuning these NA engines won't make that much of a difference, but I talked with the guys over at EC, as they've done all the tuning on my AMG, so I'm going to give it a go.
-Unlikely as the car sounds good in stock form, but I may remove the resonator and replace it with a X or straight pipes. Doubtful, though.
These are all I have in mind thus far, but I'm sure more will come along as time goes on. I did my homework via searching the forum for performance mods for the GTS, but really didn't have any luck. Anyone know of somewhat worth while mods to give it a little more "go"?
Again, these pictures aren't the best but here's a couple more of the car.
Attachment 537132
Attachment 537133
Thanks!
The time has come to sell my GTS...Here is the official sales thread: https://www.6speedonline.com/forums/...ml#post4864733
I added the most recent photos of the car to the top of this thread for new viewers. After this post, you can scroll through to see the beginning-to-end of my Panamera's journey.
Attachment 1
Attachment 1
Attachment 1
Attachment 1
Attachment 1
Attachment 1
Attachment 1
Attachment 1
Attachment 1
Attachment 1
__________________________________________________ ___
Hey Everyone!
I recently acquired a 2013 Agate Grey GTS on Good (Great!) Friday and have enjoyed every second of my short time with it. This forum was very useful during my searching period as I was debating between the GTS vs the Turbo...I won't go into the differences as of course you all already know, but I am more than pleased with my decision.
Although relatively new to this forum, I've been on car forums for many years, specifically MB-AMG, so I wanted to do something a bit different this time. I plan on kind of making this my "journal" if you will for different things I plan to do to the car oppose to creating multiple threads. Hopefully some of you guys will follow along!
These pictures are less than great as I've been very busy and have only had a chance to snap cell phone pics, but I promise to use my DSLR in the future to do this machine some justice.
Now lets get right into it...
The first thing I did was change out the chrome badges on the rear bumper to a matte black and red using plasti-dip. IMO this combination works a LOT better with the agate grey + black trim throughout the car.
Stock dealer picture...
Attachment 537126
First coat...
Attachment 537127
Fifth coat...
Attachment 537128
Final...
Attachment 537129
The next thing in line was to take off all 4 wheels and remove all the rust/caked on dirt from the rotor hub. The process for doing this (for those interested) is to use a drill with a wire brush attached to fire off all of the rust. Once you do that, wipe down the entire hub with rubbing alcohol prior to coating. I used a high temp semi-gloss paint as my final step (2 coats). If you simply remove the rust without applying some sort of coating, the rust will come back 10x worse once the rotors get wet. Ask me how I know.
Before...
Attachment 537130
After...
Attachment 537131
Coming up...
-Next week the car goes in for 15% tint on all five windows, tinting the taillights to a ruby red color, and blacking out the orange side markers.
-Ordered black "Panamera GTS" decals for the lower panel of the driver doors.
-Paint Correction. This will likely be a 3-5 day project I take on doing a multistep correction to the paint. It's current condition is "okay" and would likely be good enough for most, but as you will soon realize, I'm a bit **** when it comes to cars being right, or what I feel is acceptable.
-BMC Air Filters
-22 inch Matte Black Savini staggered wheels
-Eurocharged ECU Tune. I know, I know - tuning these NA engines won't make that much of a difference, but I talked with the guys over at EC, as they've done all the tuning on my AMG, so I'm going to give it a go.
-Unlikely as the car sounds good in stock form, but I may remove the resonator and replace it with a X or straight pipes. Doubtful, though.
These are all I have in mind thus far, but I'm sure more will come along as time goes on. I did my homework via searching the forum for performance mods for the GTS, but really didn't have any luck. Anyone know of somewhat worth while mods to give it a little more "go"?
Again, these pictures aren't the best but here's a couple more of the car.
Attachment 537132
Attachment 537133
Thanks!
Last edited by Flo1989; 01-17-2021 at 11:11 AM.
#4
04-05-2018, 10:30 PM
One filter, not filters.
http://www.insanegarage.com/diy-panamera-air-filter-replacement-change-bmc-filter-installation/
http://www.insanegarage.com/diy-panamera-air-filter-replacement-change-bmc-filter-installation/
Last edited by GT3 Chuck; 04-06-2018 at 04:49 PM.
#6
04-06-2018, 03:28 AM

Sir,
Very nice. I too have a 2013 GTS. I certainly like to do the matte black badges as well. Did you simply peel of the plasti dip or did you have to cut with a scalpel around the letters?
It looks very good in your pictures, I just want to be certain it does not look bad even up really close up from "overspray" if you like.
The red "GTS" part of the badge - was that to connect with red details in the interior? I have silver deviated stitching and seatbelts - thus contemplating the GTS in silver/grey. On the other hand, red does work with taillights and break callipers.
Any price indication on the black labels for the doors?
Thanks in advance,
Martin
#7
04-06-2018, 08:26 AM
Registered User
Join Date: Oct 2016
Location: New Jersey
Age: 42
Posts: 144
Rep Power: 15
Congrats, and great start sir! She is looking good.
2013 GTS here as well. Will be following your build. A few questions on your way by PM.
2013 GTS here as well. Will be following your build. A few questions on your way by PM.
Trending Topics
#8
04-06-2018, 01:09 PM
Join Date: Feb 2018
Location: Ohio
Age: 34
Posts: 209
Rep Power: 15
Thanks!
Smart Lady! The color really does suit the Panamera well.
Yeah, typo. Thanks for the link.
Yeah, typo. Thanks for the link.
Last edited by GT3 Chuck; 04-06-2018 at 04:51 PM.
#9
04-06-2018, 01:12 PM
Join Date: Feb 2018
Location: Ohio
Age: 34
Posts: 209
Rep Power: 15
Thanks!
No scalpel needed to remove the plasti-dip, but what you do need is a great deal of patience. Patience in between coats and most importantly patience when pealing it off. The letters look just as good up close as they do in the photos. The key is to prep (clean) your area well, apply even coats and to make sure to cover every angle, (top and bottom) not just the face of the letters. This was my first time doing this but there are a couple youtube videos that helped me out. I'm having troubles sharing the link so you can PM me for them if you'd like.
Here's where I ordered the decals from. I can't comment on the quality as I have not received them yet, but will report back once I do.
Google "Vortex Signs" as I again can't post the link.
I went with red on "GTS" simply to add a "pop" of color plus it gives it a sportier vibe IMO. I think it ties in well with the taillights and the brake calipers, as you mentioned.
Thanks - PM replied!
Sir,
Very nice. I too have a 2013 GTS. I certainly like to do the matte black badges as well. Did you simply peel of the plasti dip or did you have to cut with a scalpel around the letters?
It looks very good in your pictures, I just want to be certain it does not look bad even up really close up from "overspray" if you like.
The red "GTS" part of the badge - was that to connect with red details in the interior? I have silver deviated stitching and seatbelts - thus contemplating the GTS in silver/grey. On the other hand, red does work with taillights and break callipers.
Any price indication on the black labels for the doors?
Thanks in advance,
Martin
Very nice. I too have a 2013 GTS. I certainly like to do the matte black badges as well. Did you simply peel of the plasti dip or did you have to cut with a scalpel around the letters?
It looks very good in your pictures, I just want to be certain it does not look bad even up really close up from "overspray" if you like.
The red "GTS" part of the badge - was that to connect with red details in the interior? I have silver deviated stitching and seatbelts - thus contemplating the GTS in silver/grey. On the other hand, red does work with taillights and break callipers.
Any price indication on the black labels for the doors?
Thanks in advance,
Martin
Here's where I ordered the decals from. I can't comment on the quality as I have not received them yet, but will report back once I do.
Google "Vortex Signs" as I again can't post the link.
I went with red on "GTS" simply to add a "pop" of color plus it gives it a sportier vibe IMO. I think it ties in well with the taillights and the brake calipers, as you mentioned.
Thanks - PM replied!
#10
04-14-2018, 10:09 AM
Join Date: Feb 2018
Location: Ohio
Age: 34
Posts: 209
Rep Power: 15
This week consisted of getting the window tint done (15% on all 5 windows), side markers and taillights tinted as well. I went with a light tint on the taillights to give me that "ruby red" look it came out perfect.
Next week I'll begin the long, but worthwhile, paint correction process. I'll share some before and after close up shots of the paint and what products I use for those interested. The week after that the BMC filter will be installed and my 22" Savini wheels should be arriving near then as well. I will also apply a ceramic coating to them prior to install for easy maintenance. Stay tuned!
FYI- I will likely be selling the factory wheels after my new ones arrive if anyone is interested. I'll create a separate thread in the sales section of the forum when the time comes.
#11
04-15-2018, 12:30 PM

Yes, more info on the plasti-dip process would be appreciated. Did you just peel it of with your fingers afterwards? It just pulled away from the emblem?
#13
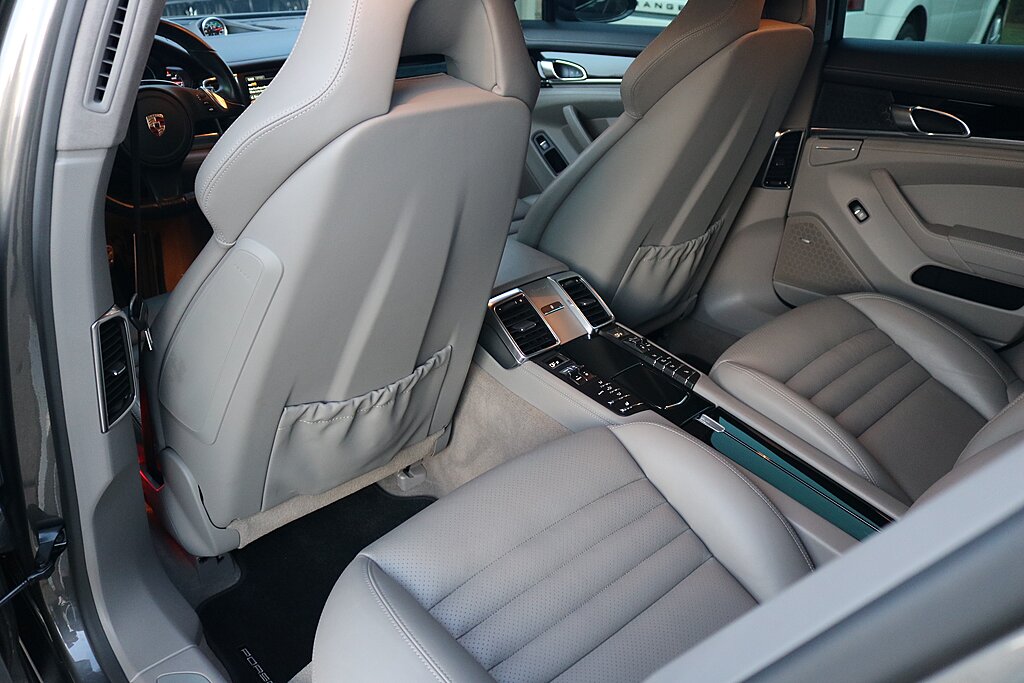
04-15-2018, 06:26 PM
Join Date: Feb 2018
Location: Ohio
Age: 34
Posts: 209
Rep Power: 15 I actually do not have any interior shots. I will snap some soon though. But for the time being its a light gray with black trim (steering wheel, dash, door trim, etc).

