
Proud New '13 GTS Owner..My *Journal*


#122
 10-01-2018, 07:06 PM
Registered User
Join Date: Jun 2018
Location: South Florida
Age: 50
Posts: 314
Rep Power: 18 
Savini does it right! Thanks for the kind words guys. It rides and looks like what I imagined so I’m happy about that. I have even started to like how the grey calipers look.
I think I will plasti dip the letters on the back and be done.............till you guys add more mods to this thread that is
I think I will plasti dip the letters on the back and be done.............till you guys add more mods to this thread that is


#125
11-14-2018, 06:47 PM
Registered User
Join Date: Jun 2018
Location: South Florida
Age: 50
Posts: 314
Rep Power: 18
The wheels are Savini SV-F2 Gloss Graphite (flow form) 22X9 and 22X11,
Gloss Graphite, Matte Bronze and Black with Dark Tint are the other colors out there.
Let me know if you want me to private message you the website I bought them from.
Gloss Graphite, Matte Bronze and Black with Dark Tint are the other colors out there.
Let me know if you want me to private message you the website I bought them from.
#127
12-15-2018, 01:51 PM

Registered User
Join Date: Dec 2018
Location: charlotte, nc
Age: 41
Posts: 2
Rep Power: 0 The key is to start your tape/mask area 1-2" inches away from the area you are dipping so that you can get a smooth peal when it comes time to take it off. Too close and you will start to run into problems. Me personally, I would mask a pretty good amount further out from the desired section because although its just plastidip, you can have overspray (ask me how I know). The spray will get into those cracks - some may peal right out and some you may have to use a toothpick to get the rest of it out. The key here is to make sure you peal it really slow - and when you think you're going slow, go slower.
#128
12-16-2018, 04:47 PM
Join Date: Feb 2018
Location: Ohio
Age: 34
Posts: 209
Rep Power: 15 Flo, I really appreciate all the info you�ve posted here. I just bought a 2013 Panamera S and will be using plasti dip on the emblems. How did you maintain the separation between the black and red? Did you mask one side and spray the other or did you just control it by hand? Thanks for your help and the inspiration!!
As far as doing the black/red combo, it was a bit tricky to do in the sense of making sure I didn't have any overspray cross over to either side. I used a piece of cardboard, maybe 12-14" in length and simply placed it in between the 'a' in Panamera and 'G' in GTS. So while I was doing the GTS in red, I held the cardboard with the left hand, sprayed with the right. And did the opposite procedure when doing Panamera in black. I had to spray a little closer than I would have liked to, but I just made sure to go light on the coats. Turned out pretty good.
#129
12-31-2018, 09:59 AM
Join Date: Feb 2018
Location: Ohio
Age: 34
Posts: 209
Rep Power: 15
Hey fellas...Here's a little update on what's been going on with the GTS...
The Eurocharged ECU tune has been installed. Unfortunately it's winter time here in Ohio so I haven't been able to fully push the car to look for a difference, but I can definitely tell that the character of the Panny has changed, in a good way. Throttle response seems to be that much more responsive and a bump in power seems to be there as well. I plan to do so number testing in the spring with the dragy data log, so stay tuned for that.
Also, I've been searching high and low for a diffuser for the 2013 GTS. 99% of what I've found was either junk or required replacing the whole rear bumper but I finally came across one that seems to be up to my standards! I will be sharing it with you all as soon as I receive it. I also let the company know that I was pretty active in the Panamera community so if all works out well, I'm sure a lot of you will be interested in the diffuser. I asked them to share some before/after photos as I am having them paint it gloss black - L741 paint code to be exact (it's a Porsche color).
#131
12-31-2018, 02:34 PM
Looking forward to the feedback regarding the tune and I'm curious about the diffuser.
What exactly does the install for a Eurocharged tune consist of? I assume you had to take it to a shop, or is the install at least DIY and any tinkering needed with stock ECU post install? Or am I way off base and this is a full on 100% ECU replacement?
Also, if you don't mind me asking, how much (ballpark is fine if you do not want to disclose the actual amount) did it cost? I can see on the site about $1k, I'm more curious about once you've spent that, what does it cost to actually get it working in the car. Thanks in advance and I appreciate any insight.
#132
01-01-2019, 10:55 AM
Join Date: Feb 2018
Location: Ohio
Age: 34
Posts: 209
Rep Power: 15
See Pics below!
So to install the tune, it's a relativity simple process that you can do from your garage - literally. Included with the price of the tune is a handheld programmer called My Genius. This gives you the ability to pull your stock file from the car and send it to them and then the ability to install your tune file back to the car. Quick run down of the whole process; You download the My Genius software on your computer. Update the handheld programmer. Take the handheld out to your car. Plug it in to the OBD II port under the steering wheel. Follow the step by step instructions to pull the stock file from the vehicle (5 mins tops) and from there you upload that file to your PC and send it to Eurocharged. In 48hrs they send you a tuned file back. From there, you follow the above instructions but this time you'll upload a file to the car instead of pulling the stock one.
As far as pricing, I paid $820 out the door. In all of my years of dealing with EC, I've always got a better price than advertised on their site. They do great work over there too. I had a stage 2 CLS AMG with their software and it ran solid with zero issues for the 5 years of me having that set up.
Now onto the diffuser. I received these photos from the company last night and here's what they said regarding the steps:
"We started off by applying featherfill 2 part primer"
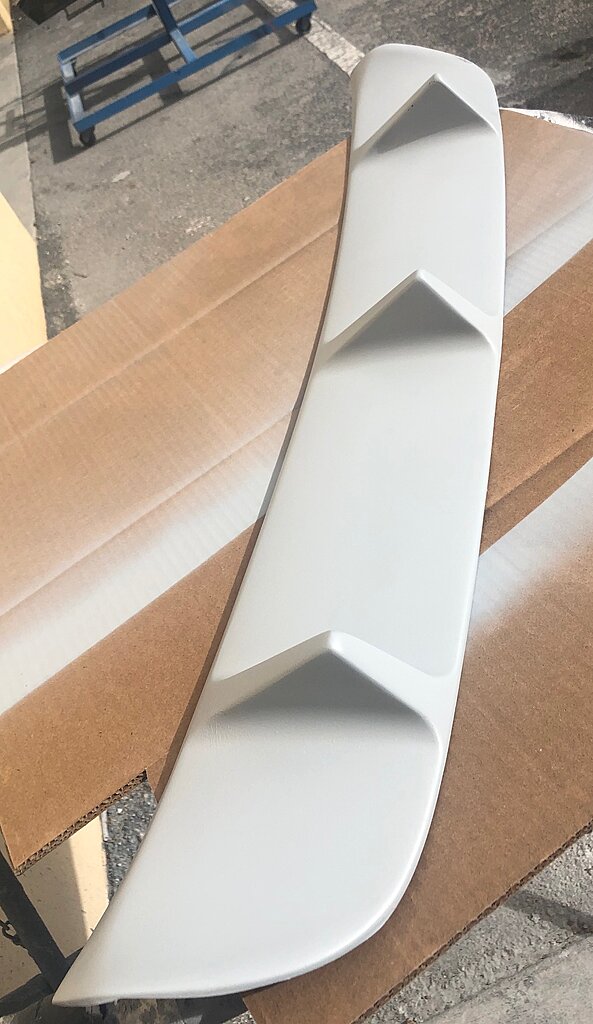
"Next, sand smooth, apply 4 to 5 coats of paint"
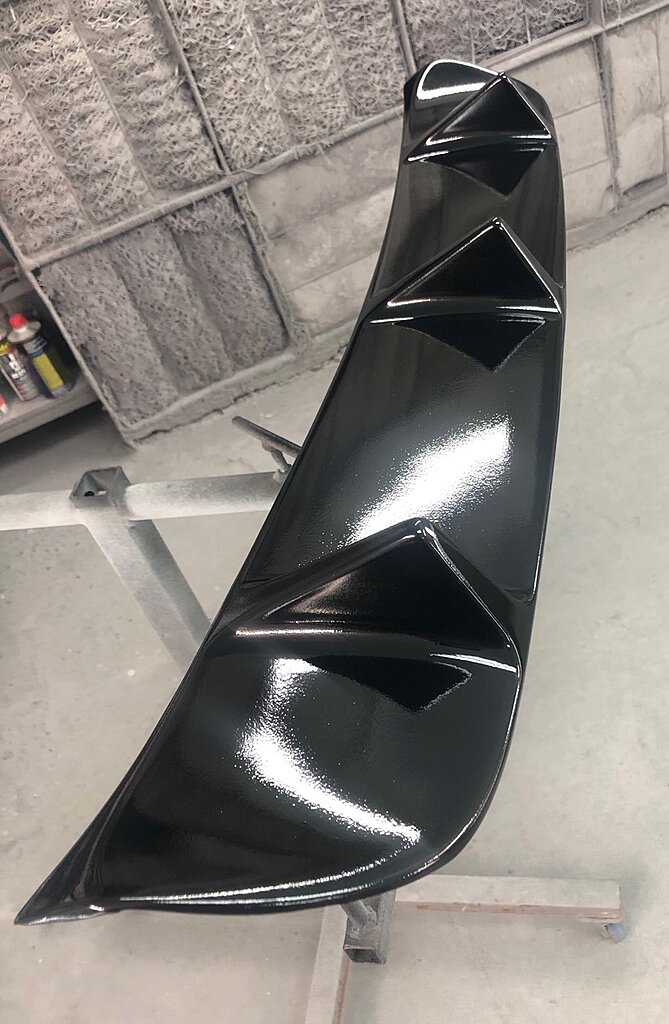
"Next we applied 4 to 5 coats of European clear coat 2/1 mix"
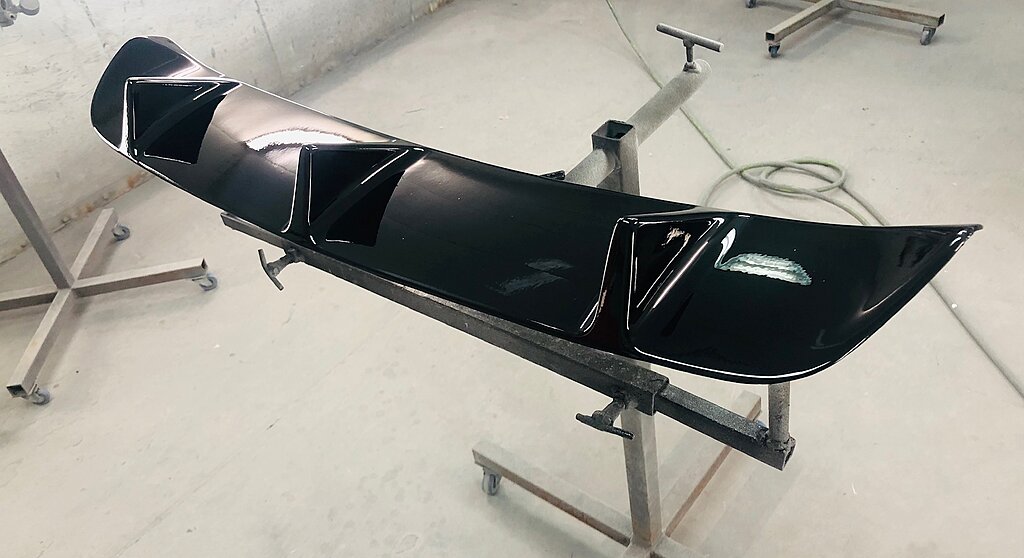
The next and final step is suppose to take place Wednesday as they'll wet sand and buff it. I think this is going to be an awesome touch to the rear of the car - much more aggressive than the stock center section currently in place.
Looking forward to the feedback regarding the tune and I'm curious about the diffuser.
What exactly does the install for a Eurocharged tune consist of? I assume you had to take it to a shop, or is the install at least DIY and any tinkering needed with stock ECU post install? Or am I way off base and this is a full on 100% ECU replacement?
Also, if you don't mind me asking, how much (ballpark is fine if you do not want to disclose the actual amount) did it cost? I can see on the site about $1k, I'm more curious about once you've spent that, what does it cost to actually get it working in the car. Thanks in advance and I appreciate any insight.
What exactly does the install for a Eurocharged tune consist of? I assume you had to take it to a shop, or is the install at least DIY and any tinkering needed with stock ECU post install? Or am I way off base and this is a full on 100% ECU replacement?
Also, if you don't mind me asking, how much (ballpark is fine if you do not want to disclose the actual amount) did it cost? I can see on the site about $1k, I'm more curious about once you've spent that, what does it cost to actually get it working in the car. Thanks in advance and I appreciate any insight.
As far as pricing, I paid $820 out the door. In all of my years of dealing with EC, I've always got a better price than advertised on their site. They do great work over there too. I had a stage 2 CLS AMG with their software and it ran solid with zero issues for the 5 years of me having that set up.
Now onto the diffuser. I received these photos from the company last night and here's what they said regarding the steps:
"We started off by applying featherfill 2 part primer"
"Next, sand smooth, apply 4 to 5 coats of paint"
"Next we applied 4 to 5 coats of European clear coat 2/1 mix"
The next and final step is suppose to take place Wednesday as they'll wet sand and buff it. I think this is going to be an awesome touch to the rear of the car - much more aggressive than the stock center section currently in place.
Last edited by Flo1989; 01-01-2019 at 11:03 AM.
#133
01-01-2019, 01:14 PM
Registered User
Join Date: Jun 2018
Location: South Florida
Age: 50
Posts: 314
Rep Power: 18
That diffuser will make it more aggressive for sure!! too bad I have the 2015 bumper 
The paint process seems like they really care about what they are doing, should look flawless!
Cheers
The paint process seems like they really care about what they are doing, should look flawless!
Cheers
#134
01-02-2019, 09:56 AM
Join Date: Feb 2018
Location: Ohio
Age: 34
Posts: 209
Rep Power: 15
That was actually the problem I kept running into; All of the aggressive, of quality diffusers I found were for the 2014+ plus bumper. So if you were in the market for one, I'm sure you could definitely score one to your liking.
#135
01-02-2019, 12:52 PM
Thank you for the reply and sharing your experiences with EC. I've gotta say that's far easier than I expected, and if I'm being honest kinda crazy if you think about it; I know its been like this for years now, but still not having to spend hours with a dude tuning and dyno runs etc, it's all boiled down to email and downloads. That's awesome.
Can't wait to see install pics of the diffuser. Mine came with paint matched and gloss black rear lower bumper part, so the addition of a more aggressive diffuser could look really good.
Can't wait to see install pics of the diffuser. Mine came with paint matched and gloss black rear lower bumper part, so the addition of a more aggressive diffuser could look really good.