anyone blackout the headlights?
#16
 06-21-2010, 08:56 AM

Join Date: Jan 2010
Location: Colorado
Posts: 113
Rep Power: 19 
I played around with this a bit this afternoon.
The lights are sealed with a grey silicone. Which is different than the black stuff that both my Audis were sealed with. Dispite them both being made by Valeo.
I used an Exacto knife and a dental pick to remove the silicone. Have about 90% of it out. That is where I had to stoo for tonight. Looks like once you dig/cut all the silicone free you should be able to pry the catch tabs up and separate the two halves fairly easy.
The nice thing about the Cayenne is that the headlights come off so easy that you can work on this a little at a time and just put them back in.
I will post more when I have time to work on it again.
 can't wait to see them
#17
06-22-2010, 09:21 AM
Have you tried heating them? Usually the headlight "glue" is designed to loosen up with medium heat for a bit of time... usually 250-300 for like 20 minutes, they the headlights should easily separate.
This is a pretty common mod though, and it almost always looks great. Not as much when people color match the interior of the headlights.
Here's a nice thing, if you clean up the outside of your headlight lens, a light smoke vinyl (or really any other vinyl) will help to keep them from getting cloudy and such.
#18
06-25-2010, 12:54 AM

Hi all,
just thought i would post my experience with this process as I have tried to open my headlights. This is my first time posting on these forms.
After many attempts to open the housing and failing, i will probably resort to tinting them either black or color matched with the vehicle(Titanium silver) and putting aluminium trim.
Anyways the process i have tried with no success are as follows:
Baking in the oven:
200F for 10mins followed by prying (process times 3 in a row)
250F For 15mins followed by prying (Process times 3 in a row)
275F for 18minutes followed by prying then added 10mins/prying
250F 20 minutes followed by prying.
350F oven, turned oven Off left in for 10-15minutes followed by prying
300F 15minutes( followed by prying)
I also tried a heat-gun with no success.
I then used an exact-o knife to cut almost ALL the adhesive from the exterior side and baked it at a few different temperatures/times followed by prying with NO LUCK. The remaining adhesive just did not get gooey at any temperatures i tried.
I am not sure what adhesive they use, but when i did my Audi TT lights it came apart super easy.
If anyone else gets luck with theres please share. If i bake mine anymore next time i open the over there will probably be a turkey.
also the lenses cover is a slightly hazey.
I am just posting as a FYI, my experience may differ from others. (people with better luck lol)
#19
07-07-2010, 08:44 PM
So, I've been cruising the Russian Cayenne forums again. Who would have thought the Russians were more creative with this stuff than us
Anyway, seems that they are cutting a notch in the sealing trim every 10cm, heating it up and bending it back to access the rest of the seal. Then reheating it to bend back into place and seal it down.
Here are some more pics. Could not find a way to join the forum so I can't ask for any more detailed pics of the process.
http://g-tuning.ru/netcat_files/360/...48cf28df27df50

#21
07-08-2010, 08:19 AM
No idea what they are using to cut or reseal with. I would imagine you can section the outer trim layer with a hack saw blade, dermal, or cut off wheel real easy. Then use some form of silicone to reseal it.
#24
07-09-2010, 02:24 AM

Hi guys. I'm the owner of Porsche Cayenne Club Russia (knclub.ru). I've been reading your posts about black headlights and registered to help you  Please feel free to ask me details about the whole process.
Please feel free to ask me details about the whole process.
#26
07-09-2010, 09:50 AM

Could you provide us a step by step (with pictures) of the whole process? I am so interested in starting this project for my CTT. I think the lights would look so sweet on the ride. Thanks!
#28
03-26-2011, 02:10 PM
Registered User
Join Date: May 2009
Location: Southwest Florida
Posts: 1,724
Rep Power: 91 

#29
03-26-2011, 03:53 PM
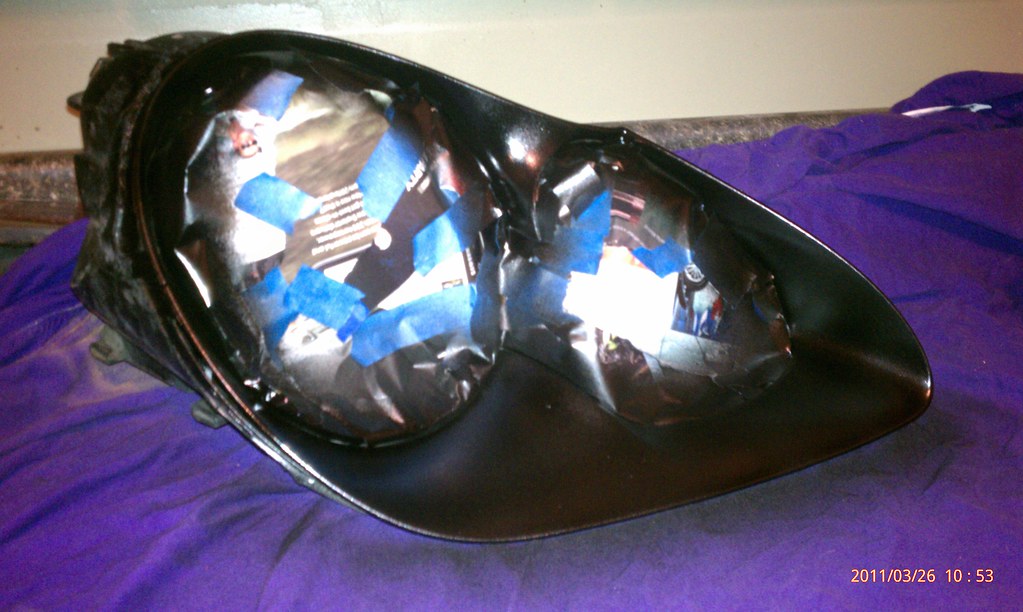
Well, today I decided to take another stab at it! I figure it was done by the Russians so it must be able to be done (Just wish I could have searched more of the Russian posts, hard when you don't read Russian).
Anyway. Have one light done and figured I would post some results before starting on the second one.
I had one hazy light and one perfect one. So I started with the hazy one figuring that if I destroyed it I would just upgrade to a nicer one.
This is not for the faint of heart!!!! After trying, baking, digging out the glue, notching the housing I figured I would go all in with the Dremel and just cut the damn thing open
The lens rides in a notch. So it is effectively sealed from 3 sides. Only one of which can you get to with a dental pick to try to get the gasket stuff out. The housing also turns soft and starts to melt before the glue does. Someone had to find this out, your welcome!!
So the only way to get the lens out of the housing is to cut off the top part of the channel ALL the way around the lens. The plus side to this is it gives a nice surface to reseal the lens when done. You can also slather on adhesive sealer onto the top surface to make sure you have an air tight seal (I used 3M window weld.)
Here are a couple of pics of the one side done. Keep in mind that the lens is still a bit hazy. I will polish it now that I know I don't have to buy a new light.

(Just wish I could have searched more of the Russian posts, hard when you don't read Russian). Anyway. Have one light done and figured I would post some results before starting on the second one.
I had one hazy light and one perfect one. So I started with the hazy one figuring that if I destroyed it I would just upgrade to a nicer one.
This is not for the faint of heart!!!! After trying, baking, digging out the glue, notching the housing I figured I would go all in with the Dremel and just cut the damn thing open
The lens rides in a notch. So it is effectively sealed from 3 sides. Only one of which can you get to with a dental pick to try to get the gasket stuff out. The housing also turns soft and starts to melt before the glue does. Someone had to find this out, your welcome!!
So the only way to get the lens out of the housing is to cut off the top part of the channel ALL the way around the lens. The plus side to this is it gives a nice surface to reseal the lens when done. You can also slather on adhesive sealer onto the top surface to make sure you have an air tight seal (I used 3M window weld.)
Here are a couple of pics of the one side done. Keep in mind that the lens is still a bit hazy. I will polish it now that I know I don't have to buy a new light.
#30
03-26-2011, 04:54 PM

Registered User
Join Date: Oct 2010
Location: Richmond,VA (USA)
Posts: 157
Rep Power: 20
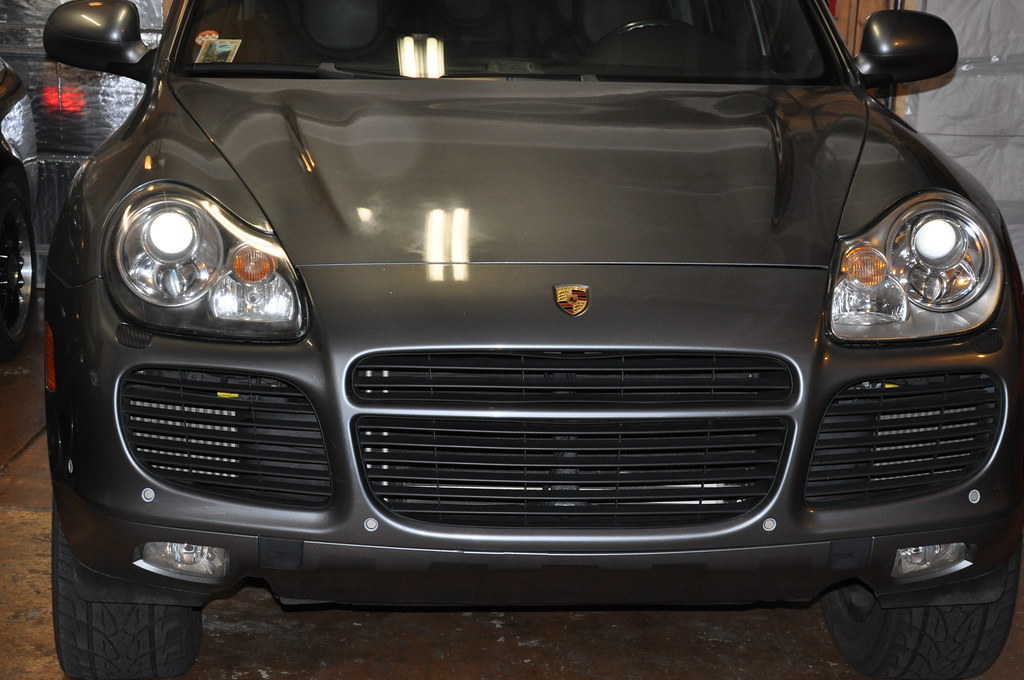
Make me even more happy about my Goldish colored Cayenne as I'm happy with the silver .
Lots of work !
However, with a dark colored vehicle, it looks outstanding. GOOD JOB
Lots of work !
However, with a dark colored vehicle, it looks outstanding. GOOD JOB