When you click on links to various merchants on this site and make a purchase, this can result in this site earning a commission. Affiliate programs and affiliations include, but are not limited to, the eBay Partner Network.
There still seems to be some confusion as to how to get these headlights open.
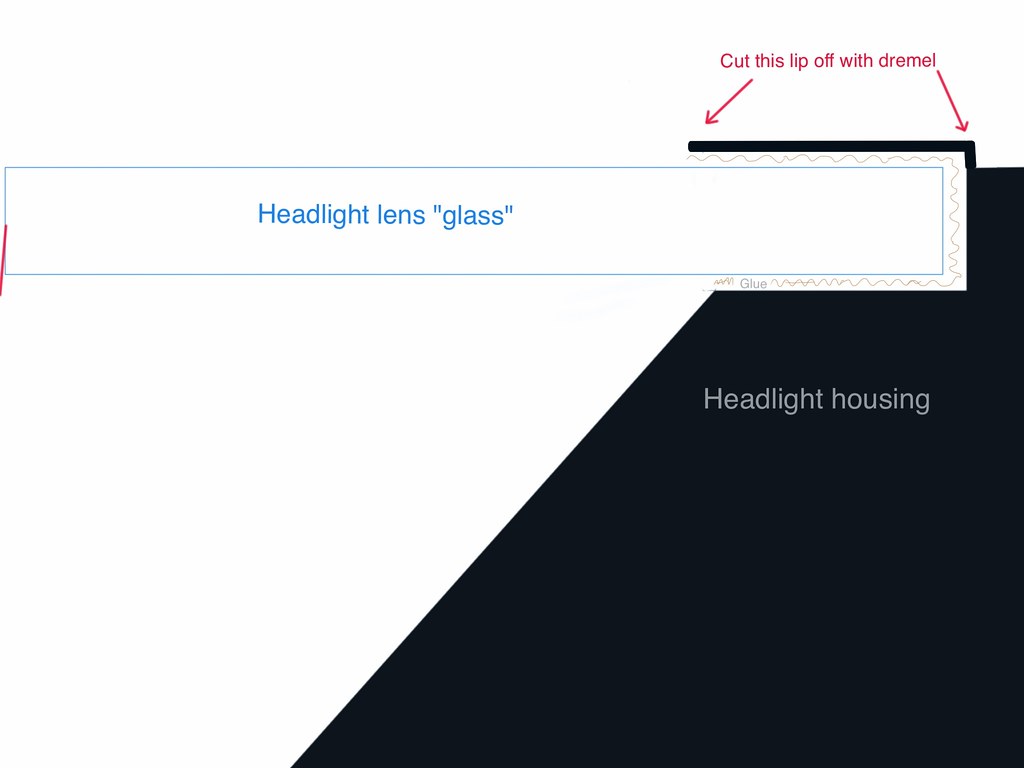
I created a quick diagram on the ipad (not to scale) to help people understand what needs to be done to get the lens out. Below is a cross section of how the lens sits in the headlight all the way around.
The glue on these headlights surrounds the lens on three sides. It also does not melt before the housing material melts so it won't just soften up like other headlights I've worked on.
You have to break the seal. The only way I have found to do this without brewing the lens is to cut the top layer of the "C channel" off so that you can get a prying stick (screwdriver) in behind/under the lens to pry it off. (It will still put up a fight so go slow and work your way around. )
I used a Dremel to cut this lip off all the way around the headlight. Don't worry, there is still enough mounting surface to completely seal the headlight again with 3M "Window Weld". My headlights have been moisture free since I did this.
I did mine in March of 2011 and here is what they look like today.
There still seems to be some confusion as to how to get these headlights open.
I created a quick diagram on the ipad (not to scale) to help people understand what needs to be done to get the lens out. Below is a cross section of how the lens sits in the headlight all the way around.
The glue on these headlights surrounds the lens on three sides. It also does not melt before the housing material melts so it won't just soften up like other headlights I've worked on.
You have to break the seal. The only way I have found to do this without brewing the lens is to cut the top layer of the "C channel" off so that you can get a prying stick (screwdriver) in behind/under the lens to pry it off. (It will still put up a fight so go slow and work your way around. )
I used a Dremel to cut this lip off all the way around the headlight. Don't worry, there is still enough mounting surface to completely seal the headlight again with 3M "Window Weld". My headlights have been moisture free since I did this.
I did mine in March of 2011 and here is what they look like today.
I've just completed my 957 lights.
Process is the same as for the 955. Still a nerve-wrecking task even after cutting off the edge, as the glue is still very strong and I was in constant fear of cracking the plastic cover while removing it.
But I eventually got it done without breaking anything.
I decided to try a 4 led setup inside the light while I was in there, and it turned out pretty good.
I found out the hard way that the "chrome" plating on the trims around the lens are very fragile. I masked it with a bit of tape to protect it while I was drilling the holes for the LEDs and the chrome coating came off with the tape.
I sprayed the entire thing black.
Nothing special, just a few I had that I picked up on fleabay.
Here are the links for the leds and sockets if you're interested.
http://www.ebay.co.uk/itm/351223052816?_trksid=p2060353.m2749.l2649&var=620401938357&ssPageName=STRK%3AMEBIDX%3AIT
http://www.ebay.co.uk/itm/252020381950?_trksid=p2060353.m2749.l2649&var=550881365231&ssPageName=STRK%3AMEBIDX%3AIT
I tried a few, but these looked best.
 08-30-2012, 08:37 AM


 ) to help people understand what needs to be done to get the lens out. Below is a cross section of how the lens sits in the headlight all the way around.