New member, recent 924 owner...

Thread Starter
|
Registered User
Joined: Jul 2008
Posts: 154
From: Redmond, OR
Rep Power: 24

__________________________________________________ ____
2-2-09
Connections with wear and tarnish on them with some corrosion. The connection itself would be a pain in the *** to re-use, but the male connector below it can be sanded down to bare metal to re-ruse. In this case, all of the connectors on the gauges are like this. We're going to not only re-wire some of it, but re-route the wires, heat wrap some of them, and replace ALL the connectors.

In a macro example, here is what you can do using fine grit sandpaper to get the crap off the connection and back down to bare metal to re-use it. You need to make sure you sand ALL OF THE CRAP OFF OF IT!


You should absolutely test each connection for each new connection you do to ensure they are 100% okay. You can do this by touching the male connector you've sanded down which is making a nice connection with your end connectors. You can touch the end connectors, but we know they work, so by touching the male connector we are ensuring that the connection between that male connector to the other male connector (and the wiring job you did inbetween) worked.
Example:

Now we can start wiring.

These connectors are a mess. The wires are flexible still... but the end connectors suck. Let's re-do this entire spot. Start by labeling or taping off where things go, or, if you prefer to do it visually like me do one connector at a time, gradually cutting a wire, stripping it, crimping it, and putting it back.

You can see on the left i've clipped the wires going to the connection and put a new end connector on it. To top it off i'm going to run these wires together so it's less of an eyesore and easier to figure out. First thing about heat shrink wrap you REALLY DO NOT need to use a whole tube. You can very easily cut it into tiny slits and then move them over your wires and then shrink them into parts of the wire. This uses less material, lasts just as long and is easier to see the wire colors too. You can buy a $20 box of shrink wrap that has a crapload of heat wrap tubing and it'll last you nearly a life time if you do it this way.

Now we heat up the shrink wrap... and tada!

We're done!
Almost.
These black end connectors look like plugs, but they aren't. They simply house these wires to make it easier to make the connector so you don't forget how they go on. Who cares, the connectors are toast, let's do this the clean way. Do you remember the first picture?

I've now clipped the wires down shorter (less hairy mess) and put new connectors on all wires in the same order they were placed in the plugs and attained less material used, cleaner routing job and shrink wrapped some of them.
Now the end result is less messy, better connections, re-used some of the wiring, used new wiring, and we've successfully brought these gauges back to life! Now the main thing is to get all the rusty mess off the metal gauge pods themselves and these suckers are as good as new. Functional now at least.

(note - this was part of a how to on wiring i did that has been edited more to the worklog to show you the progress of fixing these gauges)
2-2-09
Connections with wear and tarnish on them with some corrosion. The connection itself would be a pain in the *** to re-use, but the male connector below it can be sanded down to bare metal to re-ruse. In this case, all of the connectors on the gauges are like this. We're going to not only re-wire some of it, but re-route the wires, heat wrap some of them, and replace ALL the connectors.
In a macro example, here is what you can do using fine grit sandpaper to get the crap off the connection and back down to bare metal to re-use it. You need to make sure you sand ALL OF THE CRAP OFF OF IT!
You should absolutely test each connection for each new connection you do to ensure they are 100% okay. You can do this by touching the male connector you've sanded down which is making a nice connection with your end connectors. You can touch the end connectors, but we know they work, so by touching the male connector we are ensuring that the connection between that male connector to the other male connector (and the wiring job you did inbetween) worked.
Example:
Now we can start wiring.
These connectors are a mess. The wires are flexible still... but the end connectors suck. Let's re-do this entire spot. Start by labeling or taping off where things go, or, if you prefer to do it visually like me do one connector at a time, gradually cutting a wire, stripping it, crimping it, and putting it back.
You can see on the left i've clipped the wires going to the connection and put a new end connector on it. To top it off i'm going to run these wires together so it's less of an eyesore and easier to figure out. First thing about heat shrink wrap you REALLY DO NOT need to use a whole tube. You can very easily cut it into tiny slits and then move them over your wires and then shrink them into parts of the wire. This uses less material, lasts just as long and is easier to see the wire colors too. You can buy a $20 box of shrink wrap that has a crapload of heat wrap tubing and it'll last you nearly a life time if you do it this way.
Now we heat up the shrink wrap... and tada!
We're done!
Almost.
These black end connectors look like plugs, but they aren't. They simply house these wires to make it easier to make the connector so you don't forget how they go on. Who cares, the connectors are toast, let's do this the clean way. Do you remember the first picture?
I've now clipped the wires down shorter (less hairy mess) and put new connectors on all wires in the same order they were placed in the plugs and attained less material used, cleaner routing job and shrink wrapped some of them.
Now the end result is less messy, better connections, re-used some of the wiring, used new wiring, and we've successfully brought these gauges back to life! Now the main thing is to get all the rusty mess off the metal gauge pods themselves and these suckers are as good as new. Functional now at least.
(note - this was part of a how to on wiring i did that has been edited more to the worklog to show you the progress of fixing these gauges)
Thread Starter
|
Registered User
Joined: Jul 2008
Posts: 154
From: Redmond, OR
Rep Power: 24
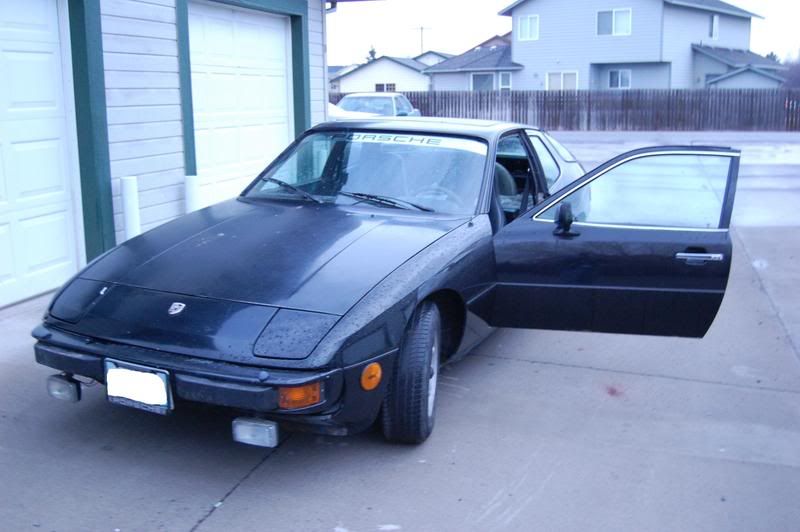
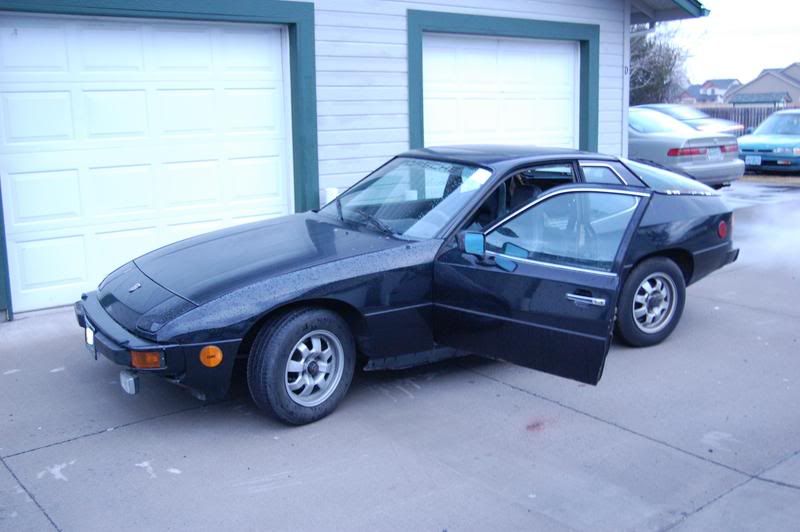
Just for ****s and giggles... day photo of the car now that it's no longer thrashed.
Did a bit more tinkering today and got it running smoothly.. Video....:
http://www.youtube.com/watch?v=E7ygVRL0W6Y
Repaired the hatch and figured out why the stupid thing wasn't locking consistently.
However, in the process of changing a lightbulb above the car i also noticed the rear portion of my hatch towards the top of the car near the roof has a big gap, this is why it is leaking so badly.
Anyway... the old bushings which acted as sort of a guide were so deteriorated that they had literally fallen to pieces (as most pieces of rubber from 1977 that were in the elements....) and fallen out of the actual locking mechanism. What this did essentially was cause the pins that latch down into the locking mechanism to seat at an angle. The problem with this is that once I would turn the key and the locking latches opened, the pin was at such an aggressive angle that it was literally stuck to the side of the mechanism. The only way out of this was literally a screwdriver through the bottom of the latch CAREFULLY to move it to the side while applying pressure to the hatch window.
When i got the bushings from Porsche they were a 911 part number. They had the same shape to actually fit into the locking mechanism itself and i had to cut holes where the pins went but it actually provided a much more SOLID closing of the hatch, they stayed in place, and made a nice tight lock. Much better....
Pics to come later. But the difference was night and day.
Thread Starter
|
Registered User
Joined: Jul 2008
Posts: 154
From: Redmond, OR
Rep Power: 24
parts on order:
Drum brake pieces
Drum brake pads
Intake Manifold Gasket
Exhaust manifold gasket
fuel filter
window-weld
hatch latch bushing mount
hatch latch lock pin
hatch latch washer
hatch latch nut
Drum brake pieces
Drum brake pads
Intake Manifold Gasket
Exhaust manifold gasket
fuel filter
window-weld
hatch latch bushing mount
hatch latch lock pin
hatch latch washer
hatch latch nut
Thread Starter
|
Registered User
Joined: Jul 2008
Posts: 154
From: Redmond, OR
Rep Power: 24
 (actually been looking into 911 models lately! LOL! funny you'd say that!)
Thread Starter
|
Registered User
Joined: Jul 2008
Posts: 154
From: Redmond, OR
Rep Power: 24
Parts have arrived and i have a 4 day vacation coming up... and i'm spending it IN THE GARAGE! WITH A WRENCH IN MY HAND!
Oh and a hammer (best porsche tool ever. i told my fiance it's impossible to work on a porsche without one)
Oh and a hammer (best porsche tool ever. i told my fiance it's impossible to work on a porsche without one)
Thread Starter
|
Registered User
Joined: Jul 2008
Posts: 154
From: Redmond, OR
Rep Power: 24
Ok pics...
So basically the fuel filter was the culprit in my fuel hesitation, the car has no more "hesitation" so it wasn't the distributor advance afterall, although i got new vacuum line (see this thread here as i'm trying to figure out the routing w/o emissions) so that i can fix everything and get it running smoothly.
The car feels like it's missing at low rpms. Or running really rough. Once i get it up to what i'd say is about 2k rpms, she runs smooth as butter, strange.
Ok so pics... here's the old fuel filter
Tasty.
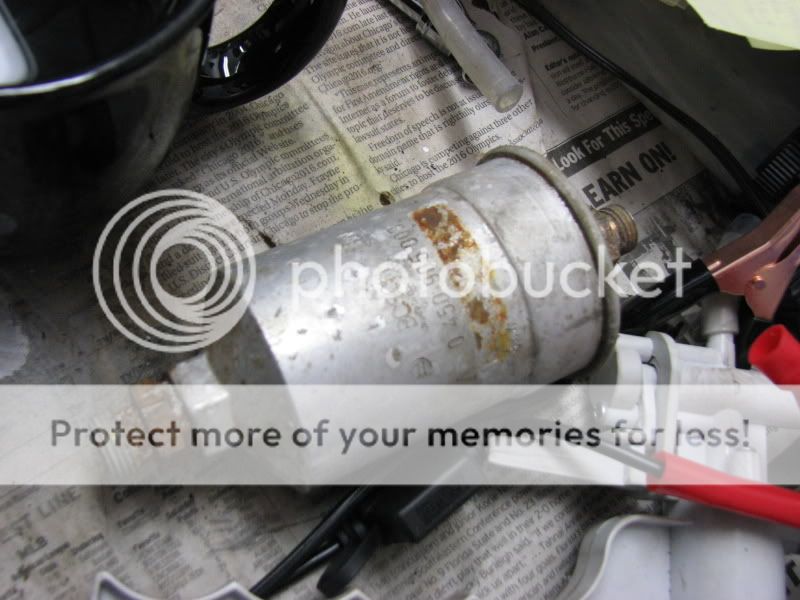
The reason for the hesitation? Check out the color of the liquid hitting the newspaper, no, that isn't seethrough newspaper, yes, it's the same color as the work bench.
Cut a new ring to fit in place of the old one as the old one was rusted to hell, fit like a glove.


Used my dremel and cleaned up all the fittings for all ends of the fuel filter
new happy filter in place
Pictures of the hatch progress to come later.
So basically the fuel filter was the culprit in my fuel hesitation, the car has no more "hesitation" so it wasn't the distributor advance afterall, although i got new vacuum line (see this thread here as i'm trying to figure out the routing w/o emissions) so that i can fix everything and get it running smoothly.
The car feels like it's missing at low rpms. Or running really rough. Once i get it up to what i'd say is about 2k rpms, she runs smooth as butter, strange.
Ok so pics... here's the old fuel filter
Tasty.
The reason for the hesitation? Check out the color of the liquid hitting the newspaper, no, that isn't seethrough newspaper, yes, it's the same color as the work bench.
Cut a new ring to fit in place of the old one as the old one was rusted to hell, fit like a glove.
Used my dremel and cleaned up all the fittings for all ends of the fuel filter
new happy filter in place
Pictures of the hatch progress to come later.
Thread Starter
|
Registered User
Joined: Jul 2008
Posts: 154
From: Redmond, OR
Rep Power: 24
More progress. All the parts came today! Except the stupid deck piece....
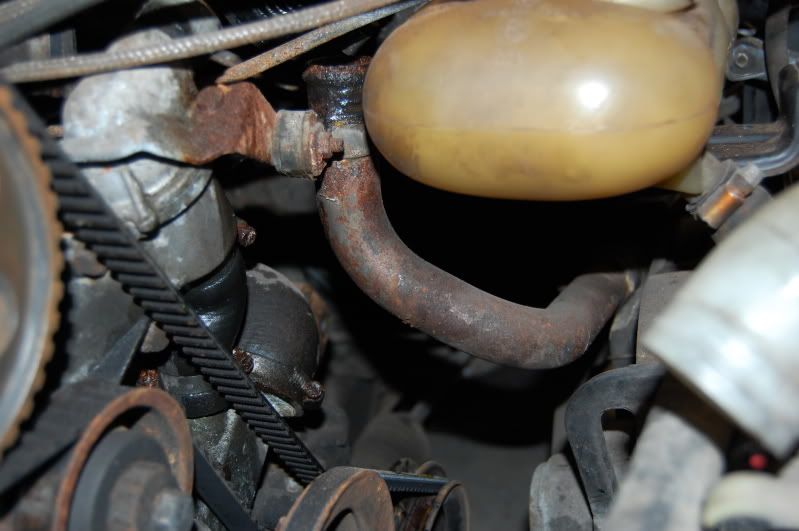
Well. Today I got almost all of my parts here. I found out I'm going to need some more after giving a more thorough look over my cooling system. The radiator is good. The hoses are /okay/ but need replaced, and all of the clamps were crap. Hoses are a check, clamps are a check, the seals and gaskets are a check. The main problem as i started undoing hoses and checking things to replace them was the big metal tubes that are attached to parts of the system. While the engine didn't actually pass any rust in the coolant flush and it's doing a fabulous job cooling, these parts of the system are rusted to hell on the inside just because the engine never once moved and circulated over the 10 year span. So quite literally where the coolant sat these things just sat and rusted. Thank god it didn't circulate. I checked and checked and checked, everything seems to be okay. So I will be replacing all the cooling tubes soon.
However... because I did make some decent progress today, i'm posting away.
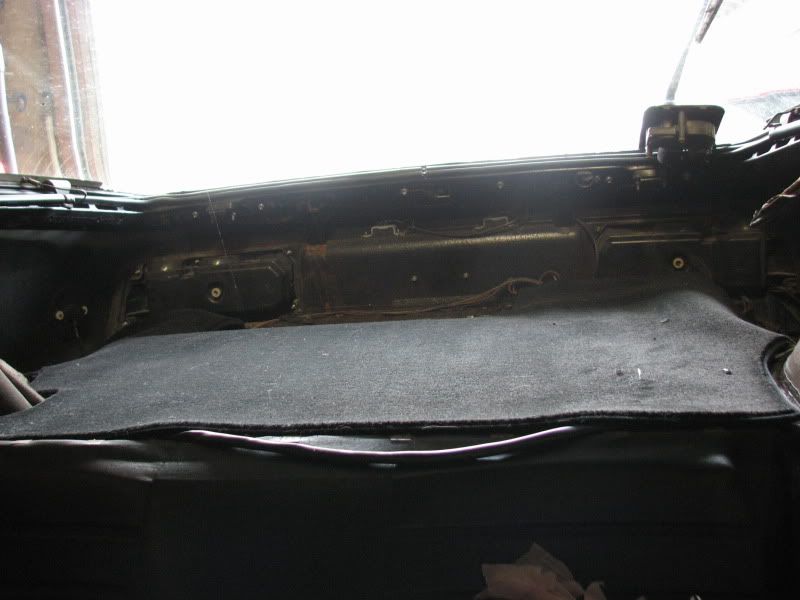
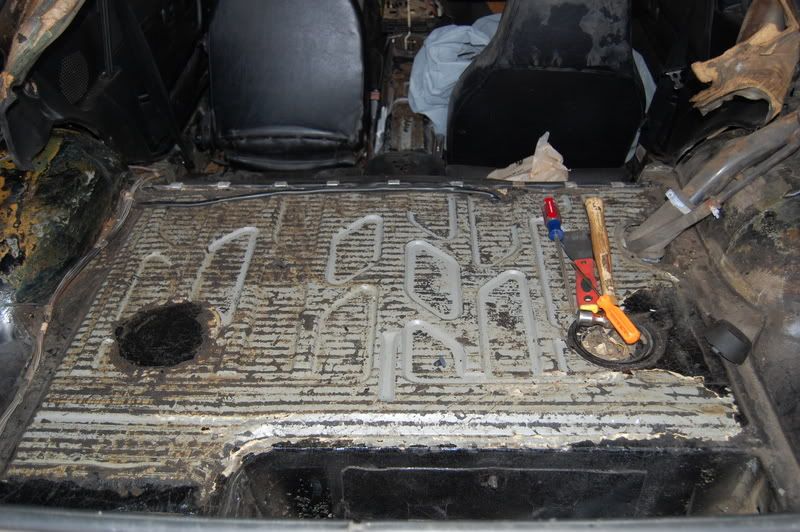
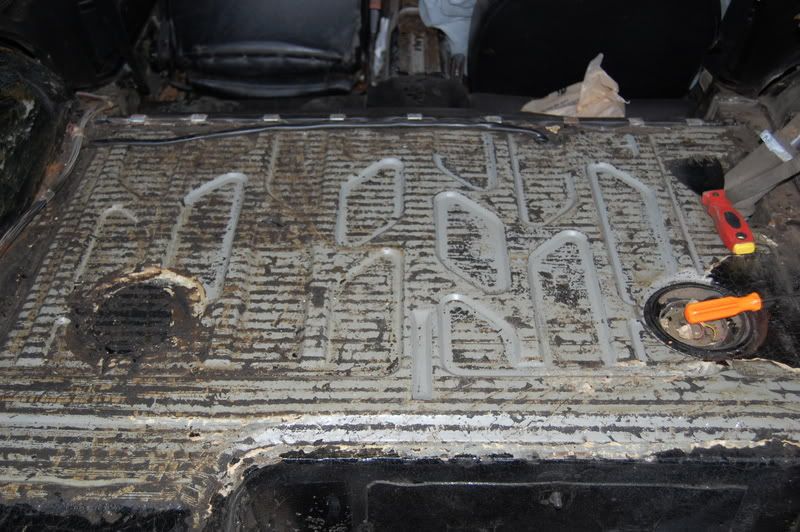
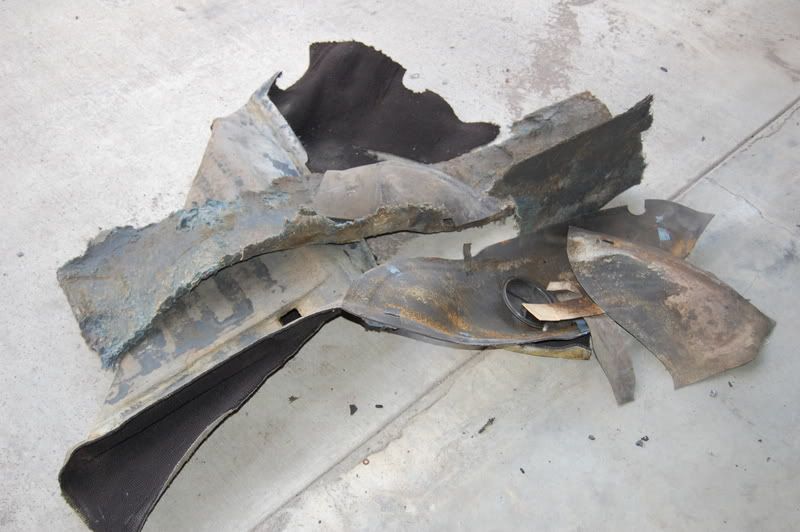
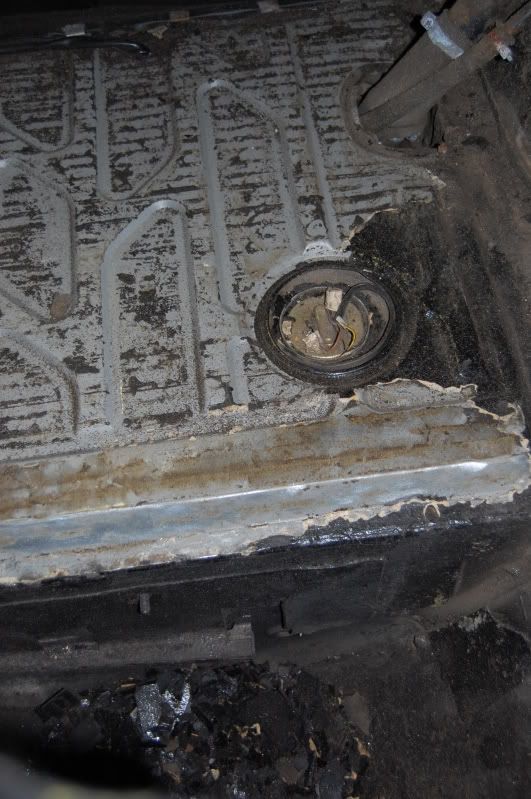
The trunk is ready to finish stripping and seal for the deck lid that is coming. For those who did not get to see the back of the car when I got it, here is a horrific idea of what it looked like.
First, here's the carpeted piece of the back. The white you see on the spare tire area is not a reflection, that is... well.. mold. So are the rest of the "Spots"

Don't forget that the hatch wouldn't open at first, then wouldn't close... and why

Some of you might remember the progress on before and after with the rear seats. (oh yeah dude, that's mold!)


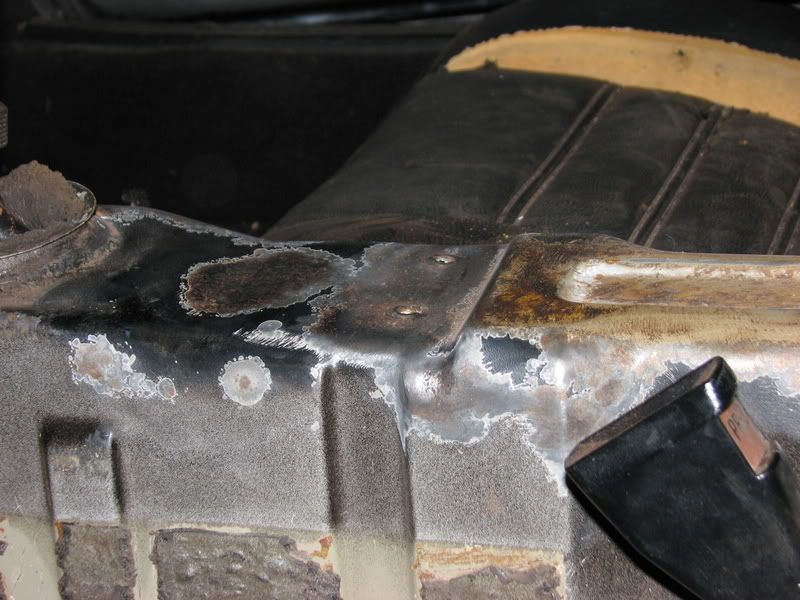
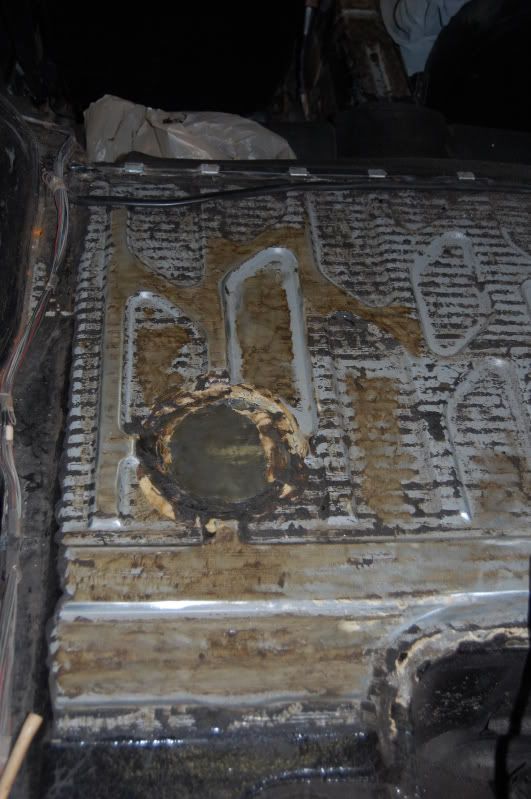
So here we go.... I bring you the thus far progress of stripping it down to the pan and bare metal. In just in general stripping out all of the sound deadening, and "convenience" materials. I started tearing up the entire back of the car. Pulled everything out, stripped it down. Armed with chisels, screwdrivers, a BFH and whatever else I could muster up to use to get the job done.


And more...
And even more....
Then moved onto the drivers side
Then started coming all of the sound deadening and rubber guards inside. Nothing that was good about them, they aren't "Guarding" anything, just holding moisture making the car rust.
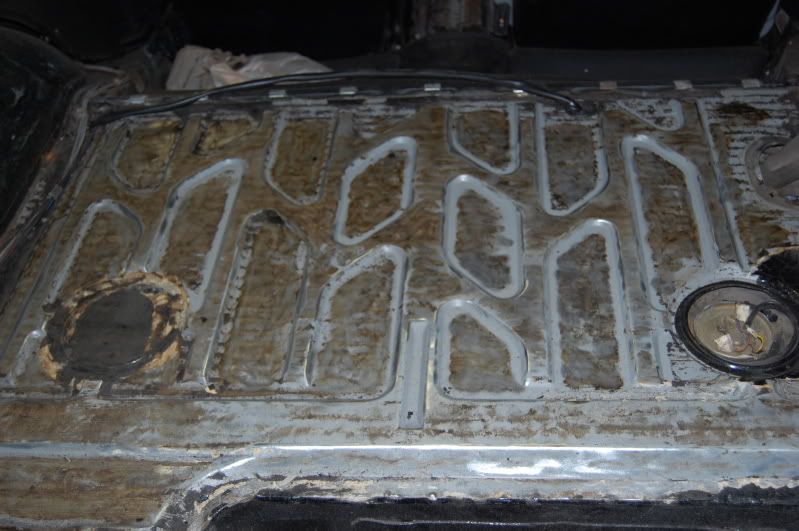
Then the wire wheel came out. Keep in mind the reddish brown you see there is not rust, but the glue from the material which will need to be stripped away before i lay down carpet.
The back was finally ready for the wire wheel today after finishing up the last bit.
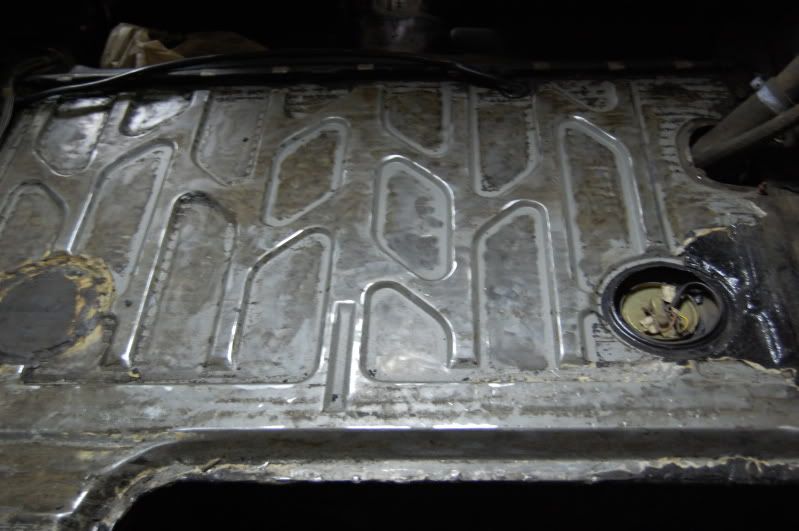
And finally ready. Now to strip the crap off and get the new deck section installed. Should be here in the next few days.
Well. Today I got almost all of my parts here. I found out I'm going to need some more after giving a more thorough look over my cooling system. The radiator is good. The hoses are /okay/ but need replaced, and all of the clamps were crap. Hoses are a check, clamps are a check, the seals and gaskets are a check. The main problem as i started undoing hoses and checking things to replace them was the big metal tubes that are attached to parts of the system. While the engine didn't actually pass any rust in the coolant flush and it's doing a fabulous job cooling, these parts of the system are rusted to hell on the inside just because the engine never once moved and circulated over the 10 year span. So quite literally where the coolant sat these things just sat and rusted. Thank god it didn't circulate. I checked and checked and checked, everything seems to be okay. So I will be replacing all the cooling tubes soon.
However... because I did make some decent progress today, i'm posting away.
The trunk is ready to finish stripping and seal for the deck lid that is coming. For those who did not get to see the back of the car when I got it, here is a horrific idea of what it looked like.
First, here's the carpeted piece of the back. The white you see on the spare tire area is not a reflection, that is... well.. mold. So are the rest of the "Spots"
Don't forget that the hatch wouldn't open at first, then wouldn't close... and why
Some of you might remember the progress on before and after with the rear seats. (oh yeah dude, that's mold!)
So here we go.... I bring you the thus far progress of stripping it down to the pan and bare metal. In just in general stripping out all of the sound deadening, and "convenience" materials. I started tearing up the entire back of the car. Pulled everything out, stripped it down. Armed with chisels, screwdrivers, a BFH and whatever else I could muster up to use to get the job done.
And more...
And even more....
Then moved onto the drivers side
Then started coming all of the sound deadening and rubber guards inside. Nothing that was good about them, they aren't "Guarding" anything, just holding moisture making the car rust.
Then the wire wheel came out. Keep in mind the reddish brown you see there is not rust, but the glue from the material which will need to be stripped away before i lay down carpet.
The back was finally ready for the wire wheel today after finishing up the last bit.
And finally ready. Now to strip the crap off and get the new deck section installed. Should be here in the next few days.
Thread Starter
|
Registered User
Joined: Jul 2008
Posts: 154
From: Redmond, OR
Rep Power: 24
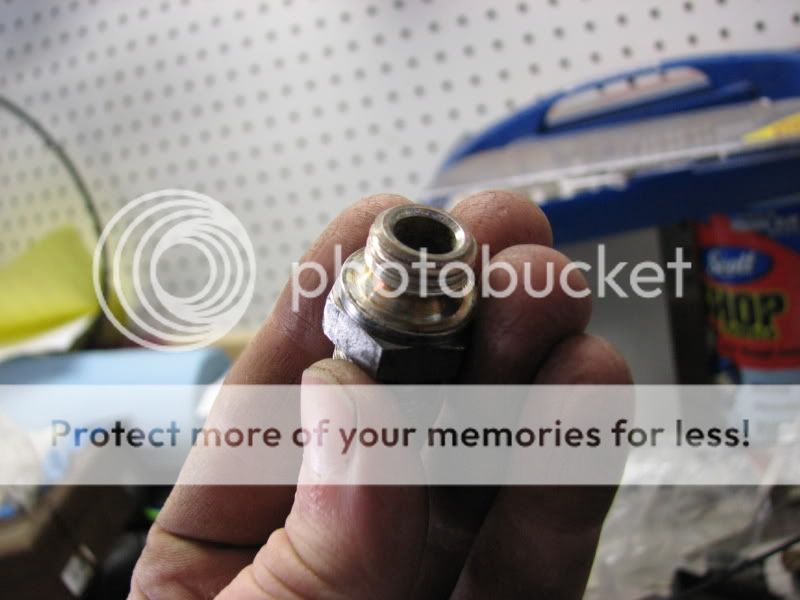
But that's not all the progress today. You see, I had this problem with the hood cable. It was starting to stick which scared me. I'm not sure how many of you have ever owned a motorbike of any kind and had a throttle or clutch cable snap, but it sucks ***. It isn't a gradual "Hey by the way i'm gonna go ahead and break sometime later." but just decides to go. At the chance of not being able to open my hood i just ordered a new cable entirely. Came with a new handle, the whole bit.
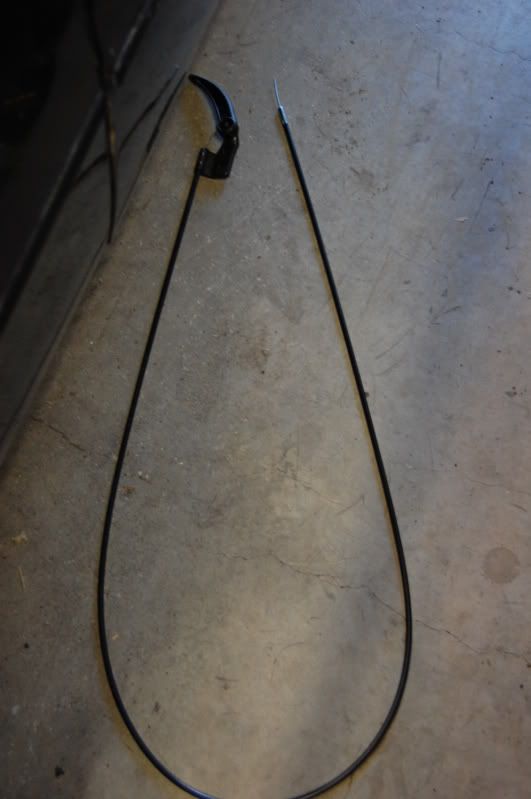
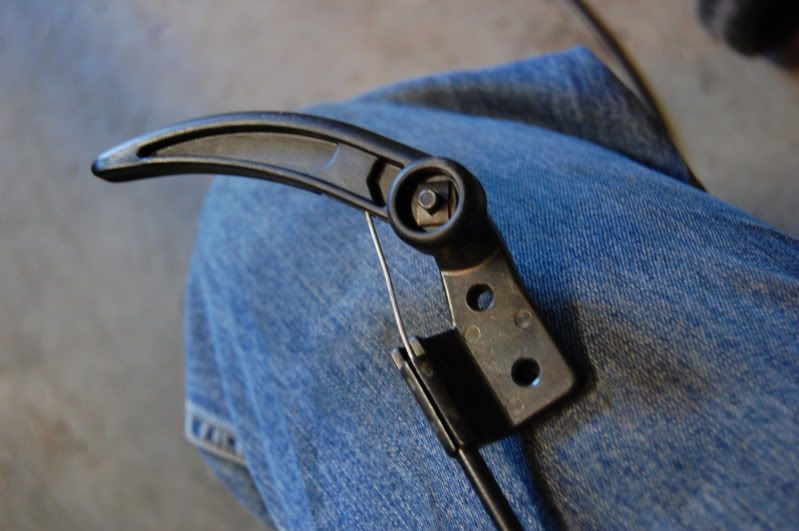
Pretty.
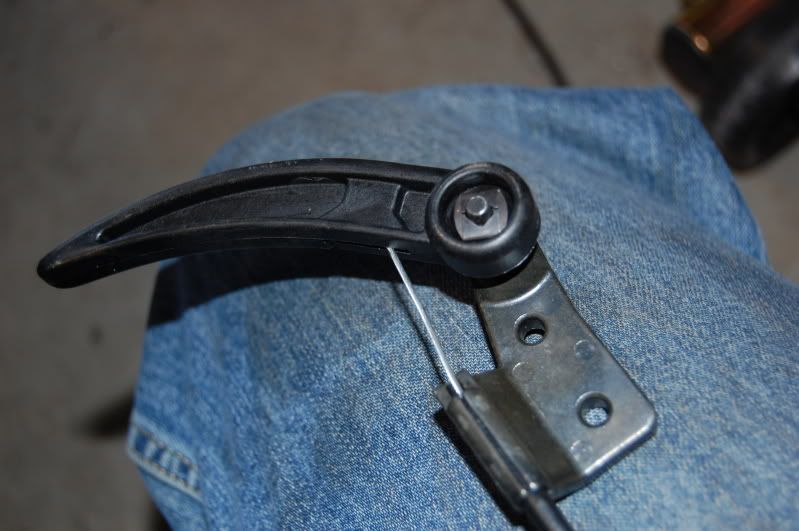
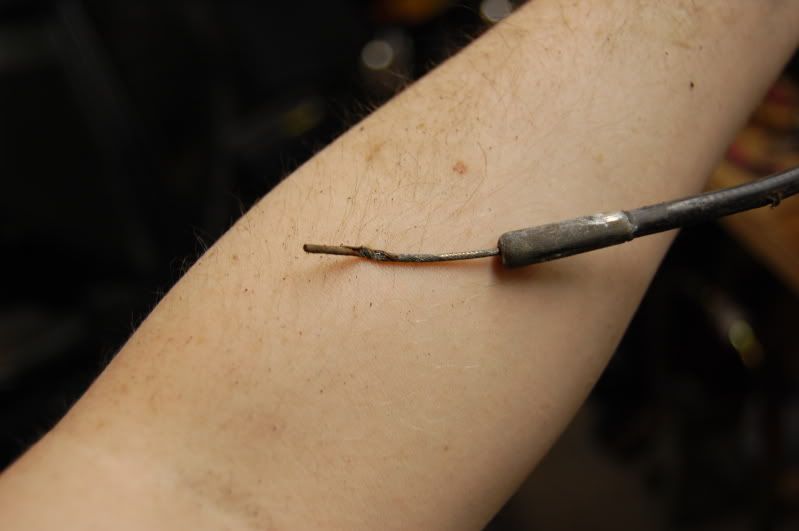
Why would it stick might you ask? Well... after I removed it I took a picture.

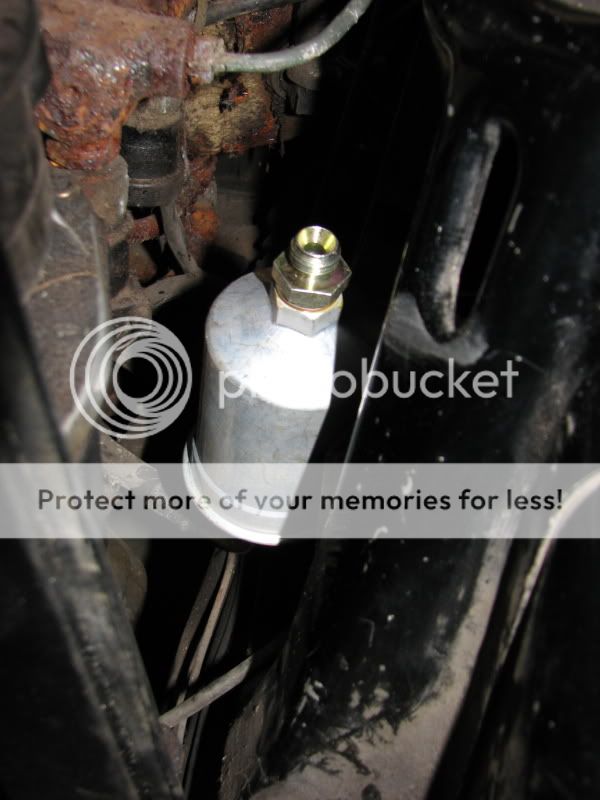
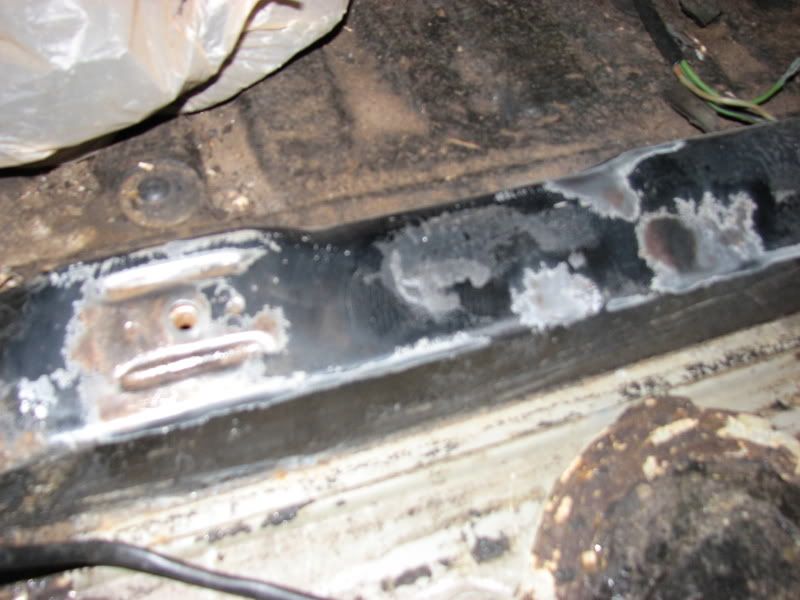
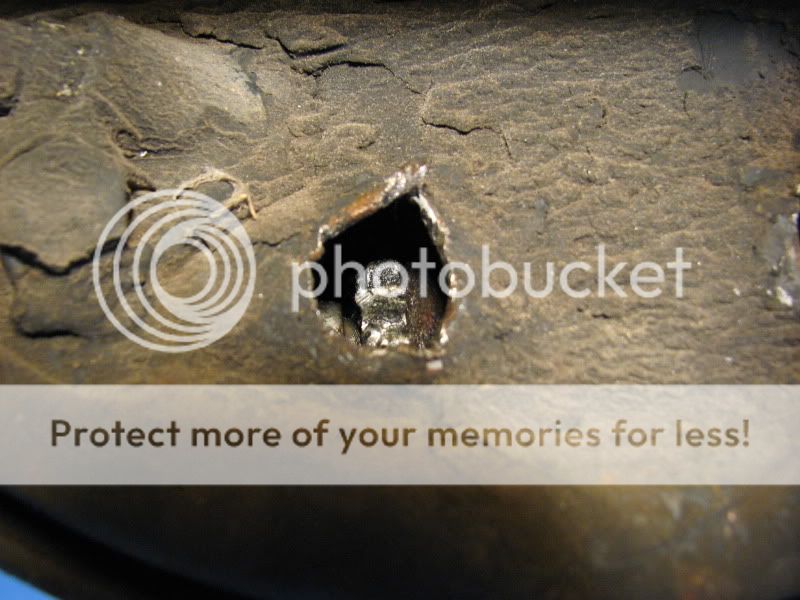
After inspecting the cooling system I started replacing some of the hoses ahead of time just so i was a step ahead, i'll still need to replace the tubes of course, but at least the hoses are in place and i can toss the crap ones.
Yuck.
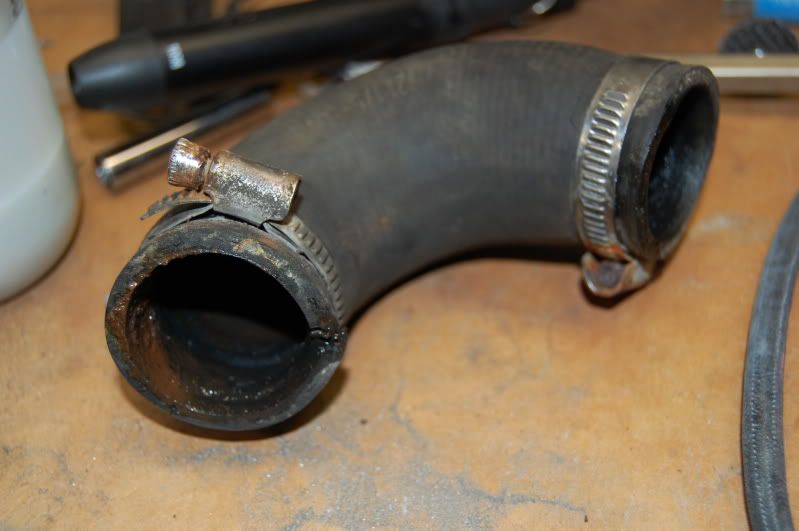
Check out the coolant tube, yum!

Definitely needs replaced.
Hoses are great! But rusty tubes, not so much.... a clean coolant system is a happy coolant system. On the ingredients list are some coolant and water wetter and rust prevention additives.
I would like to add to make sure you wear eye protection when using a wire wheel. Especially the medium sized wire wheels, the small metal strands are prone to breaking off if they encounter a brief and momentary disruption if they are frayed or bent. I had the pleasure of one of them breaking off at about 10,000 rpms and embedding itself straight into my shin. I thought "Glad that wasn't my eye!" Ouch.
PS If anyone knows of any of the tubes for sale for the coolant or has some spares that aren't rusted let me know! Part #s 047 121 073 and 047 121 073A.
Pretty.
Why would it stick might you ask? Well... after I removed it I took a picture.
After inspecting the cooling system I started replacing some of the hoses ahead of time just so i was a step ahead, i'll still need to replace the tubes of course, but at least the hoses are in place and i can toss the crap ones.
Yuck.
Check out the coolant tube, yum!
Definitely needs replaced.
Hoses are great! But rusty tubes, not so much.... a clean coolant system is a happy coolant system. On the ingredients list are some coolant and water wetter and rust prevention additives.
I would like to add to make sure you wear eye protection when using a wire wheel. Especially the medium sized wire wheels, the small metal strands are prone to breaking off if they encounter a brief and momentary disruption if they are frayed or bent. I had the pleasure of one of them breaking off at about 10,000 rpms and embedding itself straight into my shin. I thought "Glad that wasn't my eye!" Ouch.
PS If anyone knows of any of the tubes for sale for the coolant or has some spares that aren't rusted let me know! Part #s 047 121 073 and 047 121 073A.
Last edited by CorsePerVita; Apr 7, 2009 at 05:01 PM.


Thread Starter
|
Registered User
Joined: Jul 2008
Posts: 154
From: Redmond, OR
Rep Power: 24
The last 5 times i took the 924 out of it's spot to work on it, it dug itself into the gravel. I suspected the brakes were stuck... replaced one drum side i THOUGHT was bad, it was fine. Turns out the other side was the culprit. So i had to have it PULLED out of the spot today.
The last time i worked on the drums, i could not get the passenger side off. I tried and tried and TRIED, it was bound, tight. The adjusters were so tight and would not budge so essentially i got nowhere. I actually stripped away some of the back cover trying to get them to move.
Today though? Success.
You see, the issue is that the adjusters wouldn't budge, or when they did, it wasn't much. So basically, the pad wasn't moving. The other issue is that one of the adjusters was ALREADY as in as it could go, and that pad was literally BOUND and rusting to the drum on the inside. So basically... it seemed i was screwed.
However, a little PB blaster and you can do amazing things. What i worked on was basically at the risk of ruining the drums, but i did actually get it. I took a screwdriver, used a hammer and basically chiseled INTO the pads that were inside so i was up against the metal. Using the screwdriver to PRY the pad back just a little i got PB blaster inside the pad.
Slowly i kept repeating this until the pad was more and more loose. I was able to get enough in there that as i hammered and kept a screwdriver keeping pressure from another angle the drum slowly came off. It took about 20 minutes to get it off. It was really torquing me to be honest, i wanted to get out a cutting wheel and cust the bastard off the car, but I was insistent, and persistent. And it worked.
With that... onto step by step progress.
As you can see, the adjusters were frozen, the prying force used to get INSIDE caused some of the metal to strip back. The driver side was not this difficult.
The adjuster gears themselves also were not doing so hot. But i had little choice... i HAD to get this thing off or else id' be facing more rust and NEVER getting it off.
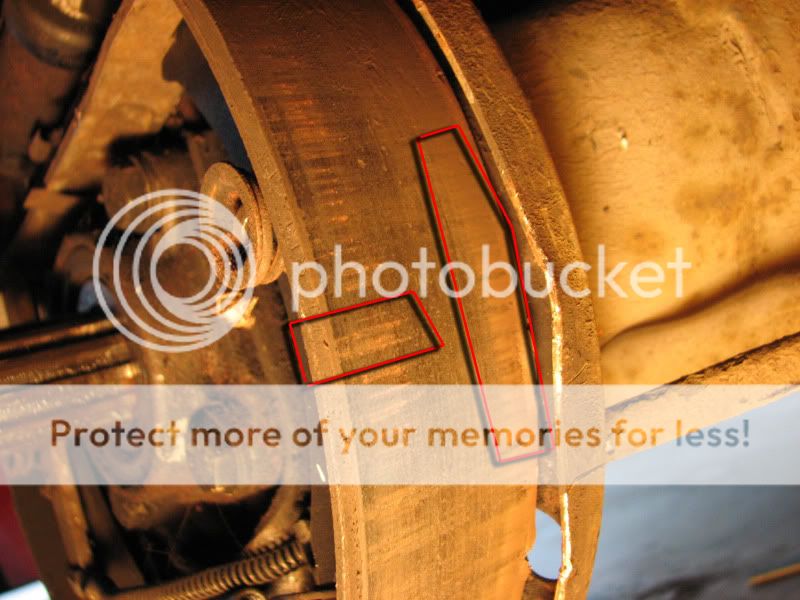
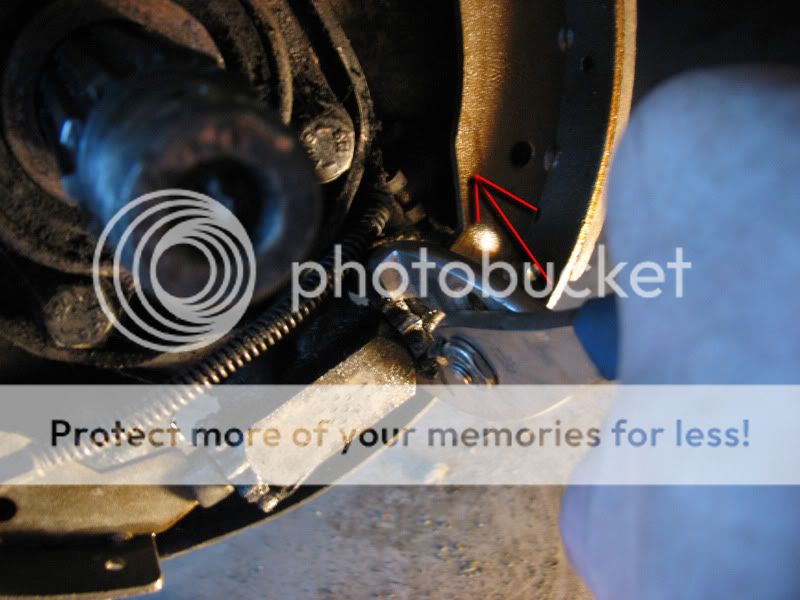
Now, disregarding the bent pad inside, what you should see when the drums are properly set is just a tad bit of play. In this case there is a lot, but you can actually SEE the gap back there.

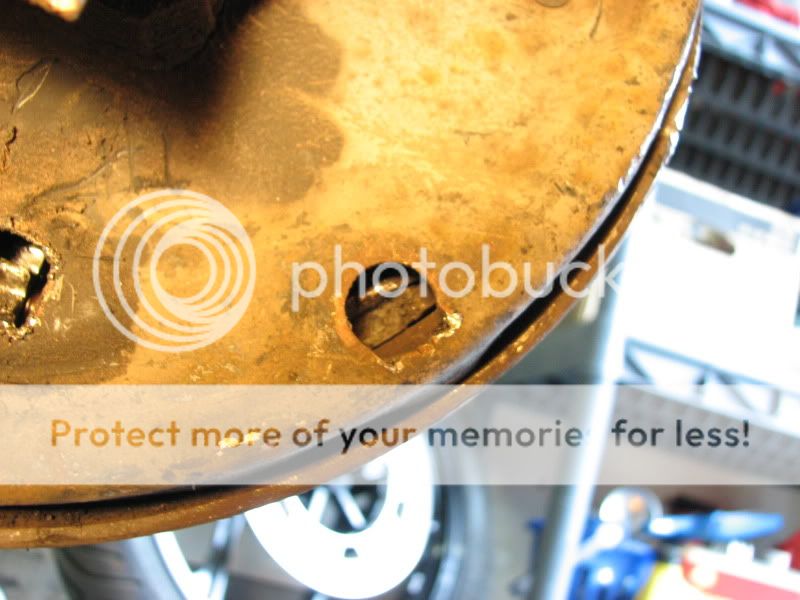
When i actually got them off you could see where it had frozen up and rusted. Basically what happened is that the dust that made it's way in built up and caused scoring on the pad, which rusted, caused more scoring and build up, more scoring and the pads self mutilated themself and swelled against the drum.
Pictures of the scoring


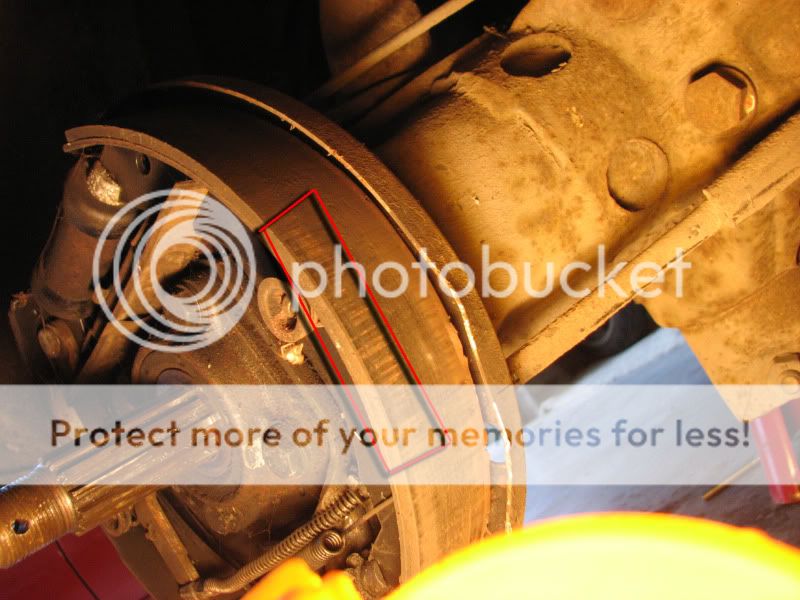
Getting the drum brakes off was easy. The adjusters still posed an issue. But there's a remedy for that, so get ready for a little how to guide.
Step 1, pb blaster.
Step 2, using a set of pliers that will NOT STRIP THE ADJUSTERS - grip one firmly. Spray some pb on and work it back and forth. Now picture emulating the last 2 pictures back and forth, back and forth back and forth. Keep spraying pb on it now and then till it feels just right.
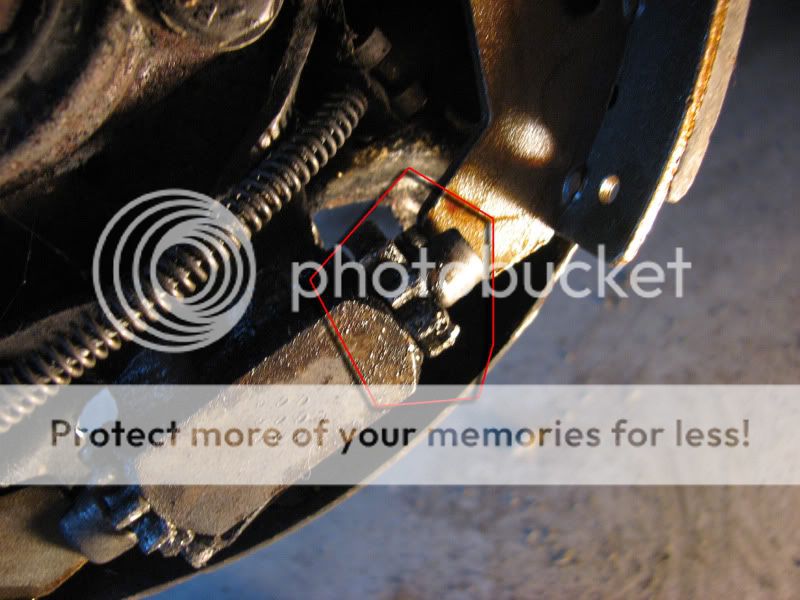
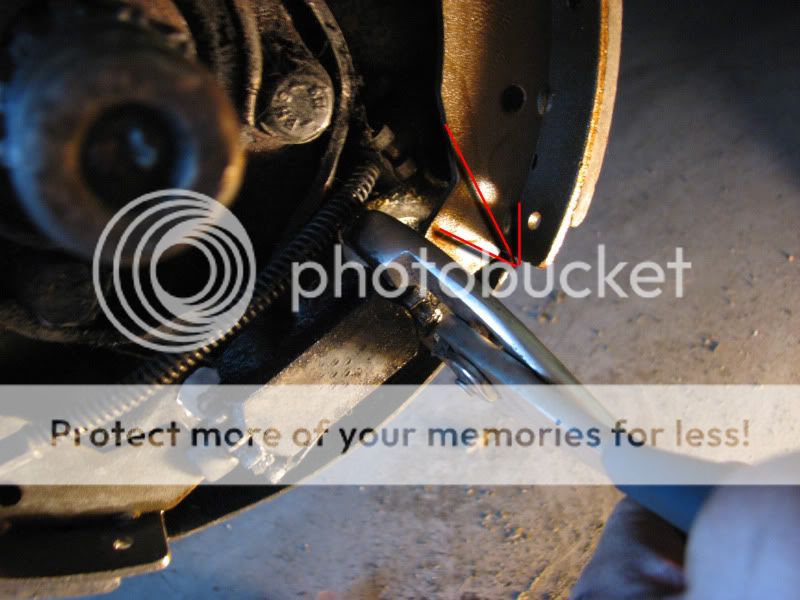
In about 5 minutes of doing this, your adjuster should be much better, back to normal, or if it's rusted to hell you've got issues.
PS: Trunk is finished. Need to sand near the hatch and de-rust that... but it's FINISHED> Driver side ready for carpet. Passenger side prepped for it.