
Warped paint

Thread Starter
|
Registered User
Joined: Jan 2011
Posts: 13
From: Tucson Arizona
Rep Power: 0

Warped paint
I have noticed that the paint is warping on the silver bezel around the shifter (see photo below) on my 2001 turbo. I was curious if anyone else noticed this on their car? It almost looks like it has been repainted (although it definitely has not). Does anyone know if there is a replacement bezel available through Porsche. I looked through the Porsche OEM parts guide and I am unable to find this piece.
Also, while I'm on the subject, the carbon fiber is fading only on the bottom panel around and below the a/c (in the second photo). There rest of the CF has remained normal. This has left me wondering if this bottom panel is in fact not carbon fiber. Has anyone else noticed this phenomenon?
Also, while I'm on the subject, the carbon fiber is fading only on the bottom panel around and below the a/c (in the second photo). There rest of the CF has remained normal. This has left me wondering if this bottom panel is in fact not carbon fiber. Has anyone else noticed this phenomenon?
Registered User
Joined: Jan 2007
Posts: 10,774
From: OR Room 5
Rep Power: 1007

This is from another rennlist.com, from member fbgh2o.
http://forums.rennlist.com/rennforums/996-forum/544198-shifter-trim-repair-refinishing-results-pictures-and-description.html
http://forums.rennlist.com/rennforums/996-forum/544198-shifter-trim-repair-refinishing-results-pictures-and-description.html
There have been a couple threads recently on this topic, so I thought that I would document my attempt to refinish my trim ring around the shifter.
The finish on the U-shaped silver trim that surrounds the shifter boot on the 996 (1999 C4 I my case) starts to bubble and lift, as you can see from the pictures.


While I had read that it would require a full replacement the boot assembly (over $250) as the trim is an integral part of the boot assembly, I decided to try to remove and repair it.
Trim removal from shift boot assembly
It is possible to separate the trim from the assembly. Six plastic studs are molded into the back side of the trim to hold it in place in the boot assembly. Starting at the open end of the �U�, I pushed from the backside and lower part of the trim. It took some time to work them free and separate it. Go slowly, be firm, but gentle.

Removal of old trim finish
The trim is a piece of U-shaped plastic covered in a foil-like silver finish. It is this finish that was bubbling.

Starting where it had bubbled up, I used a sharp knife to peel the old foil off. This can be time consuming because the foil adheres quite well where it is not bubbled. Using a sharp blade (razor or x-acto) flush against the surface allows you to peel back the foil enough to use your thumb and forefinger and pull it off in small to medium-sized strips. I also found that if you do this at the edges of the tri, you could get larger edge to peel off. You want to be careful not to gauge the surface as this will likely show through when you paint it.

I removed 100% of the foil from the visible portion of the pieces, all of the edges, but could not get about 15% to 20% of the foil on the inner (concave) portion of the trim piece to come off and did not think it was necessary to spend any more time.
Refinishing
Preparation - Very lightly sand the outer surface of the piece with 220 grit (I did not have any 360 or 400) to rough up the surface and smooth any knife marks. Wipe it down with a damp rag to remove the sanding dust and then wipe with a rag dabbed in a small amount of acetone to clean the surface. Prime with Dupli-Color grey primer � 3 light coats.


Finishing � Finish with 3 coats of Dupli-Color VW Diamond Silver (P/N 8802029) and 2 coats of clear coat. (I took the trim to the store and VW Silver was the closest match).


Reinstallation
The trim piece simply snaps back into place.


Conclusion
The silver is a pretty close match (the picture is not representative). The new finish lacks, perhaps, a bit of metallic lustre, but is much better than what was there.
Total time was about 1.5 hours, but it took about 8 hours with paint drying time.
The finish on the U-shaped silver trim that surrounds the shifter boot on the 996 (1999 C4 I my case) starts to bubble and lift, as you can see from the pictures.
While I had read that it would require a full replacement the boot assembly (over $250) as the trim is an integral part of the boot assembly, I decided to try to remove and repair it.
Trim removal from shift boot assembly
It is possible to separate the trim from the assembly. Six plastic studs are molded into the back side of the trim to hold it in place in the boot assembly. Starting at the open end of the �U�, I pushed from the backside and lower part of the trim. It took some time to work them free and separate it. Go slowly, be firm, but gentle.
Removal of old trim finish
The trim is a piece of U-shaped plastic covered in a foil-like silver finish. It is this finish that was bubbling.
Starting where it had bubbled up, I used a sharp knife to peel the old foil off. This can be time consuming because the foil adheres quite well where it is not bubbled. Using a sharp blade (razor or x-acto) flush against the surface allows you to peel back the foil enough to use your thumb and forefinger and pull it off in small to medium-sized strips. I also found that if you do this at the edges of the tri, you could get larger edge to peel off. You want to be careful not to gauge the surface as this will likely show through when you paint it.
I removed 100% of the foil from the visible portion of the pieces, all of the edges, but could not get about 15% to 20% of the foil on the inner (concave) portion of the trim piece to come off and did not think it was necessary to spend any more time.
Refinishing
Preparation - Very lightly sand the outer surface of the piece with 220 grit (I did not have any 360 or 400) to rough up the surface and smooth any knife marks. Wipe it down with a damp rag to remove the sanding dust and then wipe with a rag dabbed in a small amount of acetone to clean the surface. Prime with Dupli-Color grey primer � 3 light coats.
Finishing � Finish with 3 coats of Dupli-Color VW Diamond Silver (P/N 8802029) and 2 coats of clear coat. (I took the trim to the store and VW Silver was the closest match).
Reinstallation
The trim piece simply snaps back into place.
Conclusion
The silver is a pretty close match (the picture is not representative). The new finish lacks, perhaps, a bit of metallic lustre, but is much better than what was there.
Total time was about 1.5 hours, but it took about 8 hours with paint drying time.
Thread Starter
|
Registered User
Joined: Jan 2011
Posts: 13
From: Tucson Arizona
Rep Power: 0
After searching hi and low I have finely found the part that I have been looking for. I found it in an old post for 2006 from Carnewal,
https://www.6speedonline.com/forums/...996-986-a.html
attached are the images:
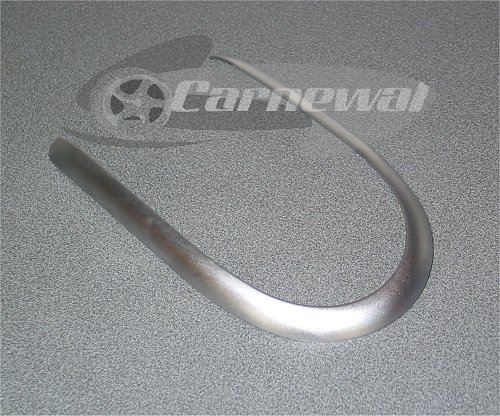
Does anyone know where I can apprehend this part. Like I said, I have searched through the OEM part guide with no success. Maybe someone has a part number?
Thanks
Edit: it does not appear that carnewal carries it anymore
https://www.6speedonline.com/forums/...996-986-a.html
attached are the images:
Does anyone know where I can apprehend this part. Like I said, I have searched through the OEM part guide with no success. Maybe someone has a part number?
Thanks
Edit: it does not appear that carnewal carries it anymore
Last edited by nstea; Jun 19, 2011 at 02:09 PM.

Thread
Thread Starter
Forum
Replies
Last Post
NC 996TT
Automobiles For Sale
13
Mar 23, 2023 06:19 AM
Bmw M3 Guy
Automobiles For Sale
2
Feb 21, 2018 09:29 AM
bongnation
Automobiles For Sale
9
Sep 25, 2015 02:58 PM