

New Product, Valentine One Mounting Bracket (G Bracket) Made for 997 by G Rides


Thread Starter
|
Former Vendor
Joined: Aug 2006
Posts: 233
From: San Luis Obispo, CA
Rep Power: 0


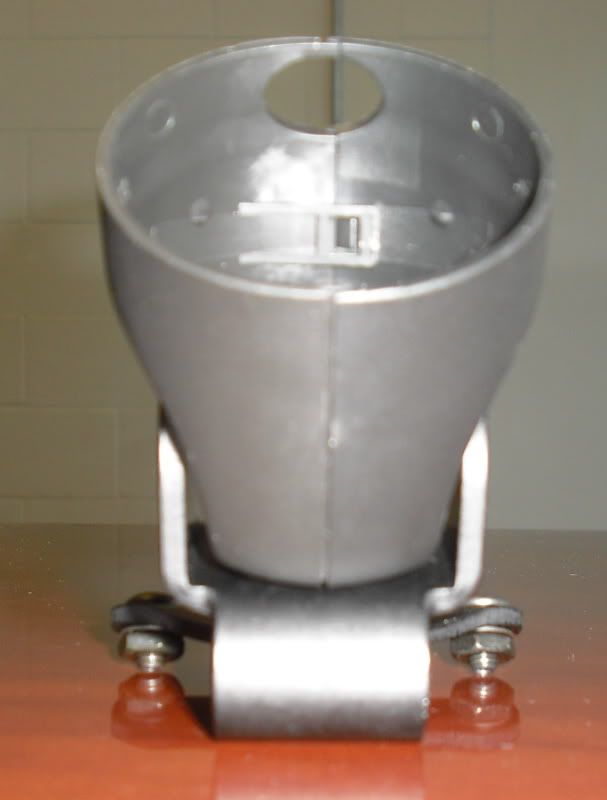
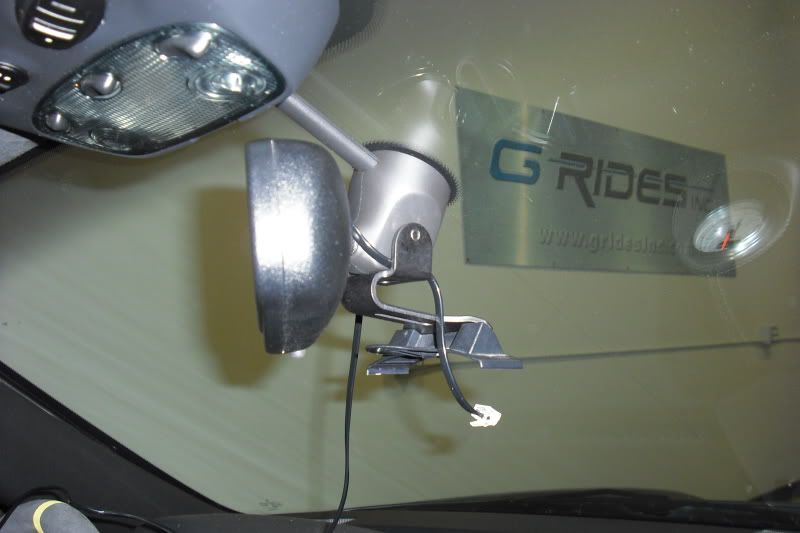
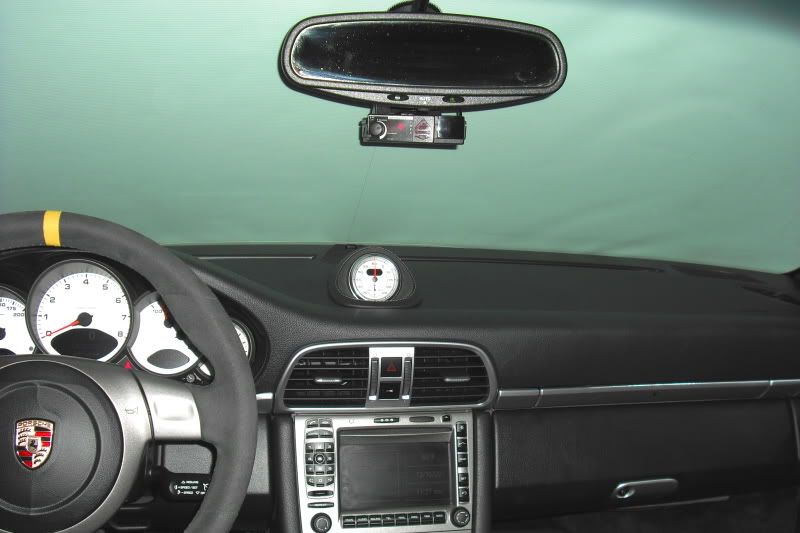
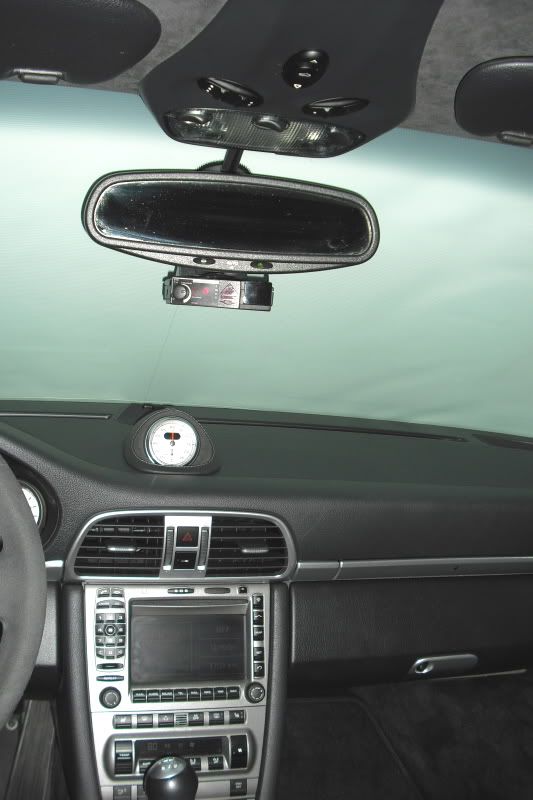
These pictures may help convey how the G Bracket is installed. Full instructions to come.
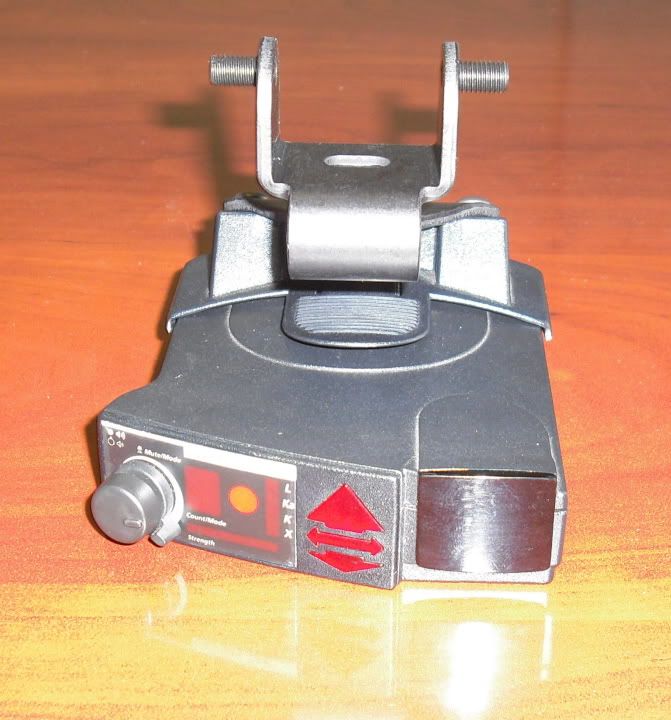
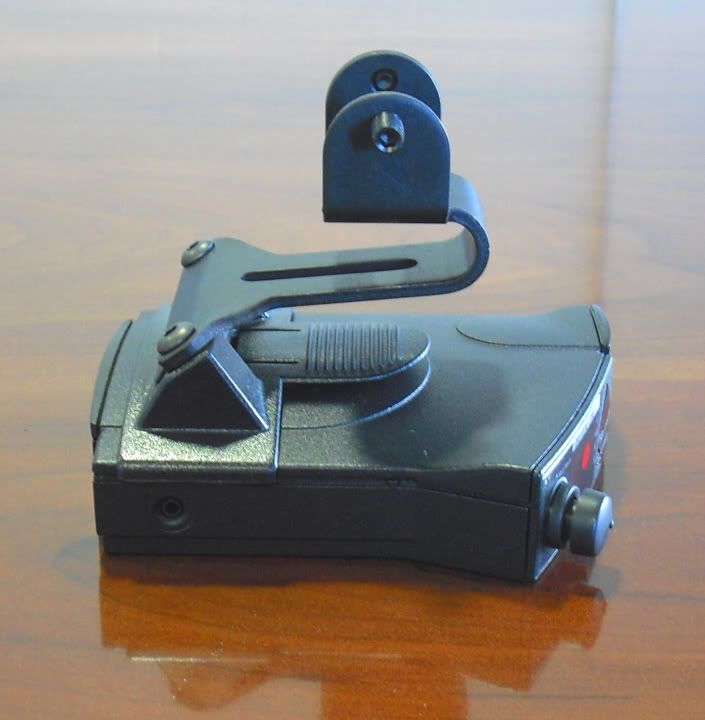
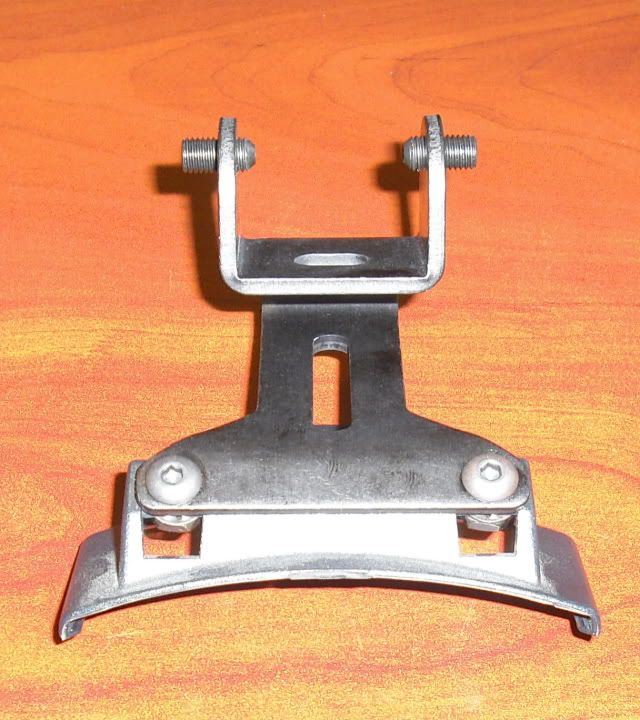
The G Bracket mounts to the V1 by removing the suction cup from the V1 mount. Attach the G Bracket to the V1 mount with supplied fasteners as seen in these pictures.

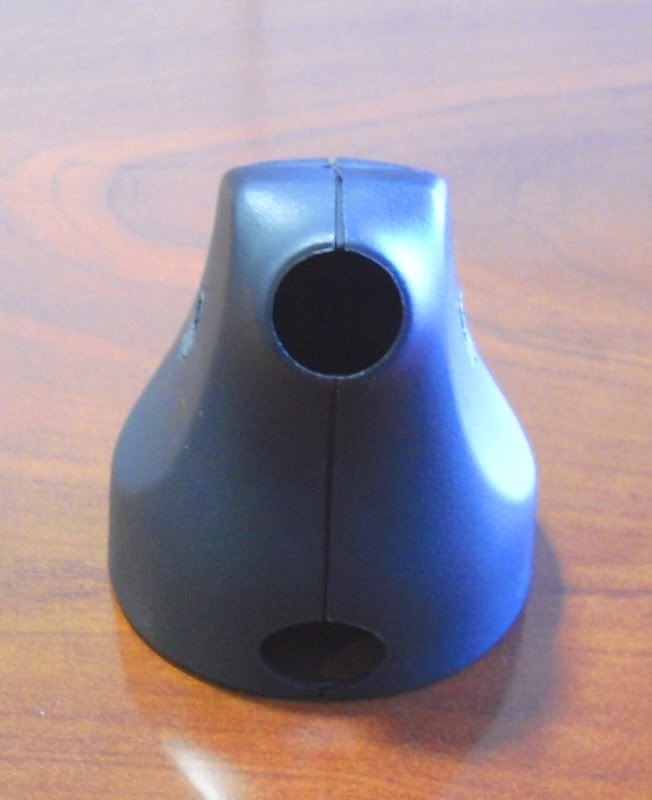
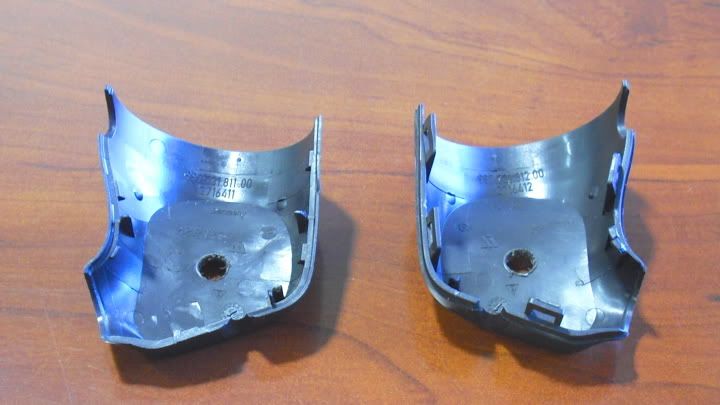
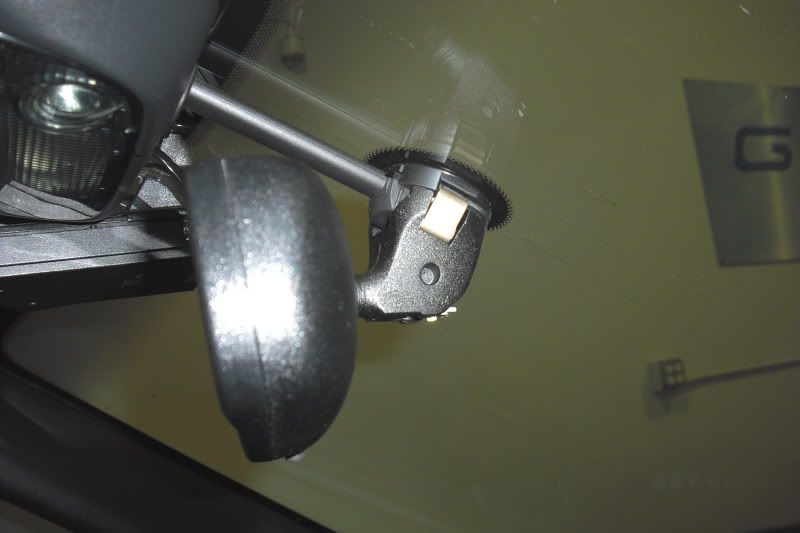
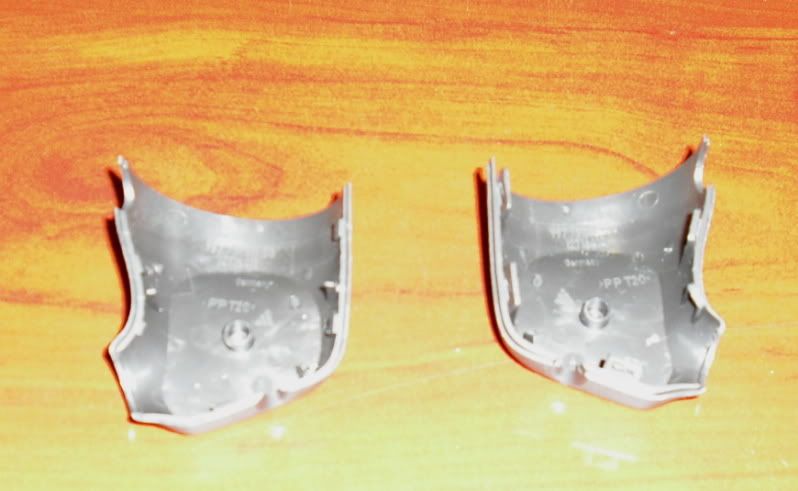
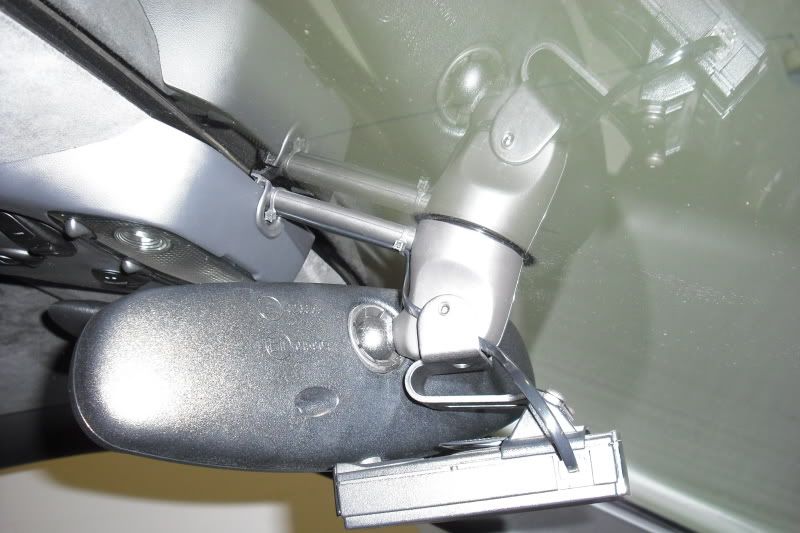
This is the 2-Piece Plastic Housing that covers the Metal Mirror Post, which needs to be removed. This Plastic Housing is snapped in place and needs to be pryed off. We use one of those flat plastic blades and place it towards the top back seem and it will snap apart.
This piece is already drilled but, before drilling there is basically a little plastic nub on each side that indexes where the holes need to be made. Those little plastic nubs went into the pockets of the Metal Mirror Post which the G Bracket Set Screws will go into. Once the holes are drilled, re-install the Plastic Housing by snapping it back together in place.
I colored the set screws yellow so you may see where the set screws go.
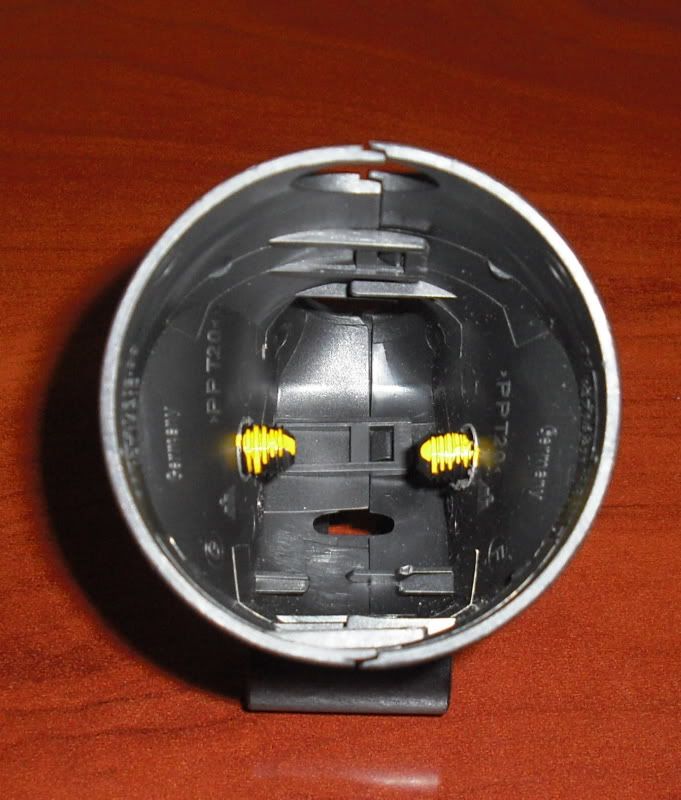
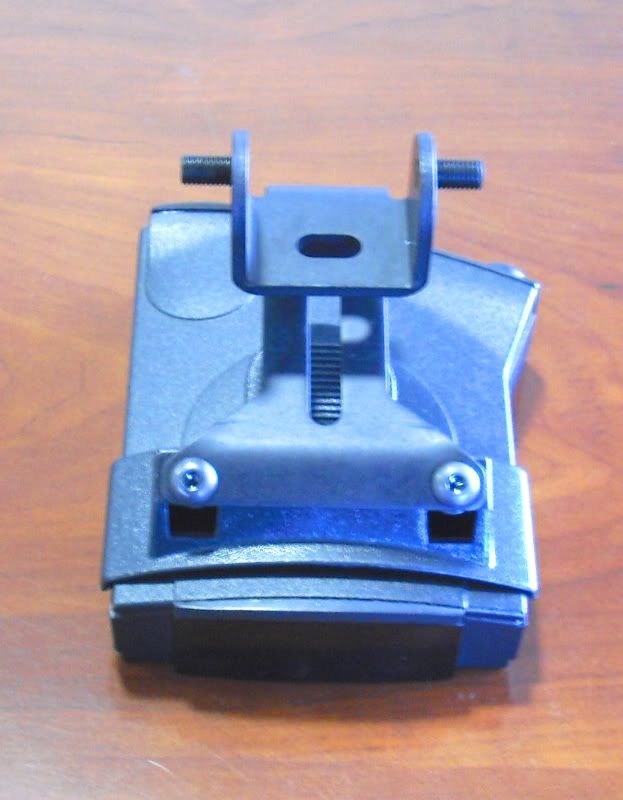
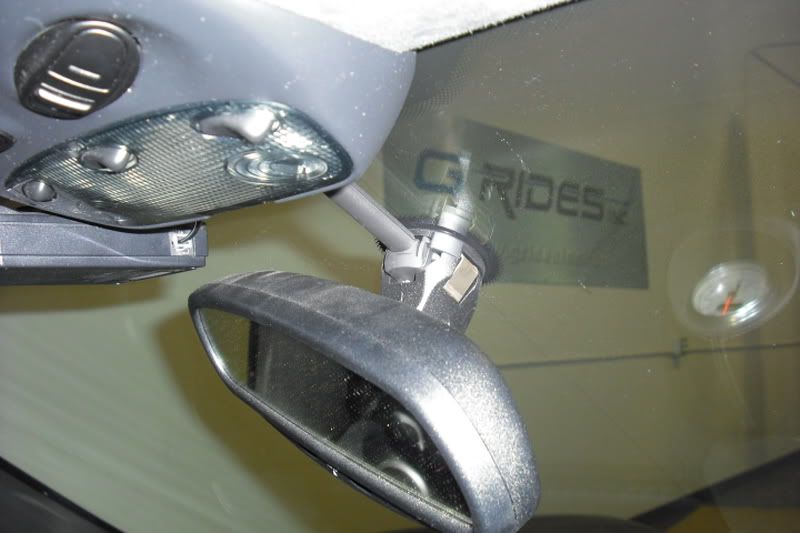
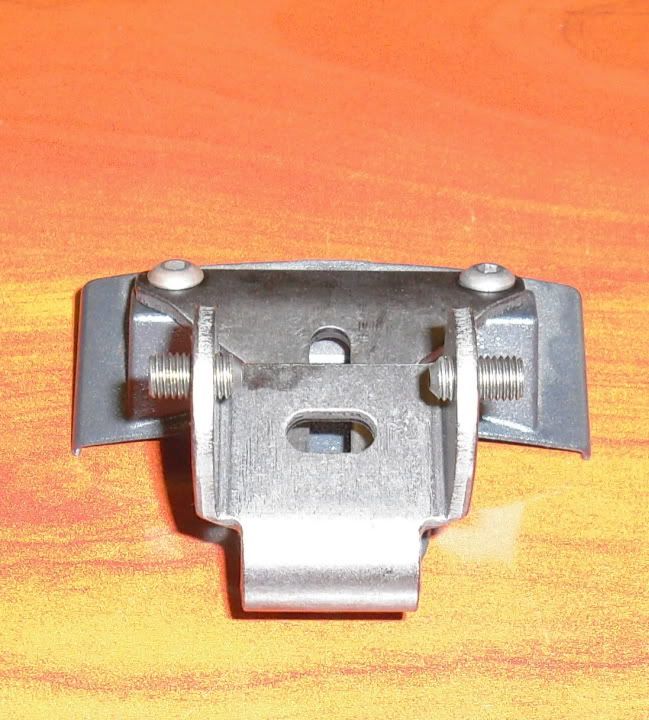
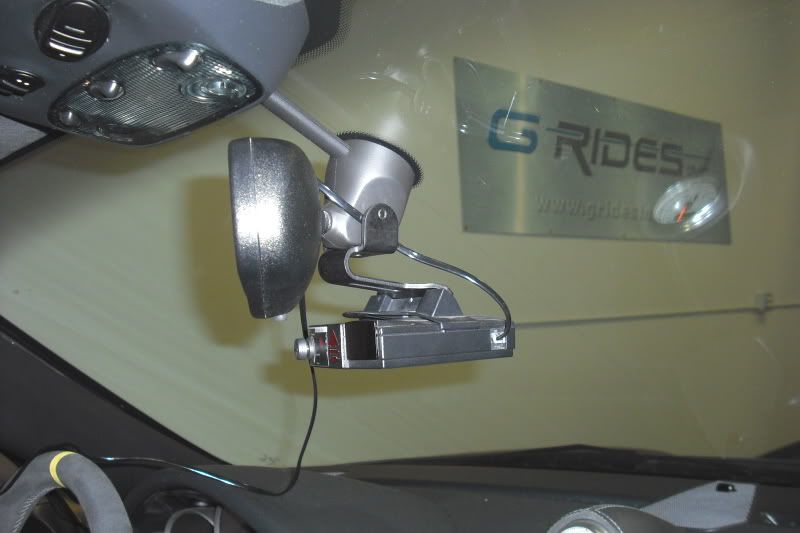
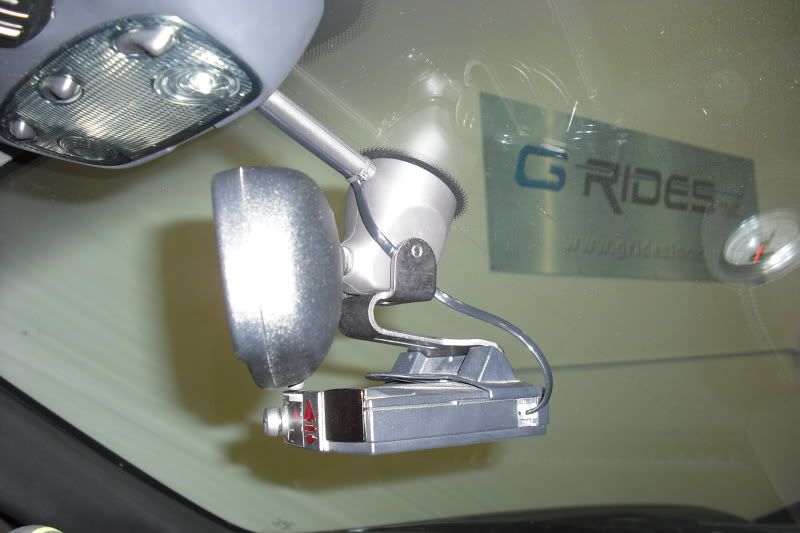
With the plastic housings reinstalled, slide the G Bracket into place. It is a tight fit, but the tight fit helps it mount securely. With the G Bracket in place, thread in the set screws which should just about bottom out making them flush with the G Bracket.
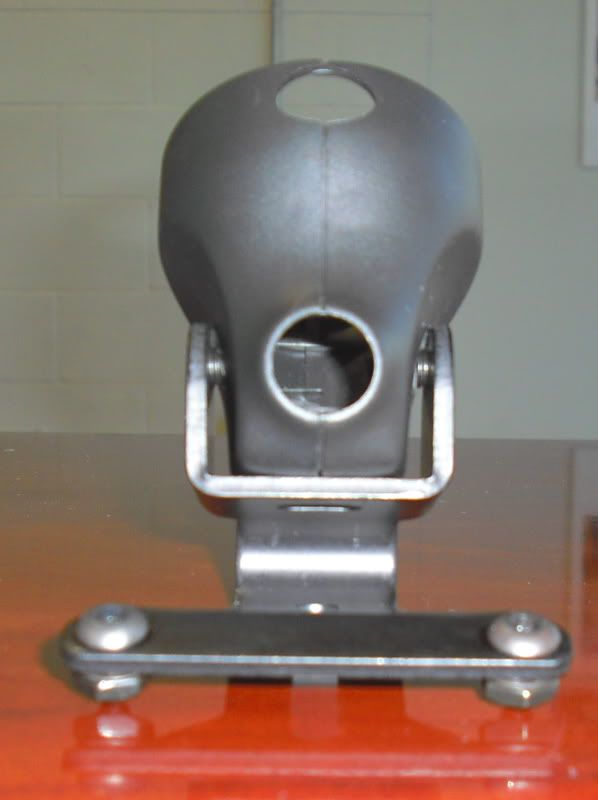
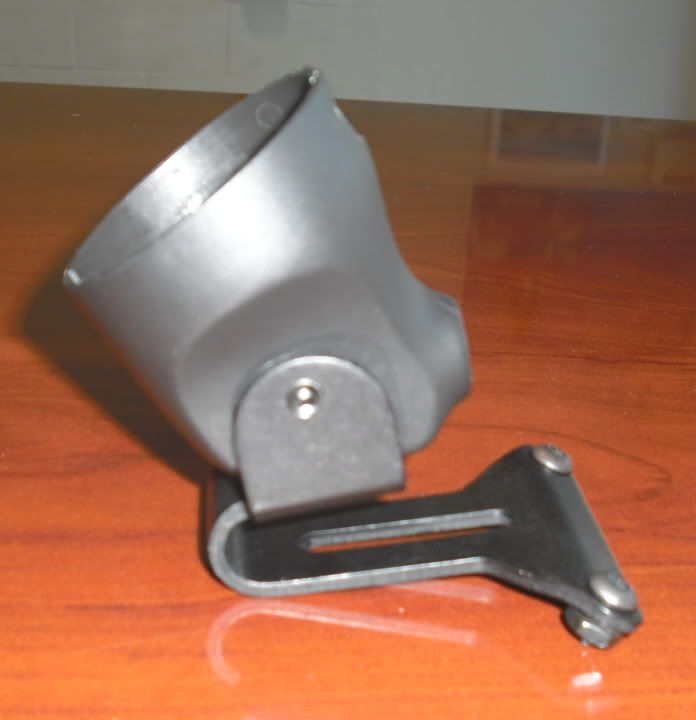
The G Bracket mounts to the V1 by removing the suction cup from the V1 mount. Attach the G Bracket to the V1 mount with supplied fasteners as seen in these pictures.
This is the 2-Piece Plastic Housing that covers the Metal Mirror Post, which needs to be removed. This Plastic Housing is snapped in place and needs to be pryed off. We use one of those flat plastic blades and place it towards the top back seem and it will snap apart.
This piece is already drilled but, before drilling there is basically a little plastic nub on each side that indexes where the holes need to be made. Those little plastic nubs went into the pockets of the Metal Mirror Post which the G Bracket Set Screws will go into. Once the holes are drilled, re-install the Plastic Housing by snapping it back together in place.
I colored the set screws yellow so you may see where the set screws go.
With the plastic housings reinstalled, slide the G Bracket into place. It is a tight fit, but the tight fit helps it mount securely. With the G Bracket in place, thread in the set screws which should just about bottom out making them flush with the G Bracket.
Thread Starter
|
Former Vendor
Joined: Aug 2006
Posts: 233
From: San Luis Obispo, CA
Rep Power: 0
Price available here:
https://www.6speedonline.com/forums/...o-g-rides.html
In-stock ready to ship now.
https://www.6speedonline.com/forums/...o-g-rides.html
In-stock ready to ship now.
Registered User
Joined: Feb 2007
Posts: 26
From: central california
Rep Power: 21
I have this bracket mounted in my car and there is minimal impact on the view to the right. The V-1 sits just below the mirror in the perfect position for monitoring while driving. Thanks to Gary and G-Rides for developing such a functional and well designed product.
Ken
Ken
Registered User

Joined: May 2008
Posts: 1,768
From: Cyprus
Rep Power: 111
Sorry for being off topic but can someone please tell me the difference of Valentine one and all other detectors?
I'm asking this because in the past when i used similar staff i got caught as soon as i heard the beep, is this one different?
thx
I'm asking this because in the past when i used similar staff i got caught as soon as i heard the beep, is this one different?
thx
Thread Starter
|
Former Vendor
Joined: Aug 2006
Posts: 233
From: San Luis Obispo, CA
Rep Power: 0
Installed another G Bracket today and took a few pictures.
Pry apart the 2-piece plastic mirror housing cover. It's best to pry from the front as seen here because there are no wires in this area. Pry with a tool, just enough to get some separation, then carefully pull apart by hand.

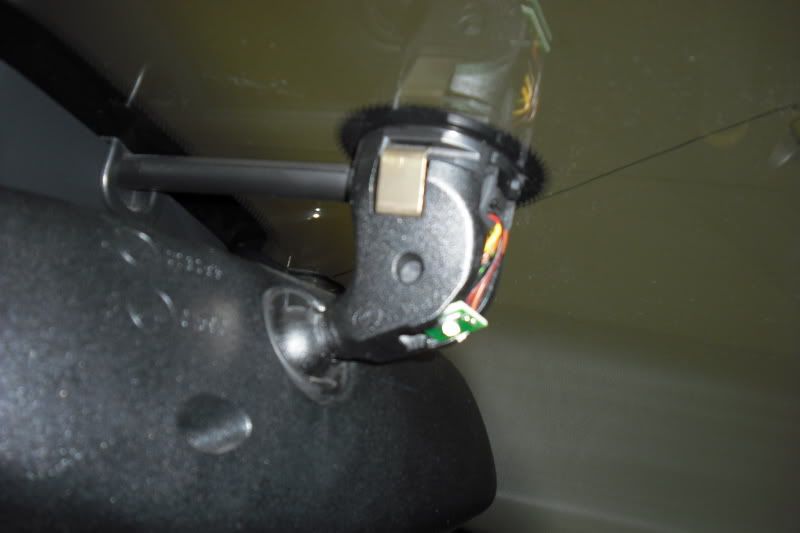
You can see the metal mirror post now with the plastic removed.
In these pictures please notice the pocket on the side of the mirror post (It's the same on both sides, the post comes like this from Porsche and you do not need to drill on the mirror post), this is where the G Bracket Set Screws inserts and creates a very sturdy mount.
Here is the plastic housing before drilling. Please notice the little nubs, they are where you need to drill.
After holes have been drilled.
Take your bracket from your V1 and remove the suction cups.

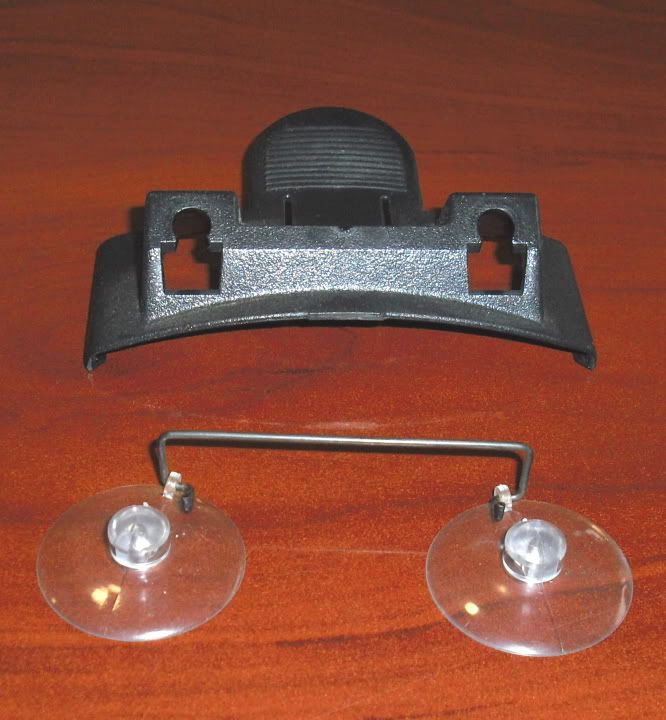
Bolt the G Bracket to the V1 Bracket with supplied hardware.

Reinstall the drilled plastic housings.

If installing with a hardwire, place your wire in between the G Bracket and the plastic housing, there is space for this and the wire will not get pinched. Screw in the set screws through the holes of the plastic housing and into the pockets of the metal mirror post. Do not torque real hard, the set screws should bottom out into the pockets of the mirror post and sit pretty flush with the G Bracket.
Slide your V1 onto the V1 Bracket all the way towards the windshield and take the slack out of the hardwire cord.
Route the hardwire as seen and 2-small black zip ties tiddy the hardwire cord well as seen and are fairly descreet.
Here are a couple finished shots, the V1 sits just below the rearview mirror.
We realized going into this that this location would not be for everyone. We know there are people that prefer their radar detector elsewhere. We just set out to make a great solution for folks who would like their Radar Detector located below their rear view mirror, those folks seem to really appreciate that we have developed a quality, well designed product and brought it to market.
Pry apart the 2-piece plastic mirror housing cover. It's best to pry from the front as seen here because there are no wires in this area. Pry with a tool, just enough to get some separation, then carefully pull apart by hand.
You can see the metal mirror post now with the plastic removed.
In these pictures please notice the pocket on the side of the mirror post (It's the same on both sides, the post comes like this from Porsche and you do not need to drill on the mirror post), this is where the G Bracket Set Screws inserts and creates a very sturdy mount.
Here is the plastic housing before drilling. Please notice the little nubs, they are where you need to drill.
After holes have been drilled.
Take your bracket from your V1 and remove the suction cups.
Bolt the G Bracket to the V1 Bracket with supplied hardware.
Reinstall the drilled plastic housings.
If installing with a hardwire, place your wire in between the G Bracket and the plastic housing, there is space for this and the wire will not get pinched. Screw in the set screws through the holes of the plastic housing and into the pockets of the metal mirror post. Do not torque real hard, the set screws should bottom out into the pockets of the mirror post and sit pretty flush with the G Bracket.
Slide your V1 onto the V1 Bracket all the way towards the windshield and take the slack out of the hardwire cord.
Route the hardwire as seen and 2-small black zip ties tiddy the hardwire cord well as seen and are fairly descreet.
Here are a couple finished shots, the V1 sits just below the rearview mirror.
We realized going into this that this location would not be for everyone. We know there are people that prefer their radar detector elsewhere. We just set out to make a great solution for folks who would like their Radar Detector located below their rear view mirror, those folks seem to really appreciate that we have developed a quality, well designed product and brought it to market.
Last edited by Gary@G Rides; Dec 10, 2009 at 04:35 PM.
Thread Starter
|
Former Vendor
Joined: Aug 2006
Posts: 233
From: San Luis Obispo, CA
Rep Power: 0
We've done this on a couple of 997's. What's great about this is you're able to have the Radar Detector be switched on and off with the ignition and you don't have a cord hanging down from the Radar Detector and plugged into a cigarette lighter.
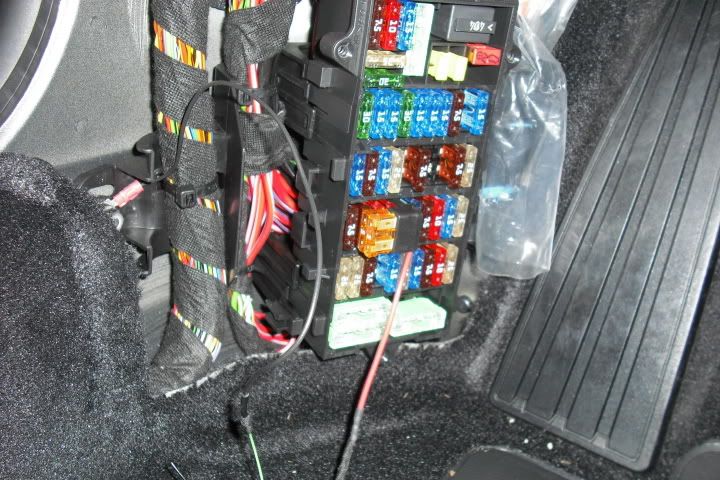
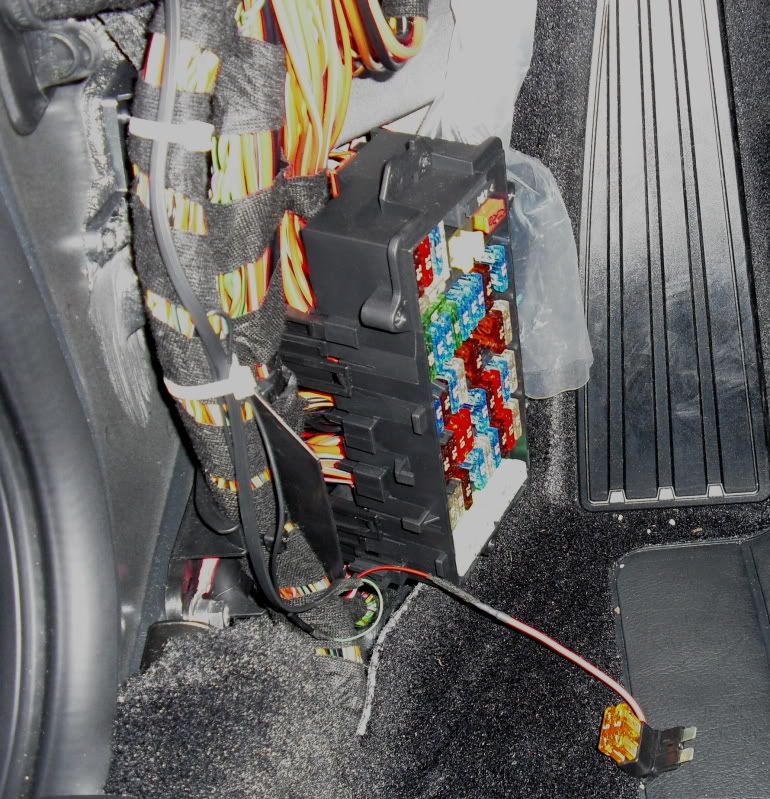
Using one of these Add-A-Fuse deals is a great way to grab an ignition on 12-Volt source with out having to cut/splice on factory wiring.
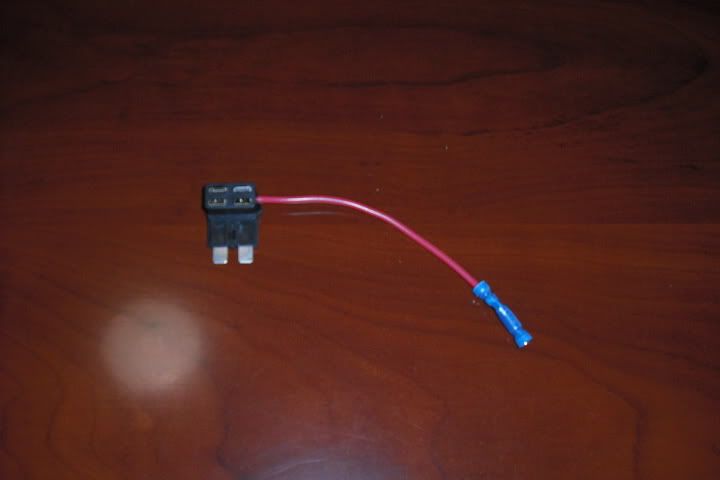
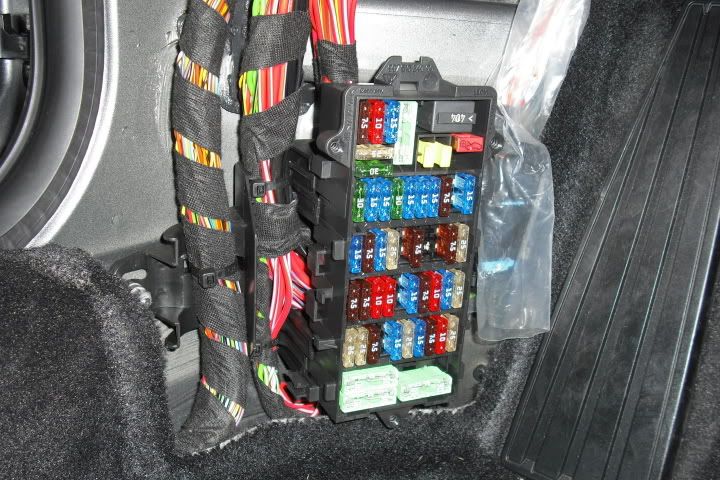
The Add-A-Fuse goes right into a fuse block. For this install there was an unused fuse location that was a switched on 12-Volt source so we used that. With the Add-A-Fuse you may also use it with a pre-existing fuse, replace that fuse with the Add-A-Fuse, put the removed fuse into the Add-A-Fuse then place a second fuse into the Add-A-Fuse so the Radar Detector has a inline fuse (we used a 5 Amp fuse going to the Radar Detector).
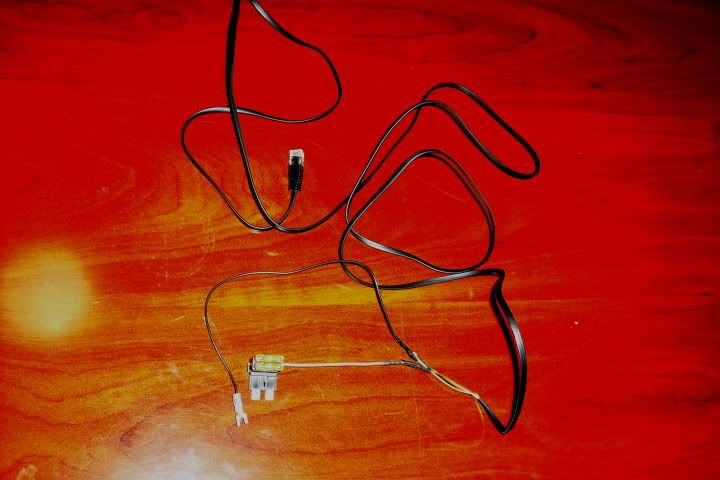
We used basically a phone cable as a wire to the Radar Detector. Find out which wire needs to be Hot (12-Volt Source), then Solder and shrink wrap the Add-A-Fuse to that.
Find out which wire needs to be Ground, then solder and shrink wrap a connector that suits your install to complete a good ground.

Here we used a pre-existing nut on a stud for our ground close to the fuse block, we put a stainless steel washer behind that nut so the ground connector gets sandwiched between to pieces of steel to make a good ground.
Remove the A-Pillar Cover so you can route the wire and secure it with some zip ties. Route the wire to where you want the Radar Detector and your about done already and the wire is hidden.

Here's how this Fuse Block looked when done with the cover off. The Add-A-Fuse is easily accessible and removed for any maintenance and nothing from the factory has been cut up. Having fun and keeping it clean. Any question please ask.

Thread Starter
|
Former Vendor
Joined: Aug 2006
Posts: 233
From: San Luis Obispo, CA
Rep Power: 0
Removing and reinstalling the A-Pillar Cover on the Coupes is a little tricky, Cabriolet's are much easier. Here are some pictures and info to help with the Coupes to help when Hardwiring into your Fuse Panel.
Start by removing the Hanger Holder Piece, pry from the base, then lift up to release the tab. I try to pry up with just my fingers, if that doesn't work, try to use some type of plastic wedge rather than a metal screwdirver.


Please have a look at these to get an idea how the Hanger Cover is held in. The 2-bottom tabs pop in and out of place, the top is more hinged.


Here is the A-Pillar removed so you may see what holds it in place. No screws or bolts, just poped in and out of place with metal prongs (5 Prongs total) and a tab at the base that inserts by the dash board.


This portion runs along the windshield, note the 2-Prongs. Also note the tab that inserts into a slot by the dashboard.


This portion runs along the headliner, note the 3-Prongs.


Please note this Plastic Post, which insert in hole towards the top of the windshield. It's tricky to see when installing, but look to make sure this is going into it's home so you don't break it off or have to wonder why your A-Pillar Cover doesn't seem to be fitting right.

Ok so once the Hanger holder is off, work your fingers under the A-Pillar cover and start to pull those prongs free from their homes. I start around the top near where the headliner and windshield meet. Once the Prongs are pulled free, which will make a little noise, carefully slip the back of the A-Pillar Cover free from the B-Pillar Cover, it just sits behind it a little as seen in this picture.
This is with the A-Pillar Cover slipped by the B-Pillar Cover. You may have to bow the A-Pillar Cover a little to work it free here and reinstall, just be carefull and take your time. You don't need to be very forcefull here.

Once the Prongs are released and you have the back of the A-Pillar Cover past the B-Pillar Cover, carefully lower the A-Pillar cover down towards the floor (watch out for your headrest and seat belt). Lowering the A-Pillar Cover down now frees the tab at the front bottom portion of the A-Pillar Cover where it inserts into the slot and groove by the dash board.


Once the bottom portion of the A-Pillar Cover is free from the dash, just carefully take it out of the cabin as it should be totally free now.


Reinstalling is basically reverse order. Insert into dash, sneak by B-Pillar Cover, line your Prongs and that plastic post up. Once things are lined up, start to press back in place, will make a little noise again. The first time you do this it can be a little intimidating but it's not that bad. The biggest thing is being patient and somewhat gentle, the most force needed should be to release the Prongs. Other than that you should not be using a lot of force. If you are not real comfortable with doing this and you're not too far from San Luis Obispo, CA you're welcome to bring your Porsche over to G Rides.
Start by removing the Hanger Holder Piece, pry from the base, then lift up to release the tab. I try to pry up with just my fingers, if that doesn't work, try to use some type of plastic wedge rather than a metal screwdirver.
Please have a look at these to get an idea how the Hanger Cover is held in. The 2-bottom tabs pop in and out of place, the top is more hinged.
Here is the A-Pillar removed so you may see what holds it in place. No screws or bolts, just poped in and out of place with metal prongs (5 Prongs total) and a tab at the base that inserts by the dash board.
This portion runs along the windshield, note the 2-Prongs. Also note the tab that inserts into a slot by the dashboard.
This portion runs along the headliner, note the 3-Prongs.
Please note this Plastic Post, which insert in hole towards the top of the windshield. It's tricky to see when installing, but look to make sure this is going into it's home so you don't break it off or have to wonder why your A-Pillar Cover doesn't seem to be fitting right.
Ok so once the Hanger holder is off, work your fingers under the A-Pillar cover and start to pull those prongs free from their homes. I start around the top near where the headliner and windshield meet. Once the Prongs are pulled free, which will make a little noise, carefully slip the back of the A-Pillar Cover free from the B-Pillar Cover, it just sits behind it a little as seen in this picture.
This is with the A-Pillar Cover slipped by the B-Pillar Cover. You may have to bow the A-Pillar Cover a little to work it free here and reinstall, just be carefull and take your time. You don't need to be very forcefull here.
Once the Prongs are released and you have the back of the A-Pillar Cover past the B-Pillar Cover, carefully lower the A-Pillar cover down towards the floor (watch out for your headrest and seat belt). Lowering the A-Pillar Cover down now frees the tab at the front bottom portion of the A-Pillar Cover where it inserts into the slot and groove by the dash board.
Once the bottom portion of the A-Pillar Cover is free from the dash, just carefully take it out of the cabin as it should be totally free now.
Reinstalling is basically reverse order. Insert into dash, sneak by B-Pillar Cover, line your Prongs and that plastic post up. Once things are lined up, start to press back in place, will make a little noise again. The first time you do this it can be a little intimidating but it's not that bad. The biggest thing is being patient and somewhat gentle, the most force needed should be to release the Prongs. Other than that you should not be using a lot of force. If you are not real comfortable with doing this and you're not too far from San Luis Obispo, CA you're welcome to bring your Porsche over to G Rides
.
Thread Starter
|
Former Vendor
Joined: Aug 2006
Posts: 233
From: San Luis Obispo, CA
Rep Power: 0
More applications to come, what car did you have in mind?
You may see the price and also purchase the 997 Version here: http://storesense.megawebservers.com...tail.bok?no=71
Won't know the price of other applications till they are designed and manufactured.
You may see the price and also purchase the 997 Version here: http://storesense.megawebservers.com...tail.bok?no=71
Won't know the price of other applications till they are designed and manufactured.
Thread Starter
|
Former Vendor
Joined: Aug 2006
Posts: 233
From: San Luis Obispo, CA
Rep Power: 0
I'd like to thank 6Speed Member BartN (TX) for helping us out. BartN (TX) was kind enough to test fit our 997 G Bracket for Auto Dimming Mirror in his Manual Mirror equipped 997 GT3. From that we've learned the 997 Manual Dimming Mirror equipped cars will require a different G Bracket. So please note that our current G Bracket will not fit the 997 Manual Dimming Mirror. Thanks again BartN (TX).
997 Auto Dimming Mirror G Brackets are in-stock, please let me know if you have any questions or how we may be of service.
997 Auto Dimming Mirror G Brackets are in-stock, please let me know if you have any questions or how we may be of service.

Registered User
Joined: Oct 2009
Posts: 86
From: Jacksonville Beach, FL
Rep Power: 20
I'd like to thank 6Speed Member BartN (TX) for helping us out. BartN (TX) was kind enough to test fit our 997 G Bracket for Auto Dimming Mirror in his Manual Mirror equipped 997 GT3. From that we've learned the 997 Manual Dimming Mirror equipped cars will require a different G Bracket. So please note that our current G Bracket will not fit the 997 Manual Dimming Mirror. Thanks again BartN (TX).
997 Auto Dimming Mirror G Brackets are in-stock, please let me know if you have any questions or how we may be of service.
997 Auto Dimming Mirror G Brackets are in-stock, please let me know if you have any questions or how we may be of service.