Chadillac2000's 2012 Porsche Cayenne Base Maintenance & Modification Thread


#17
 07-14-2017, 02:14 PM
This thread is great on the photos man
I love documenting DIYs with photos or if not just snapping a couple pics for reference.
I gotta pick up those OEM mats (interior color same as u) but I want beige mats and I gotta pick up those quad tips its on my list
I love documenting DIYs with photos or if not just snapping a couple pics for reference.
I gotta pick up those OEM mats (interior color same as u) but I want beige mats and I gotta pick up those quad tips its on my list
#18
07-14-2017, 07:32 PM
Registered User

I believe the "too slippery" trunk mat was a 955/957 thing. The factory trunk mat for those was a hard plastic mat with dimples - shiny hard plastic. It was rather slippery. The OE mat for the 958 is the same material as the front mats - with the embossed Cayenne in it like the fronts. Things don't slide around on it.
Oh - remembered now - love the room you have in your garage. Mine is full of stuff (like a motorcycle, large tool-boxes and canoes and.. and..
For the Rhino Ramps - I used those with my BMW M-cars. To keep them from walking away as you try to pull up on them - easy. A piece of carpet a bit longer than the ramp so the wheel goes on the carpet first, then presses the lip of the ramp into the carpet and holds it there as the wheel climbs up. Made it very easy to ride up on them. I have a large piece of carpeting that lives under the Cayenne - works fine with the ramps.
#19
07-15-2017, 08:58 PM

Join Date: Nov 2008
Location: Western North Carolina
Posts: 214
Rep Power: 26 
I believe the "too slippery" trunk mat was a 955/957 thing. The factory trunk mat for those was a hard plastic mat with dimples - shiny hard plastic. It was rather slippery. The OE mat for the 958 is the same material as the front mats - with the embossed Cayenne in it like the fronts. Things don't slide around on it.
Oh - remembered now - love the room you have in your garage. Mine is full of stuff (like a motorcycle, large tool-boxes and canoes and.. and..
For the Rhino Ramps - I used those with my BMW M-cars. To keep them from walking away as you try to pull up on them - easy. A piece of carpet a bit longer than the ramp so the wheel goes on the carpet first, then presses the lip of the ramp into the carpet and holds it there as the wheel climbs up. Made it very easy to ride up on them. I have a large piece of carpeting that lives under the Cayenne - works fine with the ramps.
Oh - remembered now - love the room you have in your garage. Mine is full of stuff (like a motorcycle, large tool-boxes and canoes and.. and..
For the Rhino Ramps - I used those with my BMW M-cars. To keep them from walking away as you try to pull up on them - easy. A piece of carpet a bit longer than the ramp so the wheel goes on the carpet first, then presses the lip of the ramp into the carpet and holds it there as the wheel climbs up. Made it very easy to ride up on them. I have a large piece of carpeting that lives under the Cayenne - works fine with the ramps.
-----------------------------------------------------------------------------------------------
My fianc� has been the one mostly driving the Cayenne over the past month or so, while I've been daily driving my 135i to work and back. But today I was able to spend some more time with my newly acquired (shared) toy. Since this car is stored outdoors, I had been meaning to pay some attention to the paint. It had been sitting under our big oak tree collecting debris from the afternoon rain storms when I snapped these.
I washed/dried the 958 before pulling it inside and opening up all the doors/hatch.
Just as I started to clean the interior, the looming thunderstorm struck making me thankful I had access to somewhere indoors to work.
I've been using a lot of Griot's Garage products recently, and I really enjoy using their Leather Care Spray. After a vacuum, the entire interior was wiped down with some of this leaving everything with a nice sheen, great scent, and completely clean.
I also took this time to wipe down all the door jambs and the exposed part of the hatch when open.
Following the interior, I used a clay bar over the entire truck. This was quite time extensive, especially the roof.
Before embarking on the paint polishing and wax application, it was beer thirty.
I wasn't looking to spend days fully correcting a paint that already looked great, so my first pass over the entire car was with a black cutting microfiber pad coupled with MeGuiar's 205. Before doing this, I used some fishing line to remove the rear badging. This pad/polish combo helped remove the staining and residue. It took over half an hour just to get all the adhesive that was left over after popping the letters off. The "Cayenne" badge broke off in multiple pieces.
After a full pass with the combo above, I then used a red Griot's Garage waxing pad with Blackfire Wet Diamond to make another full pass over the entire truck.
By the time I was finished the rain had stopped and the wet pavement had dried. I backed the Cayenne out of the garage and let it bask in the sunset. The results were pretty stunning. I definitely prefer the badge-less look in the rear, especially with the quad tips.
Attachment 1
Attachment 1
I also picked up a Porsche oil tote with an extra liter of Mobil 1 ESP 5W-30 to keep in the back along with iCarsoft module.
The BMW coupe is very efficient at hauling around about whatever I ask of it by being able to fold down the rear seats, but it's so convenient having a full size hatch to use. On the way home I was able to bring home all my detailing supplies as well as a bunch of components for a very near future turbo upgrade I'm performing on the 135i -- including port injection.
Last edited by Chadillac2000; 07-18-2017 at 09:11 AM.
#21
07-26-2017, 05:16 AM
Chad
Thanks for the great write up. Please keep it going. I just picked up a 11 myself and ordered the tips oil filter and pedal cover while reading yours. Thanks for the link on the tips!
#22
07-27-2017, 09:10 AM
Join Date: Nov 2008
Location: Western North Carolina
Posts: 214
Rep Power: 26 
--------------------------------------------------------------
I loaded up Winston (my Border Collie) and a bunch of blankets into the Cayenne yesterday to make a road trips of sorts. I've been on the lookout for a set of larger wheels for the 958 as the stock 18s are the only portion of this truck I'm not fond of. They're fine for what they are, and I'll probably hang on to them for winter duty, but I wanted more.
I'd been keeping my eye on local listings, eBay, Rennlist and this forum and finally found something that looked promising at a decent price only a few hours away. Rather than pay for shipping, I asked for an additional discount and just went and picked them up. Teaser shots until I have a chance to get them all cleaned up and mounted:
I was not prepared for the enormity of what a 21" wheel and tire would be in person. With the rear seats folded down, and the correct orientation, I was able to keep them in place for the ride back home without damaging any of the interior, but it was no easy task!
#25
07-31-2017, 11:35 AM
Join Date: Nov 2008
Location: Western North Carolina
Posts: 214
Rep Power: 26
After picking up the new wheels last Wednesday, I finally had a chance to get them all cleaned up and figure out exactly what I was dealing with over the weekend.
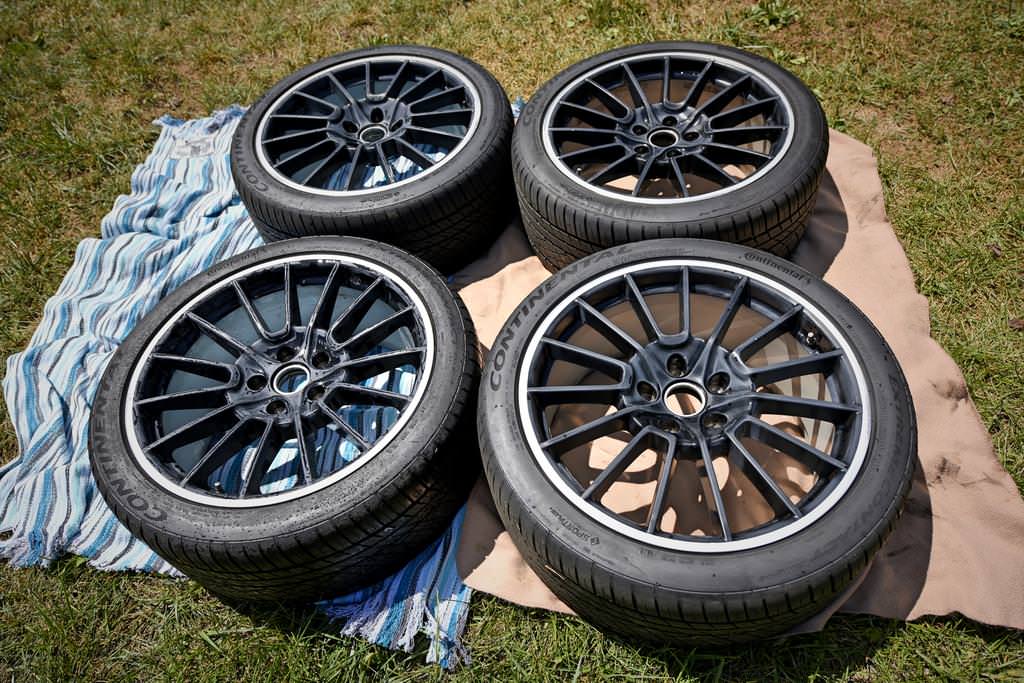
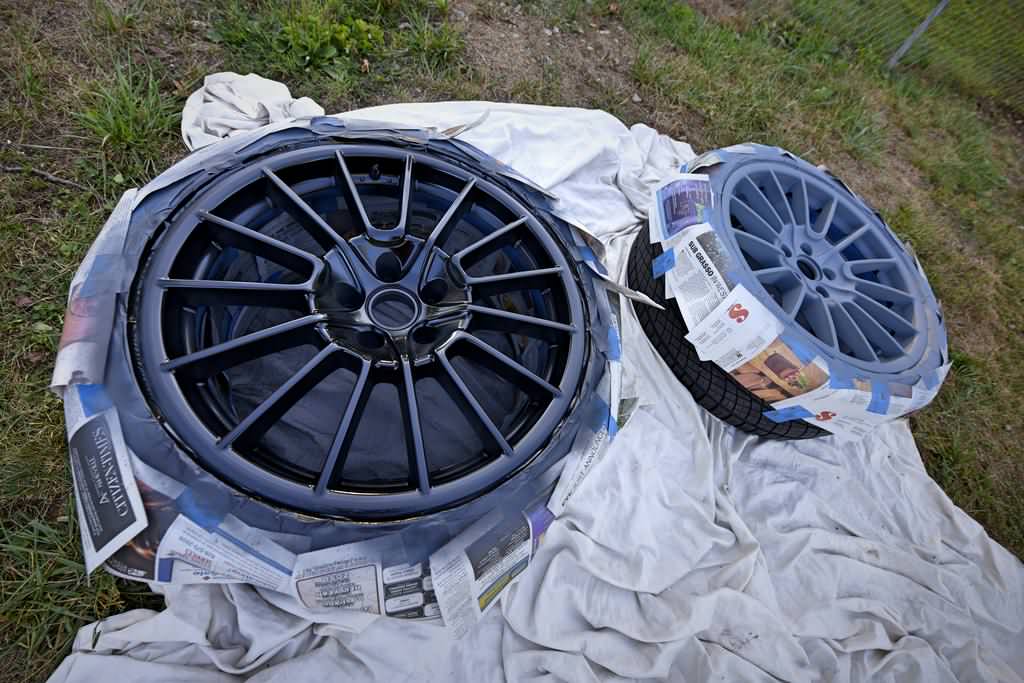
The wheels are 21" Sport Plus wheels from the 957 era Cayenne GTS or Turbo S, already equipped with functioning TPMS, and wrapped in 295/35/21 Continental ExtremeContact rubber with most of the tread still remaining. Since I made the trip to go pick them up and they had a bit of minor curb rash on each of the wheels, I was able to negotiate the seller down to $1,250; more than fair for what I was getting. The only downside is 45mm offset on the rears, and 50mm offset on the fronts, so tires cannot be rotated, but I'm already used to that running a staggered setup on my 135i. Widths are 21x9 on all four.
Bolting up a new set of wheels to the Cayenne with curb rash already present was not an option. I was completely content with the OEM silver stripe along the outer edge of the wheel, but my fiance preferred all black, so quickly after cleaning these up I settled on completely refinishing them -- a job that would prove to be time-consuming with wheels this large that already had tires mounted.
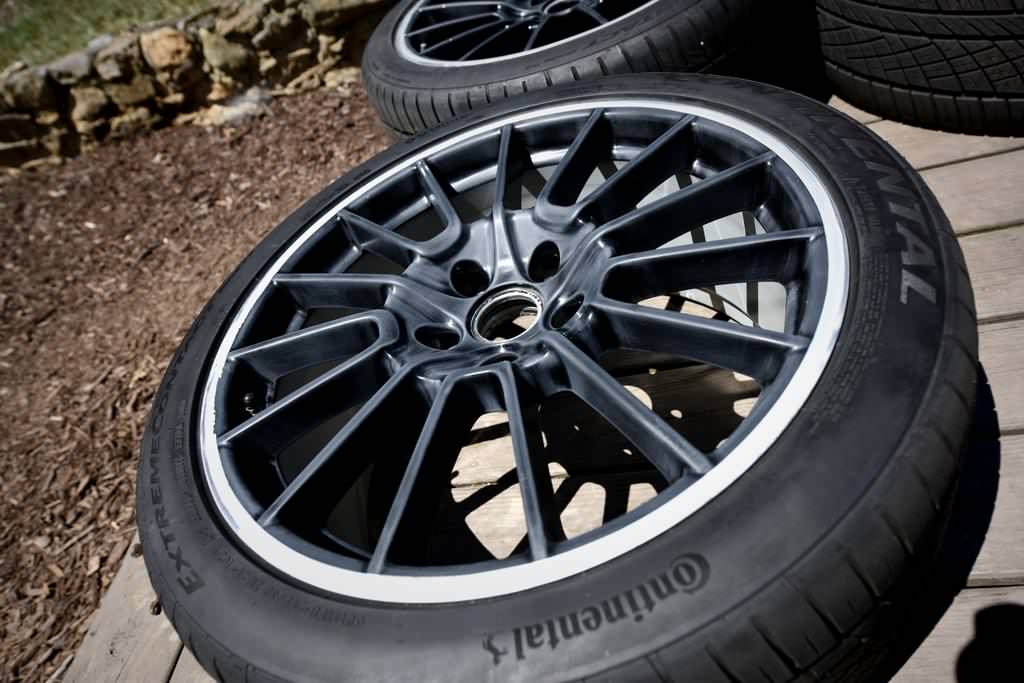
After a bunch of Simple Green and elbow grease, I was able to get a true representation of the wheels once they were fully cleaned up and dried off.
A few knicks around the other edge, but nothing serious enough to warrant anything more than a few passes with a medium grit sandpaper while wet. I hit all the high spots, chips, and complete outer edge, then worked my way up through the sandpaper grits until I had a uniform, smooth finish. The final step before moving on to masking and painting was to hit every surface area with a Scotchbrite.
Another thorough washing to get rid of all sandpaper debris and dust and we were ready to let them dry. The 90 degree heat helped do this quickly.
 .
.
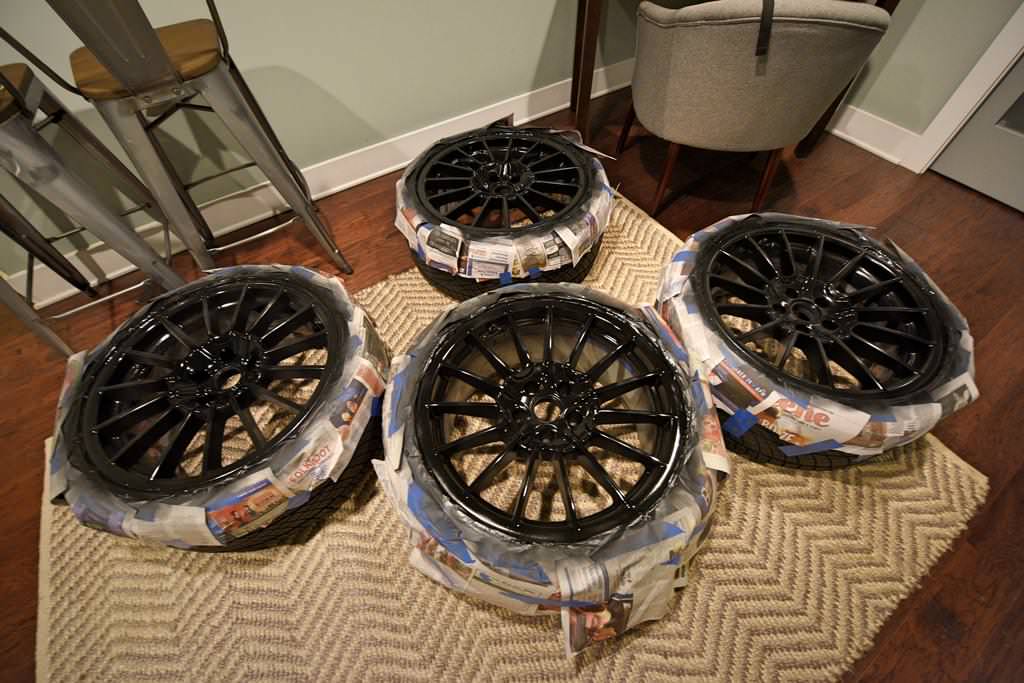
Here were the other supplies I used for the actual painting. First up was taping off everything carefully for the first primer coat. This was time intensive -- easily 30 minutes a wheel after already spending multiple hours on each getting the surface prepared properly.
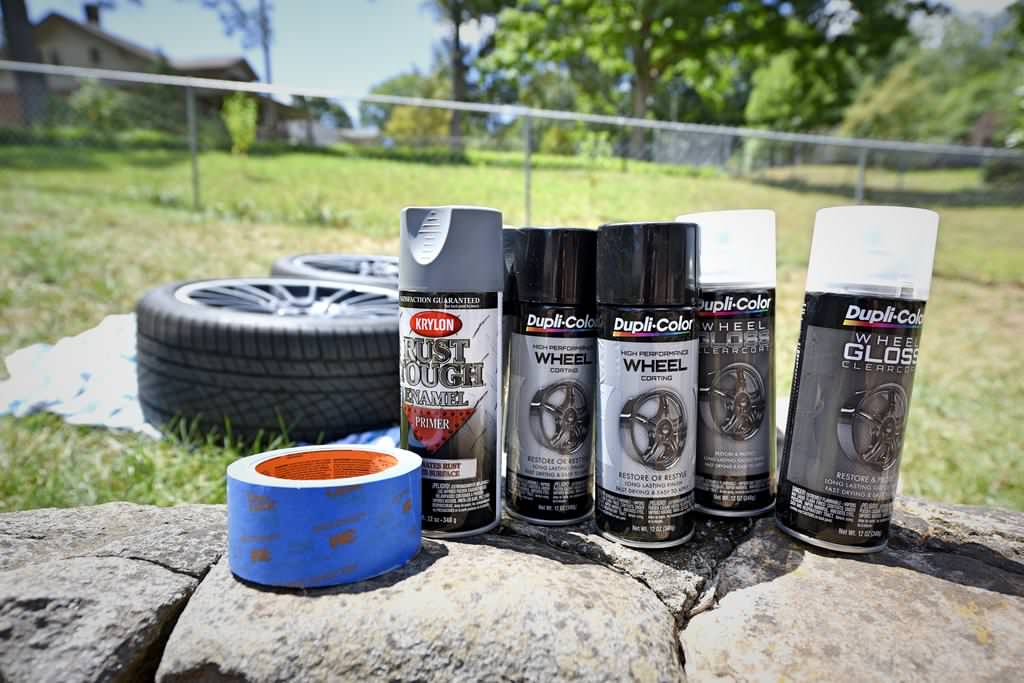
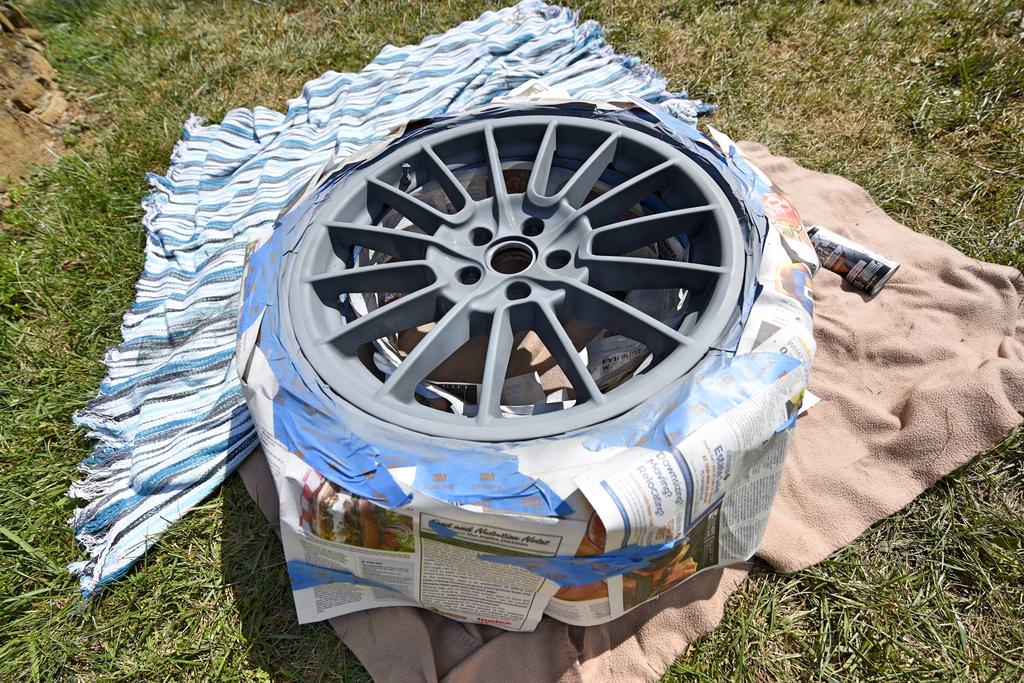
A few light coats of primer followed by a medium "wet" coat was done on all four wheels. Tape was applied around the outer edge of the tire, as well as inside the barrel to mimic the OEM paint. This provided the ideal foundation to start laying down the actual color over.
After waiting the appropriate amount of time for the primer to dry, I followed the same two light coat, one medium wet coat method with the Dupli-Color Gloss Black Wheel Coating.
By the end of the day I was exhausted, my index fingers on both hands were swollen from pressing the release trigger, but the new wheels were looking brand new again. The gloss black plus clear coat combo from Dupli-Color had the wheels still looking wet even after drying for a few hours. I brought them inside where I'll let them cure for a few days before doing anything else with them. I plan on removing the tape and adding the center caps back later tonight. Here's another teaser until then:
Later this week the brake decals and high-temperature paint I ordered from Suncoast will be arriving and this coming weekend I have plans to remove the old 18s, refinish the brake calipers in red with white Porsche decals, mount up the new refinished 21s, and immediately start saving up again for replacement tires after looking at the prices.
The wheels are 21" Sport Plus wheels from the 957 era Cayenne GTS or Turbo S, already equipped with functioning TPMS, and wrapped in 295/35/21 Continental ExtremeContact rubber with most of the tread still remaining. Since I made the trip to go pick them up and they had a bit of minor curb rash on each of the wheels, I was able to negotiate the seller down to $1,250; more than fair for what I was getting. The only downside is 45mm offset on the rears, and 50mm offset on the fronts, so tires cannot be rotated, but I'm already used to that running a staggered setup on my 135i. Widths are 21x9 on all four.
Bolting up a new set of wheels to the Cayenne with curb rash already present was not an option. I was completely content with the OEM silver stripe along the outer edge of the wheel, but my fiance preferred all black, so quickly after cleaning these up I settled on completely refinishing them -- a job that would prove to be time-consuming with wheels this large that already had tires mounted.
After a bunch of Simple Green and elbow grease, I was able to get a true representation of the wheels once they were fully cleaned up and dried off.
A few knicks around the other edge, but nothing serious enough to warrant anything more than a few passes with a medium grit sandpaper while wet. I hit all the high spots, chips, and complete outer edge, then worked my way up through the sandpaper grits until I had a uniform, smooth finish. The final step before moving on to masking and painting was to hit every surface area with a Scotchbrite.
Another thorough washing to get rid of all sandpaper debris and dust and we were ready to let them dry. The 90 degree heat helped do this quickly.
Here were the other supplies I used for the actual painting. First up was taping off everything carefully for the first primer coat. This was time intensive -- easily 30 minutes a wheel after already spending multiple hours on each getting the surface prepared properly.
A few light coats of primer followed by a medium "wet" coat was done on all four wheels. Tape was applied around the outer edge of the tire, as well as inside the barrel to mimic the OEM paint. This provided the ideal foundation to start laying down the actual color over.
After waiting the appropriate amount of time for the primer to dry, I followed the same two light coat, one medium wet coat method with the Dupli-Color Gloss Black Wheel Coating.
By the end of the day I was exhausted, my index fingers on both hands were swollen from pressing the release trigger, but the new wheels were looking brand new again. The gloss black plus clear coat combo from Dupli-Color had the wheels still looking wet even after drying for a few hours. I brought them inside where I'll let them cure for a few days before doing anything else with them. I plan on removing the tape and adding the center caps back later tonight. Here's another teaser until then:
Later this week the brake decals and high-temperature paint I ordered from Suncoast will be arriving and this coming weekend I have plans to remove the old 18s, refinish the brake calipers in red with white Porsche decals, mount up the new refinished 21s, and immediately start saving up again for replacement tires after looking at the prices.
Last edited by Chadillac2000; 07-31-2017 at 01:16 PM.
#26
07-31-2017, 02:21 PM
Registered User
Build is coming along excellent! I have 2014 Cayenne Base v6 also, but can't find the chrome exhaust tips you have installed. The link you posted is from ebay is for the V8?
#27
08-01-2017, 06:39 AM

I'm enjoying your thread, thanks for sharing and please keep it coming.
You are brave in having removed both the PORSCHE along with the Cayenne on the rear hatch. I have thought about it as I usually de-badge everything I have ever owned but have not gotten rid of one thing on the Cayenne, yet.
I also want to get a set of quad exhaust tips as they do look a lot better than the big openings I have now.
I wonder, why in Savannah GA, you would need a set of winter tires/wheels? Does it actually snow down there?
I'm looking forward to how your wheel painting comes out. Are you going to do anything about the barrels of the wheels? Did you mask that part off?
#28
08-01-2017, 08:16 AM
Join Date: Nov 2008
Location: Western North Carolina
Posts: 214
Rep Power: 26 I'm enjoying your thread, thanks for sharing and please keep it coming.
You are brave in having removed both the PORSCHE along with the Cayenne on the rear hatch. I have thought about it as I usually de-badge everything I have ever owned but have not gotten rid of one thing on the Cayenne, yet.
I also want to get a set of quad exhaust tips as they do look a lot better than the big openings I have now.
I wonder, why in Savannah GA, you would need a set of winter tires/wheels? Does it actually snow down there?
I'm looking forward to how your wheel painting comes out. Are you going to do anything about the barrels of the wheels? Did you mask that part off?
I need to update my profile. I'm in Western North Carolina at the moment, so we get 6" or so 3-4 times a winter. Not dire by any means, but would be nice to have an extra set in the garage.
After removing all the masking tape last night and putting them in a place to cure for a few days, they look brand new. I'll most likely hit them up with a little bit of my paint polish, then maybe some compound and wax if I'm feeling up to it. And yes, I masked the entire inside of the barrel off to keep the original finish there (which was an off-silver color, not black).
#29
08-02-2017, 11:10 AM
Debadged and quad tips, I like it. I have been too cheap to spend the $250 or so to get a set of them myself but one of these days I will. Thanks for the pics of it and all the pics really, you have been doing awesome posting everything up.
NC, ok, I didn't know that it snows down there every now and then. Up here in MA, we get snow all winter long but I get by just fine with all seasons as it is not like they don't plow the roads all storm long and afterwards the roads are down to just about pavement.
Good you didn't waste time on the barrels and will get that contrasting look once it is all done. I'll be interested in how it holds up in the months/years ahead as I consider getting my wheels either painted or powdercoated as I do like the DesignII wheels but again, I'm always so hesitant to spend the money on either the refinish or new wheels. Your paint job looks awesome so far.
#30
08-02-2017, 05:47 PM
Join Date: Nov 2008
Location: Western North Carolina
Posts: 214
Rep Power: 26 Debadged and quad tips, I like it. I have been too cheap to spend the $250 or so to get a set of them myself but one of these days I will. Thanks for the pics of it and all the pics really, you have been doing awesome posting everything up.
NC, ok, I didn't know that it snows down there every now and then. Up here in MA, we get snow all winter long but I get by just fine with all seasons as it is not like they don't plow the roads all storm long and afterwards the roads are down to just about pavement.
Good you didn't waste time on the barrels and will get that contrasting look once it is all done. I'll be interested in how it holds up in the months/years ahead as I consider getting my wheels either painted or powdercoated as I do like the DesignII wheels but again, I'm always so hesitant to spend the money on either the refinish or new wheels. Your paint job looks awesome so far.
I will keep you updated on how the paint on the wheels hold up over time. Hopefully the prep work, primer, multiple coats of black, and multiple coats of clear coat will help add some longevity. It was very time consuming, but only about $75 in supplies. It will be a few weeks before I'm able to get them mounted because of life, but that will allow them to fully cure indoors before encountering the elements. I'm still going to lay down a coating of polish and a coating of sealant to really make them pop and buff out any imperfections. The black Porsche center caps and black valve stems finish off the look.
The red caliper paint and Porsche decals from Suncoast arrived earlier. I picked up a can of high temperature caliper clear coat as well to use after the decals are applied.