The 12-Gauge Garage
#1
 02-06-2010, 04:12 PM


Join Date: Mar 2005
Location: Los Angeles
Posts: 83
Rep Power: 43 

The 12-Gauge Garage
I first posted online about my garage back in 2007. I called it the ‘Poor Man’s Retro Retreat’ back then because my budget for it had been low ($500) and I’d used a kind of old-fashioned color scheme when I painted it. It’s a garage I’ve liked a lot. It’s had everything I’ve needed. I’ve gotten a lot of work done in it.
So naturally, I had to go through and re-do pretty much every component in the place.
The garage can’t really be called the ‘Poor Man’s Retro Retreat’ anymore because I’ve spent too much money on it. It’s still pretty modest, by the standards of many of the garages on this board. It’s pretty humble, still -- a suburban two-car garage tucked around behind the house on my tiny 1/8-acre lot.But by my own personal standards (I’m very cheap), it’s now a pretty expensive operation. I would guess that I’ve now put another $2,000 into the place. (It kind of blows my mind that the cost of a place like ‘The Bunker” -- which is awesome, don’t get me wrong -- would pay for my re-do and 399 other garages just like mine. But you do what you can with whatever you’ve got -- and this is what I did.)
THE HISTORY
During the 2007 Writers Guild strike, I went through my completely useless junk bin of a garage and tried to get a little organized for the first time in my then 43-year-old life. Both my wife and I write for a living, so we were both out of work for the duration -- I was understandably cautious with spending money. But on the other hand, I couldn’t work -- so I had all the time in the world. I gave myself a $500 budget and attempted to re-use or re-purpose as much of the crap filling my garage as possible, while moving most of what was left to a dumpster. Every day, after a shift spent pounding the pavement on a picket line, I’d work on it. The last touch was to paint it in sort-of-early-1960s shades of green, yellow and tan.
I was pretty happy with it.

I also built a shed for the stuff that would normally clutter up a garage as small as mine. I’d never done much carpentry, but having a garage that I could actually move around in made it easier to get a little creative with the roof lines.

And then one day I saw a sale on ceramic tile at Home Depot and I jumped into a .68/sf scheme to both tile my garage and teach myself how to set tile. It worked out all right, considering how unlevel my 84-year-old garage floor was. I ended up with a nicer-to-use and nicer-to-look-at garage for another $400 invested. (I also ended up with bigger shoulders, since grouting that much tile is a pretty serious amount of work.)

So I thought I was done. But you know how that goes.
It didn’t happen overnight, but -- slowly, steadily, you can’t fight it forever -- I started to no longer see my finished garage as finished anymore.
It was just getting started.
So naturally, I had to go through and re-do pretty much every component in the place.
The garage can’t really be called the ‘Poor Man’s Retro Retreat’ anymore because I’ve spent too much money on it. It’s still pretty modest, by the standards of many of the garages on this board. It’s pretty humble, still -- a suburban two-car garage tucked around behind the house on my tiny 1/8-acre lot.But by my own personal standards (I’m very cheap), it’s now a pretty expensive operation. I would guess that I’ve now put another $2,000 into the place. (It kind of blows my mind that the cost of a place like ‘The Bunker” -- which is awesome, don’t get me wrong -- would pay for my re-do and 399 other garages just like mine. But you do what you can with whatever you’ve got -- and this is what I did.)
THE HISTORY
During the 2007 Writers Guild strike, I went through my completely useless junk bin of a garage and tried to get a little organized for the first time in my then 43-year-old life. Both my wife and I write for a living, so we were both out of work for the duration -- I was understandably cautious with spending money. But on the other hand, I couldn’t work -- so I had all the time in the world. I gave myself a $500 budget and attempted to re-use or re-purpose as much of the crap filling my garage as possible, while moving most of what was left to a dumpster. Every day, after a shift spent pounding the pavement on a picket line, I’d work on it. The last touch was to paint it in sort-of-early-1960s shades of green, yellow and tan.
I was pretty happy with it.
I also built a shed for the stuff that would normally clutter up a garage as small as mine. I’d never done much carpentry, but having a garage that I could actually move around in made it easier to get a little creative with the roof lines.
And then one day I saw a sale on ceramic tile at Home Depot and I jumped into a .68/sf scheme to both tile my garage and teach myself how to set tile. It worked out all right, considering how unlevel my 84-year-old garage floor was. I ended up with a nicer-to-use and nicer-to-look-at garage for another $400 invested. (I also ended up with bigger shoulders, since grouting that much tile is a pretty serious amount of work.)
So I thought I was done. But you know how that goes.
It didn’t happen overnight, but -- slowly, steadily, you can’t fight it forever -- I started to no longer see my finished garage as finished anymore.
It was just getting started.
#2
02-06-2010, 04:13 PM
Join Date: Mar 2005
Location: Los Angeles
Posts: 83
Rep Power: 43
THE GARAGE TODAY

I’m calling it ‘The 12-Gauge Garage’ because when I built a steel-topped bench for it, I discovered Strong Hold Cabinets, a Wisconsin company that makes ridiculously strong cabinets. They claim that they’re the strongest metal cabinets you can buy. They’re rated to hold 1900 pounds per shelf. That’s definitely stronger than I have any need for in my garage (and watch out, they’re expensive, too). But the one that was holding up the steel plate for my bench -- well, it just felt good to open and close the thing. Is that crazy?
This is how it looked when I bought it.

Here it is painted and with a 510-pound bench on top of it.

I liked using that cabinet so much that I started keeping an eye out for other used Strong Hold cabinets on eBay.
With a lot of patience, and letting about 50 of the cabinets go to other buyers (I’m cheap, there’s no two ways about it), I finally lucked into a 4’ wide model for $62. This is a 760-pound cabinet that lists for (I think) $2,300 new. I snapped it up, and even got a little less cheap when I sourced a second one for $148. Then I got a Lyon cabinet for a shallower space near my metal bench (it’s made of 14-gauge steel, not 12-gauge). Including the short Strong Hold cabinet I’d already bought, I had about $600 in the four steel cabinets for my garage. It’s about 2,300 pounds of cabinetry.
Getting them to my house and getting them installed into my garage is a very long story I won’t tell here. I did document one bad day when I basically knocked one of the 760-pounc cabinets onto my Porsche. Yeah, you read that right. I ended up not hurting the car too badly, but still -- a pretty bone-headed moment.

Did I mention that they’re heavy? Each of the doors on the 4’ wide cabinets weighs 85 pounds. They open and close easily, but it has the feel of opening a bank safe.

THE BASIC FACTS
The garage is small -- 20’x22’. I store one car in it and use the rest as my home shop. In addition to the normal home and car repairs, I do some woodworking projects and some welding projects in it. It’s not lit like an operating room. I don’t have beer signs, gas pumps or televisions in it. It’s built to remind me of working with my father in his shop in Chicago, where I grew up.

I'll take it wall by wall. In my initial clean-up of the garage, I added a fold-down table for wood projects. It had pre-drilled holes for my router table and was at the same height as the other bench in the garage so I could use it for cutting long pieces of lumber. I liked it so much that when I took up welding, I added a second, steel table for welding. Both of them fold up along the first wall of the garage so I can park my car there. But when I back the car out I can lower one or both of them for work. It’s a really handy thing to have when you’re working in such a small space.


I’m calling it ‘The 12-Gauge Garage’ because when I built a steel-topped bench for it, I discovered Strong Hold Cabinets, a Wisconsin company that makes ridiculously strong cabinets. They claim that they’re the strongest metal cabinets you can buy. They’re rated to hold 1900 pounds per shelf. That’s definitely stronger than I have any need for in my garage (and watch out, they’re expensive, too). But the one that was holding up the steel plate for my bench -- well, it just felt good to open and close the thing. Is that crazy?
This is how it looked when I bought it.
Here it is painted and with a 510-pound bench on top of it.
I liked using that cabinet so much that I started keeping an eye out for other used Strong Hold cabinets on eBay.
With a lot of patience, and letting about 50 of the cabinets go to other buyers (I’m cheap, there’s no two ways about it), I finally lucked into a 4’ wide model for $62. This is a 760-pound cabinet that lists for (I think) $2,300 new. I snapped it up, and even got a little less cheap when I sourced a second one for $148. Then I got a Lyon cabinet for a shallower space near my metal bench (it’s made of 14-gauge steel, not 12-gauge). Including the short Strong Hold cabinet I’d already bought, I had about $600 in the four steel cabinets for my garage. It’s about 2,300 pounds of cabinetry.
Getting them to my house and getting them installed into my garage is a very long story I won’t tell here. I did document one bad day when I basically knocked one of the 760-pounc cabinets onto my Porsche. Yeah, you read that right. I ended up not hurting the car too badly, but still -- a pretty bone-headed moment.
Did I mention that they’re heavy? Each of the doors on the 4’ wide cabinets weighs 85 pounds. They open and close easily, but it has the feel of opening a bank safe.
THE BASIC FACTS
The garage is small -- 20’x22’. I store one car in it and use the rest as my home shop. In addition to the normal home and car repairs, I do some woodworking projects and some welding projects in it. It’s not lit like an operating room. I don’t have beer signs, gas pumps or televisions in it. It’s built to remind me of working with my father in his shop in Chicago, where I grew up.
I'll take it wall by wall. In my initial clean-up of the garage, I added a fold-down table for wood projects. It had pre-drilled holes for my router table and was at the same height as the other bench in the garage so I could use it for cutting long pieces of lumber. I liked it so much that when I took up welding, I added a second, steel table for welding. Both of them fold up along the first wall of the garage so I can park my car there. But when I back the car out I can lower one or both of them for work. It’s a really handy thing to have when you’re working in such a small space.
#3
02-06-2010, 04:13 PM
Join Date: Mar 2005
Location: Los Angeles
Posts: 83
Rep Power: 43
In the latest update of the garage, I got rid of the yellow paint on this wall. I’ve decided the only two colors on the wall will be the tan and the green.
Here’s the old yellow:

The back wall is the one that’s changed the most this month. Here’s the way it used to look. I had banker’s boxes on shelves made of hollow-core doors and some crooked cabinets that had been put in sometime before I’d owned the house.

The main bench I was using was pretty simple, too. A solid core door over a frame with three wooden drawers I’d saved when we’d torn a closet out of the house.

I tore out everything and put in cabinets up above the line that had been formed by a piece of aluminum up above my bench. I extended that line across the whole garage, now, with wooden cabinets up above it, mostly with sliding doors. I can keep a lot of stuff up there that I don’t need to access all the time.

Down below, I adapted both of the Strong Hold cabinets to store as much stuff as possible.


One of them now has seven wooden shelves, each holding six bins I sourced from (huh?) Ikea. I keep all kinds of different stuff -- everything from extension cords and trouble lights to hinges, casters, light switches, you name it -- in those bins. I got labels for them so I don’t have to remember where I put what.
For the other cabinet, I wanted to have vertical storage so I could store a small ladder, a broom, and hang my overalls and welding jacket up. So there’s a small space for that, and then a set of normal shelves. On the doors of the cabinets, I put about a hundred bins for fasteners. It’s still not completely sorted out and organized, but I’m getting closer.

The doors can open with plenty of extra space when the car is parked in there.
Putting in the steel cabinets let me move my main bench 30 inches to the left, which allowed me to move my tool boxes to the back wall. They used to divide the garage, and I never liked the way it looked. I also got a Harbor Freight tool box to function as the base for the bench. I painted it to match the Sears boxes.


Here’s the old yellow:
The back wall is the one that’s changed the most this month. Here’s the way it used to look. I had banker’s boxes on shelves made of hollow-core doors and some crooked cabinets that had been put in sometime before I’d owned the house.
The main bench I was using was pretty simple, too. A solid core door over a frame with three wooden drawers I’d saved when we’d torn a closet out of the house.
I tore out everything and put in cabinets up above the line that had been formed by a piece of aluminum up above my bench. I extended that line across the whole garage, now, with wooden cabinets up above it, mostly with sliding doors. I can keep a lot of stuff up there that I don’t need to access all the time.
Down below, I adapted both of the Strong Hold cabinets to store as much stuff as possible.
One of them now has seven wooden shelves, each holding six bins I sourced from (huh?) Ikea. I keep all kinds of different stuff -- everything from extension cords and trouble lights to hinges, casters, light switches, you name it -- in those bins. I got labels for them so I don’t have to remember where I put what.
For the other cabinet, I wanted to have vertical storage so I could store a small ladder, a broom, and hang my overalls and welding jacket up. So there’s a small space for that, and then a set of normal shelves. On the doors of the cabinets, I put about a hundred bins for fasteners. It’s still not completely sorted out and organized, but I’m getting closer.
The doors can open with plenty of extra space when the car is parked in there.
Putting in the steel cabinets let me move my main bench 30 inches to the left, which allowed me to move my tool boxes to the back wall. They used to divide the garage, and I never liked the way it looked. I also got a Harbor Freight tool box to function as the base for the bench. I painted it to match the Sears boxes.
#4
02-06-2010, 04:14 PM
Join Date: Mar 2005
Location: Los Angeles
Posts: 83
Rep Power: 43
The next wall over has my ‘compliance station,’ which is a steel-topped bench on another Strong Hold cabinet. Next to that, I’ve got one last steel cabinet, a Lyon, which I belt cut and rewelded so it would be short enough to fit in this space.

I still have the sink and a small bench that I built to surround it. I’ve left the yellow paint on those walls -- mostly because I’m too lazy to re-paint it.

Those are the walls. But I also added an kitchen-island-type bench in the middle of the garage, and a new butcher-block-topped bench up front. The garage has eight work surfaces in it, now (three steel, five wood), and a ninth (a steel table) suspended from the ceiling above my car.
I stained the tops of the three main benches dark with an opaque stain and marine varnish on top of it. I’m still on the fence about this decision -- I don’t want benches that look so nice you’re afraid to use them, but I also was getting tired of all my benches being the same unfinished wood color.

We’ll see how they hold up.
I try to keep stuff off of the floor and out of plain sight.


When you’ve got a place to put everything, you can clean the whole place up really fast with something like this:

Well, that’s the basic rundown of the place. It’s not going to set the world on fire or re-invent the idea of a garage, but I’ve got to admit that I really enjoyed putting it together and I’m really enjoying getting stuff done in it. I got it all clean for the pictures, but it will get messy on a regular basis.
And, of course, I like having a place to keep the race car:

Any questions?
I still have the sink and a small bench that I built to surround it. I’ve left the yellow paint on those walls -- mostly because I’m too lazy to re-paint it.
Those are the walls. But I also added an kitchen-island-type bench in the middle of the garage, and a new butcher-block-topped bench up front. The garage has eight work surfaces in it, now (three steel, five wood), and a ninth (a steel table) suspended from the ceiling above my car.
I stained the tops of the three main benches dark with an opaque stain and marine varnish on top of it. I’m still on the fence about this decision -- I don’t want benches that look so nice you’re afraid to use them, but I also was getting tired of all my benches being the same unfinished wood color.
We’ll see how they hold up.
I try to keep stuff off of the floor and out of plain sight.
When you’ve got a place to put everything, you can clean the whole place up really fast with something like this:
Well, that’s the basic rundown of the place. It’s not going to set the world on fire or re-invent the idea of a garage, but I’ve got to admit that I really enjoyed putting it together and I’m really enjoying getting stuff done in it. I got it all clean for the pictures, but it will get messy on a regular basis.
And, of course, I like having a place to keep the race car:
Any questions?

#7
02-06-2010, 08:58 PM

Thats pretty much exactly how I want my garage to be. Simple, good looking, usable and efficient on space. You should create a thread for the 911 too. 
Trending Topics
#9
02-07-2010, 02:21 AM
Registered User
Join Date: Dec 2009
Location: An oven called Phoenix
Posts: 194
Rep Power: 22
There's a couple shots there with the car in the garage that are pretty good. The fauna in the foreground just makes it happen.
You clearly have a lot of time in your garage, it shows. Nice work. Interesting how the car and the theme of the garage aren't coordinated, yet it works fine just it is. It has a warm comfortable look to it. Good job.
You clearly have a lot of time in your garage, it shows. Nice work. Interesting how the car and the theme of the garage aren't coordinated, yet it works fine just it is. It has a warm comfortable look to it. Good job.

#11
02-07-2010, 12:30 PM
Join Date: Mar 2005
Location: Los Angeles
Posts: 83
Rep Power: 43
Thanks, guys.
That's an interesting thought about how the garage's 'look' and the car both match and don't match. More than anything, I wanted a place that was functional and relaxed for me working on car, wood or metal projects. Second to that, I wanted it to kind of evoke my own father's basement shop in Chicago, which he started putting together in 1969. I guess there's some link between the early-sixties colors (if that's what they are) and the car, which was designed at the beginning of that same decade.
On the other hand, there are a lot of parts to it that aren't period-correct at all -- they were just what I found or what I could afford.
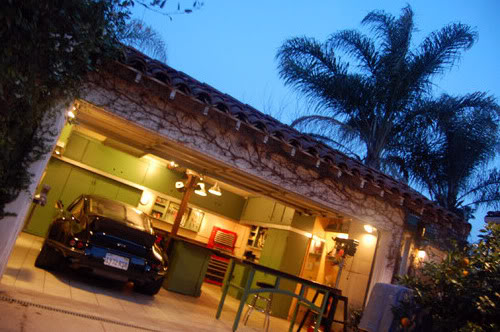
Here's another picture that shows the colors a little more accurately:

And one that shows how small the garage is. I wish it were bigger, but I don't know where it would fit on my tiny 1/8-acre lot.

That's an interesting thought about how the garage's 'look' and the car both match and don't match. More than anything, I wanted a place that was functional and relaxed for me working on car, wood or metal projects. Second to that, I wanted it to kind of evoke my own father's basement shop in Chicago, which he started putting together in 1969. I guess there's some link between the early-sixties colors (if that's what they are) and the car, which was designed at the beginning of that same decade.
On the other hand, there are a lot of parts to it that aren't period-correct at all -- they were just what I found or what I could afford.
Here's another picture that shows the colors a little more accurately:
And one that shows how small the garage is. I wish it were bigger, but I don't know where it would fit on my tiny 1/8-acre lot.
#12
02-07-2010, 01:05 PM
Registered User
Join Date: Feb 2008
Location: NYC : Miami
Age: 45
Posts: 1,972
Rep Power: 126
awesome garage, all thats important is that it works for you. It looks like you are very handy and that you did it wall to wall with functionality in mind. It looks awesome and so does your race Pcar. I love your garage.
P.S. i too have the same cleaning tool, so quick and easy just to blow all the dust out
P.S. i too have the same cleaning tool, so quick and easy just to blow all the dust out

#14
02-08-2010, 08:57 AM

Registered User
Join Date: Jul 2007
Location: Charles Town, WV
Posts: 58
Rep Power: 19
wow ... i agree .... awesome garage. straightforward and functional. it's obvious that you've put alot of thought into how you organize the space and how you use it. good work. it certainly motivates me to get busy cleaning my two car garage up!!
more pics of the car?
more pics of the car?
#15
02-08-2010, 09:12 AM

Air Hose
Beautiful job. Makes me think there is hope yet for my tiny 20's era garage attached to my house.
I'm curious about what looks like a hose reel, hidden behind a wood panel to the right of your HF cabinets. How did you do it, and where is your compressor hiding?
I'm curious about what looks like a hose reel, hidden behind a wood panel to the right of your HF cabinets. How did you do it, and where is your compressor hiding?
Last edited by Rockcam; 02-08-2010 at 09:16 AM.