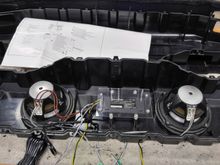
This is the OEM connector on the outside of the sub box. The Red wire is 12v + in, the Brown Wire is Ground, white is the Remote turn on lead for the amp (not used with this Alpine unit as it has signal sensing for auto turn on), and then the yellow wires are the signal input wires. Solid yellow for + and striped for -. The Amp needs bass signals on both the L & R + and - inputs (4). Crutchfield advised me to tie together both + inputs to the solid yellow & both - inputs to the striped one.