
DIY: Replacing Coolant Expansion Tank: 996TT

Thread Starter
|
Registered User
Joined: May 2010
Posts: 52
From: San Francisco
Rep Power: 27


This is my version of the replacement of the coolant expansion tank. I say my version, as opposed to Dan@SharkWerks because mine is the 996TT and the one he DIY'd wasn't and there are extra bits to remove to get the job done. So, here it goes:
Time: 5 hrs.
1. Draining the coolant
Place jack under engine and jack up the car. (be sure to have a piece of rubber or wood on your jack point. Use two jack stands on the rear jack points. (at the front of rear wheels) Unscrew coolant cap to release pressure. Get a 2-3 gallon plastic bucket and place it underneath the coolant drain plug. (There are two, I just unscrewed the drivers side) With hex key, unscrew drain plug. Be careful, the coolant splashes. Screw the drain plug back in.
2. Removing the air filter:
Unscrew fastening screw on front of AF (13mm). Remove the MAF sensor by removing two torx screws. Pull out of housing and squeeze the clip to remove. Set aside. Unscrew hose clamp on the end of the AF to loosen and pull apart from the accordian hose. Rotate the air filter housing upwards to the left 90 degrees and pull out of the car and set aside.
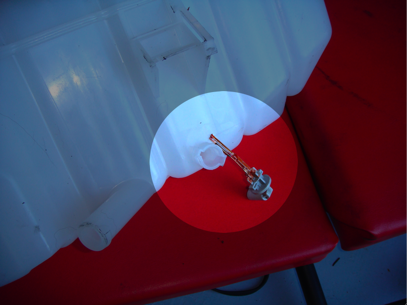
3. Removing the Fuel Filter:
Remove the fuel return and fuel supply lines, front is two 19mm that you counter and unscrew. The other is a grey clip that you squeeze and pull apart. Remove the ground wire by pulling it off. Next loosen the clip that attaches the FF to the coolant expansion tank to remove from tank and remove it from the car. (cover the front opening and the hose that is still attached to the FF with a rubber glove finger and a rubber band to prevent the fuel from leaking all over the place)


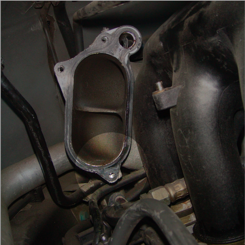
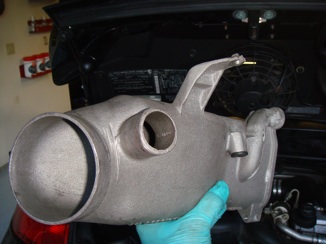
4. Removing the intake pipe:
Remove three bolts (10mm) at the back of the intake pipe. Two on top, and one that isn't visible at the bottom. This one is the trickiest bolt of the whole job. Lowering the engine helps. Unhook the two IC hoses from the Y-Pipe. Put a floor jack under the engine to hold it up. Remove the rear engine mount nuts on the underside of the car. They are long screws so this takes a while. You will need an extended ratchet and a 9-12" extension. Once removed, slowly lower the engine to give yourself enough room for the next step.
On the left side of the intake where the fuel filter previously was, reach back (it is very difficult and you will get scratches and bruises with this step) to feel the bottom screw of the intake pipe.

With an extra long extension, and a 10mm ratchet guide the ratchet under the bottom of the intake pipe and with your left hand feel it onto the nut. Unscrew and with your left hand make sure you catch the bolt when removed. Remove the hose clamp and hose that connects to the back of the pipe. Remove the hose that connects to the right side of the intake also. Remove the last screw at top of the intake pipe that holds it in place and gently remove intake pipe from car. Be sure to keep the intake gasket in position for later. Good, you finished the hardest part!! Now go and take a break and grab a beer!
Now you have room to remove the coolant expansion tank and remove all hoses and sensor.
5. Removing the coolant expansion tank:
Remove all three hoses on the expansion tank with a grip wide enough to squeeze together the hose clips and pull hoses from tank.
Remove coolant level sensor wire by squeezing and pulling clip out. Remove sensor from tank by twisting. Pull out and set aside.
Unscrew nut that attaches the tank to the inside body of car. Pull out tank from track that it slides from. Now work the tank out of the car by twisting and pulling. Push the IC hose that you removed earlier down enough and the tank should come right out!
Now, attach the coolant drain hose to the new tank and attach the coolant level sensor.
Reverse process, add coolant, cap the tank and start the car. The check coolant light will come on. Drive car, then park. Let engine cool, then top with coolant until you reach maximum coolant level. Drive again and repeat process until level is full. Check coolant level light should turn off.
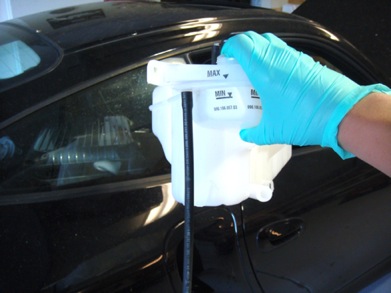
Here is a close up of the old tank and the crack, and the new one installed. The pic of the new tank is sideways.


I hope this helps us 996 Turbo folk!
Time: 5 hrs.
1. Draining the coolant
Place jack under engine and jack up the car. (be sure to have a piece of rubber or wood on your jack point. Use two jack stands on the rear jack points. (at the front of rear wheels) Unscrew coolant cap to release pressure. Get a 2-3 gallon plastic bucket and place it underneath the coolant drain plug. (There are two, I just unscrewed the drivers side) With hex key, unscrew drain plug. Be careful, the coolant splashes. Screw the drain plug back in.
2. Removing the air filter:
Unscrew fastening screw on front of AF (13mm). Remove the MAF sensor by removing two torx screws. Pull out of housing and squeeze the clip to remove. Set aside. Unscrew hose clamp on the end of the AF to loosen and pull apart from the accordian hose. Rotate the air filter housing upwards to the left 90 degrees and pull out of the car and set aside.
3. Removing the Fuel Filter:
Remove the fuel return and fuel supply lines, front is two 19mm that you counter and unscrew. The other is a grey clip that you squeeze and pull apart. Remove the ground wire by pulling it off. Next loosen the clip that attaches the FF to the coolant expansion tank to remove from tank and remove it from the car. (cover the front opening and the hose that is still attached to the FF with a rubber glove finger and a rubber band to prevent the fuel from leaking all over the place)
4. Removing the intake pipe:
Remove three bolts (10mm) at the back of the intake pipe. Two on top, and one that isn't visible at the bottom. This one is the trickiest bolt of the whole job. Lowering the engine helps. Unhook the two IC hoses from the Y-Pipe. Put a floor jack under the engine to hold it up. Remove the rear engine mount nuts on the underside of the car. They are long screws so this takes a while. You will need an extended ratchet and a 9-12" extension. Once removed, slowly lower the engine to give yourself enough room for the next step.
On the left side of the intake where the fuel filter previously was, reach back (it is very difficult and you will get scratches and bruises with this step) to feel the bottom screw of the intake pipe.
With an extra long extension, and a 10mm ratchet guide the ratchet under the bottom of the intake pipe and with your left hand feel it onto the nut. Unscrew and with your left hand make sure you catch the bolt when removed. Remove the hose clamp and hose that connects to the back of the pipe. Remove the hose that connects to the right side of the intake also. Remove the last screw at top of the intake pipe that holds it in place and gently remove intake pipe from car. Be sure to keep the intake gasket in position for later. Good, you finished the hardest part!! Now go and take a break and grab a beer!
Now you have room to remove the coolant expansion tank and remove all hoses and sensor.
5. Removing the coolant expansion tank:
Remove all three hoses on the expansion tank with a grip wide enough to squeeze together the hose clips and pull hoses from tank.
Remove coolant level sensor wire by squeezing and pulling clip out. Remove sensor from tank by twisting. Pull out and set aside.
Unscrew nut that attaches the tank to the inside body of car. Pull out tank from track that it slides from. Now work the tank out of the car by twisting and pulling. Push the IC hose that you removed earlier down enough and the tank should come right out!
Now, attach the coolant drain hose to the new tank and attach the coolant level sensor.
Reverse process, add coolant, cap the tank and start the car. The check coolant light will come on. Drive car, then park. Let engine cool, then top with coolant until you reach maximum coolant level. Drive again and repeat process until level is full. Check coolant level light should turn off.
Here is a close up of the old tank and the crack, and the new one installed. The pic of the new tank is sideways.
I hope this helps us 996 Turbo folk!
Last edited by Keithbeats; Jul 2, 2010 at 04:28 PM.


This should help. Which bearing seal are you referring to?
Trending Topics

Banned
Joined: May 2006
Posts: 122
From: Jackson, MS
Rep Power: 26
There are Five...
Two in the rear:

Front Passenger (Driver side is mirrored in this location):

Front Center Radiator:
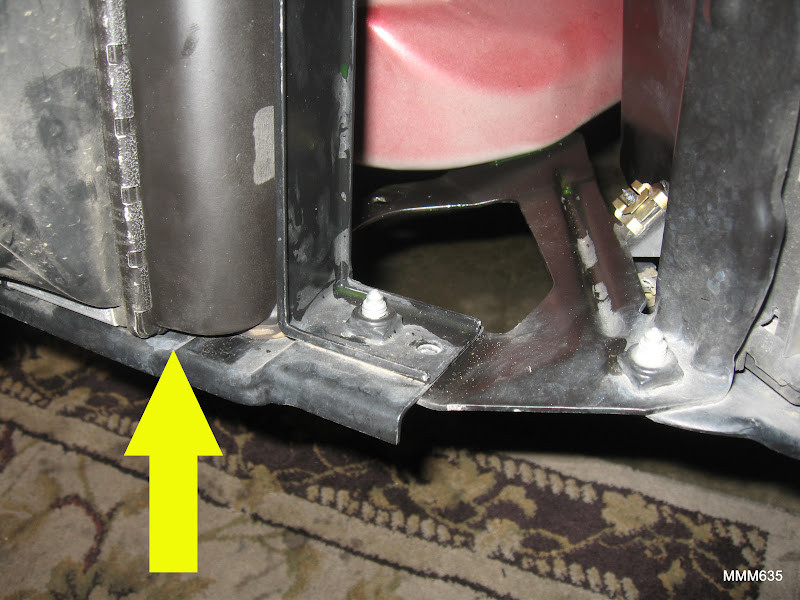
Note: If you really want to completely drain the system, then you need to disconnect the two hoses underneath the car next to the transmission. I had over a gallon of coolant come out when I replaced those hoses. I did not see that mentioned in any write-ups and discovered this when I replaced most of my cooling hoses in the rear.
Here is the passenger's side...

Two in the rear:
Front Passenger (Driver side is mirrored in this location):
Front Center Radiator:
Note: If you really want to completely drain the system, then you need to disconnect the two hoses underneath the car next to the transmission. I had over a gallon of coolant come out when I replaced those hoses. I did not see that mentioned in any write-ups and discovered this when I replaced most of my cooling hoses in the rear.
Here is the passenger's side...
Last edited by mmm635; Mar 5, 2011 at 08:40 AM.


Registered User
Joined: Mar 2009
Posts: 249
From: NYC
Rep Power: 29
This is my version of the replacement of the coolant expansion tank. I say my version, as opposed to Dan@SharkWerks because mine is the 996TT and the one he DIY'd wasn't and there are extra bits to remove to get the job done. So, here it goes:
Time: 5 hrs.
1. Draining the coolant
Place jack under engine and jack up the car. (be sure to have a piece of rubber or wood on your jack point. Use two jack stands on the rear jack points. (at the front of rear wheels) Unscrew coolant cap to release pressure. Get a 2-3 gallon plastic bucket and place it underneath the coolant drain plug. (There are two, I just unscrewed the drivers side) With hex key, unscrew drain plug. Be careful, the coolant splashes. Screw the drain plug back in.
2. Removing the air filter:
Unscrew fastening screw on front of AF (13mm). Remove the MAF sensor by removing two torx screws. Pull out of housing and squeeze the clip to remove. Set aside. Unscrew hose clamp on the end of the AF to loosen and pull apart from the accordian hose. Rotate the air filter housing upwards to the left 90 degrees and pull out of the car and set aside.
3. Removing the Fuel Filter:
Remove the fuel return and fuel supply lines, front is two 19mm that you counter and unscrew. The other is a grey clip that you squeeze and pull apart. Remove the ground wire by pulling it off. Next loosen the clip that attaches the FF to the coolant expansion tank to remove from tank and remove it from the car. (cover the front opening and the hose that is still attached to the FF with a rubber glove finger and a rubber band to prevent the fuel from leaking all over the place)
4. Removing the intake pipe:
Remove three bolts (10mm) at the back of the intake pipe. Two on top, and one that isn't visible at the bottom. This one is the trickiest bolt of the whole job. Lowering the engine helps. Unhook the two IC hoses from the Y-Pipe. Put a floor jack under the engine to hold it up. Remove the rear engine mount nuts on the underside of the car. They are long screws so this takes a while. You will need an extended ratchet and a 9-12" extension. Once removed, slowly lower the engine to give yourself enough room for the next step.
On the left side of the intake where the fuel filter previously was, reach back (it is very difficult and you will get scratches and bruises with this step) to feel the bottom screw of the intake pipe.
With an extra long extension, and a 10mm ratchet guide the ratchet under the bottom of the intake pipe and with your left hand feel it onto the nut. Unscrew and with your left hand make sure you catch the bolt when removed. Remove the hose clamp and hose that connects to the back of the pipe. Remove the hose that connects to the right side of the intake also. Remove the last screw at top of the intake pipe that holds it in place and gently remove intake pipe from car. Be sure to keep the intake gasket in position for later. Good, you finished the hardest part!! Now go and take a break and grab a beer!
Now you have room to remove the coolant expansion tank and remove all hoses and sensor.
5. Removing the coolant expansion tank:
Remove all three hoses on the expansion tank with a grip wide enough to squeeze together the hose clips and pull hoses from tank.
Remove coolant level sensor wire by squeezing and pulling clip out. Remove sensor from tank by twisting. Pull out and set aside.
Unscrew nut that attaches the tank to the inside body of car. Pull out tank from track that it slides from. Now work the tank out of the car by twisting and pulling. Push the IC hose that you removed earlier down enough and the tank should come right out!
Now, attach the coolant drain hose to the new tank and attach the coolant level sensor.
Reverse process, add coolant, cap the tank and start the car. The check coolant light will come on. Drive car, then park. Let engine cool, then top with coolant until you reach maximum coolant level. Drive again and repeat process until level is full. Check coolant level light should turn off.
Here is a close up of the old tank and the crack, and the new one installed. The pic of the new tank is sideways.
I hope this helps us 996 Turbo folk!
Registered User

Joined: Apr 2010
Posts: 2,164
From: Victoria, BC
Rep Power: 217
If your tank is yellow - you need to replace it ASAP. There is another more detailed DIY here: Replace Reservoir DIY
Registered User
Joined: May 2009
Posts: 7,984
From: la
Rep Power: 608
whoever mentioned upthread that swapping the expansion tank is a 5 hour job most be talking porsche dealer "book time". when i last replaced mine a year ago it was 2.5 hours tops. adding coolant takes 45 minutes ( 1 hr max incl equalizing presure at the breather etc ), and wrangling the new tank in/out along with airbox removal ( etc ) the other 1.5 hours.
don't be fooled lol
don't be fooled lol
Registered User
Joined: Mar 2009
Posts: 249
From: NYC
Rep Power: 29
whoever mentioned upthread that swapping the expansion tank is a 5 hour job most be talking porsche dealer "book time". when i last replaced mine a year ago it was 2.5 hours tops. adding coolant takes 45 minutes ( 1 hr max incl equalizing presure at the breather etc ), and wrangling the new tank in/out along with airbox removal ( etc ) the other 1.5 hours.
don't be fooled lol
don't be fooled lol