
OEM 996 rear spoiler button relocate?

Thread Starter
|
Registered User
Joined: Jul 2006
Posts: 333
From: Miami
Rep Power: 33

The OEM 996 rear spoiler can be manually raised or lowered by pushing the mini switch in the driver footwell; however the button down there would be dangerous to fiddle with whilst driving. There are situations, such as a fast sweeper in the rain, where I'd prefer to have the downforce ready to go and uniform, and maybe slight understeer bias before entering the corner - esp if it's raining or otherwise slippery.
Q. Does anyone know how easy it would be to rewire that button to a safer location, ie. one of the vacant button spots on the main facia? Has anybody bothered to do this, or seen a thread on this topic? Thanks!
Q. Does anyone know how easy it would be to rewire that button to a safer location, ie. one of the vacant button spots on the main facia? Has anybody bothered to do this, or seen a thread on this topic? Thanks!


Registered User

Joined: May 2005
Posts: 5,404
From: San Ramon, CA
Rep Power: 267

here you go
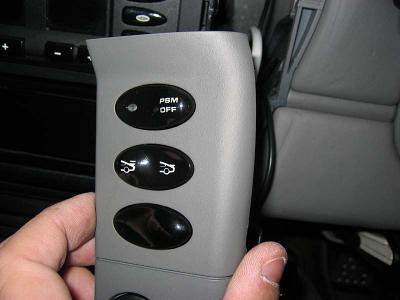
The switch is part number 996.613.155.00 A02 for a switch installed on the left side of the dash and 996.613.156.10.A05 for a switch installed on the right side of the dash. Like other dash switches it has a raised portion on one side. When you order the switch, ensure you specify which side you want the raised portion according to which side of the dash you are installing it into. These install procedures assume you will be placing the switch in the unused dash socket below the PSM switch on a RHD car. For LHD cars, the PSM switch is on the left side of the dash and the raised portion of the tail switch should also be on the left (as shown in the picture). For RHD cars, the PSM switch is on the right of the dash and the raised portion of the tail switch should also be on the right. Take care that you order the correct tail switch for your car.
Parts you will need:
1 ea 996.613.155.00 A02 (or 996.613.156.10.A05) Spoiler Switch
5 ea Female connectors
5 feet (1 length) Connector cable
2 (3 inch length each) 14 gauge wire
few Cable ties
Tools you will need:
Phillips head screw driver
Blunt flat blade to prise the switch tab (I used a butter knife)
Wire cutters
Crimping tool
Soldering iron
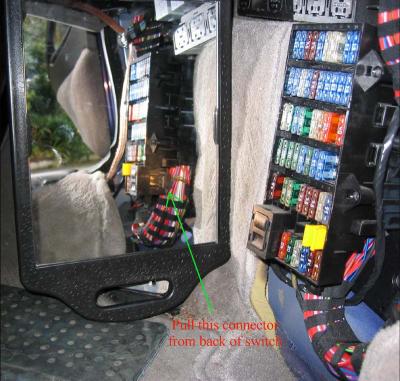
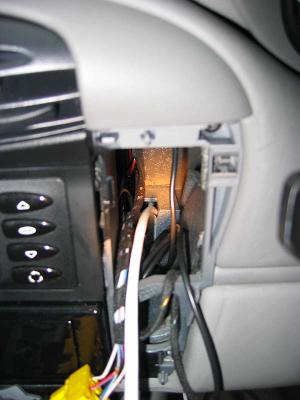
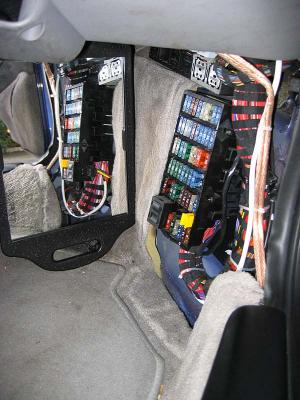
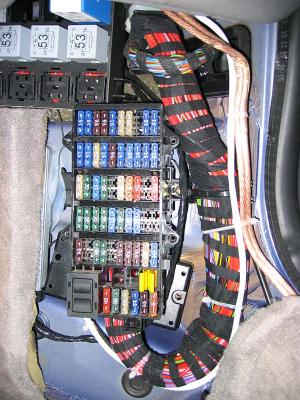
- Remove the cover from the fuse box. Then carefully remove the four screws pointed out in the picture. Ensure the screws do not fall into the fuses else you may start a fire! (The fusebox is located in the drivers side footwell.)
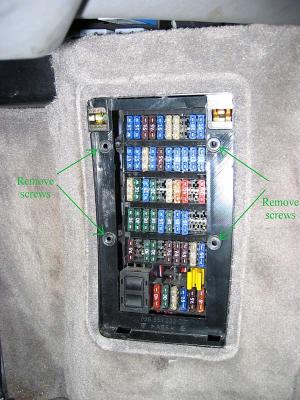
- Once the screws are removed, pull away the carpet trim around the fuse box.
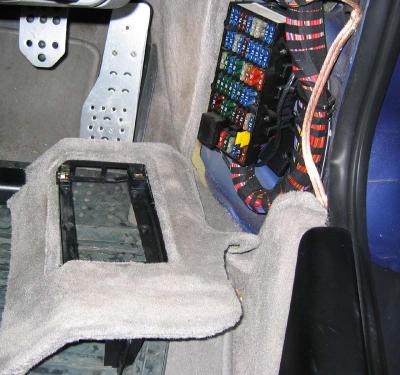
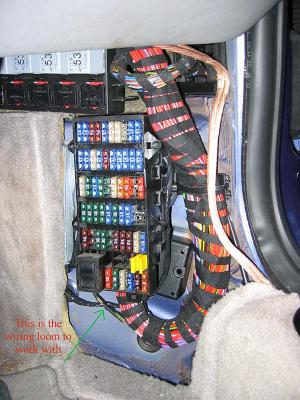
- You will be cutting into the wiring loom connected to the existing spoiler (tail) switch. The switch is the black square item located in the bottom left corner of the fuse box.
Note: The installation of the new in-dash tail switch does not effect operation of the existing spoiler (tail) switch. It is simply wired in parallel to it.
- I have used a mirror here to show you the back of the fuse box. Pull the connector from the switch. It has no clips but it may be quite hard to pull off. Be careful not to pull the wires out of the connector. DO NOT use a metal implement to pry it off. If you rock it from side to side while pulling, it will eventually come off the switch.
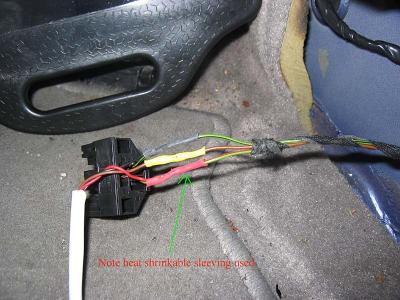
- Here you can see the connector pulled away from the switch. The connector has three wires: Green/black, Brown/Green and Brown.
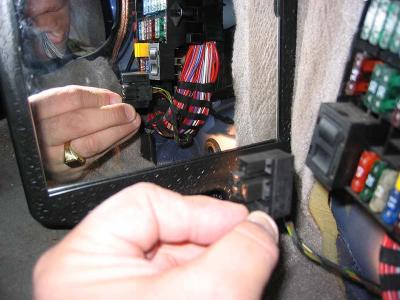
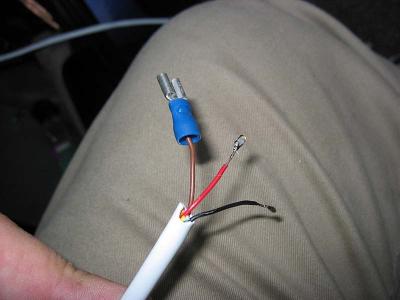
- Carefully cut the 3 wires going to the connector. Ensure you do not short the wires as you cut them. Leave a long tail on the wires at the connector as you will need to splice them back later
- Use a blunt blade to carefully pry out the switch tab holding the PSM switch in the dash.
- I used alarm wire in a single cable. You need 3 cores in the cable and it needs to be about 5 feet long. Feed it through the opening for the PSM switch tab. You can see in the picture where you can feed it through the back. Push the wire through so that you can grab it from underneath the dash and feed it along within the dash to bring it out behind the fuse box.
- Carefully cut the 3 wires going to the connector. Ensure you do not short the wires as you cut them. Leave a long tail on the wires at the connector as you will need to splice them back later
Last edited by alex911s; Sep 18, 2006 at 08:01 PM.
Registered User
Joined: May 2005
Posts: 5,404
From: San Ramon, CA
Rep Power: 267
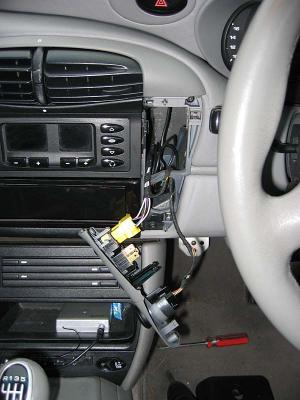
- Fit the new tail switch into an unused slot. Usually the one below the PSM. Place the connectors as shown on the switch. Make a note of the colour coding you use and which switch terminals you put them on. I used red, brown and black wires in this configuration.

- Next you will wire up the tail switch light. Use two 14 gauge wires cut to about 3 inches. I used blue and brown wires. Strip both ends of the two wires. Crimp a female tag onto one end of each wire. Connect the tags on these wires to the two outer (remaining) tail switch tags. Pull off the connector from the back of the PSM switch. Insert the blue wire onto the left most PSM switch tag (blue/pink/brown connection wire). Insert the brown wire onto the top PSM switch tag (red/blue connection wire). Ensure the inserted wires are not shorting any other tags. Push the PSM connector back into place with the inserted wires.
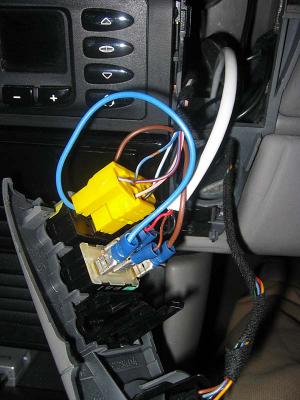
- One way to do this is to cut the bare ended wires short and feed them through the tag holes before pushing the connector back on to the PSM switch.
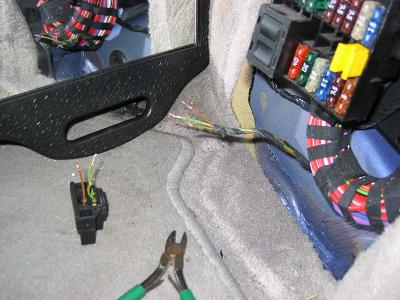
- At the switch box end, feed a 1 inch piece of heat shrink sleeve onto each of the 3 exposed loom wires. Push the sleeves along to expose the bare wires. Pre-solder each end on all exposed 9 wire ends. Then solder the loom wires back together while at the same time splicing the new wires into the loom. The 9 wires comprise 3 from the original Spoiler (tail) switch connector, 3 in the loom that you cut from the tail connector and 3 that you have just wired in from your new tail switch.
The wires are soldered as follows:
red -> red/green
black -> green/black
brown -> brown
Check the solder joints. Push the sleeving over the joints and use the soldering iron to heat the sleeving so that it shrinks around the solder joints. Ensure no strands of wires or solder is protruding from the sleeving.
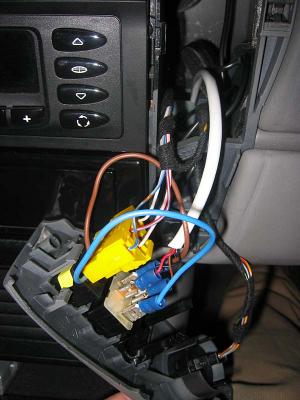
- Refit the connector back to the original fuse box spoiler (tail) switch.
- It is important to tidy up your cabling. I used cable ties to ensure the cables don't rub on anything sharp.
- Before refitting the switch tab, test that your newly installed in-dash tail switch works. Also test that the switch light works when you turn your side lamps on (with ignition on of course).
- Finally, replace the switch tab in the dash, push the fuse box surround carpet back into place and replace the 4 screws.
Job done.

Registered User
Joined: Jul 2003
Posts: 8,579
From: SF Bay Area
Rep Power: 387
Originally Posted by 02barebones996
didnt kirby do that diy also?
Trending Topics
Thread Starter
|
Registered User
Joined: Jul 2006
Posts: 333
From: Miami
Rep Power: 33
Originally Posted by calicolin
The switch in the picture is shiny. My switches have a matte finish (2003 C2 cab). Do they have the same switch with a matte finish? If so, do u know the part no.?
Note: For 1997-2001 use extension .A02 for gloss finish. For 2002- use extension .A05 for matte finish.
http://www.whiteson.org/boxster/mods/switches
Last edited by NIKAS; Dec 7, 2012 at 12:00 PM.

Registered User
Joined: Mar 2010
Posts: 2,004
From: Chicago
Rep Power: 122


Registered User
Joined: Aug 2010
Posts: 23
From: North Carolina
Rep Power: 0
I just finished this DIY this morning - it works great. Instead of cutting the switch wires, I used quick splice connectors like this: http://www.radioshack.com/product/in...ductId=2998435 from Radio Shack, which made the install very easy.
I also used 4-conductor intercom wire from Radio Shack for the connection.
I also used 4-conductor intercom wire from Radio Shack for the connection.

Registered User

Joined: May 2010
Posts: 444
From: SC
Rep Power: 58
That is an awesome write-up, thanks so much for sharing it.
Do you have a link to it you could post please?
Standard console button on 997 but not so on a 996?
Do you have a link to it you could post please?
Standard console button on 997 but not so on a 996?