Zunsport Radiator Grille DIY - No Bumper Removal Required
#1
 04-08-2012, 08:43 AM


Zunsport Radiator Grille DIY - No Bumper Removal Required
I've seen several threads that mentioned the Zunsport grilles, but was curious how they mount without removing the front bumper. The website says you need a drill and screwdriver but doesn't provide any further instructions. So I thought I'd clarify for anyone who may also be considering the Zunsport grilles.
I'll start by saying that I ordered the grilles online and received them just a week later from the UK, although no tracking information was provided. I will admit that I screwed up and meant to order the entire set, which is five pieces. But because I bought them on an impulse I inadvertently only ordered the pieces for the outside openings. So I'll have to go back and order the piece for the center opening, even though I don't have a center radiator. Also, please excuse the camera pictures as the battery was dead in my digital camera.
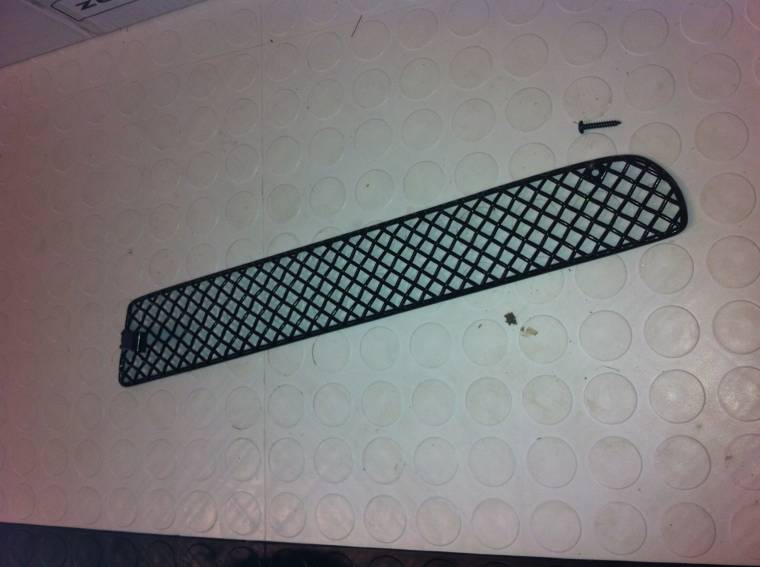
The outside openings are covered by an upper grille and a lower grille. Although I don't think it matters which one you install first, the instructions start with the upper grille so that's what I'll describe first. The first photo shows the upper grille. You can barely make it out but one end had a clip and toward the other end (near the screw) is a small opening.
The grille simply attaches via the clip to the inside part of the opening. I had to bend the clips very slightly to make sure they attached to the bumper.
Then you have to slightly flex the grill to get the outside part into the opening. When you do, it's a pretty snug fit but then you drill a small hole into the upper part of the opening and screw the supplied black coarse thread screw in to hold the grille in place. The instructions didn't specify what size, but I used a 1/16" bit.
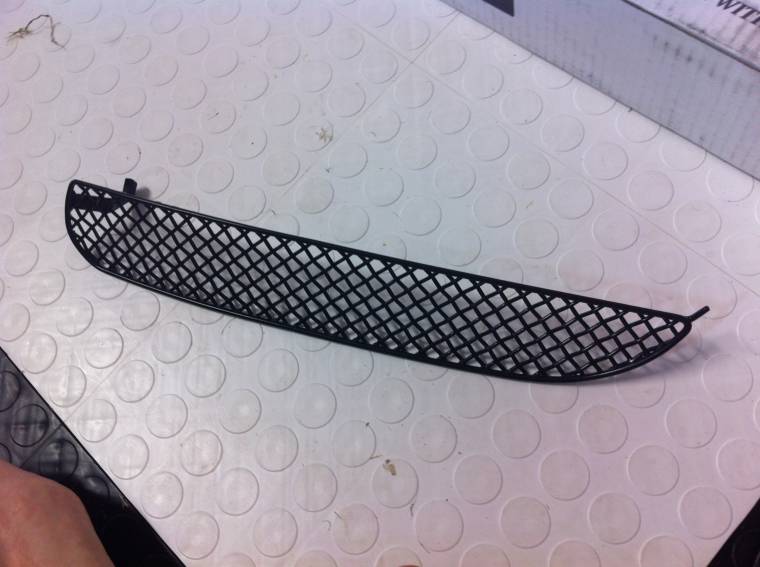
The lower grille was a little more involved. Once again, you can see in the photo that it also has a clip on one end. However, on the other end is a small pin.
To install the lower grille requires the reverse procedure. You have to drill a small hole in the bumper first for the pin. The instructions state to drill a "3mm hole." Being a typical American I'm like, "Huh? How am I supposed to know how big that is? They should have separate instructions for us non-metric customers!" Just kidding, of course. But none of my drill bits are in metric diameters so I eyeballed it and used a 1/8" bit. The hardest part of the whole installation is figuring out where to drill the hole. I probably looked at the grill and tried to test fit it about a half-dozen times before finally moving forward. Also, if you have a lower lip installed like I do, it may interfere with your drill. I finally remembered that I had a Dremel tool and was able to get the right angle using that without having to take off the lower lip. I tried to take a photo but wasn't able to capture where I drilled the hole in the upper corner of the lower vent. Once the hole is drilled, you simply take the lower grille and insert the pin into the hole. If it doesn't fit you can just go back and enlarge the hole a little. To attach the clip you have to use a small screwdriver, insert it through the grill, and put pressure against the clip until it snaps into place.
The whole thing probably took me an hour, but most of that time was trying to decide if I needed to remove my front lip or not. The tools needed were a Phillips head screwdriver, electric drill (or Dremel), and two drill bits. I didn't take any after-pictures because you can see that my car is dirty so I'll add those after I wash it. However, the Zunsport website has photos. If any of you are considering the Zunsport grilles I hope this DIY will answer any questions you have and/or save you some time.
Jeff
I'll start by saying that I ordered the grilles online and received them just a week later from the UK, although no tracking information was provided. I will admit that I screwed up and meant to order the entire set, which is five pieces. But because I bought them on an impulse I inadvertently only ordered the pieces for the outside openings. So I'll have to go back and order the piece for the center opening, even though I don't have a center radiator. Also, please excuse the camera pictures as the battery was dead in my digital camera.
The outside openings are covered by an upper grille and a lower grille. Although I don't think it matters which one you install first, the instructions start with the upper grille so that's what I'll describe first. The first photo shows the upper grille. You can barely make it out but one end had a clip and toward the other end (near the screw) is a small opening.
The grille simply attaches via the clip to the inside part of the opening. I had to bend the clips very slightly to make sure they attached to the bumper.
Then you have to slightly flex the grill to get the outside part into the opening. When you do, it's a pretty snug fit but then you drill a small hole into the upper part of the opening and screw the supplied black coarse thread screw in to hold the grille in place. The instructions didn't specify what size, but I used a 1/16" bit.
The lower grille was a little more involved. Once again, you can see in the photo that it also has a clip on one end. However, on the other end is a small pin.
To install the lower grille requires the reverse procedure. You have to drill a small hole in the bumper first for the pin. The instructions state to drill a "3mm hole." Being a typical American I'm like, "Huh? How am I supposed to know how big that is? They should have separate instructions for us non-metric customers!"
Just kidding, of course. But none of my drill bits are in metric diameters so I eyeballed it and used a 1/8" bit. The hardest part of the whole installation is figuring out where to drill the hole. I probably looked at the grill and tried to test fit it about a half-dozen times before finally moving forward. Also, if you have a lower lip installed like I do, it may interfere with your drill. I finally remembered that I had a Dremel tool and was able to get the right angle using that without having to take off the lower lip. I tried to take a photo but wasn't able to capture where I drilled the hole in the upper corner of the lower vent. Once the hole is drilled, you simply take the lower grille and insert the pin into the hole. If it doesn't fit you can just go back and enlarge the hole a little. To attach the clip you have to use a small screwdriver, insert it through the grill, and put pressure against the clip until it snaps into place.The whole thing probably took me an hour, but most of that time was trying to decide if I needed to remove my front lip or not. The tools needed were a Phillips head screwdriver, electric drill (or Dremel), and two drill bits. I didn't take any after-pictures because you can see that my car is dirty so I'll add those after I wash it. However, the Zunsport website has photos. If any of you are considering the Zunsport grilles I hope this DIY will answer any questions you have and/or save you some time.
Jeff


#3
04-08-2012, 11:37 PM
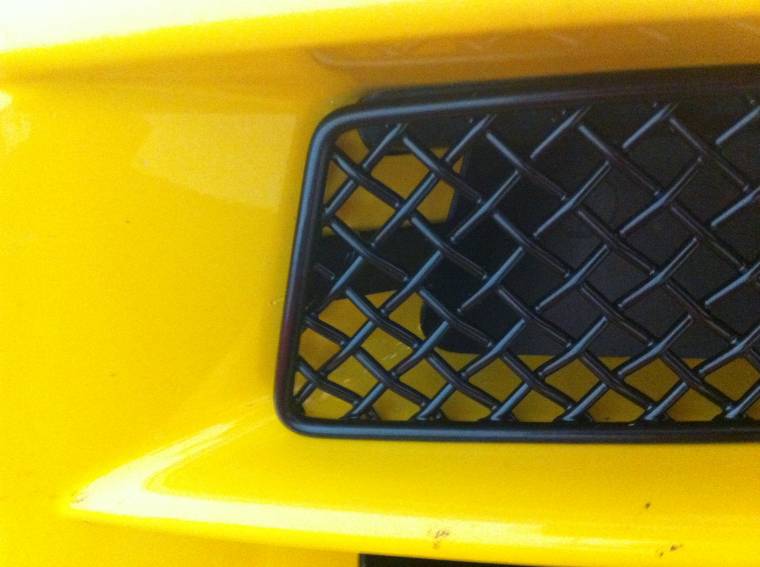
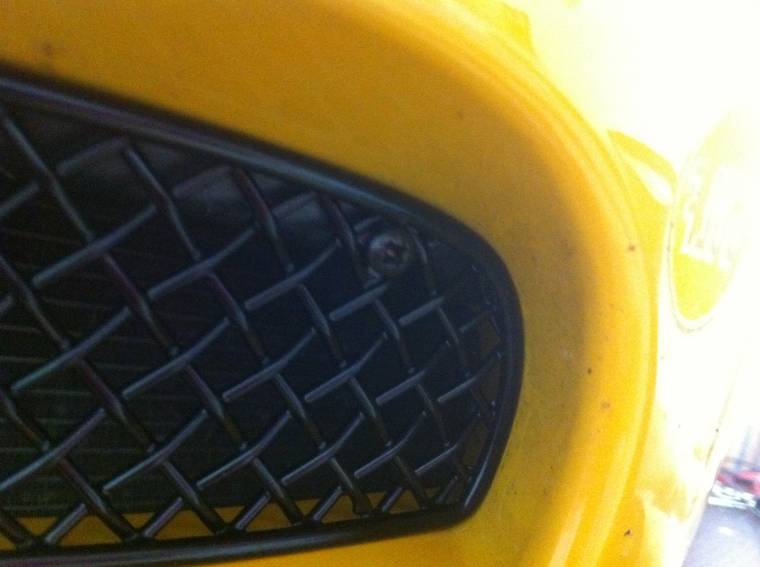
Here is a picture of the grills after installation. The Zunsport grills are of very good quality and installation is a breeze.
#5
04-28-2012, 10:44 PM

Can confirm that installation is a snap. Photo in instruction manual is a bit misleading, though. For the bottom grill, it looks like there is a hole drilled much more inferior than it should be. Look at the grill, look at the slot, where the hole goes makes sense.

#7
09-11-2012, 08:52 PM
It's just a clip that snaps them into place. Should pop out easily enough. FWIW, I don't have any debris of consequence that's gotten past the screens. They work really well.
Trending Topics
#9
09-12-2012, 03:34 AM
When placing my order earlier this week, I was provided with a discount code good for a 15% savings
#10
09-12-2012, 07:51 AM
I emailed Zunsport last night, this morning I had a reply along with a discount code since I mentioned the forum! I just placed my order. I was on the fence about these vs. other brands which do require bumper removal because at some point you still need to remove the bumper to thoroughly clean the radiators. I did this on my prior 996 and it was amazing all of the bugs and dirt that gets caught between the radiator/condensor and the small flutes that pass though them both! Granted these will protect larger debris, but I think the radiators will still collect the same amount of dirt along with a few bugs. The price was better on the Zunsport and at least you can remove them from the front if some debris does happen to accumulate, where the other brands you don't have that option.

#14
09-23-2012, 08:01 PM
Just got my set! Was the hole drilled for the bottom pin in the actual painted bumper or back more in the plastic frame surround....doesn't look like much room for the pin to attach (hard to tell how far back it should go)!
#15
09-23-2012, 10:23 PM
On call tonight so I can't check right now, but I recall the drilling to be in the painted bumper part. Found that initially quite disturbing, but I got over it. Do a few mental dry runs with the positioning and it all makes sense. Good luck with the install. I'm perfectly happy not to have to pull frogs and livestock out of my radiator...