Clear tail lights install on my DB9
#1
 05-04-2014, 01:11 PM

Join Date: Jun 2010
Location: Lake Geneva, WI
Posts: 757
Rep Power: 46 
Clear tail lights install on my DB9
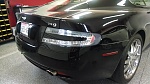
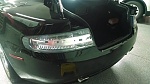
So I could not pull the trigger for the big ticket price of these things (retail), so I was over time able to find great deals on them purchased individually on eBay. In the end picked them up for around $200 each, used but basically perfect condition.
The install was pretty straight forward but I wanted to share a couple tips I learned along the way.
Take the time to mask off the body work surrounding the tail lights to prevent scratching when removing and refitting. (I don't really want to talk about how I learned this)
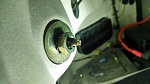
When removing the stock light, first push the wiring grommet through the whole towards the light to allow for more slack when trying to disconnect the harness from the light.
When loosening the remaining nuts be careful not to turn the adjuster.. Only the large (I believe 14mm) nut. Use another wrench to keep the adjuster from turning. This will help with the reinstall that's coming.
I used a common feeler gauge to indicate the position of the adjusters original location on the stock light and then transferred that location as closely as possible to the replacement. Adjustment on these things is a bit tricky so this really helped me out. I also noticed that the stud the adjusters screws down onto had some type of thread sealer from the factory to offer a little bit of resistance so the adjuster would not easily spin on the stud when fiddling with the fit. I put a little Teflon tape on the threads to help with this as well, and it really did work well. In the end the new lamps went right in pretty easy with only a minimal amount of fiddling to get perfect.
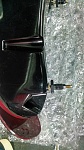
The toughest part of the job I thought was removing the painted center insert. Being careful with a heat gun and patience with a plastic pry tool was what it took. Reapply 3m clear double sided tape after carefully removing the residual adhesive and old tape with some brake clean and press back in place on new lamps.
I know there has been some talk about having a reflash done after doing this with some vehicles. All I know is on my 05 Db9 everything is working perfectly and no warning lights are appearing. ?? I'm loving that..
Here are some pictures.
The install was pretty straight forward but I wanted to share a couple tips I learned along the way.
Take the time to mask off the body work surrounding the tail lights to prevent scratching when removing and refitting. (I don't really want to talk about how I learned this)
When removing the stock light, first push the wiring grommet through the whole towards the light to allow for more slack when trying to disconnect the harness from the light.
When loosening the remaining nuts be careful not to turn the adjuster.. Only the large (I believe 14mm) nut. Use another wrench to keep the adjuster from turning. This will help with the reinstall that's coming.
I used a common feeler gauge to indicate the position of the adjusters original location on the stock light and then transferred that location as closely as possible to the replacement. Adjustment on these things is a bit tricky so this really helped me out. I also noticed that the stud the adjusters screws down onto had some type of thread sealer from the factory to offer a little bit of resistance so the adjuster would not easily spin on the stud when fiddling with the fit. I put a little Teflon tape on the threads to help with this as well, and it really did work well. In the end the new lamps went right in pretty easy with only a minimal amount of fiddling to get perfect.
The toughest part of the job I thought was removing the painted center insert. Being careful with a heat gun and patience with a plastic pry tool was what it took. Reapply 3m clear double sided tape after carefully removing the residual adhesive and old tape with some brake clean and press back in place on new lamps.
I know there has been some talk about having a reflash done after doing this with some vehicles. All I know is on my 05 Db9 everything is working perfectly and no warning lights are appearing. ?? I'm loving that..
Here are some pictures.
#2
05-16-2014, 11:24 PM
Hey Man,
That's a great deal. By chance was it AM part number: 8D33-13405-AH and 8D33-13404-AG? Also, what year is your car? Thanks for your help. I'm trying to put the lights that correspond to the above part number on an 05 DB9.
SoCal997

That's a great deal. By chance was it AM part number: 8D33-13405-AH and 8D33-13404-AG? Also, what year is your car? Thanks for your help. I'm trying to put the lights that correspond to the above part number on an 05 DB9.
SoCal997
So I could not pull the trigger for the big ticket price of these things (retail), so I was over time able to find great deals on them purchased individually on eBay. In the end picked them up for around $200 each, used but basically perfect condition.
The install was pretty straight forward but I wanted to share a couple tips I learned along the way.
Take the time to mask off the body work surrounding the tail lights to prevent scratching when removing and refitting. (I don't really want to talk about how I learned this)
When removing the stock light, first push the wiring grommet through the whole towards the light to allow for more slack when trying to disconnect the harness from the light.
When loosening the remaining nuts be careful not to turn the adjuster.. Only the large (I believe 14mm) nut. Use another wrench to keep the adjuster from turning. This will help with the reinstall that's coming.
I used a common feeler gauge to indicate the position of the adjusters original location on the stock light and then transferred that location as closely as possible to the replacement. Adjustment on these things is a bit tricky so this really helped me out. I also noticed that the stud the adjusters screws down onto had some type of thread sealer from the factory to offer a little bit of resistance so the adjuster would not easily spin on the stud when fiddling with the fit. I put a little Teflon tape on the threads to help with this as well, and it really did work well. In the end the new lamps went right in pretty easy with only a minimal amount of fiddling to get perfect.
The toughest part of the job I thought was removing the painted center insert. Being careful with a heat gun and patience with a plastic pry tool was what it took. Reapply 3m clear double sided tape after carefully removing the residual adhesive and old tape with some brake clean and press back in place on new lamps.
I know there has been some talk about having a reflash done after doing this with some vehicles. All I know is on my 05 Db9 everything is working perfectly and no warning lights are appearing. ?? I'm loving that..
Here are some pictures.
Attachment 370464
Attachment 370462
Attachment 370461
Attachment 370460
Attachment 370459
#3
05-17-2014, 12:09 PM


Awesome. This is definitely in my mod list but also cannot bring myself to pay retail on the kit.. a bit much for just an aesthetic change. Never seen the lights go for that little on Ebay! Great find, was it on the US or UK Ebay?
#4
05-17-2014, 12:58 PM
Join Date: Jun 2010
Location: Lake Geneva, WI
Posts: 757
Rep Power: 46
Yea, the retail price is a little bit crazy. I'm not sure of the part number of the lights I got.. But when I was researching this I learned that any of the light assemblies will work as they're all the same with the exception of the carbon black series. I actually bought one of those on eBay as well and then discovered that the color of the plastic casing is black and not gray like the more common fixtures.
I found them on the US eBay site and actually bought them individually as I saw them listed.. It took a little time but was worth it. You can also watch aston martin bits site as I've seen good deals on used tail lights there as well. I've also installed a DBS shift **** that I found (used) there and paid only $400 for that.
The lights look fabulous on my black DB9..my favorite mod so far. If you're looking for the carbon black style lights, I can help you out with a perfect right side assembly I have.
#6
05-18-2014, 09:58 AM
Join Date: Jun 2010
Location: Lake Geneva, WI
Posts: 757
Rep Power: 46
Oh I did! The problem was that I actually bought the carbon fixture by accident, before I realized the difference between the two. Then I couldn't find the left side at a reasonable price to match so just went with the standard tail lights because I found them quickly.
Trending Topics
#8
05-18-2014, 11:25 AM
Yea, the retail price is a little bit crazy. I'm not sure of the part number of the lights I got.. But when I was researching this I learned that any of the light assemblies will work as they're all the same with the exception of the carbon black series. I actually bought one of those on eBay as well and then discovered that the color of the plastic casing is black and not gray like the more common fixtures.
I found them on the US eBay site and actually bought them individually as I saw them listed.. It took a little time but was worth it. You can also watch aston martin bits site as I've seen good deals on used tail lights there as well. I've also installed a DBS shift **** that I found (used) there and paid only $400 for that.
The lights look fabulous on my black DB9..my favorite mod so far. If you're looking for the carbon black style lights, I can help you out with a perfect right side assembly I have.
I found them on the US eBay site and actually bought them individually as I saw them listed.. It took a little time but was worth it. You can also watch aston martin bits site as I've seen good deals on used tail lights there as well. I've also installed a DBS shift **** that I found (used) there and paid only $400 for that.
The lights look fabulous on my black DB9..my favorite mod so far. If you're looking for the carbon black style lights, I can help you out with a perfect right side assembly I have.
Thanks for the offer
#9
05-18-2014, 12:10 PM
Join Date: Jun 2010
Location: Lake Geneva, WI
Posts: 757
Rep Power: 46 https://www.astonmartinbits.com/models/3-DBS/parts/1420
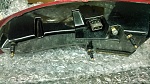
Another thing worth mentioning I think.. The used lights I got were missing a mounting stud. Both lights.. Bought at different times from different sellers, but both missing the same stud for some odd reason I thought. I tried to remove a stud from my stock light fixture to reuse in place of the missing one and realized they aren't the same.. Not a big deal though. I just went and got some 6mm (If I remember correctly) threaded rod and cut to length to make a couple studs. Screwed them into the housing using a dab of loctite and you would never know the difference. Just FYI..
Last edited by speedracer800; 05-18-2014 at 12:24 PM.
#10
05-18-2014, 01:45 PM
Just beware that prices for shipping from "bits" to the US is very expensive and almost nullifies any good deals in prices compared to buying from the dealer.
Also, doing the borders in black vinyl is a cheap alternative that can look just as good as the carbon edition lights.
Also, doing the borders in black vinyl is a cheap alternative that can look just as good as the carbon edition lights.
#11
05-24-2014, 05:12 PM
Join Date: Jun 2010
Location: Lake Geneva, WI
Posts: 757
Rep Power: 46
Just FYI.. There's a nice used one on Ebay currently.. Around $200!
#14
05-24-2014, 11:32 PM
Join Date: Jun 2010
Location: Lake Geneva, WI
Posts: 757
Rep Power: 46
I bought mine from eBay for this kind of money and they're perfect. If the seller has good feedback I say go for it. Good luck!
#15
05-25-2014, 08:06 AM
Join Date: Jun 2010
Location: Lake Geneva, WI
Posts: 757
Rep Power: 46
I was checking out the picture closely and noticed one of mounting studs is missing. Problem is that the studs on your red lights won't fit in these.. I'd ask if he has that. Mine were missing also but I just cut a piece of threaded rod to make a couple up.. Pretty easy.