
Refilling Spoiler Hydraulic Ram


Thread Starter
|
Registered User

Joined: May 2010
Posts: 444
From: SC
Rep Power: 58


Refilling Spoiler Hydraulic Ram
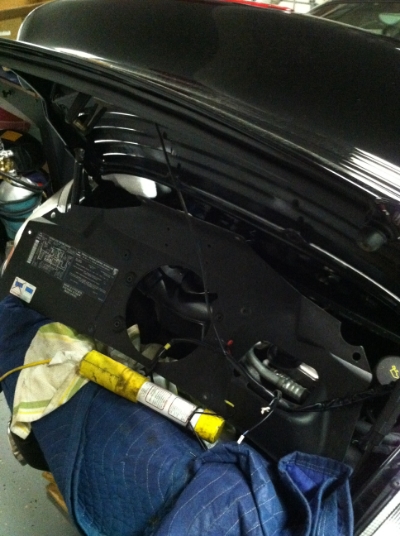
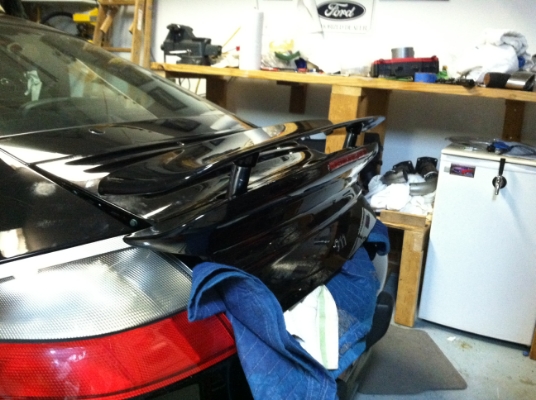
When refilling the hydraulic spoiler ram, the instructions are clear (attached) but my cylinder only takes a few drops. It was leaking and when I removed the banjo bolt more fluid leaked out but no way I can get 5ml in there before it over flows. It appears to only fill the small volume where the banjo bolt goes. I am using a syringe with a tip (maybe the tip needs to be longer?). Is there something below where the banjo bolt resides? Anyone else experience refilling and can lend me some information on what I might be doing wrong? See attached picture of the ram after a couple of drops of fluid were added. Thanks in advance!


Registered User
Joined: May 2009
Posts: 7,984
From: la
Rep Power: 608
only thing i can say is that the refill process is reeaallly slow. it has to drip into the receptacle and slowly. 15-20 mins to fill. also, the lucas stop leak has a tip that helps. not a fun process, but you will prevail! i.e... it won't just pour in, is what i'm saying. GL
Registered User
Joined: May 2010
Posts: 1,062
From: Utah
Rep Power: 107
Each ram capacity is 5 ml. That's a teaspoon, or about 1/6 of an ounce. If you're low it could only be a few drops. The pump cylinders will hold more, be careful you don't loose fluid there. I don't know of a good way to keep the system 100% full of fluid and equal R to L and bleed all the air out.
Thread Starter
|
Registered User
Joined: May 2010
Posts: 444
From: SC
Rep Power: 58
Yea I am using a graduated syring and I would have thought the ram to be completly empty since I removed the bolt while it was installed and more fluid came out (not much). I will try the Lucas stop leak and see if the tip is longer than what I am using.
Regardless, do I have to bleed the system and remove the entire actuation assembly so I can refill/top off the pumps? Sounds dreadful. Thanks.
Regardless, do I have to bleed the system and remove the entire actuation assembly so I can refill/top off the pumps? Sounds dreadful. Thanks.
Registered User
Joined: May 2009
Posts: 7,984
From: la
Rep Power: 608
i had this diy as a backup and it's essentially correct. we didn't use it but my buddy has done a few of these. don't give up! a working oem spoiler will be an anomaly someday, that only a few of us still have
") i'm in fact celebrating my operable hydraulics, by getting a strosek
i'm in fact celebrating my operable hydraulics, by getting a strosek 
good luck w it. ( rep pts for the nameless soul that posted this originally..)
ps.. i'd like to hear of your success!
1. Open rear deck-lid with spoiler in down position
2. Put towels/plastic over the engine to keep fluids from dripping onto engine or body parts.
3. Remove approx. one dozen bolts that retain shroud/fan to deck-lid
4. Loosen and remove 4 retaining acorn style nuts that hold pump onto shroud
5. Cut tie wraps that retain electrical wires and hydralic lines so pump can be removed
6. Lift pump off shroud, loosen and remove banjo fittings on driver's side of pump watch for fluid to leak out and catch in a paper towel or rag. I held pump with channel locks for a good hold while loosening
7. Remove the positiive and negative wires on the opposite end of the pump.
8. Unplug sensors on passenger side ram carefully as they are sensitive. They are under a plastic cover that pulls off
9. Turn pump upside down in proper waste recepticle to empty the fluid remaining
10. With 12 volt power source, connect positive and negative to pump connectors. You will feel the torque and hear the pump motor turning, have a towel ready to catch any remaining fluids
11. With pump in hand, slowly add fluid. The Lucas product has a snout that you can cut and place into recpticle. This took approx. 20 minutes of adding, waiting for it to seep into pump, add more, wait, add more, etc...until bubbles stop coming up. Pump should then be full
12. Carefully attach banjo fittings with pump held upright. A small amount of fluid will seep when attaching banjo bolts
13. Torque the banjo bolts snug
14. Place pump onto shroud, tighten acorn nuts and connect wires
15. Connect sensors to ram (I used a tie wrap to hold sensors in place)
16. Place shroud in position on deck lid and snug up the dozen bolts
17. Tie wrap the electrical wires to the shroud
18. Actuate spoiler from dash with key on to see if you get the warning light
Thread Starter
|
Registered User
Joined: May 2010
Posts: 444
From: SC
Rep Power: 58
Many thanks, good thing I have a keg in the garage sounds like I'm gonna need it. One last question. I have yet to completly remove the spoiler (only bad side removed so far) but how do you reconnect it to the ram pistons as they have been retracted during the removal process? It would appear there is not enough piston showing to turn and lock onto the spoiler.
Trending Topics
Registered User
Joined: May 2009
Posts: 7,984
From: la
Rep Power: 608
i can't help you further, sorry. while i am there for most all this drama on my cars.. i'm the guy pumping the keg. but i will tell you the spoiler/decklid needs to be removed in addition to the pump/rams.. to do all this properly..that's just a cpl bolts?.. iirc.. it's all gotta come apart, but it all bolts right back on. the spoiler on/off.. requires either the special *tool* or know how with others. it's *heavy*, can snap at you ..and it's tricky, and beyond my scope. sorry i can't help more. this diy though proven, is not for the meek,.. as i'm sure you're finding. this if successful, will be a testament to your skill.
Last edited by '02996ttx50; Apr 14, 2013 at 08:31 PM.

When I did this I first filled the pump upright and then stuck the ends of the hoses from the rams in the can of fluid. I then lifted the wing with my hands and pumped it up and down to purge the air and fill the rams and lines. Then I simply connected the lines back on to the pump and everything worked on the first try.
Registered User
Joined: May 2009
Posts: 7,984
From: la
Rep Power: 608
When I did this I first filled the pump upright and then stuck the ends of the hoses from the rams in the can of fluid. I then lifted the wing with my hands and pumped it up and down to purge the air and fill the rams and lines. Then I simply connected the lines back on to the pump and everything worked on the first try.
Thread Starter
|
Registered User
Joined: May 2010
Posts: 444
From: SC
Rep Power: 58
Diy
I thought I�d expand this thread into a DIY, moderator feel free to break out to a separate thread.
For me the issue was a leaking drivers side ram and consistent warning light on thedash. The spoiler did operate correctly for the most part but it seemed to be getting sporadic in that it would stay up or down when it wasn�t supposed to.
I acquired the small M5 banjo bolt washers from Master-Carr (Porsche only sells the entire actuation kit for something like $1K) as the leak appeared to initiate from this fitting on the lower end of the ram. The smallest quantity was a 50 count bag but itwas only $11 (much better than the dealer fix of ~$1900).
First the spoiler has to be removed (ref. shop manual 665819). Aftercomplete removal of the pump assembly via the shop manual (559037), I placed theunit on the work bench. No special instructions here other than using a wrapped crescent wrench to rotate the pistons to remove the wing (in place ofthe specialty tool); this worked fine for removal but I had to insert a cut off allen wrench for installation - Do yourself a favor and get the spoiler hook it only costs like $20 and well worth it. Caution, the ram internal spring will throw down the piston, so keep a good hold of it with the pliers and ease it down. The tape prevents damage to the piston surface. Once everything was on the bench I ensured both rams were full as well as both pumpoutlets (replace all banjo bolt washers). I then submerged both hose ends (that attach to the ram) in cups of Pentosin. I hooked up my battery charger (12V 15amp setting) to the pump (small male end positive, large male end negative). This will retract the rams (they should already be retracted). Turn off the power source and swap the positive and negative hook ups to the pump, this will extend the rams and pull hydraulic fluid into the lines from the submerged ends (be sure they remain submerged or you will get air in thesystem). I did this about a dozen times or more. Carefully do the power source swap to avoid crossing the lines. After completion,carefully attach the hose ends to their respective rams, ensuring the open end and ram are ABOVE the pump unit (this will prevent air from entering and losingfluid). Now repeat the procedure of hooking the power unit to the pumpassembly to extend and retract the rams. Do this a dozen or sotimes. At first one ram may lag the other but over time they should go insync (if not, the lagging ram needs more fluid). The refil and bleeding instructions are in the shop manual 667237. You are now ready to assemble per the shop manual, again no real special instructions here just repeat the process and attach all the 13mm bolts to secure everything. One hint, assemble with the rams extended, this will aide in attaching the wing as you will now be able to grasp and twist the pistons. Clean the extended pistons with goo gone or equivalent.
While this is not an extremely difficult job it is tedious and you need to be careful with the 12v power source and ensuring a good bleeding to eliminate air in the system. As mentioned in the post above, you may be able to perform this without removing the pump assembly but you will need at least 1 assistant maybe 2. They can hold the hose ends in Pentosin while someone operates the rams via the dashboard switch. Best of luck, photos below.
PS �alternate fix: GT2 Wing!
After removal:
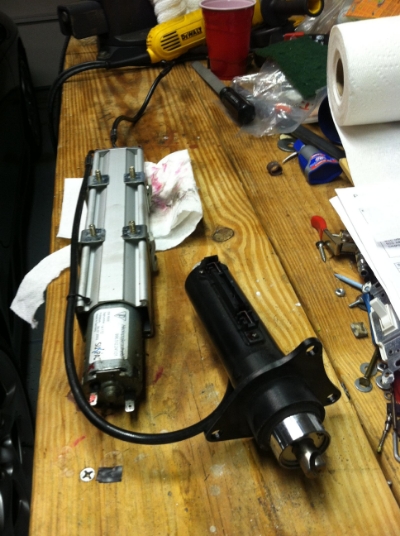
Pump assy on bench:
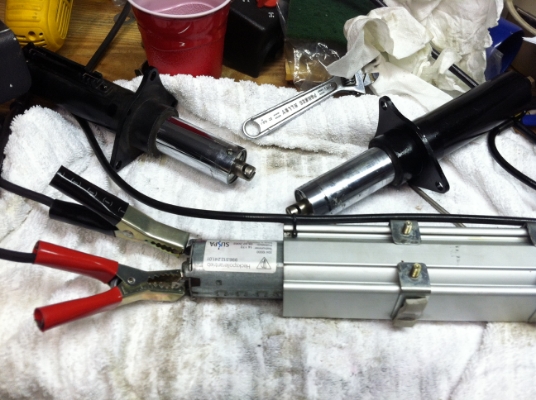
Hooking up power source to actuate and retract the rams:
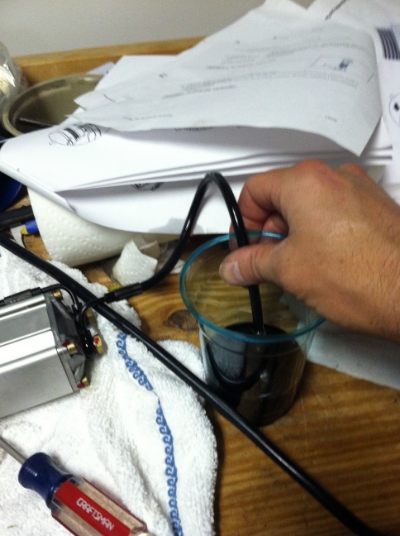
Submerging hose ends for bleeding:
Tie wrap pump during assy makes it easier:

Pliers and modified allen wrench for installation (get the tool):

All done:
For me the issue was a leaking drivers side ram and consistent warning light on thedash. The spoiler did operate correctly for the most part but it seemed to be getting sporadic in that it would stay up or down when it wasn�t supposed to.
I acquired the small M5 banjo bolt washers from Master-Carr (Porsche only sells the entire actuation kit for something like $1K) as the leak appeared to initiate from this fitting on the lower end of the ram. The smallest quantity was a 50 count bag but itwas only $11 (much better than the dealer fix of ~$1900).
First the spoiler has to be removed (ref. shop manual 665819). Aftercomplete removal of the pump assembly via the shop manual (559037), I placed theunit on the work bench. No special instructions here other than using a wrapped crescent wrench to rotate the pistons to remove the wing (in place ofthe specialty tool); this worked fine for removal but I had to insert a cut off allen wrench for installation - Do yourself a favor and get the spoiler hook it only costs like $20 and well worth it. Caution, the ram internal spring will throw down the piston, so keep a good hold of it with the pliers and ease it down. The tape prevents damage to the piston surface. Once everything was on the bench I ensured both rams were full as well as both pumpoutlets (replace all banjo bolt washers). I then submerged both hose ends (that attach to the ram) in cups of Pentosin. I hooked up my battery charger (12V 15amp setting) to the pump (small male end positive, large male end negative). This will retract the rams (they should already be retracted). Turn off the power source and swap the positive and negative hook ups to the pump, this will extend the rams and pull hydraulic fluid into the lines from the submerged ends (be sure they remain submerged or you will get air in thesystem). I did this about a dozen times or more. Carefully do the power source swap to avoid crossing the lines. After completion,carefully attach the hose ends to their respective rams, ensuring the open end and ram are ABOVE the pump unit (this will prevent air from entering and losingfluid). Now repeat the procedure of hooking the power unit to the pumpassembly to extend and retract the rams. Do this a dozen or sotimes. At first one ram may lag the other but over time they should go insync (if not, the lagging ram needs more fluid). The refil and bleeding instructions are in the shop manual 667237. You are now ready to assemble per the shop manual, again no real special instructions here just repeat the process and attach all the 13mm bolts to secure everything. One hint, assemble with the rams extended, this will aide in attaching the wing as you will now be able to grasp and twist the pistons. Clean the extended pistons with goo gone or equivalent.
While this is not an extremely difficult job it is tedious and you need to be careful with the 12v power source and ensuring a good bleeding to eliminate air in the system. As mentioned in the post above, you may be able to perform this without removing the pump assembly but you will need at least 1 assistant maybe 2. They can hold the hose ends in Pentosin while someone operates the rams via the dashboard switch. Best of luck, photos below.
PS �alternate fix: GT2 Wing!
After removal:

Pump assy on bench:

Hooking up power source to actuate and retract the rams:

Submerging hose ends for bleeding:

Tie wrap pump during assy makes it easier:

Pliers and modified allen wrench for installation (get the tool):

All done:

Last edited by BMiller33; Apr 17, 2013 at 09:51 PM. Reason: Fixed photo link
Registered User
Joined: May 2009
Posts: 7,984
From: la
Rep Power: 608
that and taking the assembly over to a bench while working is key.
and yes, help is good. i alternated btw working the beer keg pump and the dash switch operation, but i have no less a sense of accomplishment for merely having been there. congratulations on your success. tedious, is about right. but it works
great write up.
and yes, help is good. i alternated btw working the beer keg pump and the dash switch operation, but i have no less a sense of accomplishment for merely having been there. congratulations on your success. tedious, is about right. but it works
great write up.
Registered User
Joined: May 2010
Posts: 1,062
From: Utah
Rep Power: 107
BMiller, thanks for your post.
Just wondering, is it possible to connect the banjos to the rams without the ingress of air or loosing any fluid? Or is any such loss of either so little it doesn't matter?
My next step is to manufacture a major component inside the pump assembly that failed. If I can get that done , I'll proceed in putting my system back together, even though I may not put it back on my car until I decide to sell it.
Thread Starter
|
Registered User
Joined: May 2010
Posts: 444
From: SC
Rep Power: 58
Thread Starter
|
Registered User
Joined: May 2010
Posts: 444
From: SC
Rep Power: 58
Interestingly, thde system worked perfectly on the bench but once installed the inside button was not functional (except for the first time where it dropped the spoiler). Afterwards, nothing. At speed the spoiler remained down. I am thinking micro-switches. Any other ideas? Thanks.