
DIY VF Eng. Ver 3 Supercharger Install

Registered User
Joined: Mar 2010
Posts: 2,004
From: Chicago
Rep Power: 122


Great progress Doug! Have fun and take your time and you will have a blast!
One note....throw the WD-40 away....that is a lubricant and not a rust penetrant. Good for door hinges and the such, not for breaking down rust. Get yourself a can of Kroil, PB blaster, or liquid wrench for removing the rusty nuts and bolts
One note....throw the WD-40 away....that is a lubricant and not a rust penetrant. Good for door hinges and the such, not for breaking down rust. Get yourself a can of Kroil, PB blaster, or liquid wrench for removing the rusty nuts and bolts
 I'll even heat up the tools before you arrive.
Radiators & Coolant Hoses Removal
So over the weekend, I found a few hours to remove the radiators and some of the coolant hoses.
Although it's not necessary to remove the side radiators, I found it much easier to remove the hose clamps (worm & OEM spring type) this way. Also, I'm making a best possible effort to drain/extract the original coolant, and flushing the radiators while off the car will be much easier.
I'm considering removing the two coolant Y-pipes (hard pipes) in order to remove their respective flexible hoses. Those clamps are in a really tight area! Another benefit to doing this is I could replace the fuel filter much easier, and.... (idea time), fastening plastic holders to the top of the pipe(s) to hold the SC coolant lines. Aaron, I remember you used zip ties? The goal was (and is) to prevent heat transfer from the aluminum coolant pipes to the braided, SC coolant. (Yes, I know this is ****. I know these lines are braided/insulated.)
Enough rambling, here are the related photos.
Removing 3rd radiator. Flush and disconnect OEM hoses.

Passenger side radiator. The lower hose is "T"ed. The smaller connected the 3rd center radiator. The larger connected to the side radiator. I will be selling these hoses, along with the brand new center radiator that came with the SC kit. PM me if you have any interest.

Passenger side, sans radiator.

Passenger side coolant hoses connected to aluminum Y-Pipe. That's a tight fit!

This Craftsman hose clamp compressing tool is a worthwhile investment.

Driver side radiator.

Driver side sans radiator.

Coolant hoses removed from engine block.

On the garaga ceiling are two, 8' long shop lights, hanging directly over the rear area of the car. The the engine lid open, the light is blocked. Off comes the engine lid/wing! Somebody once asked me in a PM how the Gemballa wing's brake light is connected. Here's the answer: brown (+), brown/black (-).

Marked the position (black line) of the wing.

Ah, more light.


Although it's not necessary to remove the side radiators, I found it much easier to remove the hose clamps (worm & OEM spring type) this way. Also, I'm making a best possible effort to drain/extract the original coolant, and flushing the radiators while off the car will be much easier.
I'm considering removing the two coolant Y-pipes (hard pipes) in order to remove their respective flexible hoses. Those clamps are in a really tight area! Another benefit to doing this is I could replace the fuel filter much easier, and.... (idea time), fastening plastic holders to the top of the pipe(s) to hold the SC coolant lines. Aaron, I remember you used zip ties? The goal was (and is) to prevent heat transfer from the aluminum coolant pipes to the braided, SC coolant. (Yes, I know this is ****. I know these lines are braided/insulated.)
Enough rambling, here are the related photos.
Removing 3rd radiator. Flush and disconnect OEM hoses.
Passenger side radiator. The lower hose is "T"ed. The smaller connected the 3rd center radiator. The larger connected to the side radiator. I will be selling these hoses, along with the brand new center radiator that came with the SC kit. PM me if you have any interest.
Passenger side, sans radiator.
Passenger side coolant hoses connected to aluminum Y-Pipe. That's a tight fit!
This Craftsman hose clamp compressing tool is a worthwhile investment.
Driver side radiator.
Driver side sans radiator.
Coolant hoses removed from engine block.
On the garaga ceiling are two, 8' long shop lights, hanging directly over the rear area of the car. The the engine lid open, the light is blocked. Off comes the engine lid/wing! Somebody once asked me in a PM how the Gemballa wing's brake light is connected. Here's the answer: brown (+), brown/black (-).
Marked the position (black line) of the wing.
Ah, more light.
Registered User
Joined: Nov 2005
Posts: 573
From: Under Your Car
Rep Power: 80
Once you get to the point of pulling the coolant lines up into the engine bay, stop and do your injectors first. Then run the lines up over the back of the motor to where your coolant tank sits. That way your lines aren't in the way.
I'm glad you mentioned that! Does anyone know if it is an absolute must to use one step cooler plugs? Karl, what's been your experience? The reason I ask is because my current plugs have only been used for approximately 2000 miles.
On another note, new coolant hoses, low temp thermostat, water pump, fuel filter, etc. are trickling in. Anybody have any ideas on what to use to suspend the hoses from underneath the body, but above the aluminum coolant pipes (see photo below). I have complete access to that tunnel now.
These are a PITA to remove.

Ample room in the tunnel for a 2-wheel drive. I'm thinking of ways to suspend the SC coolant lines. Will replace that fuel filter tonight.

My plan is to keep this vehicle for at least 10 more years (by then, my daughter will be old enough to drive it). May as well replace these hoses now.

Pelican Parts is a good source for these. There are a few I couldn't find on Pelican though. Will give Suncoast a call.

These are the two large hoses located above the transmission. There's also a small breather hose I need to order.

Removed the stock thermostat & housing. While there, I was able to snap a shot of the engine serial nbr. The "AT" signifies "remanufactured".

On another note, new coolant hoses, low temp thermostat, water pump, fuel filter, etc. are trickling in. Anybody have any ideas on what to use to suspend the hoses from underneath the body, but above the aluminum coolant pipes (see photo below). I have complete access to that tunnel now.
These are a PITA to remove.
Ample room in the tunnel for a 2-wheel drive. I'm thinking of ways to suspend the SC coolant lines. Will replace that fuel filter tonight.
My plan is to keep this vehicle for at least 10 more years (by then, my daughter will be old enough to drive it). May as well replace these hoses now.
Pelican Parts is a good source for these. There are a few I couldn't find on Pelican though. Will give Suncoast a call.
These are the two large hoses located above the transmission. There's also a small breather hose I need to order.
Removed the stock thermostat & housing. While there, I was able to snap a shot of the engine serial nbr. The "AT" signifies "remanufactured".
Ran into a problem tonight. VF's instructions for the 3.4L 1st generation 996, shows the reservoir tank and Bosch pump as one assembly. The kit I received, instead, contains a reservoir that should mount behind the front crash beam. The only reference I can find to this reservoir is cited in the install instructions for the 997S. Has anyone installed this front-mounted reservoir tank in a 996? Damn thing just doesn't fit correctly. Here are some pics. Will call VF Engineering tomorrow.
Reservoir NOT sitting on crash beam top lip. Too low.
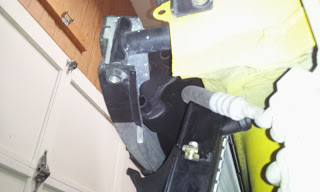
Reservoir NOT sitting on crash beam top lip. Too low.

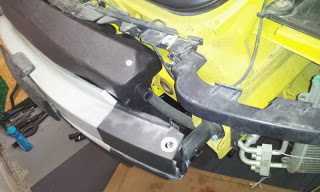
Reservoir sitting on top of the crash beam top lip. Too high. Crash beam bolt does not align with hole.
VF install instructions for 3.4L 1st gen 996. (Not included in kit.)


Reservoir NOT sitting on crash beam top lip. Too low.
Reservoir NOT sitting on crash beam top lip. Too low.
Reservoir sitting on top of the crash beam top lip. Too high. Crash beam bolt does not align with hole.
VF install instructions for 3.4L 1st gen 996. (Not included in kit.)
Last edited by Doug996InKC; Feb 6, 2013 at 12:04 AM.
Registered User
Joined: Nov 2005
Posts: 573
From: Under Your Car
Rep Power: 80
Doug, the early reservoir was discontinued a long time ago. The front mount tank should fit no problem. On the 997's, IIRC, I move the homelink module out of the way as that interferes, but other than that should fit right in there.
Oh and good luck getting any info from VF. Their customer service is horrible. Been waiting on a simple response on prices for updated pipe parts from Paul for over a month. They only want to sell you the kit, they can't support it.
Oh and good luck getting any info from VF. Their customer service is horrible. Been waiting on a simple response on prices for updated pipe parts from Paul for over a month. They only want to sell you the kit, they can't support it.
Last edited by IAPorscheDoc; Feb 6, 2013 at 08:29 AM.
Registered User
Joined: Sep 2008
Posts: 942
From: Vancouver
Rep Power: 65
So I'll respond to your PM on this thread. Yes my kit has the front tank as well. Your front crash bar looks a little different than mine as it seems like you have a larger upper lip in the middle. Not 100% sure though. (yes I know you cut the bar for your bumper, I had to do the same)
In thinking back, it looks like you actually have it too high. I think the area you have sticking above is supposed to be inside the crash bar.
I have to take my front bumper off again, but it likely won't be in the timeline you are looking for. I do remember I had to play around with it to get the right "spot" but it wasn't a perfect fit when it got there.
Cheers
Aaron

Former Vendor
Joined: Apr 2012
Posts: 376
From: Anaheim, CA
Rep Power: 0
Looking great so far, Doug! I believe Jeff called you back today. If not let me know.
Congrats on the progress and can't wait to see what she puts out!
We apologize for the late reply, IAPorscheDoc. After seeing your post and following up with the Technical Department, I believe they are now working to help answer your query and we did recently make a change in email servers that caused a gap in exporting emails (you are not the only one affected by the transfer) Paul will be giving you a call shortly, so please expect a ring
If anyone needs any assistance please email me at sales1@vf-engineering.com and if you'd like to reach the technical department directly please email technical@vf-engineering.com and we will do our best to respond within a timely manner.
Congrats on the progress and can't wait to see what she puts out!
Doug, the early reservoir was discontinued a long time ago. The front mount tank should fit no problem. On the 997's, IIRC, I move the homelink module out of the way as that interferes, but other than that should fit right in there.
Oh and good luck getting any info from VF. Their customer service is horrible. Been waiting on a simple response on prices for updated pipe parts from Paul for over a month. They only want to sell you the kit, they can't support it.
Oh and good luck getting any info from VF. Their customer service is horrible. Been waiting on a simple response on prices for updated pipe parts from Paul for over a month. They only want to sell you the kit, they can't support it.
If anyone needs any assistance please email me at sales1@vf-engineering.com and if you'd like to reach the technical department directly please email technical@vf-engineering.com and we will do our best to respond within a timely manner.

Registered User
Joined: Apr 2006
Posts: 1,346
From: 19454
Rep Power: 90
This is what I'm afraid of...i still haven't received a reply regarding pulley in the other thread and it's been weeks...
Front Crash Bean Lip Removal
Thanks for confirming.
Bingo! A VF tech confirmed that on "older 996s" (perhaps he means 1st generation?) the lip has to be cut off.
Yes, I spoke with Jeff. Thanks for the support.
I must say, Vivid and VF have been very accommodating thus far!
////////////////////////////////////////////////////////////////////////////////////
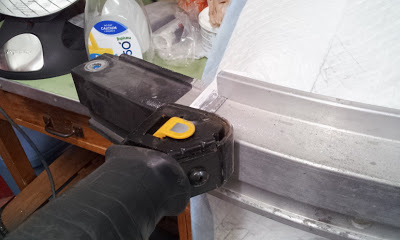
So, as Aaron and VF alluded, the crash beam lip needs to be trimmed in order for the tank to fit correctly. There are two threaded nuts molded into the back side of the reservoir tank. Jeff @ VF mentioned that it is no longer necessary to attach the tank using these fastening points, as the tank will fit pretty snug. I may attach it anyway, just to prevent the possibility of future rattles.
Lip measures approximately 1 inch.

3rd radiator installed with the "air flow guide". I hope the aftermarket NR Auto bumper will not interfere.

Using reciprocating saw. A perk to doing these DIYs is I get to buy new tools! Tonight going to buy an angle grinder to smooth out the cut.
The groundhog says spring is coming early! Motivation to get this project progressing faster!
I must say, Vivid and VF have been very accommodating thus far!
////////////////////////////////////////////////////////////////////////////////////
So, as Aaron and VF alluded, the crash beam lip needs to be trimmed in order for the tank to fit correctly. There are two threaded nuts molded into the back side of the reservoir tank. Jeff @ VF mentioned that it is no longer necessary to attach the tank using these fastening points, as the tank will fit pretty snug. I may attach it anyway, just to prevent the possibility of future rattles.
Lip measures approximately 1 inch.
3rd radiator installed with the "air flow guide". I hope the aftermarket NR Auto bumper will not interfere.
Using reciprocating saw. A perk to doing these DIYs is I get to buy new tools! Tonight going to buy an angle grinder to smooth out the cut.
The groundhog says spring is coming early! Motivation to get this project progressing faster!