
DIY VF Eng. Ver 3 Supercharger Install

DIY VF Eng. Ver 3 Supercharger Install
Hi guys.
Over the winter, I'm going to be installing VF Engineering's version 3 supercharger in my home garage. It's definitely going to take "all" winter, as I plan to take it slow, have fun, and make as few mistakes as possible.
The neat thing about this car (if I may toot my horn a little), is it has a history in the 996 world. Back in the day, it was owned by Todd Zuccone's shop Evolution Motorsports, and, from what I've been told, was a test car for some of VF's first supercharger prototypes. Call it fate that she's getting a V3 so many years later. I'm not sure when, but Todd told me the factory motor was replaced with a remanufactured 3.4L motor at about 30k miles. The car currently has 59k miles. Whether or not the motor was run with a SC, I do not know. But, a dyno from November 2012 shows it is running strong with almost 30k on the reman.

I've gained a lot of valuable knowledge from reading Aaron & Stacey's threads (from a few years ago), so I shouldn't run into any problems... . I'm just going to keep telling myself that.
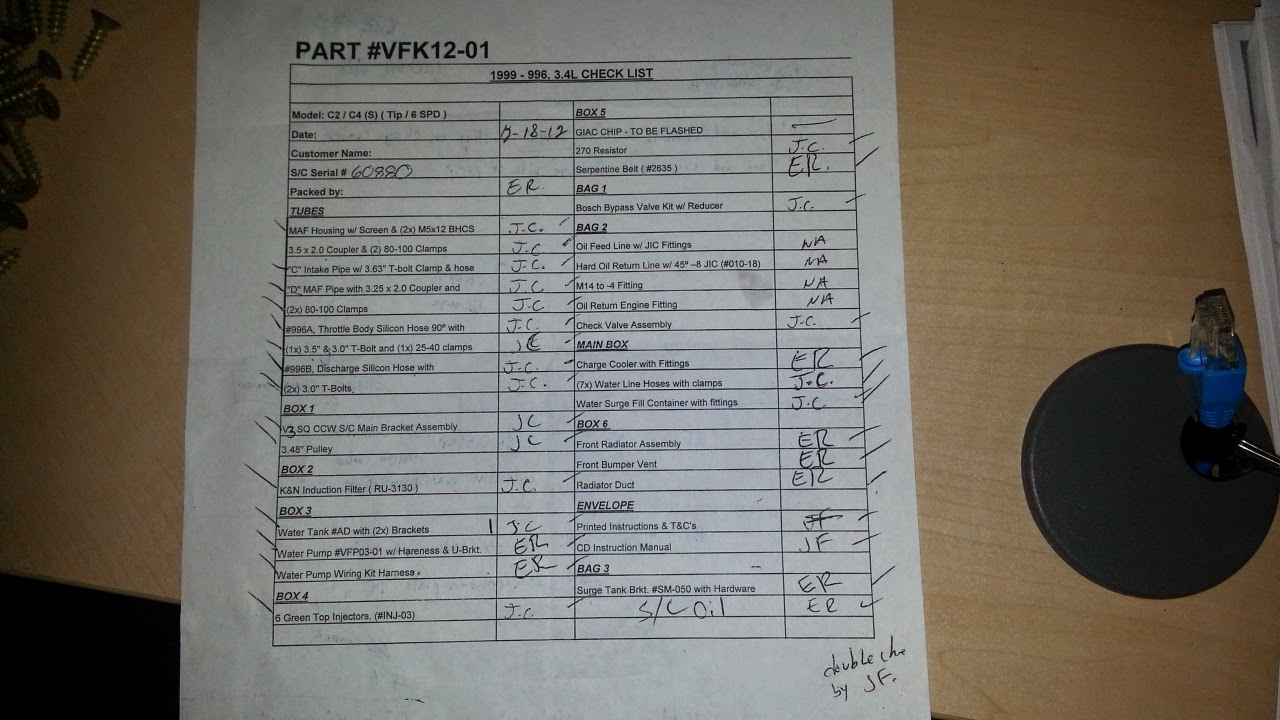
EDIT: June 2014 -- adding photo of packing list
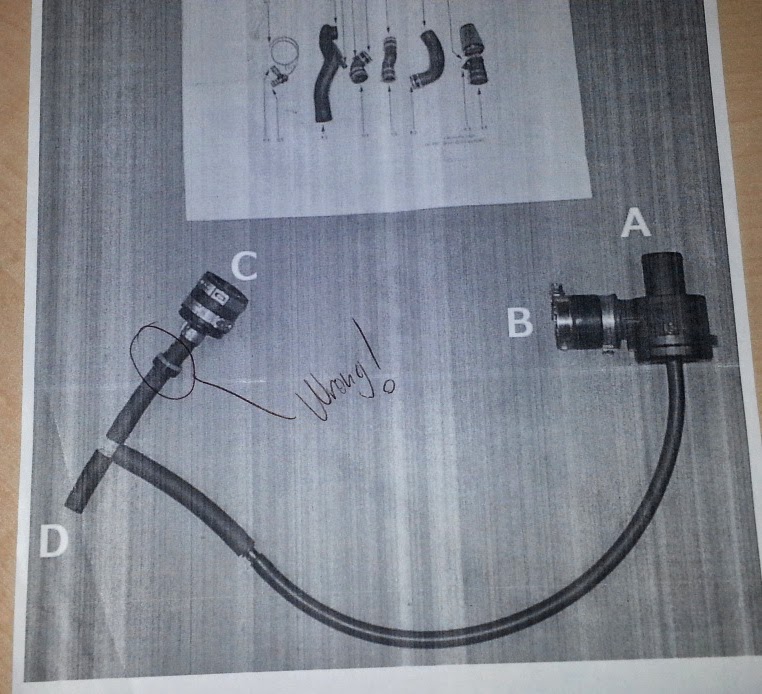
EDIT: June 2014 -- adding photo of check-valve assembly error
Two weekends ago I resolved my self-botched MaxJax install.
http://doug996inkc.blogspot.com/2012_12_01_archive.html
So let's get started!
The subject:

Over the winter, I'm going to be installing VF Engineering's version 3 supercharger in my home garage. It's definitely going to take "all" winter, as I plan to take it slow, have fun, and make as few mistakes as possible.
The neat thing about this car (if I may toot my horn a little), is it has a history in the 996 world. Back in the day, it was owned by Todd Zuccone's shop Evolution Motorsports, and, from what I've been told, was a test car for some of VF's first supercharger prototypes. Call it fate that she's getting a V3 so many years later. I'm not sure when, but Todd told me the factory motor was replaced with a remanufactured 3.4L motor at about 30k miles. The car currently has 59k miles. Whether or not the motor was run with a SC, I do not know. But, a dyno from November 2012 shows it is running strong with almost 30k on the reman.
I've gained a lot of valuable knowledge from reading Aaron & Stacey's threads (from a few years ago), so I shouldn't run into any problems...
. I'm just going to keep telling myself that.EDIT: June 2014 -- adding photo of packing list
EDIT: June 2014 -- adding photo of check-valve assembly error
Two weekends ago I resolved my self-botched MaxJax install.
http://doug996inkc.blogspot.com/2012_12_01_archive.html
So let's get started!
The subject:
Last edited by Doug996InKC; Jun 18, 2014 at 08:22 AM.
Tear-Down Part #1
The owner and friend of mine of http://rennsportkc.com/ has installed 100+ of these kits. His advice is to start with the cooling system.
Up on the lift.

Popping out the clear side markers.

Aftermarket fiberglass front bumper, as evident by the chip near the screw.

Headlight removal.


Front bumper removal.


Fender liner removal (need access to the coolant hoses).


A few more screws to remove, here and there, and the bumper is off. I installed the center radiator several years ago. For the SC kit, it will need to be disconnected from the engine cooling system and re-purposed as a self-contained air intake cooling system.


The underbody panels.

Underbody panels removed.

Historical marking made by EVOMS back in the day?

Hardline coolant hoses. The SC's coolant hoses will travel along the same path.

Up on the lift.
Popping out the clear side markers.
Aftermarket fiberglass front bumper, as evident by the chip near the screw.
Headlight removal.
Front bumper removal.
Fender liner removal (need access to the coolant hoses).
A few more screws to remove, here and there, and the bumper is off. I installed the center radiator several years ago. For the SC kit, it will need to be disconnected from the engine cooling system and re-purposed as a self-contained air intake cooling system.
The underbody panels.
Underbody panels removed.
Historical marking made by EVOMS back in the day?
Hardline coolant hoses. The SC's coolant hoses will travel along the same path.
Last edited by Doug996InKC; Jan 14, 2013 at 06:22 PM.
Registered User
Joined: Mar 2011
Posts: 137
From: toronto
Rep Power: 22

Looks great, nice lift. Subscribing really looking forward to seeing the results, especially the post install if there are any issues, oiling, breathers etc. Best of luck, it is something I am thinking of as well.


Registered User
Joined: Apr 2006
Posts: 1,346
From: 19454
Rep Power: 90

I can't wait to see this completed...I'm just waiting for the results. I want to see the actual boost as I've seen reports of the actual boost being below 5psi unlike the advertised 6psi. I'd also like to see the delta between post and pre supercharger.
Trending Topics

Tear-Down Part #2
Very little progress was made this week. Perhaps the thread title should change to "DIY... + all the other crap I decide to do along the way". 
For example, my list has grown to:

Won't need this EVOMS cold-air-intake any longer. Debating on whether to sell or not. What are these going for used these days?

Removed O2 sensor electrical connection.

Remove drain coolant plug (will wait for a warmer winter day -- yeah, oxymoron) to remove hoses.

Coolant draining. Flash photo makes it appear clean, but it was very brown. At least I didn't notice any metal particles floating around.

A few days earlier, sprayed a liberal amount of WD40 to nuts & bolts of the exhaust system. Removal was painless. Kept the headers fastened to heads (for now).

Fabspeed mufflers.

Catalytic converts removed too. Wow, this exhaust is heavy! With the extra 100 lbs. going onto the car, I'd like to find some weight shedding opportunities. And I think I've found that opportunity laying right here!

For example, my list has grown to:
- replace motor mounts
- replace water pump
- replace all coolant hoses
- coolant refill (will use suction method for extraction and refill)
- new custom exhaust (headers to tips -- some crazy ideas, but may result in an unbearable sound)
- rear brake rotors & pads (rotors measured below min. thickness)
Won't need this EVOMS cold-air-intake any longer. Debating on whether to sell or not. What are these going for used these days?
Removed O2 sensor electrical connection.
Remove drain coolant plug (will wait for a warmer winter day -- yeah, oxymoron) to remove hoses.
Coolant draining. Flash photo makes it appear clean, but it was very brown. At least I didn't notice any metal particles floating around.
A few days earlier, sprayed a liberal amount of WD40 to nuts & bolts of the exhaust system. Removal was painless. Kept the headers fastened to heads (for now).
Fabspeed mufflers.
Catalytic converts removed too. Wow, this exhaust is heavy! With the extra 100 lbs. going onto the car, I'd like to find some weight shedding opportunities. And I think I've found that opportunity laying right here!
Is this header designed with equal length tubes into the merge collector? I found a few old forum topics showing $500 and change for the pair. Is this still true?
Registered User
Joined: Mar 2010
Posts: 2,004
From: Chicago
Rep Power: 122
No, basically it's the same log style as stock but with larger primaries and exhaust outlet. This and the 997s headers were the few that have been known to make some power.
They go close to $1k new but I've seen them pop up time to time for around $600. There is a company that makes am exact x51 reproduction in stainless steel for close to $900 IIRC.
They go close to $1k new but I've seen them pop up time to time for around $600. There is a company that makes am exact x51 reproduction in stainless steel for close to $900 IIRC.

VF Engineering provides a tune with the kit. I just need to send the Dme to them closer to completion of install. A tweak to their tune would be nice, but from what i have read, few individuals can do it right.
Registered User
Joined: Nov 2005
Posts: 573
From: Under Your Car
Rep Power: 80
Great progress Doug! Have fun and take your time and you will have a blast!
One note....throw the WD-40 away....that is a lubricant and not a rust penetrant. Good for door hinges and the such, not for breaking down rust. Get yourself a can of Kroil, PB blaster, or liquid wrench for removing the rusty nuts and bolts
One note....throw the WD-40 away....that is a lubricant and not a rust penetrant. Good for door hinges and the such, not for breaking down rust. Get yourself a can of Kroil, PB blaster, or liquid wrench for removing the rusty nuts and bolts