
Agency Power End Of Month Exhaust & Intake Sale


We have our headers instock too. Will PM you.
Porschinator - alot of people are running that setup and extremely happy. I personally give my guarantee you will have no complaints.
Porschinator - alot of people are running that setup and extremely happy. I personally give my guarantee you will have no complaints.
Registered User
Joined: May 2006
Posts: 72
From: Seattle
Rep Power: 23

Originally Posted by delirium
No more MAF sensor failures? I am intersted, how much is the sale price?
I am thinking about pairing this up w/ muffler bypass pipes, hopefully to get some low end back, would this be the right move?
I am thinking about pairing this up w/ muffler bypass pipes, hopefully to get some low end back, would this be the right move?

Oh, and here are the Sparco's I just (had) put in. (little more difficult with them since some modifications had to be done due to me being 6' tall and them being wider than stock in the back)

Registered User
Joined: Apr 2007
Posts: 3,123
From: Chained to my Laptop....
Rep Power: 172

Schnazzy- Very nice!! I like the Sparcos-
I was noticing from your KN pic, doesn't look like your coolant tank cap is on all the way. May want to take it of, lube the threads and put it back on until the cap cross is vertical and you feel a slight 'click'...
I was noticing from your KN pic, doesn't look like your coolant tank cap is on all the way. May want to take it of, lube the threads and put it back on until the cap cross is vertical and you feel a slight 'click'...
Registered User
Joined: May 2006
Posts: 72
From: Seattle
Rep Power: 23
Yeah Dan the tunnels were in the way, nothing a dremel won't fix. They are notched to allow the adjuster wheel slide right in. The seats will go back exactly as far as I need an no further. The inside seat adjuster wheel is removed for clearance.
Thanks p0rsch3. I just checked it when I took the pic and it seemed fine. Checked it when I washed the car.
Note you can barely make out the plenum in the picture.
Thanks p0rsch3. I just checked it when I took the pic and it seemed fine. Checked it when I washed the car.
Note you can barely make out the plenum in the picture.
Registered User
Joined: Apr 2007
Posts: 3,123
From: Chained to my Laptop....
Rep Power: 172
Schnazzy- When I rplaced my coolant tank cap I had read several articles describing proper seating of the newer design cap- It is actually designed so the cross on the cap is perfectly up and down when fully seated. Problem is that you can't fully seat it unless the threads are lubed. Leaving it cocked is a common problem and will lead to leaks (again, so I've read). I tested this on my pcar and lo-and-behold, lubing the threads allowed the cap to seat fully and 'click' into place.
Before I lubed it my cap looked like yours with the cross on the cap slightly cocked.
This is taken from a thread at Renntech:
So FWIW it may not be leaking now, but if it is in fact supposed to seat in a bit further it couldn't hurt to take off the cap, lube the tank threads, top of tank opening lip and inside cap seal and make sure it is 100% seated.
Before I lubed it my cap looked like yours with the cross on the cap slightly cocked.
This is taken from a thread at Renntech:
Early 996 coolant tank caps have a design defect in them that will cause them to start 'weeping' coolant over time. These caps have a part number that ends in "00". If your car has one of these caps, it is best to replace it.
Later caps with an 01 or higher part number suffix do not have this problem, but can be difficult to fully seat because of the improved seal. Later caps that exhibit 'weeping' may not actually be defective, they are only not fully screwed on and seated.
The issue is that the cap gasket is slightly thicker, and will bind against the tank top and threads for the last 1/8th turn. Because the cap is hand tightened, it is easy to think that the cap is fully seated. In order to overcome this, clean off all of the dried coolant residue from the mouth of the tank, and the inside seal and threads of the cap. Then spray some silicone lubricant on the cap seal and threads prior to screwing on the cap. This will allow the cap to be fully hand-tightened.
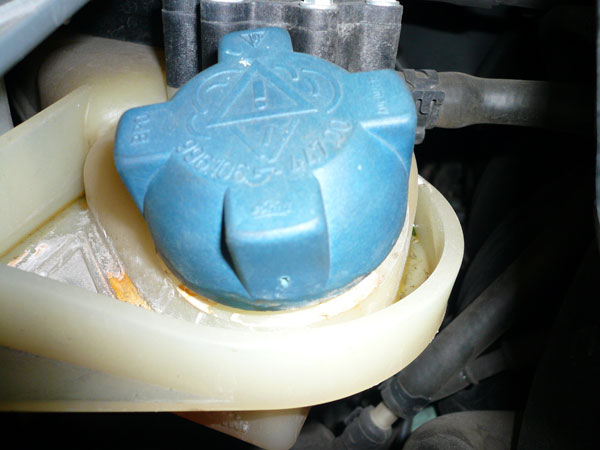
The cap has a cruciform pattern on it which makes it easy to verify if it is fully seated. Further, the when the cap is fully seated, it will make a "clicking" feel as it is fully seated.
Here is an example of a coolant tank cap in which the owner reported that there was leakage. Notice the cap cruciform alignment (and that it is an 00 cap).
Here is an example of a coolant cap that is fully seated and has no leaks. Notice the cap cruciform alignment.

Later caps with an 01 or higher part number suffix do not have this problem, but can be difficult to fully seat because of the improved seal. Later caps that exhibit 'weeping' may not actually be defective, they are only not fully screwed on and seated.
The issue is that the cap gasket is slightly thicker, and will bind against the tank top and threads for the last 1/8th turn. Because the cap is hand tightened, it is easy to think that the cap is fully seated. In order to overcome this, clean off all of the dried coolant residue from the mouth of the tank, and the inside seal and threads of the cap. Then spray some silicone lubricant on the cap seal and threads prior to screwing on the cap. This will allow the cap to be fully hand-tightened.
The cap has a cruciform pattern on it which makes it easy to verify if it is fully seated. Further, the when the cap is fully seated, it will make a "clicking" feel as it is fully seated.
Here is an example of a coolant tank cap in which the owner reported that there was leakage. Notice the cap cruciform alignment (and that it is an 00 cap).
Here is an example of a coolant cap that is fully seated and has no leaks. Notice the cap cruciform alignment.
Last edited by p0rsch3; Jun 4, 2007 at 02:09 AM.
You probably already saw them, but K&N has full detailed instructions here -
http://www.kandn.com/instructions/63-7000.pdf
I have seen my techs do it in about 1 hour.
http://www.kandn.com/instructions/63-7000.pdf
I have seen my techs do it in about 1 hour.
Registered User
Joined: Apr 2007
Posts: 3,123
From: Chained to my Laptop....
Rep Power: 172
the only tough part of installing the intake is the $%&&* assembly of the heat shield body and rubber weather stripping. The instructions it comes with look like they are from a 1970's erector set.
for me, that was the longest part of the install- once it was assembled it just dropped right in and secured very solid.
Pleased with the results and can't be beat for the price IMO..
for me, that was the longest part of the install- once it was assembled it just dropped right in and secured very solid.
Pleased with the results and can't be beat for the price IMO..
Registered User
Joined: Apr 2007
Posts: 3,123
From: Chained to my Laptop....
Rep Power: 172
I just unpacked the Agency Exhaust yesterday, and it looks fabulous.
Nice workmanship on the welds and bends. Looks very solid and nice polished stainless finish. Can't wait to put it on this weekend.
Nice workmanship on the welds and bends. Looks very solid and nice polished stainless finish. Can't wait to put it on this weekend.
Registered User
Joined: Dec 2005
Posts: 756
From: South florida
Rep Power: 51
Originally Posted by p0rsch3
I just unpacked the Agency Exhaust yesterday, and it looks fabulous.
Nice workmanship on the welds and bends. Looks very solid and nice polished stainless finish. Can't wait to put it on this weekend.
Nice workmanship on the welds and bends. Looks very solid and nice polished stainless finish. Can't wait to put it on this weekend.
Let me know how it sounds. Mine will be here today.
Registered User
Joined: Nov 2006
Posts: 265
From: Woodinville, WA
Rep Power: 30
Mines fitted. Exhaust sounds sweet - took it for a quick spin before going on to the intake, and it sounded great, and felt smoother at low revs - it used to jerk a little in first at walking speed. Only problem is I've not transfered the tips yet - damn bolts are both rusted to hell, even though it's an 02. They are currently soaking in penetrating oil, hopefully tomorrow...
Intake went on fairly easily as well. The instructions *do* suck - over twenty steps, each of which say "with the supplied hardware", without clearly saying which bolt, washer etc. There is an exploded diagram, but it's so small it's useless. However, the car now sounds even better, and there is a definite "seat of the pants" power bump.
I know what some say - without a dyno nothings proven. Don't care. It *feels* faster, and that's all that really matters.
REALLY happy with this upgrade, at least on the day I fitted it. Time will tell of course.