

Dealership Doesn't Know the Answer, Do You?

Registered User
Joined: Nov 2011
Posts: 687
From: Oklahoma City
Rep Power: 63


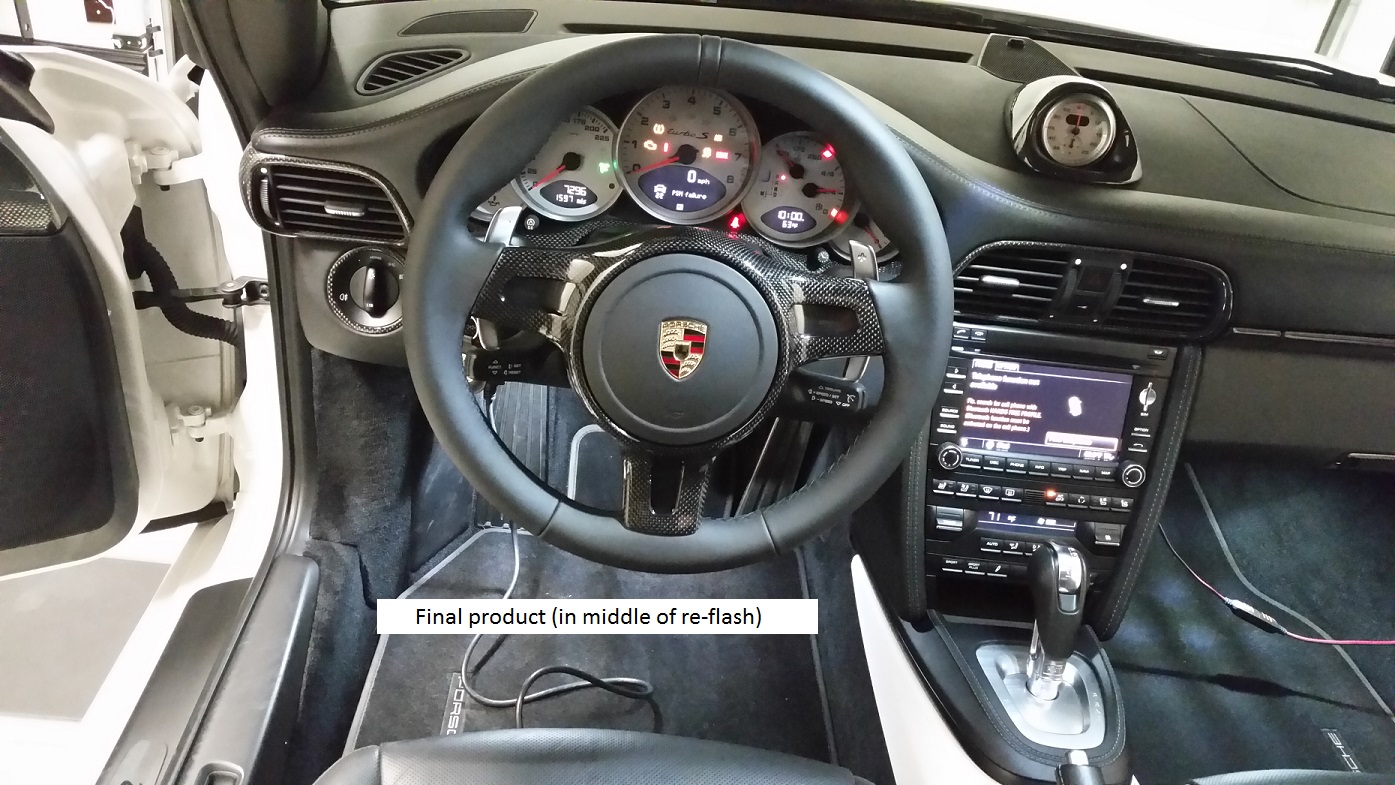
My dealership ordered a replacement steering wheel for me ten days ago. This morning, I emailed my rep and asked her if it had come in yet. Our p-car dealer (only one) leaves more than just a little to be desired. Just about everyone in the service department (except techs) is new. Very unimpressive, unfortunately. btw, I ordered the new CF trim piece for the front of what will be my brand new wheel. I won't see that until second week of April, so some time thereafter I will weigh in with what I discover relative to the makeup of the wheel parts.

Registered User
Joined: Nov 2011
Posts: 687
From: Oklahoma City
Rep Power: 63
My dealership is nothing if not consistent. I have an email wherein they indicated that the wheel had been ordered, two weeks ago.
Today they tell me it did not get ordered.
They are awful. All very nice people, just not steeped in competence.
Today they tell me it did not get ordered.
They are awful. All very nice people, just not steeped in competence.
Registered User
Joined: Nov 2011
Posts: 687
From: Oklahoma City
Rep Power: 63
a few answers
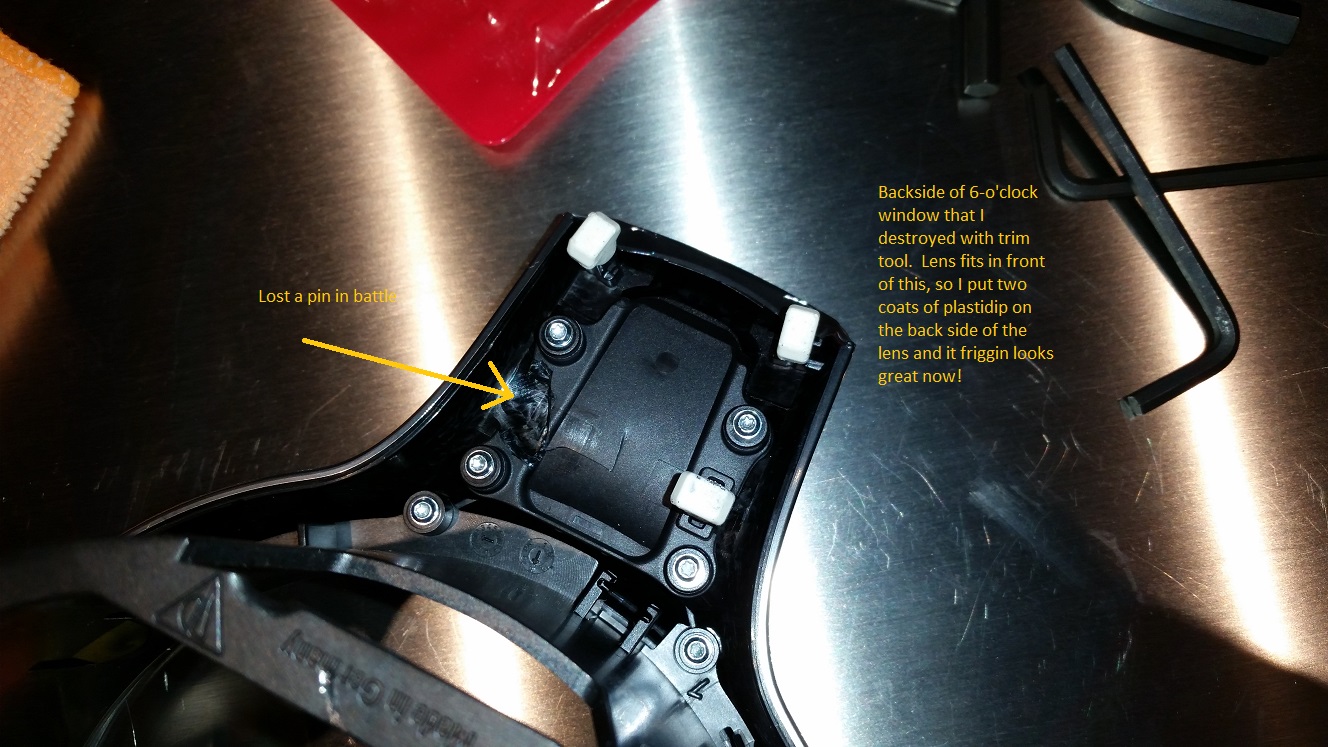
I still can't tell anyone whether that moldy-mildewy looking film inside the lens can be cleaned, but I can tell you it's pretty complicated to get to.
I had my wheel replaced under warranty, then commenced to rip it apart to install my new CF trim pieces. Well I learned some lessons. Like usual I screwed the pooch somewhat in the process of taking it apart.
Steps to get to the lenses:
1. disconnect negative battery terminal, and wait ten minutes
2. remove air bag
3. remove wheel nut
4. disconnect orange plug at the back of the wheel hub. This is important-wheel wiring all goes through this plug, treat it like gold. I broke mine.
5. remove wheel
6. use trim tools to literally pry the front trim piece off of the wheel assembly. This is not for the faint of heart. DO NOT extend any trim piece very far into the trim housing as you can damage the guts. Keep your tools at the perimeter where wheel hub meets front trim. You are pulling about 10 large pins with oversized heads on them out of the 9 and 3 o'clock positions on the wheel. There are four pins at 9 o'clock, four pins at 3 o'clock, and two at 6 o'clock. The pins at 6 o'clock are more easily screwed up as they are less substantial. Each of the pins is about 3/4 inch long with large head, and is seated in a firm rubber receptacle, and each tip dipped in glue prior to seating. Work your way around from 9 to 3, back and forth as you go, trying to remove the face somewhat evenly. You will reach a point where you can get your fingers under the trim piece and you should pull at it firmly yet methodically. DO NOT PRY TRIM TOOLS INTO ANY OF THE ENDS OF THE THREE SPOKES. That's not necessary and is the weakest point on the trim piece.
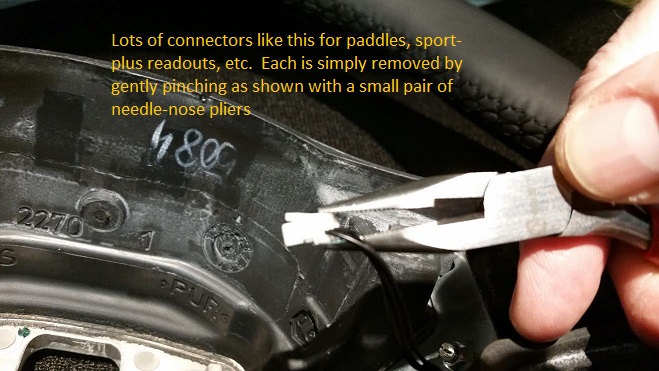
7. Once you have pulled out the trim piece and wheel hub assembly (inside guts of the wheel), you can go to work disconnecting all the wire connectors. Each of them pinches like the photo below, and there's no way to not know how things go back when you're finished.
8. Lots of tiny torx screws that hold the trim piece to the hub.
9. If all you want to do is get at the lenses, you do not have to remove the trim piece altogether. Each of the three windows is connected separately. Remove the screws, take it apart, and see if that **** comes off the plastic lens (pic of new lens below).
10. If you are replacing the trim piece like I did, you have to remove all screws and transfe the necessary parts over to your replacement piece.


I had my wheel replaced under warranty, then commenced to rip it apart to install my new CF trim pieces. Well I learned some lessons. Like usual I screwed the pooch somewhat in the process of taking it apart.
Steps to get to the lenses:
1. disconnect negative battery terminal, and wait ten minutes
2. remove air bag
3. remove wheel nut
4. disconnect orange plug at the back of the wheel hub. This is important-wheel wiring all goes through this plug, treat it like gold. I broke mine.
5. remove wheel
6. use trim tools to literally pry the front trim piece off of the wheel assembly. This is not for the faint of heart. DO NOT extend any trim piece very far into the trim housing as you can damage the guts. Keep your tools at the perimeter where wheel hub meets front trim. You are pulling about 10 large pins with oversized heads on them out of the 9 and 3 o'clock positions on the wheel. There are four pins at 9 o'clock, four pins at 3 o'clock, and two at 6 o'clock. The pins at 6 o'clock are more easily screwed up as they are less substantial. Each of the pins is about 3/4 inch long with large head, and is seated in a firm rubber receptacle, and each tip dipped in glue prior to seating. Work your way around from 9 to 3, back and forth as you go, trying to remove the face somewhat evenly. You will reach a point where you can get your fingers under the trim piece and you should pull at it firmly yet methodically. DO NOT PRY TRIM TOOLS INTO ANY OF THE ENDS OF THE THREE SPOKES. That's not necessary and is the weakest point on the trim piece.
7. Once you have pulled out the trim piece and wheel hub assembly (inside guts of the wheel), you can go to work disconnecting all the wire connectors. Each of them pinches like the photo below, and there's no way to not know how things go back when you're finished.
8. Lots of tiny torx screws that hold the trim piece to the hub.
9. If all you want to do is get at the lenses, you do not have to remove the trim piece altogether. Each of the three windows is connected separately. Remove the screws, take it apart, and see if that **** comes off the plastic lens (pic of new lens below).
10. If you are replacing the trim piece like I did, you have to remove all screws and transfe the necessary parts over to your replacement piece.
Last edited by Domer911; Apr 18, 2014 at 07:01 AM.
Registered User
Joined: Nov 2011
Posts: 687
From: Oklahoma City
Rep Power: 63
Thread Starter
|
Registered User
Joined: Feb 2014
Posts: 163
From: Kuwait
Rep Power: 23
Hey Domer911,
Thanks for the info, but could you explain what u mean with this:
9. If all you want to do is get at the lenses, you do not have to remove the trim piece altogether. Each of the three windows is connected separately. Remove the screws, take it apart, and see if that **** comes off the plastic lens (pic of new lens below).
I mean I can get to the part where I take off the steering wheel.
What else?
That does look like a nightmare! Why did Porsche do this! Should have been an easy replacement job!
Thread Starter
|
Registered User
Joined: Feb 2014
Posts: 163
From: Kuwait
Rep Power: 23
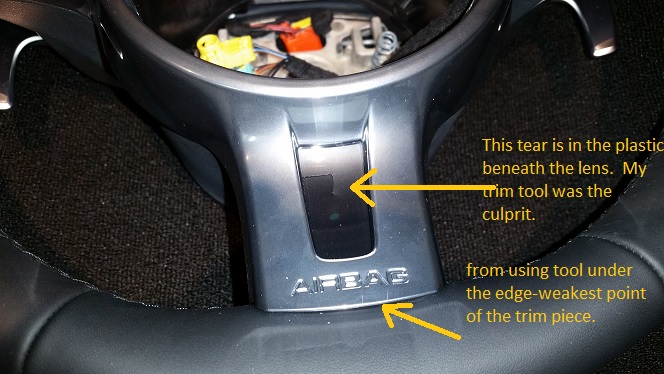
I do need to remove the metal trim, correct?
and what does "DO NOT PRY TRIM TOOLS INTO ANY OF THE ENDS OF THE THREE SPOKES" mean? English wise heheee sorry "pry trim" mainly
and what does "DO NOT PRY TRIM TOOLS INTO ANY OF THE ENDS OF THE THREE SPOKES" mean? English wise heheee sorry "pry trim" mainly
Registered User
Joined: Nov 2011
Posts: 687
From: Oklahoma City
Rep Power: 63
See the pic below and follow the legend for where on the trim you want to pry the wheel apart.

Registered User
Joined: Jul 2010
Posts: 177
From: San Diego
Rep Power: 40
delamination
When I bought my used 2010 997.2 TT the indicator issue was present; as part of the CPO process they ordered me a new wheel. Word is, there is no way to "fix" this without replacing the whole steering wheel (paddles and all); apparently a defect in the clear plastic overlay causing it to delaminate --- buff it all you want with wax, won't fix it; certainly not worth disassembling the wheel after that instruction list
Registered User
Joined: Nov 2011
Posts: 687
From: Oklahoma City
Rep Power: 63
I CAN tell you that you can get access to the lenses, and unless that crap has somehow impregnated the plastic, cleaning it should be pretty simple (once you get it apart).
Registered User
Joined: Nov 2011
Posts: 687
From: Oklahoma City
Rep Power: 63
When I bought my used 2010 997.2 TT the indicator issue was present; as part of the CPO process they ordered me a new wheel. Word is, there is no way to "fix" this without replacing the whole steering wheel (paddles and all); apparently a defect in the clear plastic overlay causing it to delaminate --- buff it all you want with wax, won't fix it; certainly not worth disassembling the wheel after that instruction list
The crap you see does not reside on the outside of the lens, so you are right about not being able to buff it out. I do believe, however, that Coupe will be able to clean it up from the inside. He's our guinea pig.

Registered User
Joined: Dec 2012
Posts: 92
From: UK
Rep Power: 17
I have the same cloudy/mouldy clear window problem too. For those who managed to get a warranty replacement, can I ask how many years into the warranty is this?
Here in the UK the first 2 years of Porsche warranty is Factory Warranty, and after that it's Porsche extended warranty which doesn't cover as much? My dealer has examined this problem and denied replacement as they said the extended warranty does not cover "cosmetic" issues.
Here in the UK the first 2 years of Porsche warranty is Factory Warranty, and after that it's Porsche extended warranty which doesn't cover as much? My dealer has examined this problem and denied replacement as they said the extended warranty does not cover "cosmetic" issues.
Registered User
Joined: Nov 2011
Posts: 687
From: Oklahoma City
Rep Power: 63
I have the same cloudy/mouldy clear window problem too. For those who managed to get a warranty replacement, can I ask how many years into the warranty is this?
Here in the UK the first 2 years of Porsche warranty is Factory Warranty, and after that it's Porsche extended warranty which doesn't cover as much? My dealer has examined this problem and denied replacement as they said the extended warranty does not cover "cosmetic" issues.
Here in the UK the first 2 years of Porsche warranty is Factory Warranty, and after that it's Porsche extended warranty which doesn't cover as much? My dealer has examined this problem and denied replacement as they said the extended warranty does not cover "cosmetic" issues.

Thread
Thread Starter
Forum
Replies
Last Post
NYC997
997
32
Sep 24, 2015 01:58 PM