

Concours Vintage 911, here for the 997 passion

Registered User
Joined: Dec 2009
Posts: 107
From: Charlotte, NC
Rep Power: 21

Absolutely stunning Cattman!!! I have a real soft spot for the '87 as well since that year was my first, and one of my favorite P-Cars!!! Outstanding!!! Thank you for sharing, as always!
I owe you a call by the way. Sorry for the delay on my end pal!
I owe you a call by the way. Sorry for the delay on my end pal!
Registered User
Joined: Feb 2008
Posts: 1,969
From: NYC : Miami
Rep Power: 128

good stuff John, I absolutely love the older 911's I would love to have one of each from this poster at some point in my life. One down, 5 to go,  Your two look great, keep up the great work.
*btw if anyone can find a place that sells this poster, please please PM me. I have been trying to get it forever and cant find it anywhere.
Your two look great, keep up the great work.*btw if anyone can find a place that sells this poster, please please PM me. I have been trying to get it forever and cant find it anywhere.
Last edited by dinorocz; Dec 1, 2010 at 09:27 AM.
Thread Starter
|
Registered User
Joined: Jan 2007
Posts: 1,953
From: ATL
Rep Power: 201
Tonight's progress was meaningful in that finally some parts are going back together. Wearing a serious respirator, feeling like a hazmat worker, I began to use the 3M 74 FoamFast Orange Glue, starting on the rear hump. As you can see, the new carpet is luscious soft-looking, and soo new! You can also see the rear seat hinge that I repainted, satin black.
The glue is fantastic, so easy to use, with 3 spray settings (Lo, Med, Hi) you can completely forget overspray. And the orange color of the adhesive makes it easy to see on the back of black carpet.
The process is simple: wear 2 pairs of rubber gloves (so, like a jokey in a muddy race, you can tear one off if you get glue/mud on it), spray the adhesive onto both surfaces, wait 15-20 seconds, and place it down, smooth it out. If you get a wrinkle, slowly peal it up, and relay it smooth. Smooth it gently, evenly, ensuring no wrinkles or bubbles.
I then did the inside rear 1/4 panels, which are really tough, and the passenger front kick panel, no joy either, but I am getting the hang of it. The glue is very workable, so it's not too scary.
The results are coming along nicely. Finally, a pic of my workshop- the front trunk...
CATTMAN
Last edited by Cattman; Dec 1, 2010 at 09:25 PM.
Registered User
Joined: Nov 2009
Posts: 1,656
From: Eastern Washington.
Rep Power: 105
Wow..I have special admiration and respect for you Cattman. To say that it is a job well done would be a gross understatement. You did not answer my previous question. Any rock chips on your hood after all these years of duty.
Thread Starter
|
Registered User
Joined: Jan 2007
Posts: 1,953
From: ATL
Rep Power: 201
But they've been "corrected". In some spots, seamlessly, in others, like a 5th grader with white-out. But overall, for some reason, original single stage Guard's Red paint hides blemishes extraordinarily well. It shocks me!
I was dinged 1/4 pt at a recent Concours for a chip on the inside of my side-view mirror (imagine!), and so I bought Dr. Colorchip, though I've yet to use it. I'll be sure to post results when I do.
In a PCA Concours, you lose points for a chip that's not been corrected, but lose nothing for a chip that's been corrected, even if poorly. It's about attentiveness, apparently.
The simple answer is: the hood of my '87 is pristine compared to the hood on my '05 997S.
But why?
Only a guess, but: The top of the bumper on the '87 is higher than the top of the bumper on my '05. I suspect it has to do with the ever-changing "pedestrian crossing" laws, which has changed how some cars are made! To think, cars are now designed to save pedestrian's lives who cross in front of them! In '87, a pedestrian would be hit above the knee, and as such, be sucked under the car, and killed. In the '05, the same pedestrian would be hit by the bumper below his knee, and would ride the hood toward the glass, up and over, and perhaps live.
The 4-8 inch height difference seems to be where rock chips do their worst, and so, that's my hypothesis. I'll measure actual bumper heights tomorrow...
CATTMAN
Thread Starter
|
Registered User
Joined: Jan 2007
Posts: 1,953
From: ATL
Rep Power: 201
Made some progress this AM, installing the passenger side rear 1/4 panels, passenger side door carpets, and the rear seat yolk.
It won't look complete until it's 100% done, so now is when I have to buckle down and maintain my methodical pace, and not rush it.
CATTMAN
It won't look complete until it's 100% done, so now is when I have to buckle down and maintain my methodical pace, and not rush it.
CATTMAN
Thread Starter
|
Registered User
Joined: Jan 2007
Posts: 1,953
From: ATL
Rep Power: 201
I have to get it done this weekend, as my local dealership wants to borrow the car for a Christmas Santa Promotion- pretty cool. I guess they'll use it like it's Santa's Sleigh, and take pictures of it with Santa and some kids, etc.
I finished the carpeting in the rear seats tonight.
This really is a fun project! And truly, anyone can do it, although it is time consuming.
The 3M 74 glue is great in that it's spray nozzle is so precise that you can really go for it without fear of overspray.
BTW, I found that if you do get any glue on the face of the carpet, Goo Gone Gel Spray works very well- it leaves no hint of adhesive behind whatsoever.
I will re-install the top shelf and rear seat-backs after I retro fit a shoulder belt on the driver's side to match the one I did a few months ago on the passenger's side.
Notice the rear seat hinge- I repainted it satin black. Once I put the seat backs on again, I will install new red release pins, too.
Thread Starter
|
Registered User
Joined: Jan 2007
Posts: 1,953
From: ATL
Rep Power: 201
It seems that there are so many little things to be done before the big exciting things can be done. But I'm in the home stretch. After spending a couple of hours measuring and cutting the new holes and slit for the 2nd rear shoulder belt, I got back to work on the carpet.
Still to be done before the interior is Concours:
-Source bolts to secure the second rear shoulder belt retractor, receptor, and base
-Reinstall modified interior rear shelf
-Reinstall rear seat backs (with newly painted metal bits), using new OEM red hinge pulls
-Source new bolts to replace the ones I had to extract from the seat rails
-Measure, cut, and lay the center carpet
-Reinstall the heat-control elements
-Reinstall the center console with it's myriad electronic connectors for AC, hazard, etc.
-Reinstall the heater light
-Re-dye front leather seats and shift boot
-Bolt the front seats in
-Reattach the front seat belts
-Refinish or source OEM front seat belt top covers
-Place the front and rear mats in place
-Install new OEM door seals
-Attach new OEM black steel sill plates
-Glue in new OEM black rubber door sill thresholds
-Install new OEM passenger side air vent
-Install new RENNLINE stainless steel pedals, including dead pedal/ footrest
Oh yeah, and the door pocket carpets. Got those to look forward too.
I am thrilled to save the money, but this is worth every bit of a couple grand in labor alone, if not more, especially considering all the other interior restoration I've been doing along the way. Costs are adding up for parts, tools, and supplies.
Enjoy more pics:
1. Stapling the carpet down, under the thin vinyl edge. I first glued the carpet down, and then began to staple the edges. Stapling the edges is important. While my staple gun is OK, I may finish the rest with a pneumatic stapler and longer (16 millimeter) staples. Make sure to lift the small edge of the vinyl trim, and get the staple underneath it so that it's completely hidden.
2. Using chalk to keep track of where the screw holes are in the plastic behind the carpet.
3.View of driver's side interior.
4. Restored interior door panels: Re-dyed pocket lids, new pocket lid hinges, reshaped pockets, replaced faded black plastic handles with new black anodized aluminum handles, and installed new Focal PolyGlass speakers.
CATTMAN
Last edited by Cattman; Dec 6, 2010 at 12:17 AM.

Registered User
Joined: Mar 2005
Posts: 651
From: Carlsbad
Rep Power: 48
It looks great and I am considering doing this on my 85'. I am undecided on whether I will replace the interior or completely gut it. One question for you though, why did you not pull up the tar on the floor boards? Was this because it will not show?
A picture of my 85' Euro
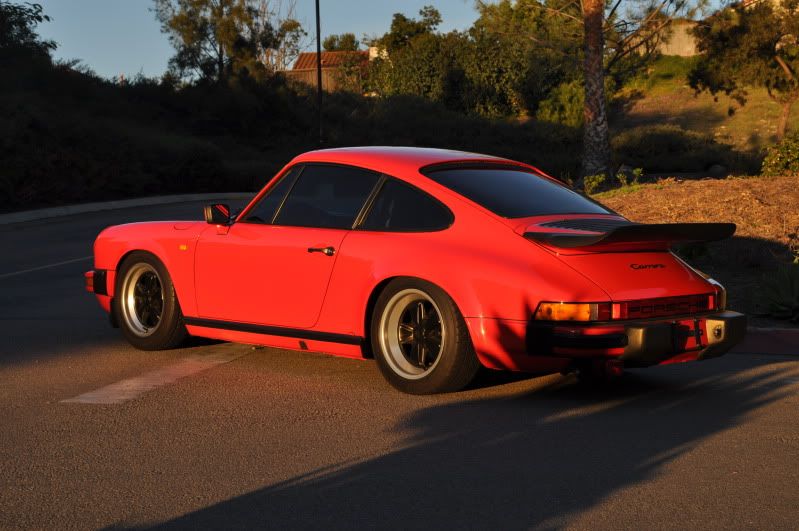
A picture of my 85' Euro

Thread Starter
|
Registered User
Joined: Jan 2007
Posts: 1,953
From: ATL
Rep Power: 201
Hi Salespunk,
Back in 1987 the materials that Porsche used for sound/ heat/ vibration damping were great, but there are modern options today that are lighter in weight.
However, since:
1. I am not concerned with reducing the weight of my car
AND
2. The original materials (asphalt on the floor boards, and the sound/ heat pad over the rear seats and deck) were in pristine condition,
it would have made no sense for me to rip them out.
If you are fine with the current noise and weight of your car, as I am, and the original materials are in good shape, there's no need to rip them out and install Dyna Mat, or any other after-market sound/ heat/ vibe reducing material.
CATTMAN
Thread Starter
|
Registered User
Joined: Jan 2007
Posts: 1,953
From: ATL
Rep Power: 201
Here are a couple more. Progress has slowed due to the cold weather, which makes it tough for me to work on it since our garage is not heated.
I know, I know, I did the Supercharger installation in 20 degree temps in an unheated garage last year. Perhaps I've gone soft!
Pics:
1. Re-installed the rear deck, after having cut it and modified it so that I now have 2 rear shoulder belts, where in the past there were nothing but lap belts. I can now safely but a booster seat back there for my son, or even let a passenger ride back there safely. I used OEM Porsche parts, so it looks completely stock, as it would in an '88 which was the first year that US 911's had 3 point rear belts. Only one of the rear seat backs are in for this photo.
2. Old, rusted rear seat hinge bolts, and scratched/ worn hinge.
3. New, OEM Porsche rear seat hinge bolts, and new OEM Porsche seat bolt caps/ covers. Repainted rear hinge. Really makes a big difference...
CATTMAN
Last edited by Cattman; Dec 7, 2010 at 04:32 PM.