
DIY DB9 Change out door Struts

Thread Starter
|
Registered User
Joined: Dec 2013
Posts: 48
From: Alabama
Rep Power: 16

DIY DB9 Change out door Struts
Tools Needed:
� T30 Torx Socket
� Drill with Socket adapter
� Jack Stands
� Lug Wrench
� Prop for door (Or a hot helper!)
� Small Flathead screwdriver
� Needle nose pliers
� New Strut AM 4G43-23504-AB or similar: https://www.astonmartinbits.com/mode...gato/parts/996
1. Jack up Front of car and place on stands
2. Remove front tires
3. Remove wheel well liners using Torx socket

4. Prop open door so you can reach head of strut.
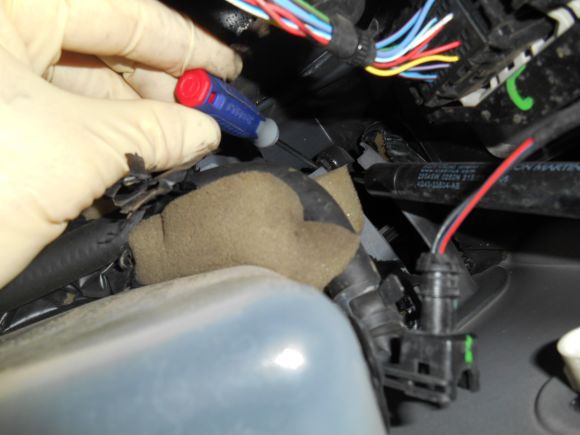
5. Unplug side marker light. Pull clip from bottom.
6. Move foam insulation out of the way.
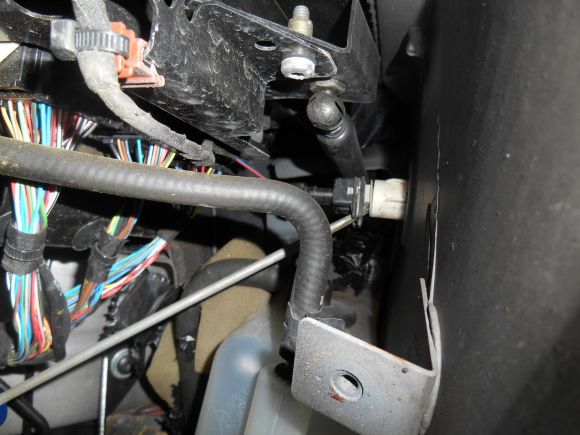
7. Use a small flathead screwdriver to pry off clips. Needle nose pliers can also help. (This pic is a little sideways for clarity)
8. Place new strut on. You can pre-install the clips. Use a long screwdriver or needle nose to help seat
9. Re-Install in reverse order
� T30 Torx Socket
� Drill with Socket adapter
� Jack Stands
� Lug Wrench
� Prop for door (Or a hot helper!)
� Small Flathead screwdriver
� Needle nose pliers
� New Strut AM 4G43-23504-AB or similar: https://www.astonmartinbits.com/mode...gato/parts/996
1. Jack up Front of car and place on stands
2. Remove front tires
3. Remove wheel well liners using Torx socket
4. Prop open door so you can reach head of strut.
5. Unplug side marker light. Pull clip from bottom.
6. Move foam insulation out of the way.
7. Use a small flathead screwdriver to pry off clips. Needle nose pliers can also help. (This pic is a little sideways for clarity)
8. Place new strut on. You can pre-install the clips. Use a long screwdriver or needle nose to help seat
9. Re-Install in reverse order
Registered User

Joined: Jun 2010
Posts: 800
From: Lake Geneva, WI
Rep Power: 52
Wanted to thank you again for this post! I had a little free time this afternoon so I decided to FINALLY tackle this. I wish I would have done it 2 years ago as I have been (not so) silently suffering with this problem for a long time. I couldn't be happier!
It's guys like yourself who take the time to do these write ups that really make this forum an amazing tool for enthusiasts. If you are ever in the S.E Wisconsin area I'd invite you to stop by one of my establishments for drinks on the house!
Thanks again sir!
Eric
It's guys like yourself who take the time to do these write ups that really make this forum an amazing tool for enthusiasts. If you are ever in the S.E Wisconsin area I'd invite you to stop by one of my establishments for drinks on the house!
Thanks again sir!
Eric

Registered User
Joined: Aug 2007
Posts: 2,699
From: MD
Rep Power: 173

Nice thread. Not enough DIY's on this forum. I'll be getting a Vantage next year and like to do as much of my own maintenance as possible. Not being a natural mechanic, I always rely heavily on trail blazers before me. For whatever reason there isn't much of that with this brand. Part of it might be the low production numbers. It's really appreciated when someone takes the time to document their work. Nice thread.
Registered User
Joined: Apr 2014
Posts: 563
From: Columbus, Georgia
Rep Power: 38
Lots of DIY in the FAQ thread. But yeah not as much as some of the higher production vehicles, plus some projects are difficult because of the electronics and lack of the AM diag software for most people.
Please post any diy you do and will certainly ad to the FAQ thread!
Chris
Please post any diy you do and will certainly ad to the FAQ thread!
Chris
Nice thread. Not enough DIY's on this forum. I'll be getting a Vantage next year and like to do as much of my own maintenance as possible. Not being a natural mechanic, I always rely heavily on trail blazers before me. For whatever reason there isn't much of that with this brand. Part of it might be the low production numbers. It's really appreciated when someone takes the time to document their work. Nice thread.
Trending Topics

Registered User
Joined: Jun 2014
Posts: 84
From: Orange County, CA
Rep Power: 19
Thanks for this writeup!
I replaced door struts and hood & trunk struts too. Overall simple job, especially with this guide.
Notes to others:
- On my 2007 Vantage, you have to remove about 3-4 of the philips screws holding in the black plastic front lip piece also. One of those screws that goes into the wheel liner is under it so you have to loosen it enough to get access. I didn't fully remove, just gave the ends enough play to get access to that screw.
- Start with the hood/trunk struts. For some reason I started with the doors. The doors are MUCH easier once you've figured out your strut removal techniques with the hood/trunk struts where you can actually see what you are doing.
- As notes, a hot helper is needed! I tried doing this myself on the doors by propping them at first but what you really need is someone that can move the door slightly open/closed to get the inner connection ball at just the right position to make it easy.
- Removing the fender liners at first seems a bit difficult, but it's easy once you've done it once. Just be patient and wiggle things a lot. Don't be afraid to bend the liner a bit, better than putting pressure on the bumper cover, etc... There are a ton of screws, just make sure you've got them all.
- DON'T FORGET to reconnect the side markers. oops.
oops.
My times were 2 hours for the passenger door (going slow and learning), about 15 min for all 4 hood and trunk struts, and about 35 min for the driver door and about 20 min to jack it all back up again and partially loosen the driver side liner so I could reconnect the forgotten side marker.
Overall, not a difficult task, just a bit time consuming.
The difference is amazing! The doors, hood, and trunk all now pop open and stay put.
I replaced door struts and hood & trunk struts too. Overall simple job, especially with this guide.
Notes to others:
- On my 2007 Vantage, you have to remove about 3-4 of the philips screws holding in the black plastic front lip piece also. One of those screws that goes into the wheel liner is under it so you have to loosen it enough to get access. I didn't fully remove, just gave the ends enough play to get access to that screw.
- Start with the hood/trunk struts. For some reason I started with the doors. The doors are MUCH easier once you've figured out your strut removal techniques with the hood/trunk struts where you can actually see what you are doing.
- As notes, a hot helper is needed! I tried doing this myself on the doors by propping them at first but what you really need is someone that can move the door slightly open/closed to get the inner connection ball at just the right position to make it easy.
- Removing the fender liners at first seems a bit difficult, but it's easy once you've done it once. Just be patient and wiggle things a lot. Don't be afraid to bend the liner a bit, better than putting pressure on the bumper cover, etc... There are a ton of screws, just make sure you've got them all.
- DON'T FORGET to reconnect the side markers.
oops.My times were 2 hours for the passenger door (going slow and learning), about 15 min for all 4 hood and trunk struts, and about 35 min for the driver door and about 20 min to jack it all back up again and partially loosen the driver side liner so I could reconnect the forgotten side marker.
Overall, not a difficult task, just a bit time consuming.
The difference is amazing! The doors, hood, and trunk all now pop open and stay put.
Registered User

Joined: Mar 2013
Posts: 625
Rep Power: 40
Yes near culver city. Where are you located? Thanks so much for offering!!
Registered User
Joined: Feb 2015
Posts: 405
From: Corcoran, California
Rep Power: 31
Love the DIY write ups. Question though. So when doing this I could easily swap out my side markers. Anything else that is made accessible when doing this that I could take care of? Looks like brakes, maybe filters? and ...
Don't take the car apart that often so if I can line things up ahead of time and catch them when the opportunity is there.
Don't take the car apart that often so if I can line things up ahead of time and catch them when the opportunity is there.
Registered User
Joined: Dec 2013
Posts: 76
From: San Francisco
Rep Power: 16
Tools Needed:
� T30 Torx Socket
� Drill with Socket adapter
� Jack Stands
� Lug Wrench
� Prop for door (Or a hot helper!)
� Small Flathead screwdriver
� Needle nose pliers
� New Strut AM 4G43-23504-AB or similar: https://www.astonmartinbits.com/mode...gato/parts/996
1. Jack up Front of car and place on stands
2. Remove front tires
3. Remove wheel well liners using Torx socket
4. Prop open door so you can reach head of strut.
5. Unplug side marker light. Pull clip from bottom.
6. Move foam insulation out of the way.
7. Use a small flathead screwdriver to pry off clips. Needle nose pliers can also help. (This pic is a little sideways for clarity)
8. Place new strut on. You can pre-install the clips. Use a long screwdriver or needle nose to help seat
9. Re-Install in reverse order