
How To: DIY Transaxle Fluid Change


Thread Starter
|
Registered User

Joined: Apr 2009
Posts: 4,366
From: NoVa
Rep Power: 295


How To: DIY Transaxle Fluid Change
All credit for this DIY process goes to Irish. I followed his steps. Hopefully a How To DIY guide will give a better understanding of the job! This is relatively easy and took me about an hour and a half.
As always, follow all safety protocols. Don't undertake this task if you aren't comfortable with it. I am not a certified mechanic, I'm just a hobbyist. Please read all steps below before beginning. You are ultimately responsible for anything you do and I am not liable for anything that may occur.
The DIY detailed below is the process I used for changing the gear oil in the manual transmission of my 2007 V8 Vantage. The process may vary for other years and models. Quantities are in US amounts (ie, US quarts).
Tools Needed
T27 Torx Bit
14mm Hex Bit
22mm Socket*
8" extension for 22mm socket*
8mm Socket
Ratchets for above bits, sockets, and extension
Gear oil
Fluid pump for gear oil
Drain pan (6+ qts capacity)
Jack, jack stands
Paper towels
*Instead of the 22mm socket, extension, and ratchet, it may be easier to use a long 22mm box wrench. I didn't try this so I'm not sure which method would be better.
Before you begin
1) Make sure you have ratchets that work for each of the bits, sockets, and extensions in the Tools Needed list.
2) Make sure your fluid pump fits the bottle(s) containing your gear oil.
3) Very briefly drive the car to get the gear oil warmed up. Don't drive for too long because the exhaust (and everything else under the car) is also getting hot. You only want the gear oil warm enough to flow smoothly to help it drain. It doesn't take much.
4) Have paper towels ready. Everywhere. This isn't a messy job but gear oil travels from surface to surface very easily so it's good practice to keep things clean at all times.
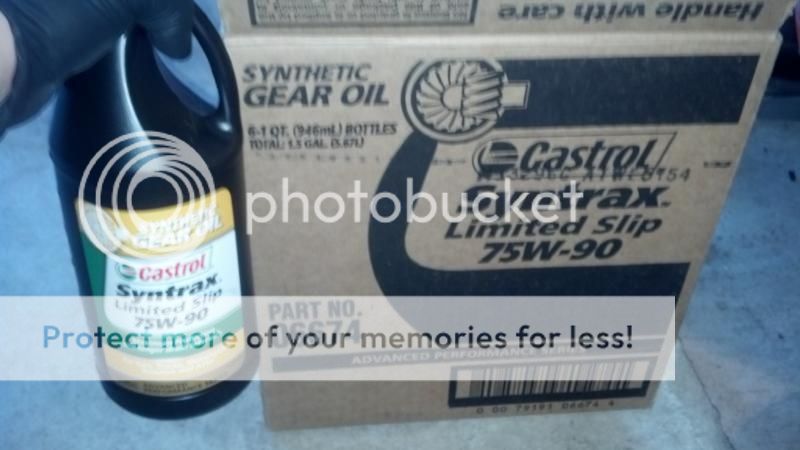
This is the gear oil I used, which I got off Amazon for $56.xx shipped. It's the stuff recommended by the factory (see Post 2 below).
Step 1
Lift the car and put jack stands underneath it. Ensure the car is properly supported before continuing.
Step 2
Use the T27 torx bits to remove the rear undertray - it's the big plastic piece that covers the muffler. Once removed, very carefully check to see if the exhaust pipes are cool enough to touch. It's likely you'll come into contact with the pipes and you don't want to accidentally burn yourself.
NOTE: You can do Step 3 and Step 4 interchangeably. Doing Step 4 before 3 helps the gear oil drain smoothly. If the gear oil is a little warm, this isn't an issue. I did Step 3 before Step 4 because the plug in Step 4 is very close to the exhaust pipe and I didn't want to risk gear oil getting on the exhaust. Here are the two plugs for Steps 3 and 4:
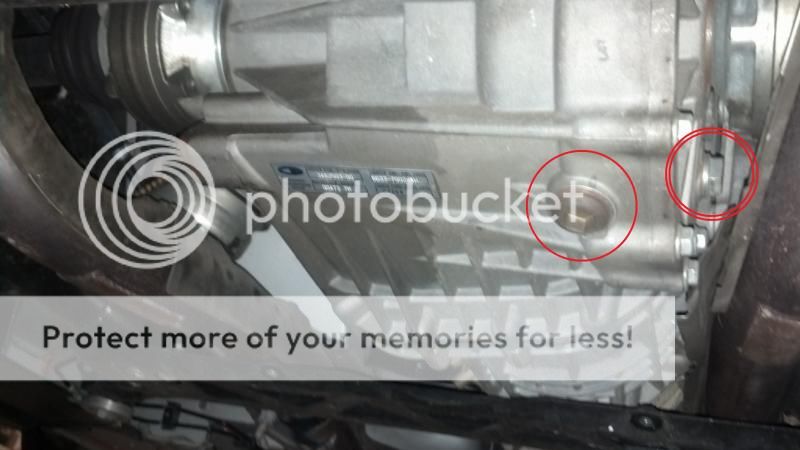
The single red circle on the bottom of the transaxle is the 14mm hex bit drain plug. The double red circle on the side of the transaxle is the 22mm socket fill plug.
Step 3
Place the drain pan below the transaxle and then use the 14mm hex bit and ratchet to remove the drain plug (single red circle in the pic above). Old gear oil will flow out as soon as the plug comes loose. You can reinstall the drain plug when the gear oil draining slows to a sparse drip.
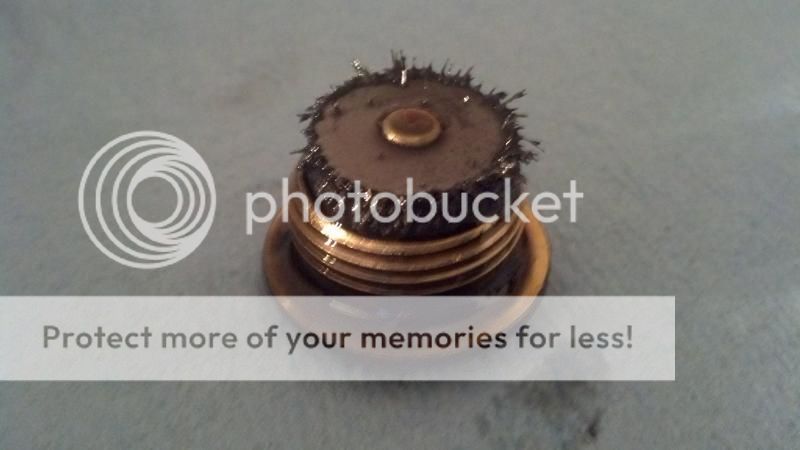
The drain plug has a magnet that collects metallic debris from the transaxle. It is very difficult to clean because, well, it's a magnet and the stuff you're trying to clean off wants to stay stuck. It looks scary, like this:
Step 4
Use the 22mm socket, extension, and ratchet (or 22mm box wrench) to remove the fill plug (double red circle in the pic above). This was the most difficult thing to get loose during the whole job. It's securely tightened but once it 'pops' it comes out very easily. There are two copper washers on the fill plug. Be careful not to drop them in your drain pan!! I did this Do not reinstall the fill plug, you still need to fill the transaxle with new fluid.
Step 5
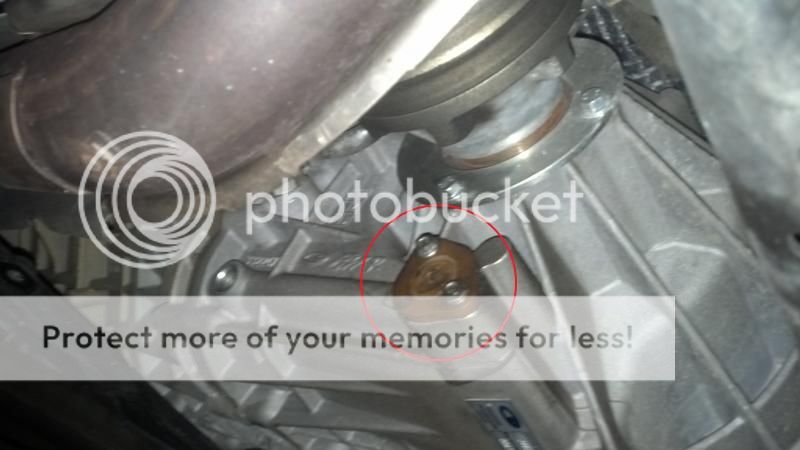
Use the 8mm socket to remove the bolts on the transmission filter. These bolts are not on tight and don't take much effort to loosen. Remember this when reinstalling the filter. Gear oil will come out. The filter is right here:
And this is what the filter looks like (as well as the fill plug and its copper washers)
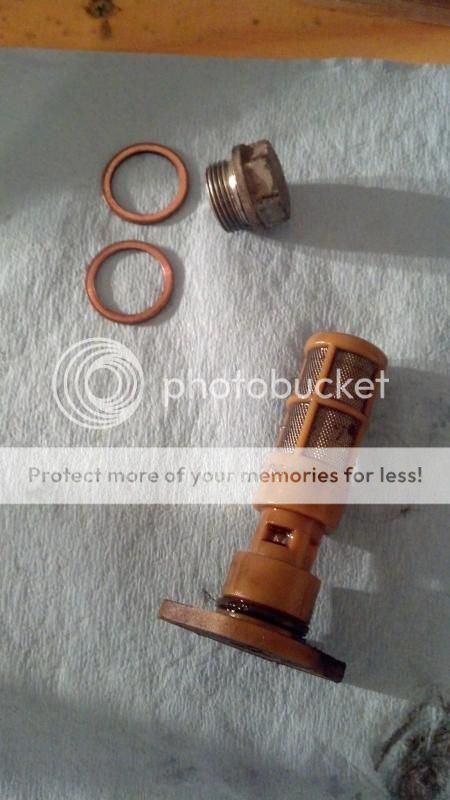
Do not pry the filter out!! It is made of plastic and can easily break! I used a very small flat-head screwdriver to very gently break the seal of the o-ring keeping the filter in place. Once the o-ring pops, the filter comes out easily. Use brake cleaner to clean the filter. I also used an old toothbrush to gently clean away some grit that had collected on the filter mesh. Let the filter fully dry - blow on it if it makes you feel better... I did - then put the filter back into the transmission and fasten the 8mm bolts back in place.
Step 6
Ensure the filter and drain plug are both in place and properly tightened. If so, you can start filling the transaxle with new gear oil. Use the proper quantity as stated in your owners manual (5.3 Qts, if I remember correctly). If gear oil starts coming out of the fill plug, it's a good time to stop pumping Once done filling, reinstall the fill plug and tighten.
Step 7
Double check to make sure everything is back in place and ready to go, then reinstall the undertray, then you can lower the car back to the ground.
Before you go taking off driving, turn the car on and listen for anything that sounds odd. When you start driving, listen for odd noises, odd feelings, or anything else that stands out. You just want to make sure you're good to go before getting on the gas!
As always, follow all safety protocols. Don't undertake this task if you aren't comfortable with it. I am not a certified mechanic, I'm just a hobbyist. Please read all steps below before beginning. You are ultimately responsible for anything you do and I am not liable for anything that may occur.
The DIY detailed below is the process I used for changing the gear oil in the manual transmission of my 2007 V8 Vantage. The process may vary for other years and models. Quantities are in US amounts (ie, US quarts).
Tools Needed
T27 Torx Bit
14mm Hex Bit
22mm Socket*
8" extension for 22mm socket*
8mm Socket
Ratchets for above bits, sockets, and extension
Gear oil
Fluid pump for gear oil
Drain pan (6+ qts capacity)
Jack, jack stands
Paper towels
*Instead of the 22mm socket, extension, and ratchet, it may be easier to use a long 22mm box wrench. I didn't try this so I'm not sure which method would be better.
Before you begin
1) Make sure you have ratchets that work for each of the bits, sockets, and extensions in the Tools Needed list.
2) Make sure your fluid pump fits the bottle(s) containing your gear oil.
3) Very briefly drive the car to get the gear oil warmed up. Don't drive for too long because the exhaust (and everything else under the car) is also getting hot. You only want the gear oil warm enough to flow smoothly to help it drain. It doesn't take much.
4) Have paper towels ready. Everywhere. This isn't a messy job but gear oil travels from surface to surface very easily so it's good practice to keep things clean at all times.
This is the gear oil I used, which I got off Amazon for $56.xx shipped. It's the stuff recommended by the factory (see Post 2 below).
Step 1
Lift the car and put jack stands underneath it. Ensure the car is properly supported before continuing.
Step 2
Use the T27 torx bits to remove the rear undertray - it's the big plastic piece that covers the muffler. Once removed, very carefully check to see if the exhaust pipes are cool enough to touch. It's likely you'll come into contact with the pipes and you don't want to accidentally burn yourself.
NOTE: You can do Step 3 and Step 4 interchangeably. Doing Step 4 before 3 helps the gear oil drain smoothly. If the gear oil is a little warm, this isn't an issue. I did Step 3 before Step 4 because the plug in Step 4 is very close to the exhaust pipe and I didn't want to risk gear oil getting on the exhaust. Here are the two plugs for Steps 3 and 4:
The single red circle on the bottom of the transaxle is the 14mm hex bit drain plug. The double red circle on the side of the transaxle is the 22mm socket fill plug.
Step 3
Place the drain pan below the transaxle and then use the 14mm hex bit and ratchet to remove the drain plug (single red circle in the pic above). Old gear oil will flow out as soon as the plug comes loose. You can reinstall the drain plug when the gear oil draining slows to a sparse drip.
The drain plug has a magnet that collects metallic debris from the transaxle. It is very difficult to clean because, well, it's a magnet and the stuff you're trying to clean off wants to stay stuck. It looks scary, like this:
Step 4
Use the 22mm socket, extension, and ratchet (or 22mm box wrench) to remove the fill plug (double red circle in the pic above). This was the most difficult thing to get loose during the whole job. It's securely tightened but once it 'pops' it comes out very easily. There are two copper washers on the fill plug. Be careful not to drop them in your drain pan!! I did this
Do not reinstall the fill plug, you still need to fill the transaxle with new fluid.Step 5
Use the 8mm socket to remove the bolts on the transmission filter. These bolts are not on tight and don't take much effort to loosen. Remember this when reinstalling the filter. Gear oil will come out. The filter is right here:
And this is what the filter looks like (as well as the fill plug and its copper washers)
Do not pry the filter out!! It is made of plastic and can easily break! I used a very small flat-head screwdriver to very gently break the seal of the o-ring keeping the filter in place. Once the o-ring pops, the filter comes out easily. Use brake cleaner to clean the filter. I also used an old toothbrush to gently clean away some grit that had collected on the filter mesh. Let the filter fully dry - blow on it if it makes you feel better... I did - then put the filter back into the transmission and fasten the 8mm bolts back in place.
Step 6
Ensure the filter and drain plug are both in place and properly tightened. If so, you can start filling the transaxle with new gear oil. Use the proper quantity as stated in your owners manual (5.3 Qts, if I remember correctly). If gear oil starts coming out of the fill plug, it's a good time to stop pumping
Once done filling, reinstall the fill plug and tighten.Step 7
Double check to make sure everything is back in place and ready to go, then reinstall the undertray, then you can lower the car back to the ground.
Before you go taking off driving, turn the car on and listen for anything that sounds odd. When you start driving, listen for odd noises, odd feelings, or anything else that stands out. You just want to make sure you're good to go before getting on the gas!
Last edited by telum01; Jul 22, 2014 at 08:11 PM.
Thread Starter
|
Registered User
Joined: Apr 2009
Posts: 4,366
From: NoVa
Rep Power: 295
According to my internets, it has been 3.5 years since my last gear oil change:
(posted 1/27/11)
To be clear, I haven't had any issues with my manual transmission. I do have the updated shift linkage. I also have an upgraded clutch (not that it'd matter for the fluid, but it's a transmission thingy). It shifts very nicely on both street and track, slowly and under heavy load. It can be a touch notchy in the morning but it isn't bad.
According to one of our awesome gurus:
So my car has Royal Purple Max Gear, and OEM suggests Castrol SynTrax (I'll refer to it by this name because that's its name in the US market, which is where I am). What's the difference? From what little I've looked around, RP goes for $13-18 per quart. I bought a case of 6 quarts of Castrol for less than $60 off Amazon. I was curious as to whether or not the extra money for RP would be worth it, so I googled. This is what I found:
http://www.lastgreatroadtrip.com/wp-...comparison.pdf
Take the final results with a grain of salt - the testing was on behalf of AMSOIL (spoiler alert: their oil won by a landslide). However, they adhered to testing standards and even included a pair of affidavits at the end of the report attesting to that. So maybe they wanted the tests done to prove their product. If it was a completely fair, non-biased series of tests, then kudos to them. A second grain of salt: the tests were performed in 2007 and formulas may have changed since then.
What I found interesting in the test is that the RP faired very poorly throughout the tests. Castrol SynTrax tested far better than Royal Purple. All in all, I'd already purchased the Castrol and still intended to use it. But at least I can draw some measure of comfort even if it is from possibly outdated sources. As for the RP, from what people reported there was either an improvement or no change in the way the transmission shifted. I'd be willing to venture an assumption that the improvements were mostly due to fresh fluid replacing the old and not because of the fluid formula. But that's just my thoughts based on what people reported.
(posted 1/27/11)
According to one of our awesome gurus:
The AM GT4 team suggests Castrol BOT 270A or Shell SAE 75W-90. In my area, Shell 75W-90 is hard to find in bulk for a dealer. being we have a Contract with Castrol, are reps advised us the best similar fluid to Castrol 270A and Shell 75W-90 is Castrol SynTec/SynGear 75W90 in Canada, in the USA this SynTec /SynGear is known as Castrol SynTrax 75W90.
http://www.lastgreatroadtrip.com/wp-...comparison.pdf
Take the final results with a grain of salt - the testing was on behalf of AMSOIL (spoiler alert: their oil won by a landslide). However, they adhered to testing standards and even included a pair of affidavits at the end of the report attesting to that. So maybe they wanted the tests done to prove their product. If it was a completely fair, non-biased series of tests, then kudos to them. A second grain of salt: the tests were performed in 2007 and formulas may have changed since then.
What I found interesting in the test is that the RP faired very poorly throughout the tests. Castrol SynTrax tested far better than Royal Purple. All in all, I'd already purchased the Castrol and still intended to use it. But at least I can draw some measure of comfort even if it is from possibly outdated sources. As for the RP, from what people reported there was either an improvement or no change in the way the transmission shifted. I'd be willing to venture an assumption that the improvements were mostly due to fresh fluid replacing the old and not because of the fluid formula. But that's just my thoughts based on what people reported.
Last edited by telum01; Jul 22, 2014 at 04:10 PM.
Registered User

Joined: May 2010
Posts: 794
From: SF East Bay
Rep Power: 67
Low cost pressure feeder for transaxle lube
In the midst of changing the lube on my 07 Vantage transaxle this weekend, I was faced with the problem of how to get the new oil into the transaxle. I resurrected my old suction gun and began cleaning it up to use to pump the new fluid; I was dreading using it as I most likely would have oil up to my elbows by the time I was done. Some time ago, I stumbled across a YouTube video of how to make a homemade brake pressure bleeder, and thought why not try and use a variation of that idea which would be suitable for use with the heavier weight transaxle lube.
A quick search on-line and a visit to the nearby “big box” home improvement store confirmed the availability of a garden sprayer that I thought would work. See the second photo. It was imperative that the sprayer had a pressure relief valve, as I wasn’t planning on using a shut-off valve. I thought the Viton seals included in the “bleach” sprayer would be more suitable for my intended use. The small pink feed tube, approximately 1/8” ID obviously won’t work well with the heavier weight oil. Recycle that and everything else except the black compression fitting.
Once I knew what the tank fittings were like, I made a second trip to my local “boutique” hardware store which resulted in the purchase of 6 feet of 3/8” OD by 1/4” ID clear plastic tubing ($0.24/ft.) and an “O” ring with an ID of 3/8” and a thickness diameter of 3/32” ($0.40): these sizes fit the tank opening and the supplied compression fitting well. See the third and fourth photos.
On my lift, the Vantage wheels are about 28” off of the garage floor, and the bottom of the frame members has about 38” of clearance. See the fifth photo for the pressure feeder in place.
My 6’ hose choice for my particular installation was a little long. I routed it over the cold exhaust and the routing can be seen in the first photo (This photo ended up as the first -it should be the fifth-I don't know how that happened???-and I can't seem to change it).
I didn’t want to contaminate the air pump, so I only put a quart and a half of oil in the container. A couple of dozen strokes on the air pump resulted in the oil flowing nicely-it took about 5 minutes (on a 70� F day) to transfer the fluid. I repeated the sequence twice more-on the final filling, it was easy to stop the flow by using the pressure relief valve, when the oil just began flowing out of the filler hole.
Thanks to Richard for the original posting and his detailed information. A 9” extension on a 22 mm socket worked well for me on the fill plug. You’ll also need two copper sealing washers: AM Part No. 4G43-27-10245 ($3.48 each from my local dealer).
The entire pump assembly with the modifications ran me under $20 plus tax. It certainly made easy work of a potentially messy job.
Last edited by DonL; Apr 12, 2015 at 05:40 PM. Reason: Photo problems
Registered User
Joined: Apr 2013
Posts: 215
From: Ohio
Rep Power: 27
Don, excellent addition to the original post. Unfortunately this is 2 weeks late for me, and the mess I made
Also, Telum, small suggestion to change the title to "transaxle" fluid change. I did find this, and it was helpful when I changed my fluid. But maybe it'll come up better if someone searches for transaxle fluid change
Also, Telum, small suggestion to change the title to "transaxle" fluid change. I did find this, and it was helpful when I changed my fluid. But maybe it'll come up better if someone searches for transaxle fluid change
Thread Starter
|
Registered User
Joined: Apr 2009
Posts: 4,366
From: NoVa
Rep Power: 295
Sorry I never saw this! Just changed it.
Trending Topics

Registered User
Joined: May 2015
Posts: 80
Rep Power: 15
Aston uses GL-4 oils in V8V their transaxles (BOT 270A being one of them). GL-5 oils are formulated for hypoid differentials and since V8V transaxles aren't hypoid they don't require it. The main reason NOT to use GL-5 is that it increases syncromesh ring wear by 2 to 4 times compared to GL-4. Unfortunately Castrol SynTrax is a GL-5. There are several brands of high quality 75W90 oils out there which are GL-4, Redline and Amsoil being among them. Personally I'd like to keep synchromesh ring wear to a minimum so Amsoil would be my choice.
Registered User
Joined: Nov 2014
Posts: 503
From: Ottawa Canada
Rep Power: 33
BOT270A is only Available from AM . Also if you read the sticky about gear oils explained Irish( who is an AM tech ) says that the Castrol syntrax 75/90 is a useable oil for the transaxle and is readily available .
Registered User
Joined: Nov 2014
Posts: 503
From: Ottawa Canada
Rep Power: 33
Guess what I did today ...
Changing the transaxle fluid is really easy . I do have a hoist and being a HVAC tech means I do have an oil pump so it was even easier for me to pump the new oil into the transaxle .
My car has only 22,000 mile on it but I like to have a baseline of when stuff was done as I didn't have a full service history on the car . The pics show the fluid was very clean you can also see the gunk on the magnetic plug and the plastic screen filter .
Registered User
Joined: Apr 2013
Posts: 215
From: Ohio
Rep Power: 27
Nice job on the DIY
Would be interested to hear your thoughts on the 75w90 fluid next year. There is a thread on the transaxle oil somewhere. I have not been thrilled with the thicker oil (redline 75w90) regarding stiffness on 1-2 shifts, when temps are cooler out.
Would be interested to hear your thoughts on the 75w90 fluid next year. There is a thread on the transaxle oil somewhere. I have not been thrilled with the thicker oil (redline 75w90) regarding stiffness on 1-2 shifts, when temps are cooler out.
Registered User
Joined: Nov 2014
Posts: 503
From: Ottawa Canada
Rep Power: 33
I'm 99% certain this is the first transaxle oil change on my car based on the tell tale mark on the drain plug . It was in the exact position . So whatever was in the transaxle when it was new it what it was .
I was suprised how thin the oil was , I expected it to be thicker , the 85/140 I put in my Healeys rear axle is like molasses .(I realize the difference is its a differential not a transaxle)
I did a lot of reading and research before buying my car so I knew about the clutch issues and the stiff cold gear changes .
I'm firm but careful with my gear changes between 1st to 2nd and 2nd to 3rd when the car is cold . I also don't do clutch dumping starts and when reversing out of my garage I merely use reverse to get the car moving then coast down my slightly downhill driveway onto the road .
Once the car is warm I don't find any issues with shifting , it is a little clunky which I think is due to all the linkages involved between the stick and the gearbox but I've never missed a shift or crunched a gear and I'm sure if I was abusing the gearbox the magnetic plug would have told me so .
I took the car out for a drive after the oil changes and didn't notice any difference . I still had to be firm but careful with the gears when the car was cold .once everything warmed up I didn't notice any difference .
Personally I think it's just the nature of the beast and some drivers are not patient enough when the cars are cold .
Just like us when it's cold we don't like to get moving in the morning , we need a little coaxing with coffee/tea and some warm clothes before we get our second wind .