Greetings from Niagara, Ontario, Canada

#226
 06-22-2017, 06:22 AM

Join Date: Apr 2017
Location: Niagara Region
Age: 52
Posts: 400
Rep Power: 28 
Thanks, it does look like they provide good protection.
How do they attach (adhesive or hardware)?
How do they attach (adhesive or hardware)?
#227
06-22-2017, 06:28 AM
Registered User
Join Date: Oct 2015
Location: Ottawa, Ontario, Canada
Age: 59
Posts: 1,471
Rep Power: 90 
Ryan, it is hardward and I believe it is included in the kit. Mine were already on the car when I purchased it. One bolt is under the car and the other 2 (1 little plastic fur and the other a philips screw) through the inner fender.
#228
06-22-2017, 01:26 PM
Join Date: Apr 2017
Location: Niagara Region
Age: 52
Posts: 400
Rep Power: 28
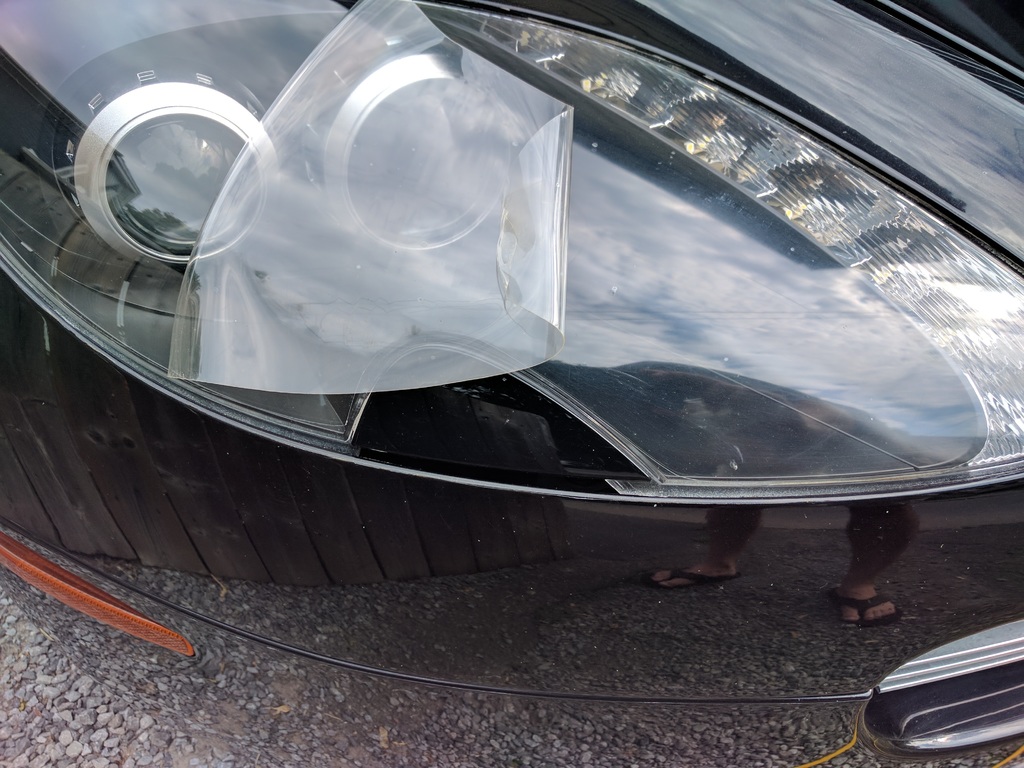
Now that the new paint has had time to cure, I went to have the clear film stone guard replaced on those panels. They use Sun Tek brand 6 mil film as their experience with it is better than some other products they've tried (forgiving to work with, good adhesion and almost invisible). I few pictures of customer Aston Martin's on the wall was also reassuring. Since the fender was being done, I opted to have the headlights redone as well since they were cosmetically tired with marks on one and air bubbles on the other. The job was done in 2 hours and the steps were:
1) make a template from opposite side of car
2) clean area thoroughly
3) wet with water/soap solution
4) apply and work out wrinkles
5) trim with razor blade
6) dry with heat gun to remove water and activate adhesive
The owner and staff were top notch to deal with, were very accommodating and have lots of experience on high end cars. Pricing was reasonable (aka a non-issue in the AM world) as I didn't even ask for a quote in advance. I'll be a repeat customer in the future when I decide what direction to go with the hood. My joke was they did such a good job the hood now looks like crap! The last person to replace film there didn't put it over a perfect finish
 ") Pictures below should be self-explanatory, but let me know if you have any questions...
Pictures below should be self-explanatory, but let me know if you have any questions...


1) make a template from opposite side of car
2) clean area thoroughly
3) wet with water/soap solution
4) apply and work out wrinkles
5) trim with razor blade
6) dry with heat gun to remove water and activate adhesive
The owner and staff were top notch to deal with, were very accommodating and have lots of experience on high end cars. Pricing was reasonable (aka a non-issue in the AM world) as I didn't even ask for a quote in advance. I'll be a repeat customer in the future when I decide what direction to go with the hood. My joke was they did such a good job the hood now looks like crap!
The last person to replace film there didn't put it over a perfect finish Pictures below should be self-explanatory, but let me know if you have any questions...
Last edited by 007V8Vantage; 04-13-2018 at 04:35 PM.
#229
06-24-2017, 08:02 PM
Join Date: Apr 2017
Location: Niagara Region
Age: 52
Posts: 400
Rep Power: 28
The missing gromets on my drivers side floor mat were replaced with some I had in the basement on stock Subaru mats - they fit and look just fine as a free cosmetic upgrade:

Also I needed new wipers as they didn't perform well anymore. A quick forum search and the Bosch option was fine by me as something I could pick up at the local parts store. Easy to replace when you use buttons 8 and 9 on the radio to relocate the wiper arms to an accessible position.


Even got the Vantage out to the newly opened Gretzky Winery and Distillery in Niagara-on-the-Lake this weekend

Also I needed new wipers as they didn't perform well anymore. A quick forum search and the Bosch option was fine by me as something I could pick up at the local parts store. Easy to replace when you use buttons 8 and 9 on the radio to relocate the wiper arms to an accessible position.
Even got the Vantage out to the newly opened Gretzky Winery and Distillery in Niagara-on-the-Lake this weekend
Last edited by 007V8Vantage; 04-13-2018 at 04:37 PM.
#230
07-07-2017, 03:10 PM
Join Date: Apr 2017
Location: Niagara Region
Age: 52
Posts: 400
Rep Power: 28
After 4000 miles all I needed to do maintenance wise was add a 1/2 litre of oil, so I decided to spend some time giving the paint some TLC...
I chose to do three steps:
1) compound using machine to address scratches, discolouration and paint defects
2) polish using machine to remove swirl marks and give a deep shine
3) wax by hand to protect the finish.
Smart phone pics don't due the before and after justice but now that it's done, I feel it's worth it and a lot of people are noticing the shine and sparkle of the metallic onyx black paint. Black is certainly a rewarding colour to work with.
Here's the materials I used:

Next I washed the car by hand and made sure it was cool and in the shade.

Here's an example of the scratches I am removing, likely caused by improper removal of bird droppings, bugs or tree sap etc:

A common mistake is people use too much product or apply too much pressure when using a buffing machine - don't!

Make long overlapping passes, not circles and let product dry:

When you remove the product use brand new microfiber rags or towels and keep switching to clean ones - make sure your final pass on a panel is with a completely clean one to buff properly and avoid scratching your work:

I chose to do three steps:
1) compound using machine to address scratches, discolouration and paint defects
2) polish using machine to remove swirl marks and give a deep shine
3) wax by hand to protect the finish.
Smart phone pics don't due the before and after justice but now that it's done, I feel it's worth it and a lot of people are noticing the shine and sparkle of the metallic onyx black paint. Black is certainly a rewarding colour to work with.
Here's the materials I used:
Next I washed the car by hand and made sure it was cool and in the shade.
Here's an example of the scratches I am removing, likely caused by improper removal of bird droppings, bugs or tree sap etc:
A common mistake is people use too much product or apply too much pressure when using a buffing machine - don't!
Make long overlapping passes, not circles and let product dry:
When you remove the product use brand new microfiber rags or towels and keep switching to clean ones - make sure your final pass on a panel is with a completely clean one to buff properly and avoid scratching your work:
Last edited by 007V8Vantage; 04-13-2018 at 04:39 PM.
#231
07-07-2017, 03:34 PM
Join Date: Apr 2017
Location: Niagara Region
Age: 52
Posts: 400
Rep Power: 28
For the wax, use an applicator pad on one panel at a time and make a second pass while product is still wet so you don't miss any spots. Key here is take your time, put on some music and have a cold drink nearby 

Keep going one panel at a time until they are all done giving time for the wax to dry to a white haze:


Same procedure with new microfiber to buff the finish. I use one in each hand with one to remove wax and other for final buff pass. Check out the results:


Time to show it off at some other events now that the great weather has arrived...
Keep going one panel at a time until they are all done giving time for the wax to dry to a white haze:
Same procedure with new microfiber to buff the finish. I use one in each hand with one to remove wax and other for final buff pass. Check out the results:
Time to show it off at some other events now that the great weather has arrived...
Last edited by 007V8Vantage; 04-13-2018 at 04:42 PM.
#232
07-07-2017, 03:40 PM
Registered User
Join Date: Oct 2015
Location: Ottawa, Ontario, Canada
Age: 59
Posts: 1,471
Rep Power: 90
Great job, I also like that Meguiar's Ultimate paste wax... I personally use a dual action buffer as I don't trust myself with a regular buffer.

#239
07-10-2017, 07:13 AM
Registered User
Join Date: Oct 2015
Location: Ottawa, Ontario, Canada
Age: 59
Posts: 1,471
Rep Power: 90
I was told that you should also be able to polish and wax your clean bra to make it look better... Check with your installer first
#240
07-10-2017, 09:49 PM
Join Date: Apr 2017
Location: Niagara Region
Age: 52
Posts: 400
Rep Power: 28  Luckily step 2 (polish) removed all those fine swirls.
 Now I just have to maintain the finish a couple times a year and we should be good.
Thanks Rich, btw let me know when your cloth air filters are ready - I'm still running the originals for now.
Thanks to some new overseas forum friends...
I tried it with the polish and avoided it with the wax. My wax directions said keep off plastics and vinyl. You can also burn it if you're not careful when using a buffing machine. I practiced on my old headlight film before I replaced it and using a plastic polish, or headlight cleaning kit on clear film gave good results. On my new headlight film, I hand applied the Meguiars headlight lens protectant (which is a clear liquid) and will report if it protects the film from discoloration etc.