2013 Cayenne S Dash Clock

#48
 12-18-2012, 12:03 PM

Join Date: Jul 2012
Location: Long Island, NY
Posts: 31
Rep Power: 13 
Same here. Finally got around to bringing it in last week and it was replaced with OEM clock. Just glad it works.

#50
12-18-2012, 02:13 PM
Registered User
Join Date: Sep 2012
Location: Long Island, N.Y.
Posts: 673
Rep Power: 43 
#54
12-17-2016, 03:39 PM
Registered User
To R&R the clock:
- Harbor Freight sells a set of interior upholstery/panel tools identical to the ones the Porsche dealers sells. HF's price is often $3.99 on sale. Porsche dealer is typically 10x that. Your choice.
- Stick fingers into the vent on the passengers side of the center top dash panel, gently pull up a bit. Wedge one of the plastic tools under the lip now revealed (if you have a leather dash - I'd suggest painters tape around the dash panel protecting the leather..) Lever the tool a bit to lift the edge. Put another tool further under the edge. Twist a bit - and the side clips on that side should be released. There are two of them.
- Go to the drivers side of the panel and repeat.
- You now have both vents/wings released. There are two clips on the front of the actual center panel, and two clips on the back. These are ones that go directly down into steel retainers in the dash. So - wedge one of the plastic tools under the front edge and gently work it free. Pull up once it's free and the back ones should release.
- You shouldn't break anything doing it this way. Just don't be a gorilla about it.
- Reach behind the clock and find the wire going to it - follow it to the clock - there is a plug going into the back of the clock. The plug has a retaining clip on one side - it has to be depressed to release the plug. Fiddle around until it releases.
- You can now remove the clock and panel and bring them into your desk. Use a screwdriver to remove the two screws holding the clock in the panel.
- Hold body of the clock in your right hand - facing your left hand. Grasp the silver bezel with your left hand and turn anti-clockwise. It will unscrew.
- The white lighting ring will fall out. No big deal. It goes back easily.
- Look on the floor until you find the second hand. Try not to run it over with your desk chair. Pick it up.
- Tiny (toothpick end size) dab of Duco on the end of the second-hand shaft.
- Using gentle finger pressure - push the second hand back on the shaft.
- Let sit overnight
Assembly is the reverse of disassembly.
Took longer to write this then it would to get my tools and do it.
Last edited by deilenberger; 12-17-2016 at 03:41 PM.
#55
12-18-2016, 06:55 AM
Not a big deal to fix. You have to R&R the clock - not hard to do - then unscrew the bezel on it - put a tiny dab of Duco cement on the second hand shaft and carefully push the second hand back on it. The Duco will make certain it will never ever come off again. Let it dry overnight - Duco puts out some fumes that might attack the inside of the clock plastic glass.
To R&R the clock:
- Harbor Freight sells a set of interior upholstery/panel tools identical to the ones the Porsche dealers sells. HF's price is often $3.99 on sale. Porsche dealer is typically 10x that. Your choice.
- Stick fingers into the vent on the passengers side of the center top dash panel, gently pull up a bit. Wedge one of the plastic tools under the lip now revealed (if you have a leather dash - I'd suggest painters tape around the dash panel protecting the leather..) Lever the tool a bit to lift the edge. Put another tool further under the edge. Twist a bit - and the side clips on that side should be released. There are two of them.
- Go to the drivers side of the panel and repeat.
- You now have both vents/wings released. There are two clips on the front of the actual center panel, and two clips on the back. These are ones that go directly down into steel retainers in the dash. So - wedge one of the plastic tools under the front edge and gently work it free. Pull up once it's free and the back ones should release.
- You shouldn't break anything doing it this way. Just don't be a gorilla about it.
- Reach behind the clock and find the wire going to it - follow it to the clock - there is a plug going into the back of the clock. The plug has a retaining clip on one side - it has to be depressed to release the plug. Fiddle around until it releases.
- You can now remove the clock and panel and bring them into your desk. Use a screwdriver to remove the two screws holding the clock in the panel.
- Hold body of the clock in your right hand - facing your left hand. Grasp the silver bezel with your left hand and turn anti-clockwise. It will unscrew.
- The white lighting ring will fall out. No big deal. It goes back easily.
- Look on the floor until you find the second hand. Try not to run it over with your desk chair. Pick it up.
- Tiny (toothpick end size) dab of Duco on the end of the second-hand shaft.
- Using gentle finger pressure - push the second hand back on the shaft.
- Let sit overnight
Assembly is the reverse of disassembly.
Took longer to write this then it would to get my tools and do it.
#56
12-18-2016, 10:25 AM
Thanks so much to deilenberger for the how to on making this fix below are some pics for other users:
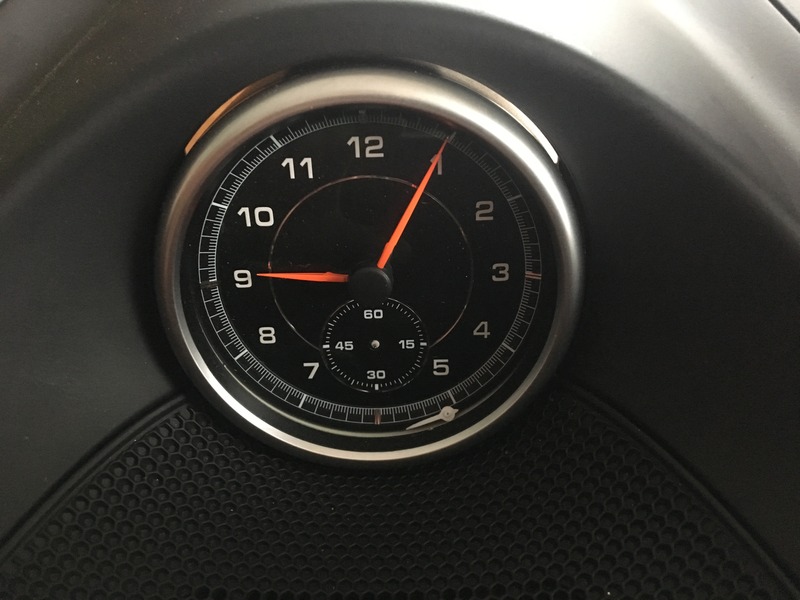
The problem
-Stick fingers into the vent on the passengers side of the center top dash panel, gently pull up a bit and the clips center on that side should be released. Repeat on the driver side. No tools were necessary. the dash gave up the center section by gently pulling on the vents
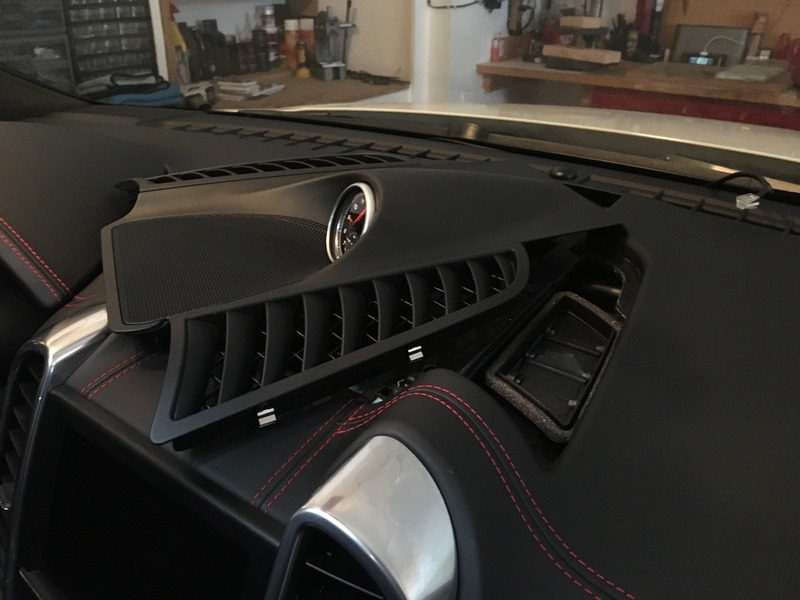
- Reach behind the clock and find the wire going to it - follow it to the clock - there is a plug going into the back of the clock. The plug has a retaining clip on one side - it has to be depressed to release the plug. Fiddle around until it releases.
- You can now remove the clock and panel and bring them into your desk. Use a torx screwdriver to remove the two screws holding the clock in the panel.
- Hold body of the clock in your right hand - facing your left hand. Grasp the silver bezel with your left hand and turn anti-clockwise. It will unscrew.
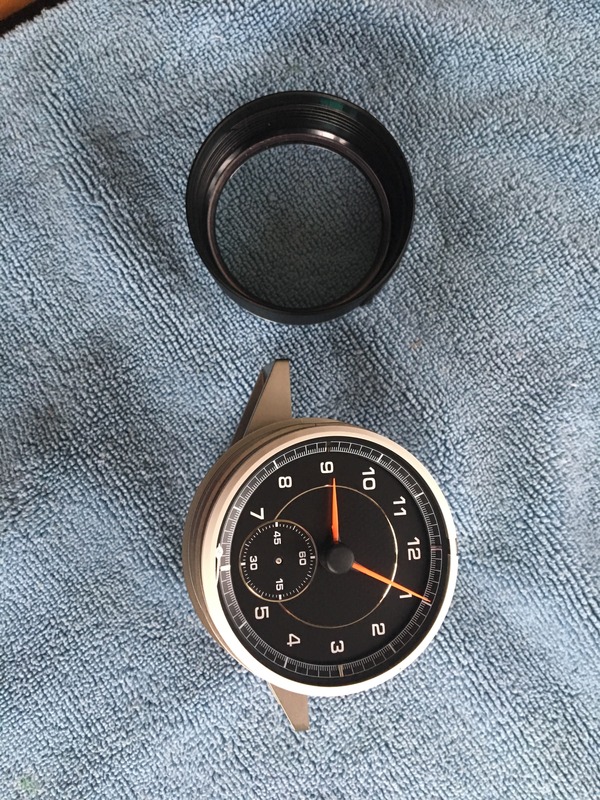
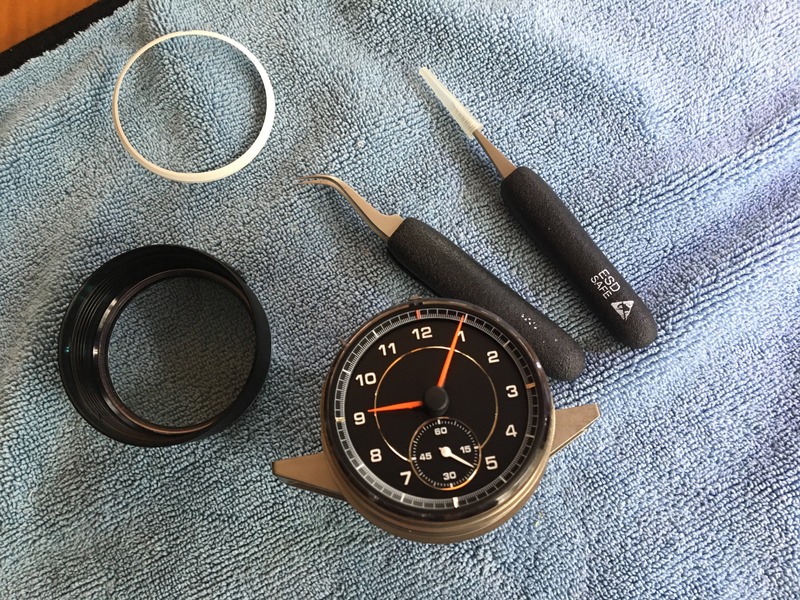
- Remove the white lighting ring it lifts out.
- Tiny (toothpick end size) dab of adhesive on the on the end of the second-hand shaft. I used a fast setting craft adhesive designed for jewelry making. My girlfriend is a crafter so I had this adhesive handy.
- Place the second hand back on the pin with a pair of tweezers then using gentle finger pressure - push the second hand back on the shaft. The second hand is fragile so be carful
I let the adhesive set up for a few hours. only use the smallest amount of adhesive.
resemble the dash in its entirety Good to go you saved yourself $$$
The problem
-Stick fingers into the vent on the passengers side of the center top dash panel, gently pull up a bit and the clips center on that side should be released. Repeat on the driver side. No tools were necessary. the dash gave up the center section by gently pulling on the vents
- Reach behind the clock and find the wire going to it - follow it to the clock - there is a plug going into the back of the clock. The plug has a retaining clip on one side - it has to be depressed to release the plug. Fiddle around until it releases.
- You can now remove the clock and panel and bring them into your desk. Use a torx screwdriver to remove the two screws holding the clock in the panel.
- Hold body of the clock in your right hand - facing your left hand. Grasp the silver bezel with your left hand and turn anti-clockwise. It will unscrew.
- Remove the white lighting ring it lifts out.
- Tiny (toothpick end size) dab of adhesive on the on the end of the second-hand shaft. I used a fast setting craft adhesive designed for jewelry making. My girlfriend is a crafter so I had this adhesive handy.
- Place the second hand back on the pin with a pair of tweezers then using gentle finger pressure - push the second hand back on the shaft. The second hand is fragile so be carful
I let the adhesive set up for a few hours. only use the smallest amount of adhesive.
resemble the dash in its entirety Good to go you saved yourself $$$
Last edited by mthaynes; 01-05-2017 at 06:42 PM.
#57
12-18-2016, 03:55 PM
Registered User
Sorry I wasn't as clear as I'd hoped - all the center vents, with clock, without clock, Boze, Burmester, whatever are one piece. It's held down with two clips on each side of the vents, then two clips in the rear of the center piece, and two clips on the front of the center piece.
And the pics are a great addition to the thread! Thanks!
And the pics are a great addition to the thread! Thanks!
#59
12-28-2016, 07:20 AM
Mine was just a clock. I did not realign the second hand to zero. I did not think of doing that to be honest.
I don't believe the second hand does the "zero dance" like the minute and hour hands do when the clock wakes up after the car has sat for a bit, but I could be wrong I suppose my clock could be off now, but I certainly have not noticed.
I don't believe the second hand does the "zero dance" like the minute and hour hands do when the clock wakes up after the car has sat for a bit, but I could be wrong I suppose my clock could be off now, but I certainly have not noticed.
Last edited by mthaynes; 01-05-2017 at 06:42 PM.