
BRAKE UPGRADE - Lots of pics - Hawk Pads/Slotted & Drilled Rotors/Calipers Painted

Thread Starter
|
Registered User
Joined: Mar 2009
Posts: 927
From: NJ
Rep Power: 70


BRAKE UPGRADE - Lots of pics - Hawk Pads/Slotted & Drilled Rotors/Calipers Painted
ONE YEAR UPDATE AT BOTTOM OF THIS POST:
This started with my original post about brake pad recommendations as my rears were low - but ended up being everything except stainless steel lines.
Pads = Hawk Ceramics (tire rack)
Rotors = R1 Concepts (R1 direct)
Hardware = OEM Porsche (Suncoast)
Sensors & Fluid = OEM Porsche (Suncoast)
G2 Caliper paint = Tire Rack
Rotor Paint = Duplicolor Caliper Paint (Advanced Auto parts)
Porsche Caliper Stickers = (ebay)
WARNING - THIS JOB WAS A MAJOR TIME SUCK - Prob have over 30 hours of actual labor to get to completion and still feeling the pains.
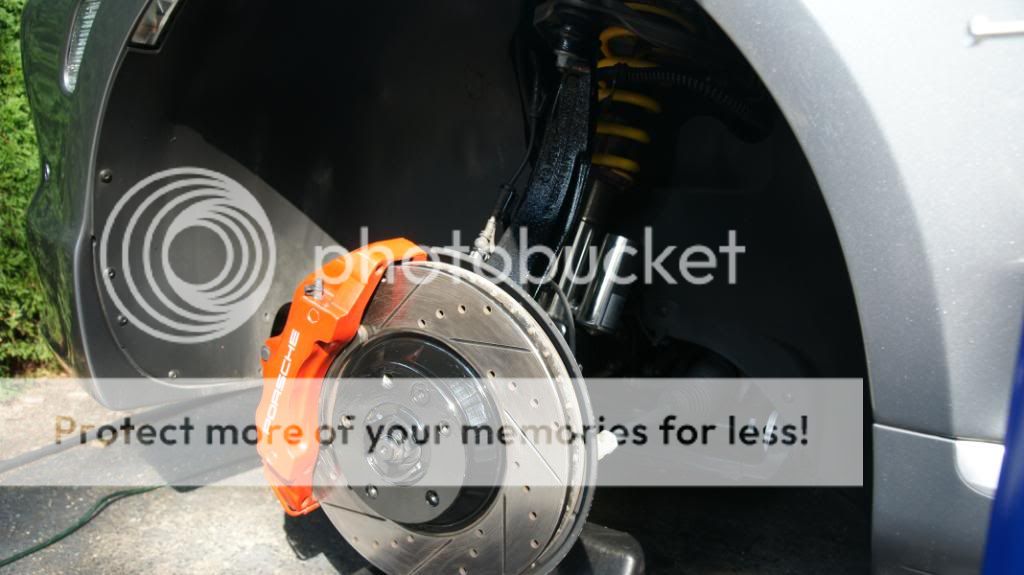
SO FIRST - Here are the finished job glam shots, so you know what i was laboring for:
Fronts:

Rears:

Low res:

Higher res Links:
http://i412.photobucket.com/albums/p...DSC04658-1.jpg
http://i412.photobucket.com/albums/p...s/DSC04660.jpg
NOW - HERE IS ALL THE WORK
CALIPERS:
Major dirt for only 17K miles:

Used about 5 cans of brake cleaner and a 2 cans of WD40 (keeps the brake cleaner from evaporating too fast):

Fully cleaned - the darker areas are where the silver paint came off:

Took a die grinder W/Cookie to the outer areas as these are what is mostly visible:

Masked off all the pistons and boots (again dark areas = where silver paint came off):

Primed with Duplicolor high temp engine primer:

G2 Caliper paid - Like painting with glue! - Not easy to work with - Use a big brush, not the one they supply:

Coat #1 - Not bad - Dry to touch in 1 hour, handling in 2, can wet said in 6, fully "baked" in 24 hours:

"G2 self levels and leaves no brush marks" LOL - on what planet??

2 hours of wet sanding and all is well:

New stickers - Make sure you get the proper sizes for front and rear (ebay or suncoast):

Clear Coated with high-temp clear (face only) :

Everything bench installed:

Closer shot of hardware:

ROTORS - I CUT THIS SHORT AS I CAN ONLY POST 20 PICS DUE TO FORUM LIMITATIONS. I LEFT THE PIC DESCRIPTIONS IN AND PUT THE LINK INSTEAD:
Arrived from R1 as Ugly Betty's (Not bad though for $400 all corners):

Beginning of LONG prep process - Wiped EVERYTHING with rubbing alcohol and begun tape process (USED Pinstripe as its easy to bend):
http://i412.photobucket.com/albums/p...n_DSCF0030.jpg
Here is an example of the 3 steps of masking - Smaller width tape bends easier which is why i used 3 types:
http://i412.photobucket.com/albums/p...n_DSCF0032.jpg
Shot with a high temp primer before paint:
http://i412.photobucket.com/albums/p...n_DSCF0032.jpg
Painted BOTH sides of the high-hats and the fin edges. I used black caliper paint - Lays down REAL NICE for a spray can:
http://i412.photobucket.com/albums/p...n_DSCF0036.jpg
Outside of high hat:
http://i412.photobucket.com/albums/p...n_DSCF0045.jpg
All done - now 2 hours of damasking and alcohol swabbing of rotor faces:
http://i412.photobucket.com/albums/p...n_DSCF0049.jpg
Shot of Final Finish - Not bad for a spray can:
http://i412.photobucket.com/albums/p...n_DSCF0068.jpg
Completed! :

Outside & edge:

PADS
Just 2 quick pics of the Hawks:
http://i412.photobucket.com/albums/p...n_DSCF0020.jpg
Pad Part numbers for my 05 s:
http://i412.photobucket.com/albums/p...n_DSCF0021.jpg
1 YEAR UPDATE !!!!!!!!!!!!!!!!!!!!!!!!!!!!!!!!!!!!!!!!!!!!!!!!!! !!!!!!!!!!!!!!!!!!!!!!!!!!!!!!!!!!!!!!!!!!!!!!!!!!
Well - I screwed up. I used caliper paint on the rotors instead of the 2 part epoxy like I did on the calipers. Rust you say? Indeed.
So now I sit here sore as can be as I spent all weekend restoring my rotors to their once former glory. THIS time I used G2 epoxy.
Fortunately all rust was superficial. Here are the pics:
BEFORE:

DURING:

AFTER:

This started with my original post about brake pad recommendations as my rears were low - but ended up being everything except stainless steel lines.
Pads = Hawk Ceramics (tire rack)
Rotors = R1 Concepts (R1 direct)
Hardware = OEM Porsche (Suncoast)
Sensors & Fluid = OEM Porsche (Suncoast)
G2 Caliper paint = Tire Rack
Rotor Paint = Duplicolor Caliper Paint (Advanced Auto parts)
Porsche Caliper Stickers = (ebay)
WARNING - THIS JOB WAS A MAJOR TIME SUCK - Prob have over 30 hours of actual labor to get to completion and still feeling the pains.
SO FIRST - Here are the finished job glam shots, so you know what i was laboring for:
Fronts:
Rears:
Low res:
Higher res Links:
http://i412.photobucket.com/albums/p...DSC04658-1.jpg
http://i412.photobucket.com/albums/p...s/DSC04660.jpg
NOW - HERE IS ALL THE WORK
CALIPERS:
Major dirt for only 17K miles:
Used about 5 cans of brake cleaner and a 2 cans of WD40 (keeps the brake cleaner from evaporating too fast):
Fully cleaned - the darker areas are where the silver paint came off:
Took a die grinder W/Cookie to the outer areas as these are what is mostly visible:
Masked off all the pistons and boots (again dark areas = where silver paint came off):
Primed with Duplicolor high temp engine primer:
G2 Caliper paid - Like painting with glue! - Not easy to work with - Use a big brush, not the one they supply:
Coat #1 - Not bad - Dry to touch in 1 hour, handling in 2, can wet said in 6, fully "baked" in 24 hours:
"G2 self levels and leaves no brush marks" LOL - on what planet??
2 hours of wet sanding and all is well:
New stickers - Make sure you get the proper sizes for front and rear (ebay or suncoast):
Clear Coated with high-temp clear (face only) :
Everything bench installed:
Closer shot of hardware:
ROTORS - I CUT THIS SHORT AS I CAN ONLY POST 20 PICS DUE TO FORUM LIMITATIONS. I LEFT THE PIC DESCRIPTIONS IN AND PUT THE LINK INSTEAD:
Arrived from R1 as Ugly Betty's (Not bad though for $400 all corners):
Beginning of LONG prep process - Wiped EVERYTHING with rubbing alcohol and begun tape process (USED Pinstripe as its easy to bend):
http://i412.photobucket.com/albums/p...n_DSCF0030.jpg
Here is an example of the 3 steps of masking - Smaller width tape bends easier which is why i used 3 types:
http://i412.photobucket.com/albums/p...n_DSCF0032.jpg
Shot with a high temp primer before paint:
http://i412.photobucket.com/albums/p...n_DSCF0032.jpg
Painted BOTH sides of the high-hats and the fin edges. I used black caliper paint - Lays down REAL NICE for a spray can:
http://i412.photobucket.com/albums/p...n_DSCF0036.jpg
Outside of high hat:
http://i412.photobucket.com/albums/p...n_DSCF0045.jpg
All done - now 2 hours of damasking and alcohol swabbing of rotor faces:
http://i412.photobucket.com/albums/p...n_DSCF0049.jpg
Shot of Final Finish - Not bad for a spray can:
http://i412.photobucket.com/albums/p...n_DSCF0068.jpg
Completed! :
Outside & edge:
PADS
Just 2 quick pics of the Hawks:
http://i412.photobucket.com/albums/p...n_DSCF0020.jpg
Pad Part numbers for my 05 s:
http://i412.photobucket.com/albums/p...n_DSCF0021.jpg
1 YEAR UPDATE !!!!!!!!!!!!!!!!!!!!!!!!!!!!!!!!!!!!!!!!!!!!!!!!!! !!!!!!!!!!!!!!!!!!!!!!!!!!!!!!!!!!!!!!!!!!!!!!!!!!
Well - I screwed up. I used caliper paint on the rotors instead of the 2 part epoxy like I did on the calipers. Rust you say? Indeed.
So now I sit here sore as can be as I spent all weekend restoring my rotors to their once former glory. THIS time I used G2 epoxy.
Fortunately all rust was superficial. Here are the pics:
BEFORE:
DURING:
AFTER:
Last edited by roxboxxx; Sep 19, 2010 at 06:44 PM.
Registered User
Joined: Jun 2005
Posts: 268
From: ?
Rep Power: 32
Nice work! Looks like they turned out well.
When are you going to do a wheel upgrade?
Next time you have a long post with many pics, you could just separate them into 2 or 3 posts. Once you get to 20 pics, post. Then reply to your post with the next set of pics.
When are you going to do a wheel upgrade?
Next time you have a long post with many pics, you could just separate them into 2 or 3 posts. Once you get to 20 pics, post. Then reply to your post with the next set of pics.
Thread Starter
|
Registered User
Joined: Mar 2009
Posts: 927
From: NJ
Rep Power: 70
Wheel upgrade! - LOL - those are my new wheels. I like the " looks like it's stock, but edgy stock" look. These are of course the audi wheels found on R4's and Q's. The darker gray insets are almost spot on with the body paint. I am sure I will get tired of these some day - but for now, I will keep them spinning.
Concerning the posts - good advice.
Concerning the posts - good advice.

Thread Starter
|
Registered User
Joined: Mar 2009
Posts: 927
From: NJ
Rep Power: 70
Thanks Matt - and after this - I no longer have the patience ! As best heard on an aquateen episode " like a thousand *****es in a ***** boat". My next few projects should be easier as they don't require critical timing (paint cure time / car stuck on lift / etc.).
Trending Topics


Thread Starter
|
Registered User
Joined: Mar 2009
Posts: 927
From: NJ
Rep Power: 70
2 hours was to wetsand the face (and some small spots) of all 4 calipers with 2000 grit followed by rubbing compound. When done, its not as glossy as original but no matter as you will want to clear over the stickers. How anyone stencils is beyond me as the caliper surface is never perfectly smooth. When I compare G2 to the Spraycan Caliper paint I used on the rotors - both have a great finish and dry pretty fast - BUT- The G2 is really tough stuff.
I made a few paint chips by painting a peice of glass. When it cured, I pealed off the G2 and I had to twist it repeatedly to get it to tear. The clear is less durable - so thats the week point.
I made a few paint chips by painting a peice of glass. When it cured, I pealed off the G2 and I had to twist it repeatedly to get it to tear. The clear is less durable - so thats the week point.

Registered User
Joined: Aug 2007
Posts: 77
From: Va
Rep Power: 22
Wow, very good job.
I admire your skills and would like to follow your steps and do this for my car.
Please update us about the brake dust issue. If brake dust diminishes significantly, then I might go ahead and do this.
I admire your skills and would like to follow your steps and do this for my car.
Please update us about the brake dust issue. If brake dust diminishes significantly, then I might go ahead and do this.
Thread Starter
|
Registered User
Joined: Mar 2009
Posts: 927
From: NJ
Rep Power: 70
BTW - I have been talked into putting my C in a local show tomorrow. For any of you North Jersey pepper heads - here is the link https://www.6speedonline.com/forums/ny-tri-state/171049-2009-nutley-high-school-car-show.html