

991 C4S Wheel Spacer Install - Part 1

Thread Starter
|
Registered User
Joined: Dec 2013
Posts: 675
From: Chalfont, PA
Rep Power: 55


991 C4S Wheel Spacer Install - Part 1
Hi All- Following is a detailed DIY for installation of Adaptec wheel spacers on my '14 991 C4S. I've broken this into 2 parts, due to the number of pictures I'd like to include. Link to the Part 2 at end of this post....
Tools I Used:
2.5 ton Floor jack
Wheel stops (2)
19mm Deep Socket
1/2 Ratchet
1/2 Torque Wrench
Porsche Wheel Lock removal socket
Rubber Mallet
Wheel hanger pins (2)
Wire Brush
Brake Cleaner
Lift-off Oil, Grease, Adhesive remover
Permatex Nickel Anti-Seize
I know, this is a very simple project, and some would probably argue one that hardly warrants a detailed DIY. Leave it to me to make the simple things in life much more complex!
Anyways, I ordered a set of wheel spacers from Adaptec Speedware (board sponsor) via Amazon at a great price. I have the stock PASM and wheels on my car -- I do not have PDCC or SPASM or factory spacers. So, stock ride-height with PASM (which for those curious to know is 10mm lower than non-S, non-SportPASM 991s). I feel that the stock setup leaves a large gap around the wheel wells, especially in the wide-body rear quarters, and this project is really about the cosmetic improvement. I do plan on adding H&R springs in the near future, which will further enhance the look. That will be a separate DIY later this year.
The package I chose for my C4S was 7mm Front and 15mm Rear spacers. Received the package in several days. Although the ad didn't state what was included in the purchase price, a set of extended wheel bolts was included in the package.
Here's a picture of the package contents:

I didn't have the option with the order I placed to change the color to black, but in hindsight I should have at least requested black bolts.... More on that in a few. So I received the spacers and bolts in silver.
Heres the set, side view to show difference in thickness (F/R):

Overall the quality was good -- I noticed a few small burrs around the inside edge of the rears, but a quick shot with metal file smoothed it out easily.

So let's get started! I began with lifting the car ( I am doing one corner at a time -- you may want to set-up on jack stands and do all at once...) and removing the stock wheel bolts. I used my standard 19MM deep socket with 1/2 ratchet. I put blue tape around the socket to protect the wheel surface from scratching -- I did the same with the Porsche wheel lock socket that you'll need to retrieve from your toolbox.

Here's a quick comparison of the stock vs extended bolts. The length of your bolts will vary based on thickness of the spacer you've chosen.

Before removing the wheel, I got out my trusty hanging pins to make wheel removal and placement much easier and safer!

Before I continue.... I mentioned earlier that the order I placed included silver spacers and bolts. I really should have ordered black powder-coat, as the OEM stock bolts are black, and I also intend to switch to black wheels in the near future. I looked at the silver on my car with the stock wheels, and didn't like. So, my quick fix was to PlastiDip the bolts in flat black. Yes, I painted myself! Here's a shot of the jig I used to hold the bolts in place while adding each coat (I did 5 coats total, with 20 min set time between each coat):

In the end, the PlastiDip coating will probably have to be replaced, but for now it works perfectly and is a lot cheaper than purchasing a new set of bolts!!!
So I get the wheel off... I'll post a set of pictures here that simply show for the curious what is "behind the wheel" on the rear of a 991 4S.

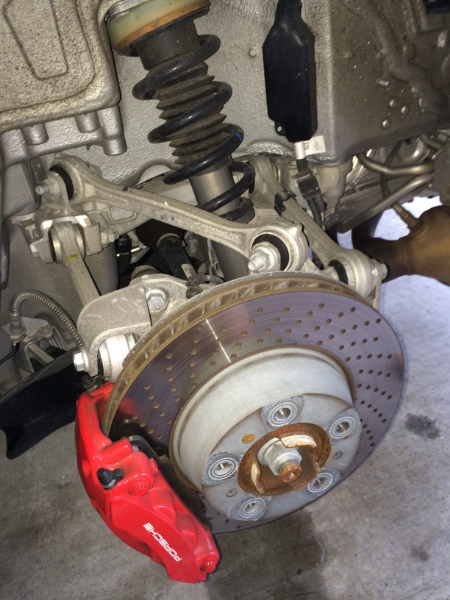

In this pic I highlighted a curved black plastic piece that is an air director to route cooler air to the brakes.

I also took the opportunity to do some wheel-well cleaning, as well as the brake calipers and other bits. I found that my car had picked-up a TON of small rock and pebbles from the crappy roads around my area, and there are a lot of spots where the rock bits just sit on top of flat surfaces and get caught in cracks, like this area just around the drivers-side muffler heatshielding, wheel well trim and rear apron panel:

With each wheel I removed, I thoroughly cleaned front face and rear tub. They weren't too bad, but there were many small tar bits stuck to the tub surface....
Before:

I used a grease, oil, adhesive and goo remover called Lift-Off to get rid of the tar bits and oil spots, before getting out the detailing products to shine everything-up! Lift-off works great, and very happy with the results! dav a bit on a cloth, place on the tar spot, and it literally dissolves - very little rubbing necessary.
After:

And final, cleaned wheel ready for mounting...

But let's get back to installing the spacers!!!
In the drivers side rear, I first cleaned the hub and mounting surface. I used combination of wire brush, brake cleaner to remove any rust or surface debri. Overall it was pretty clean, but I could definitely see that over time the areas where harsh NE winter salt and wet weather will continue to oxidize the surfaces it can reach.
I debated a short while over using anti-seize.... In the end I used my handy Permatex nickel anti-seize, putting just small dabs at various points on the surface. This will prevent the metal surfaces from sticking together in the future, and make it easier to remove the wheel, etc. I have experienced where a wheel would not budge from (previous car) the mounting without extreme pounding and things like liquid wrench, and I would like to avoid that from happening on my 991.
The first bit of anti-seize goes between new spacer and hub....

Placed the 15mm spacer on hub, pushed into place. Fit very snug, had to tap it lightly with my rubber mallet.


Once the spacer was set in place, I added a very small bit of anti-seize to the surface where the wheel will contact the spacer. I then put the hanger pins in place and we are ready to remount the wheel!

And here is a pic of the wheel installed in the rear. I've pointed-out how when viewing from above you can see the spacer. This will be of interest to those who have black or other color wheels. You may want to choose the black option for the spacers so the silver doesn't clash!

For additional details about installing the front 7mm spacers, and "After" pictures once I had all installed, visit Part 2 of the DIY: 991 C4S Wheel Spacer Install - Part 2
Tools I Used:
2.5 ton Floor jack
Wheel stops (2)
19mm Deep Socket
1/2 Ratchet
1/2 Torque Wrench
Porsche Wheel Lock removal socket
Rubber Mallet
Wheel hanger pins (2)
Wire Brush
Brake Cleaner
Lift-off Oil, Grease, Adhesive remover
Permatex Nickel Anti-Seize
I know, this is a very simple project, and some would probably argue one that hardly warrants a detailed DIY. Leave it to me to make the simple things in life much more complex!
Anyways, I ordered a set of wheel spacers from Adaptec Speedware (board sponsor) via Amazon at a great price. I have the stock PASM and wheels on my car -- I do not have PDCC or SPASM or factory spacers. So, stock ride-height with PASM (which for those curious to know is 10mm lower than non-S, non-SportPASM 991s). I feel that the stock setup leaves a large gap around the wheel wells, especially in the wide-body rear quarters, and this project is really about the cosmetic improvement. I do plan on adding H&R springs in the near future, which will further enhance the look. That will be a separate DIY later this year.
The package I chose for my C4S was 7mm Front and 15mm Rear spacers. Received the package in several days. Although the ad didn't state what was included in the purchase price, a set of extended wheel bolts was included in the package.
Here's a picture of the package contents:

I didn't have the option with the order I placed to change the color to black, but in hindsight I should have at least requested black bolts.... More on that in a few. So I received the spacers and bolts in silver.
Heres the set, side view to show difference in thickness (F/R):

Overall the quality was good -- I noticed a few small burrs around the inside edge of the rears, but a quick shot with metal file smoothed it out easily.

So let's get started! I began with lifting the car ( I am doing one corner at a time -- you may want to set-up on jack stands and do all at once...) and removing the stock wheel bolts. I used my standard 19MM deep socket with 1/2 ratchet. I put blue tape around the socket to protect the wheel surface from scratching -- I did the same with the Porsche wheel lock socket that you'll need to retrieve from your toolbox.

Here's a quick comparison of the stock vs extended bolts. The length of your bolts will vary based on thickness of the spacer you've chosen.

Before removing the wheel, I got out my trusty hanging pins to make wheel removal and placement much easier and safer!

Before I continue.... I mentioned earlier that the order I placed included silver spacers and bolts. I really should have ordered black powder-coat, as the OEM stock bolts are black, and I also intend to switch to black wheels in the near future. I looked at the silver on my car with the stock wheels, and didn't like. So, my quick fix was to PlastiDip the bolts in flat black. Yes, I painted myself! Here's a shot of the jig I used to hold the bolts in place while adding each coat (I did 5 coats total, with 20 min set time between each coat):

In the end, the PlastiDip coating will probably have to be replaced, but for now it works perfectly and is a lot cheaper than purchasing a new set of bolts!!!
So I get the wheel off... I'll post a set of pictures here that simply show for the curious what is "behind the wheel" on the rear of a 991 4S.


In this pic I highlighted a curved black plastic piece that is an air director to route cooler air to the brakes.

I also took the opportunity to do some wheel-well cleaning, as well as the brake calipers and other bits. I found that my car had picked-up a TON of small rock and pebbles from the crappy roads around my area, and there are a lot of spots where the rock bits just sit on top of flat surfaces and get caught in cracks, like this area just around the drivers-side muffler heatshielding, wheel well trim and rear apron panel:

With each wheel I removed, I thoroughly cleaned front face and rear tub. They weren't too bad, but there were many small tar bits stuck to the tub surface....
Before:

I used a grease, oil, adhesive and goo remover called Lift-Off to get rid of the tar bits and oil spots, before getting out the detailing products to shine everything-up! Lift-off works great, and very happy with the results! dav a bit on a cloth, place on the tar spot, and it literally dissolves - very little rubbing necessary.
After:

And final, cleaned wheel ready for mounting...

But let's get back to installing the spacers!!!
In the drivers side rear, I first cleaned the hub and mounting surface. I used combination of wire brush, brake cleaner to remove any rust or surface debri. Overall it was pretty clean, but I could definitely see that over time the areas where harsh NE winter salt and wet weather will continue to oxidize the surfaces it can reach.
I debated a short while over using anti-seize.... In the end I used my handy Permatex nickel anti-seize, putting just small dabs at various points on the surface. This will prevent the metal surfaces from sticking together in the future, and make it easier to remove the wheel, etc. I have experienced where a wheel would not budge from (previous car) the mounting without extreme pounding and things like liquid wrench, and I would like to avoid that from happening on my 991.
The first bit of anti-seize goes between new spacer and hub....

Placed the 15mm spacer on hub, pushed into place. Fit very snug, had to tap it lightly with my rubber mallet.


Once the spacer was set in place, I added a very small bit of anti-seize to the surface where the wheel will contact the spacer. I then put the hanger pins in place and we are ready to remount the wheel!

And here is a pic of the wheel installed in the rear. I've pointed-out how when viewing from above you can see the spacer. This will be of interest to those who have black or other color wheels. You may want to choose the black option for the spacers so the silver doesn't clash!

For additional details about installing the front 7mm spacers, and "After" pictures once I had all installed, visit Part 2 of the DIY: 991 C4S Wheel Spacer Install - Part 2
Last edited by plenum; Jun 17, 2014 at 09:47 AM. Reason: Add link to part 2
Registered User
Joined: Jan 2010
Posts: 519
From: Los Angeles, CA
Rep Power: 43
In part II, did the Plasti-Dip chip and peal off when you put a tool to the lug nuts? I cannot imagine it wouldn't as it is very fragile.
Cannot wait for the second part! The waiting is killing me!!!......")
Cannot wait for the second part! The waiting is killing me!!!......
Thread Starter
|
Registered User
Joined: Dec 2013
Posts: 675
From: Chalfont, PA
Rep Power: 55
But even if I did nick one up, I can simply remove that single bolt and repaint in a matter of minutes. Long-term I'd rather have powder-coated bolts, but for now in a pinch this works just great, and I'll leave them for now.
Sorry didn't add this last bit to my DIY posts.... Thanks again.
Registered User
Joined: Aug 2013
Posts: 1,598
From: Melbourne, FL
Rep Power: 111
Nice job on this.. !
My first thought when I saw the post was... "it's just pull the wheel off and add the spacer and put the wheel back on"..
But it's good info and always nice to see someone else do it before getting into the middle of something simple and going.. oops.. didn't think about that..
Should get it put on the sticky/DIY...

Thread Starter
|
Registered User
Joined: Dec 2013
Posts: 675
From: Chalfont, PA
Rep Power: 55
My own personal situation, I wouldn't say there was any change in driving experience -- at least not technically. The spacers definitely widen your track, so I would expect there is someone who can attest to an "improvement" in some cornering or other high-speed maneuver. But I have not tracked my car yet, and have only taken it out for "spirited" driving around my area - not nearly anything that I would notice change in handling from something like spacers. In the end, this is much more a change for aesthetics and from that perspective I am very happy with the "look" achieved.
Plus I take great satisfaction in doing all the work myself....
Hope this helps!
Plus I take great satisfaction in doing all the work myself....
Hope this helps!
Trending Topics
Registered User
Joined: Mar 2017
Posts: 2
From: Montreal
Rep Power: 0
Hi everyone,
My name is Frank and I am new to the 6speedOnline community!
I am planning to get spacers for my 991.1 4S (w/ SPASM) that has the Carrera S wheels. I heard that, for a ''Very FLUSH'' set up, some Porsche wheels require different spacers it could play between 15mm - 17mm and even 18mm in the rear.. and possibly 10mm in the front? Anybody has fitted their 4S (carrera S wheels) with such spacers? (pictures please, if possible)
I've been navigating throughout the forums/topics but I couldn't find a specific answer to my question (considering I have the carrera S wheels that, I believe, are narrower)
A BIG THANK YOU
Thread Starter
|
Registered User
Joined: Dec 2013
Posts: 675
From: Chalfont, PA
Rep Power: 55
Hi everyone,
My name is Frank and I am new to the 6speedOnline community!
I am planning to get spacers for my 991.1 4S (w/ SPASM) that has the Carrera S wheels. I heard that, for a ''Very FLUSH'' set up, some Porsche wheels require different spacers it could play between 15mm - 17mm and even 18mm in the rear.. and possibly 10mm in the front? Anybody has fitted their 4S (carrera S wheels) with such spacers? (pictures please, if possible)
I've been navigating throughout the forums/topics but I couldn't find a specific answer to my question (considering I have the carrera S wheels that, I believe, are narrower)
A BIG THANK YOU
My name is Frank and I am new to the 6speedOnline community!
I am planning to get spacers for my 991.1 4S (w/ SPASM) that has the Carrera S wheels. I heard that, for a ''Very FLUSH'' set up, some Porsche wheels require different spacers it could play between 15mm - 17mm and even 18mm in the rear.. and possibly 10mm in the front? Anybody has fitted their 4S (carrera S wheels) with such spacers? (pictures please, if possible)
I've been navigating throughout the forums/topics but I couldn't find a specific answer to my question (considering I have the carrera S wheels that, I believe, are narrower)
A BIG THANK YOU
Registered User
Joined: Nov 2010
Posts: 70
From: Texas
Rep Power: 18
Hi Frank, Recenlty purchased new wheels and no longer need these spacers. They worked perfectly on the GTS. (2) 15mm spacers with extended lug bolts and (2) 5mm spacers $ 130.00 includes free ship to Conti US & Hawaii. Rears spacers (edges only) are painted similar color as hats to blend in. pm 77tony

Thread
Thread Starter
Forum
Replies
Last Post
PelicanParts.com
930 Turbo Vendor Classifieds
0
Aug 18, 2015 04:01 PM
PelicanParts.com
964 Turbo
0
Aug 18, 2015 03:56 PM
PelicanParts.com
Boxster/Cayman Vendor Classifieds
0
Aug 18, 2015 03:51 PM
PelicanParts.com
GT3/GT2/GT Vendor Classifieds
0
Aug 18, 2015 03:42 PM