The Journey to rebuild my rear wing assembly
#16
 07-10-2013, 09:03 PM

Steve, great work and Irish thanks for adding to it.
If you have a cad of the part, you could upload it at emachineshop.com and they'll price it in just about any material you desire.
If you have a cad of the part, you could upload it at emachineshop.com and they'll price it in just about any material you desire.
#17
07-13-2013, 10:13 PM
Join Date: Feb 2011
Location: Lewisville, NC
Posts: 1,075
Rep Power: 108 

That block you made out of nylon, obviously it was an easy material for you to work with, but eventually that would fail too most likely. I bet it would be pretty easy to machine something like that out of billet aluminum, and then it would never break.
I just installed the GT2 add on wing... I want to find a good solution to keeping the wing in the lowered position without just unplugging the thing.
I just installed the GT2 add on wing... I want to find a good solution to keeping the wing in the lowered position without just unplugging the thing.
1. The factory used nylon/plastic for a reason
2. If something fails, the block one of the easiest to replace
3. The screw actually rubs the block, so it would wear aluminum faster and could be noisy
Keep in mind the block only failed, because one ram started leaking and put the wing in a bind.
Later, Steve
#18
07-13-2013, 10:15 PM
Join Date: Feb 2011
Location: Lewisville, NC
Posts: 1,075
Rep Power: 108 Later, Steve
#19
07-13-2013, 10:20 PM
Join Date: Feb 2011
Location: Lewisville, NC
Posts: 1,075
Rep Power: 108 Steve,
if you're looking for the size for the washers for the banjo bolts, they are M6 and mcmaster carr has them for like 11 bucks for a bag of 50. In fact I have some if you need a few. The washers are also the same size as a washer for the oil drain line from an evo IX. As for the O-rings, I don't remember what size they are, but they're metric and there are also little plastic rings (like piston rings) too. Definitely be sure to get the right size O-rings because when I tried mine at first I had the wrong size and I ended up messing up one of the rams pressing the piston back into it. I'm now working on finding a broke *** system to see if I can steal some parts and make it work.
James
pm me if you need some washers.
Great information.
Thanks,
Steve
#20
07-13-2013, 10:35 PM
Join Date: Feb 2011
Location: Lewisville, NC
Posts: 1,075
Rep Power: 108
Here's a quick update.
The 3D printed part will not work in the material we used as it can't handle the heat. I'll have to decide if we want to change the 3D material or just have it made the old fashion way.
I disassembled the rams for the wing today. Unfortunately I found out something I remember reading over a year ago. Below you can see the disassembled rams for the wing. Please don't try to disassemble your rams as they are under a lot of spring pressure.
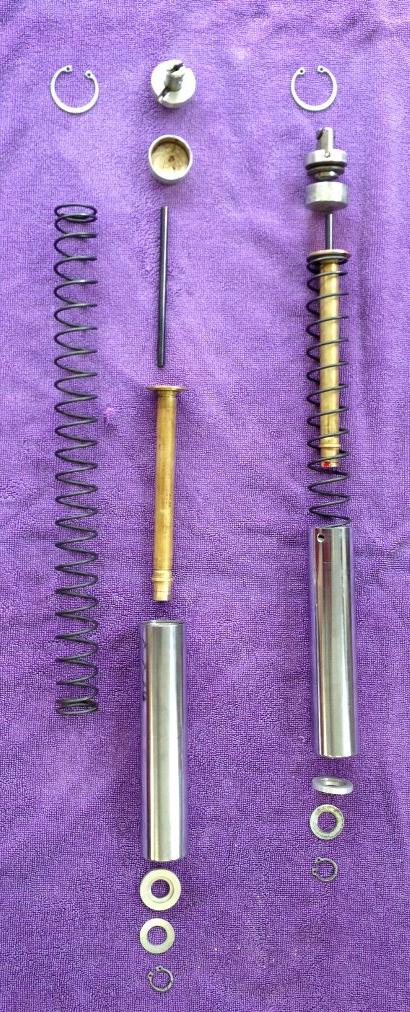
The issue is the rams can't be disassembled. If you look, they have a ring pressed into them that stops the pistons inside the ram from moving.
I have an idea of how to remove the piston, so the seals can be replaced, but I'm my try a little more stop leak before I try the modification.
Later, Steve
The 3D printed part will not work in the material we used as it can't handle the heat. I'll have to decide if we want to change the 3D material or just have it made the old fashion way.
I disassembled the rams for the wing today. Unfortunately I found out something I remember reading over a year ago. Below you can see the disassembled rams for the wing. Please don't try to disassemble your rams as they are under a lot of spring pressure.
The issue is the rams can't be disassembled. If you look, they have a ring pressed into them that stops the pistons inside the ram from moving.
I have an idea of how to remove the piston, so the seals can be replaced, but I'm my try a little more stop leak before I try the modification.
Later, Steve
#21
07-15-2013, 09:38 AM
Join Date: Feb 2011
Location: Lewisville, NC
Posts: 1,075
Rep Power: 108
I haven't reached the point of cutting into one of my rams yet, so I thought I would see if there is anyone with a broken system that may consider donating a ram to science. 
I believe there are several ways that the ram could be cut open and reasealed, but I need to cut the ram in the right place. The problem is I won't know the right place until I see the internal construction of the ram.
The first one I cut open may not be reusable, but it will allow me to figure out which seals will be needed, where the ram needs to be cut open and how to reassemble the ram.
Thanks,
Steve
#22
07-15-2013, 10:30 AM

Steve,
I have a ram that you can have if you need it. I don't care if I get it back because right now it's just collecting dust in the garage. PM me your address and I'll send it to you along with some M6 washers.
James
I have a ram that you can have if you need it. I don't care if I get it back because right now it's just collecting dust in the garage. PM me your address and I'll send it to you along with some M6 washers.
James
#23
07-15-2013, 11:26 AM
Join Date: Feb 2011
Location: Lewisville, NC
Posts: 1,075
Rep Power: 108 That sounds great.
Thanks
PM sent
Later, Steve
#24
07-24-2013, 08:43 PM
Join Date: Feb 2011
Location: Lewisville, NC
Posts: 1,075
Rep Power: 108
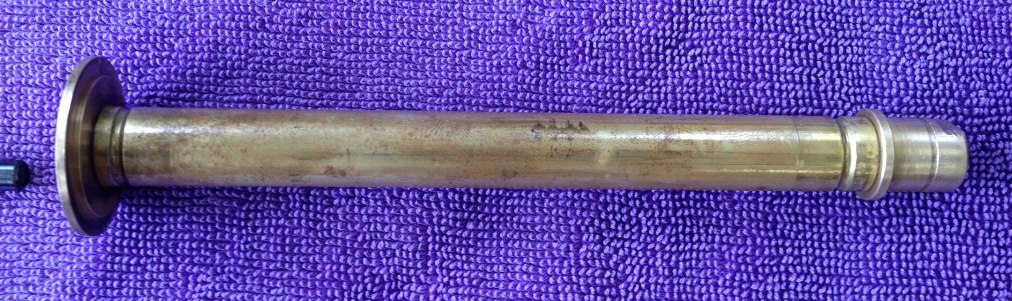
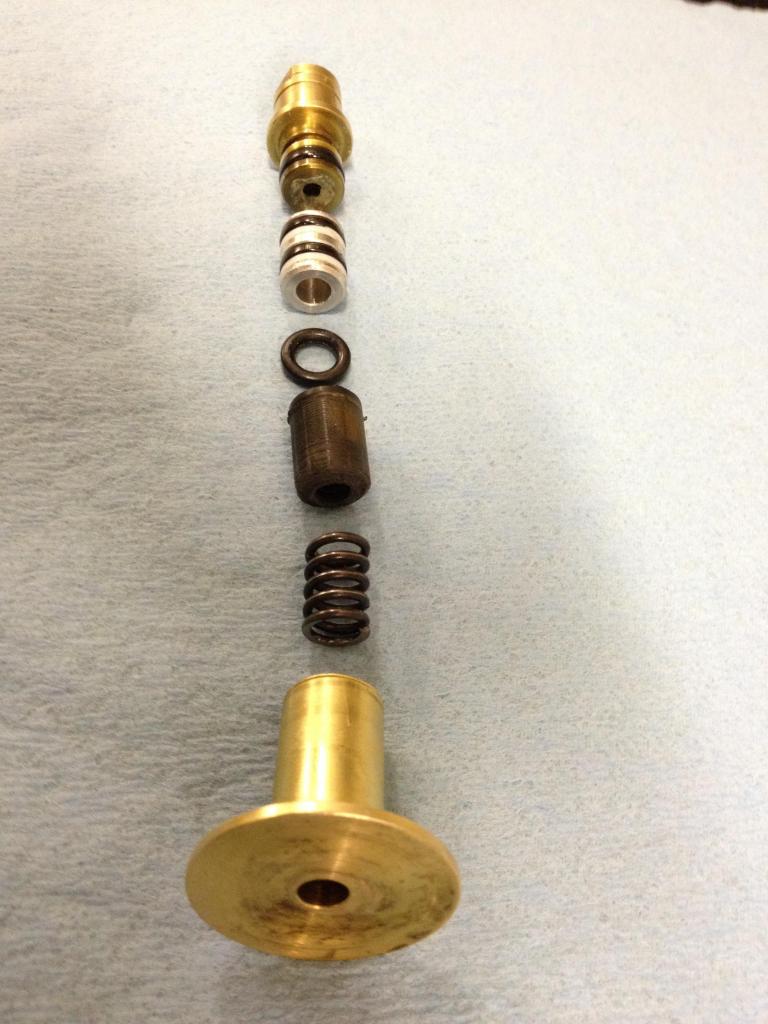
Thanks to James, we now know what the inside of the ram that lifts the wing looks like.
Unfortunately there are not only o-rings on the piston, but also on the fitting pressed into the lower part of the ram.
I solution is still possible, but will probably require some machine work.
Below is a picture of the guts of the ram.
There is a little more going on then you might imagine.
There is a spring and o-ring that are at the top of the cylinder.
 http://i260.photobucket.com/albums/ii28/sjarvis0225/image_zps4af5df43.jpg[/URL]
More updates later.
Steve
Unfortunately there are not only o-rings on the piston, but also on the fitting pressed into the lower part of the ram.
I solution is still possible, but will probably require some machine work.
Below is a picture of the guts of the ram.
There is a little more going on then you might imagine.
There is a spring and o-ring that are at the top of the cylinder.
More updates later.
Steve
#25
07-25-2013, 06:53 AM
Steve,
Glad I could help expand the knowledge a little bit more. I have another ram if you're ever in need of one. Hopefully the knowledge gained not only identified where some of the problems are coming from, but perhaps even stimulated an idea of a better replacement. In any case great work steve.
James
Glad I could help expand the knowledge a little bit more. I have another ram if you're ever in need of one. Hopefully the knowledge gained not only identified where some of the problems are coming from, but perhaps even stimulated an idea of a better replacement. In any case great work steve.
James
#26
07-25-2013, 07:14 AM
Join Date: Feb 2011
Location: Lewisville, NC
Posts: 1,075
Rep Power: 108
I definitely think there's an opportunity for a two piece cylinder (instead of the current three piece unit). This would eliminate the o-ring at the bottom of the cylinder and the top could be screwed off to replace the piston seals.
Thanks again.
Steve
Thanks again.
Steve
#27
07-30-2013, 11:53 AM
Steve,
What would one of those plastic guides cost to get done? I'm in need of one as mine is broken as of yesterday. I'm in no rush as I'm working the next few weekends, but curious as to the cost.
James
What would one of those plastic guides cost to get done? I'm in need of one as mine is broken as of yesterday. I'm in no rush as I'm working the next few weekends, but curious as to the cost.
James
#30
07-30-2013, 02:33 PM
I contacted them and to R/R our hydraulic system is 650.00 plus shipping. But they said that there are some units they can't fix but they won't know until they recieve your particular system. In any case I would rather try it myself because that's part of the fun.
James
James