
Quick DIY - Add mesh cargo pocket to 996 front area

Thread Starter
|
Registered User
Joined: Apr 2007
Posts: 3,123
From: Chained to my Laptop....
Rep Power: 172


Quick DIY - Add mesh cargo pocket to 996 front area
I installed a mesh cargo pocket in my 330i and I really missed not having it in the pcar. This may not be your cup of tea, but I find that having the extra quick-access storage to be very handy.
This DIY can be done in literally 5 minutes and does not require any tools other than your hand.
The mesh cargo pocket is for a Z3 (or Z4, I forget), and is readily available from at your local BMW dealer. It is usually an order item and takes 2-3 days for them to get in from a regional parts distribution center.
Cost is (retail) $45 and less if you can get dealer cost.
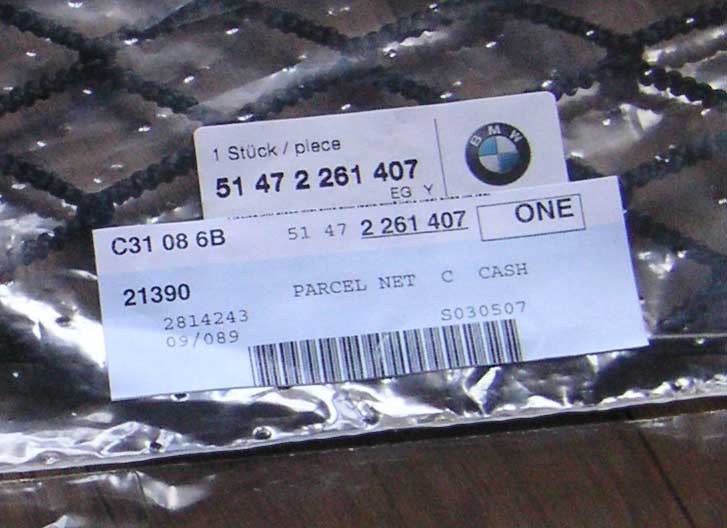
This is the part number that you need to ask for:
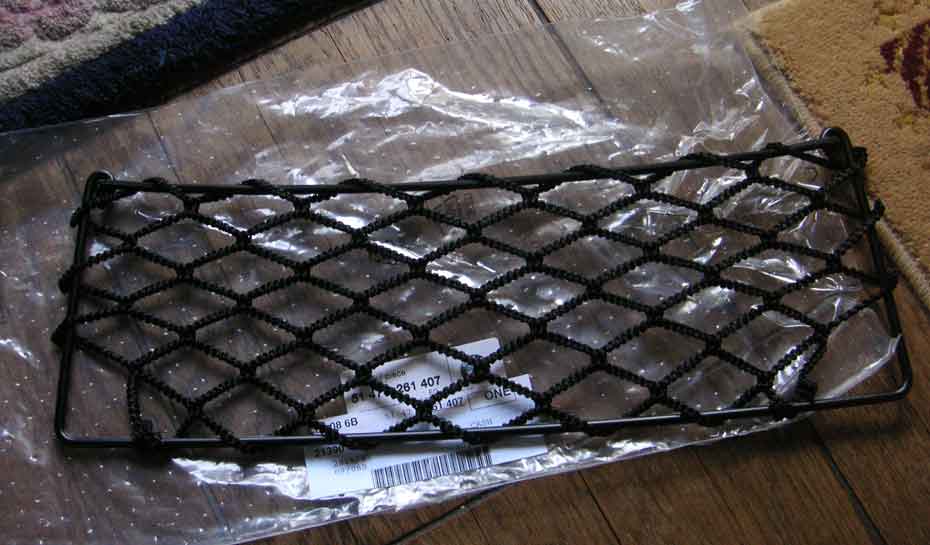
This is the mesh pocket-
The frame is easily bent to fit the countour of the 996 tunnel (or any other car, for that matter!
The securing screws are four carpet screws.
You push/wiggle them into the carpet until you feel it pop through, then screw in to tighten.
These should come with the pocket but don't assume! Be SURE to specify that they give you the four screws when you place the order for the mesh pocket (ask me how I know!).

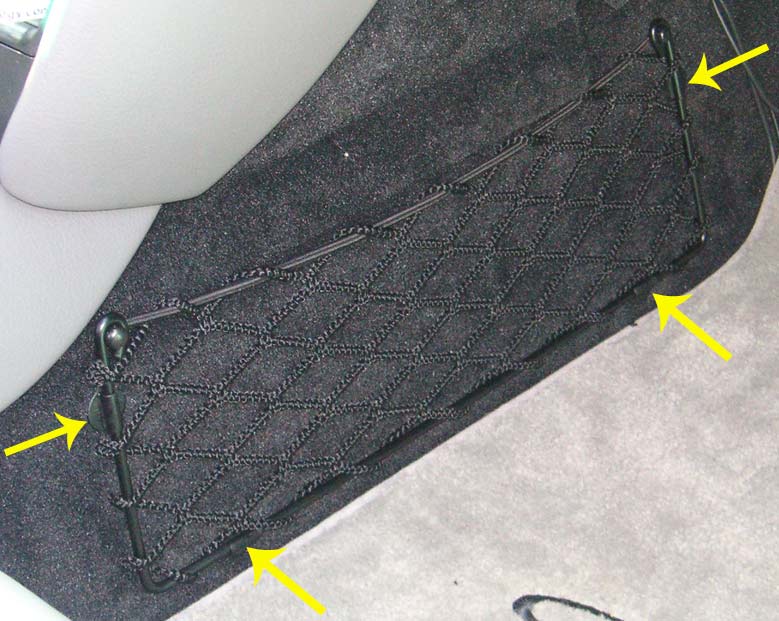
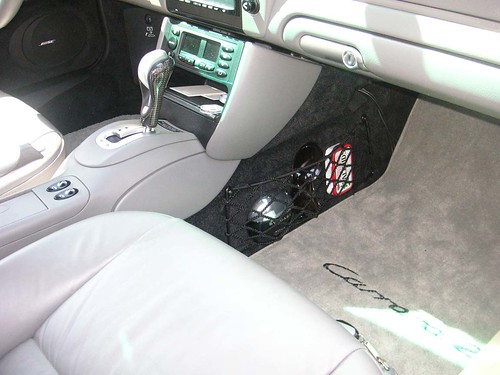
Now we need to review the spot where I will place the mesh pocket:

Hold up the pocket over the area and line up in the general area to your satisfaction. The 'front' of the pocket is the side with the top bungee head nuts facing towards you.
You will notice that the top right edge sits away from the countour of the tunnel. No biggie!
Take the frame and twist the left side bar towards you and push the right side bar away from you, until the right side bar is bent inwards enough to sit flush with the tunnel.
Then take one of the carpet screws (I usually start with the top left) and hold it against the carpet where you want to pop it through for the first securing point.
Put the mesh pocket down and push hard on the securing screw with a back-and-forth twisting motion until you feel it insert through the carpet backing. Then screw in clockwise until flush / tight, and the "C" clip opening is facing inwards.
Put mesh back up, clip into the "C" clip, line up the height and horizontal straightness (I usually use the edge of the floormat as an eyeball straight-edge), hold up the right side securing screw in the proper area. Remove the mesh pocket and put in the second screw.
Put the pocket in and clip to both L/R C clips.
Mark and insert two bottom securing screws, then clip in place on the pocket frame.
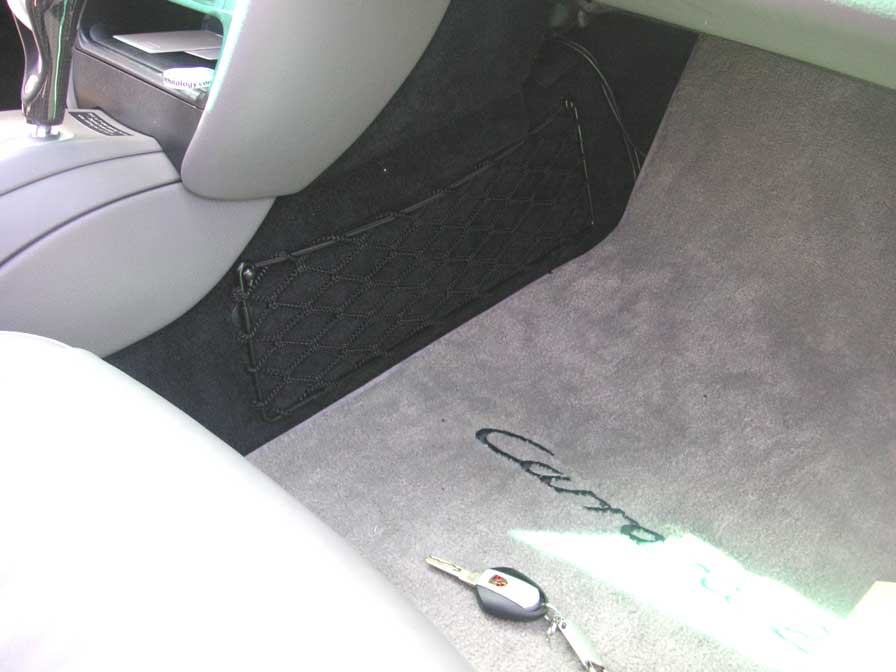
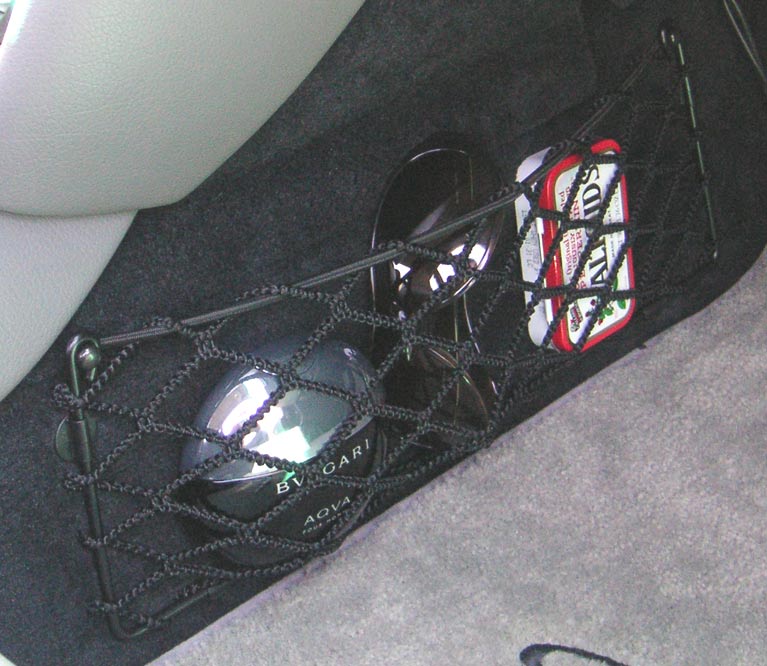
That's it!! Pack full of your favorite stuff. My External hard drive for the Kenwood DND/NAV unit will go here.
This DIY can be done in literally 5 minutes and does not require any tools other than your hand.
The mesh cargo pocket is for a Z3 (or Z4, I forget), and is readily available from at your local BMW dealer. It is usually an order item and takes 2-3 days for them to get in from a regional parts distribution center.
Cost is (retail) $45 and less if you can get dealer cost.
This is the part number that you need to ask for:
This is the mesh pocket-
The frame is easily bent to fit the countour of the 996 tunnel (or any other car, for that matter!
The securing screws are four carpet screws.
You push/wiggle them into the carpet until you feel it pop through, then screw in to tighten.
These should come with the pocket but don't assume! Be SURE to specify that they give you the four screws when you place the order for the mesh pocket (ask me how I know!).
Now we need to review the spot where I will place the mesh pocket:
Hold up the pocket over the area and line up in the general area to your satisfaction. The 'front' of the pocket is the side with the top bungee head nuts facing towards you.
You will notice that the top right edge sits away from the countour of the tunnel. No biggie!
Take the frame and twist the left side bar towards you and push the right side bar away from you, until the right side bar is bent inwards enough to sit flush with the tunnel.
Then take one of the carpet screws (I usually start with the top left) and hold it against the carpet where you want to pop it through for the first securing point.
Put the mesh pocket down and push hard on the securing screw with a back-and-forth twisting motion until you feel it insert through the carpet backing. Then screw in clockwise until flush / tight, and the "C" clip opening is facing inwards.
Put mesh back up, clip into the "C" clip, line up the height and horizontal straightness (I usually use the edge of the floormat as an eyeball straight-edge), hold up the right side securing screw in the proper area. Remove the mesh pocket and put in the second screw.
Put the pocket in and clip to both L/R C clips.
Mark and insert two bottom securing screws, then clip in place on the pocket frame.
That's it!! Pack full of your favorite stuff. My External hard drive for the Kenwood DND/NAV unit will go here.
Last edited by p0rsch3; May 31, 2007 at 12:58 AM.
Thread Starter
|
Registered User
Joined: Apr 2007
Posts: 3,123
From: Chained to my Laptop....
Rep Power: 172
thanks- was just checking out your pics and stuff- very nice!
So, this might be better place to stash the altoids huh?
That damn box always slides around in the lower console pocket...lol
So, this might be better place to stash the altoids huh?
That damn box always slides around in the lower console pocket...lol
Thread Starter
|
Registered User
Joined: Apr 2007
Posts: 3,123
From: Chained to my Laptop....
Rep Power: 172
Keith- Thanks. You've kinda set the bar already so i'm just trying to keep up.. lol
Speaking only for black BMW carpet (I'm sure other euro-car carpet material backings are similar) they don't seem to leave marks behind.
I think the screws were designed to cause as little damage to the carpet as possible.
I know this because the first time I installed one of these in my 330i I placed one of the screws in the wrong spot and had to move it. I ruffled the carpet over the hole and you couldn't tell where I had put it in.
-Kurt
Last edited by p0rsch3; May 31, 2007 at 08:50 AM.
Modaholic

Joined: Jul 2003
Posts: 2,878
From: Fresno Cali
Rep Power: 165
Originally Posted by icemann633
Sweet stuff! I like your DIYs
What kind of mark/hole will those screws leave when removed?
What kind of mark/hole will those screws leave when removed?
A slight hole, that you can kind of cover with the carpet but not completely.
Trending Topics

Thread Starter
|
Registered User
Joined: Apr 2007
Posts: 3,123
From: Chained to my Laptop....
Rep Power: 172
Hell- YA! I'm an admitted modaholic... 
so you have a sub there? Where's the pics? Represent!!
btw, they make a shorter pocket that is 1/2 as long, it is for the Z3.
If you get by a BMW dealer, order one for a Z3 and Z4 (no obligation to buy, they just put it on will-call) - check them both out- The short one might do you right.
so you have a sub there? Where's the pics? Represent!!
btw, they make a shorter pocket that is 1/2 as long, it is for the Z3.
If you get by a BMW dealer, order one for a Z3 and Z4 (no obligation to buy, they just put it on will-call) - check them both out- The short one might do you right.
Thread Starter
|
Registered User
Joined: Apr 2007
Posts: 3,123
From: Chained to my Laptop....
Rep Power: 172
Originally Posted by Wheelman
BMW Part # for the 1 screw is 51-47-2-263-062 (4 are needed)
My next lite-mod thanks pOrsch3!!!! Great ideas and mods that make sense!
My next lite-mod thanks pOrsch3!!!! Great ideas and mods that make sense!
BTW, they should throw in 4 screws with purchase of the cargo pocket if you ask them. The last 3 of these i bought they just threw in the screws n/c.
Registered User

Joined: Mar 2005
Posts: 1,827
From: Ontario
Rep Power: 102
you could do a lot of variations. i may try that on the back of the rear seat behind me. that oine is usually down and it makes a great shelf for stuff - until you hit a corner; any corner. when the seat is up, it would basically be invisable.
i'll have to check the thickness of the backing.
i'll have to check the thickness of the backing.