

Center Radiator and GT3 Bumper installed

Thread Starter
|
Registered User
Joined: Aug 2006
Posts: 1,098
From: HB.. That's in the OC Biach!
Rep Power: 80


Well as most of you know I was looking for a place to install the center radiator that I bought from Suncoast. The dealer wanted to charge $650 to install it. After looking at the parts diagram it didn't look that hard and since I already was going to have the front bumper off I decided to do it myself. The Assembly of the radiator was quite easy, as all parts needed come in the kit including the part that replaces the dummy cover on the center of the bumper. the mounting holes (2 on top) and screws (two on bottom) are already on the car. the 2 hoses are a snap in type so when you remove the dummy plugs just push the hose in till its snaps and thats it. easy as pie. start up the car check for leaks and fill up and burp the reserve tank in the rear. this takes the most time as you do this a few times to get it right after the flow starts.
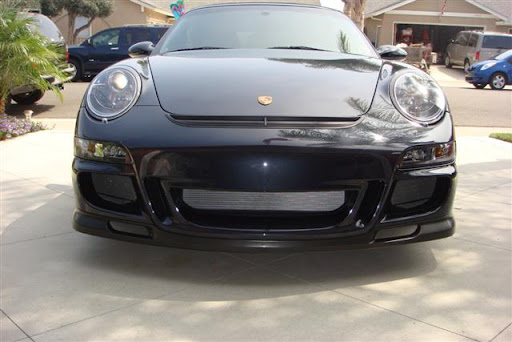
The GT3 bumper was also bought from Suncoast, I had it painted at European Motor Car Works in Santa Ana they were recommend by Moe and only deal in high end cars, Kye the owner did a great job and matched the metallic paint 99% dead on. It took 3 days to paint and bake.
After following the bumper removal instructions on rentech and this forum it was just doing it in reverse.
Pics can be found here: http://picasaweb.google.com/emailboomer/GT3Bumper##
I have to wait for Premier to come back down next week to wrap this new bumper. All in all it was rather easy to do both projects and love the way it all came out.
I've noticed that before the oil temp would get to the 225 dash, now it only gets to just above the 200 mark.
Oh the bumper now scraps a bit going out of my drive way even at an angle. But I can live with it..(I did buy a extra lip to have as a spare)
Last edited by OC Pcar; Sep 15, 2008 at 03:32 PM.
 now you need to protect those radiators with the screens
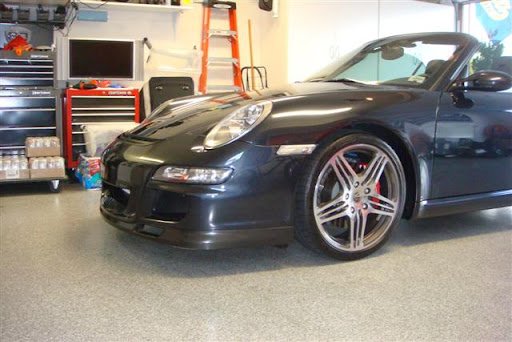


Registered User
Joined: Jan 2007
Posts: 1,468
From: Bay Area, CA
Rep Power: 78
Thread Starter
|
Registered User
Joined: Aug 2006
Posts: 1,098
From: HB.. That's in the OC Biach!
Rep Power: 80
Trending Topics
Thread Starter
|
Registered User
Joined: Aug 2006
Posts: 1,098
From: HB.. That's in the OC Biach!
Rep Power: 80
I thought it would of been harder not really being a wrencher. but after reading a few DIY threads here's one of them http://www.caymanclub.net/reviews/showproduct.php?product=102&cat=10
it was easy...once you get the old one off it just a matter of moving everything over.. Here's some larger pics of the ones posted. I'll take some more outside this week..


it was easy...once you get the old one off it just a matter of moving everything over.. Here's some larger pics of the ones posted. I'll take some more outside this week..
Registered User
Joined: Jul 2008
Posts: 1,431
From: Southern Cali
Rep Power: 86
OC Pcar,
Thanks so much for your post and pictures.
I could not have done it without your diagram.
It was very easy to put together the radiator... but I have one question....
I have a bunch of bolts left over and did not use any of the GOLD "speed washers" ..... DID YOU???
I just finished assembling the radiator and i will be taking it to my mechanic to get it installed properly.. as i don't know how to burp the radiator or have any extra fluids.
Thread Starter
|
Registered User
Joined: Aug 2006
Posts: 1,098
From: HB.. That's in the OC Biach!
Rep Power: 80
OC Pcar,
Thanks so much for your post and pictures.
I could not have done it without your diagram.
It was very easy to put together the radiator... but I have one question....
I have a bunch of bolts left over and did not use any of the GOLD "speed washers" ..... DID YOU???
I just finished assembling the radiator and i will be taking it to my mechanic to get it installed properly.. as i don't know how to burp the radiator or have any extra fluids.
Thanks so much for your post and pictures.
I could not have done it without your diagram.
It was very easy to put together the radiator... but I have one question....
I have a bunch of bolts left over and did not use any of the GOLD "speed washers" ..... DID YOU???
I just finished assembling the radiator and i will be taking it to my mechanic to get it installed properly.. as i don't know how to burp the radiator or have any extra fluids.