When you click on links to various merchants on this site and make a purchase, this can result in this site earning a commission. Affiliate programs and affiliations include, but are not limited to, the eBay Partner Network.
I just want to say that this is a 5 or 10 minute job on any other car I've ever worked on. On a V8 Vantage? An hour or more, if you even have the right tools Anyway, I had a fault code for one of my mass air flow (MAF) sensors, so I figured I'd replace it. The part came quickly from Stuart and eventually I got around to installing it. I apologize in advance if my pics aren't as good as the ones I usually take. I used my cell phone for the pics and usually I have a Nikon.
As always, follow all safety protocols. Don't undertake this task if you aren't comfortable with it. I am not a certified mechanic, I'm just a hobbyist. Please read all steps below before beginning. You are ultimately responsible for anything you do and I am not liable for anything that may occur.
The steps below detail the procedure I used for replacing the left-hand (driver's side on US cars) MAF sensor on my 2007 V8 Vantage. The right-hand side MAF sensor is probably the same. I would imagine this procedure works for all V8 Vantages. I have not looked into where the MAF sensors are situated on a car with a V12 engine, so I do not know if the procedure would be the same.
If you are cleaning your MAF sensors instead of replacing them, the same steps can be followed. See post #8 for information about cleaning a MAF sensor.
Tools Needed
Floor Jack
Jackstands
Wheel chocks (or similar)
T10 Security Torx Bit
T27 Torx Bit
T30 Torx Bit
1/4"-drive Ratchet (or other tool, for torx bits)
22mm Socket w/ Ratchet
Philips Screwdriver
Swear Jar
Quick note on security torx bits: You can buy a set of these for pretty cheap ($5-10) and are worth the investment if you don't have a set already. Normal torx bits are also good to have on hand and are very, very useful for us because Aston Martin uses them all over the car.
Step 1
Break the lugnuts loose on the front left wheel (driver's side on US cars) using the 22mm socket. Don't take them off, just break them loose so you can remove them once the car is in the air. Breaking lugnuts loose will be extremely difficult once the car is in the air as the wheel will just spin as you apply pressure to the lugnuts.
Step 2
Lift the car and put jack stands underneath it. Ensure the car is properly supported before continuing. If it's good and stable, put wheel chocks behind the rear wheels to keep the car in place (a section of 2x4 wood can work if you don't have wheel chocks). Then remove the front left wheel - this will give you space to work.
Step 3a
Use the Philips screwdriver, T27 torx bit, and T30 torx bit to remove the front undertray. Then unfasten the wheel liner so it can be moved out of the way, at least on the front end (closest to the front of the car) or remove the wheel liner entirely.
Step 3b (If you removed the wheel liner entirely, you can skip this step)
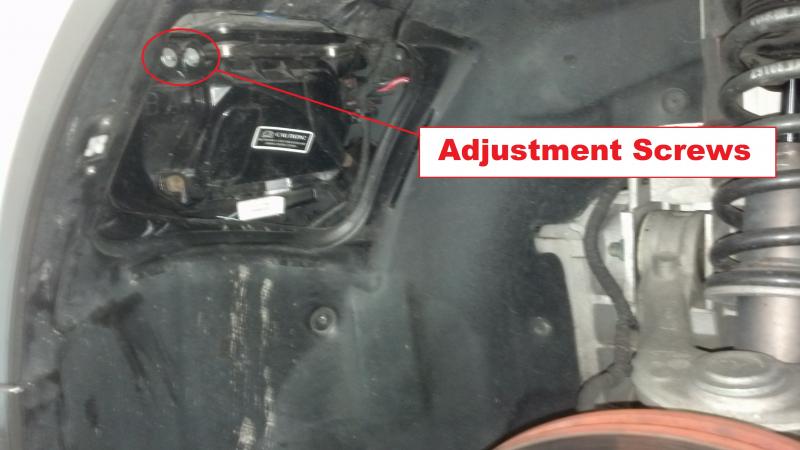
I only loosened the front rather than remove it entirely and used the access panel to stick my arm through for the rest of the steps. There is an access panel directly behind the headlight in the wheel liner. Remove the access panel. There are two screw points on the headlight housing that allow you to adjust the headlight beam angle. But that's another job. We're removing the panel so we can put our arm through it.
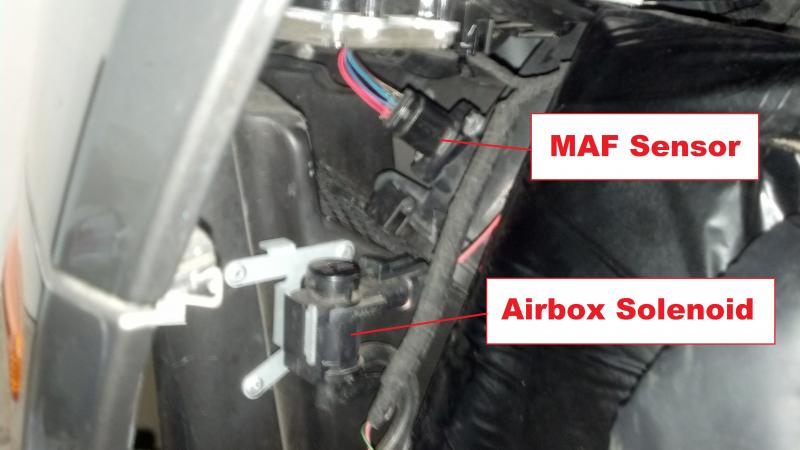
When you pull the liner back, you can see the MAF sensor sitting there looking all fabulous with its colorful wires:
NOTE: The airbox solenoid in the pic above may not be on your car. These solenoids (one on each airbox) control flaps that open up to allow more airflow. These are the airboxes found on the N400, V8VS, V8VGT, and V8 Vantages that have the Aston Martin Power Pack (which is what I have).
Step 4
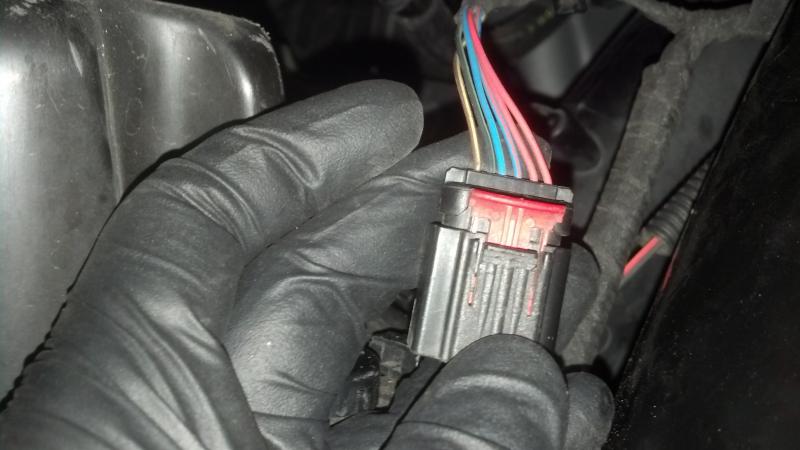
This is where it gets tricky. The release for the MAF sensor plug faces toward the front of the car, which is horrible in every way. In addition, there's a sliding clip on the plug that prevents it from being released by accident... or on purpose. This is what it looks like:
You can go about this two ways. You can either unbolt the MAF sensor then unplug it, or you can unplug it then unbolt it. Unplugging it can be a pain. If you've got nimble fingers and a small, flat-head screwdriver, give this a shot. Once unplugged, it will be easier to get to the bolt further from you. Since I couldn't see the plug's evil trickery afoot and didn't realize how devious it was, I gave up trying to disconnect it and instead unbolted the MAF sensor then unplugged it.
To unplug the MAF sensor, the red tab needs to slide up (toward the wires). If you have nimble fingers, use a small flat-headed screw driver to slide the tab. You can try your fingers or fingernails but have your swear jar ready. Once the red tab is slid away (it will not come out) you can squeeze the connector to release it, just like most automotive connectors.
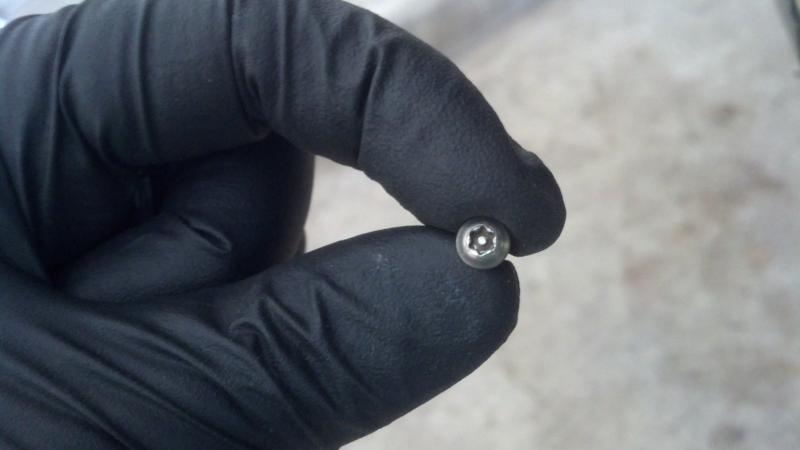
Unbolting the MAF sensor is easier said than done. You're working in a tight space and trying to get a tiny torx bit into a tiny torx bolt. To unbolt the MAF sensor, you need a T10 security torx bit. It looks just like a normal torx bit, but it has a hole drilled into it. You need this, because for no other reason than to make your life absolutely miserable, Aston Martin decided to use these little turds to bolt in the MAF:
I found out about the security torx bolts after getting the car torn open and fighting (and failing) to unplug the MAF sensor. And then I had to go across town and buy a set of security torx bits. All the while, my swear jar kept filling up.
Step 5
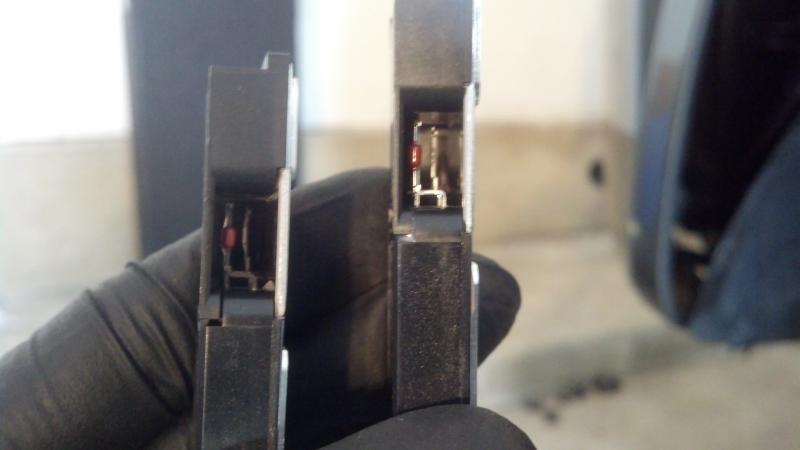
With the MAF sensor unbolted and unplugged, you can remove it. There are some very fragile components inside the sensor. In the pic below, you can see my old one (on the left with brown and dirty bits inside) and new one (on the right with shiny bits).
Very carefully put the new MAF sensor in place. Remember that the plug connector clip faces away from you when installed. That's the easiest way to determine which way the MAF sensor should be oriented. Bolt the MAF sensor into place, then plug in the connector.
Step 6
Reverse what you did in steps 3, then 2, and then 1 to put everything back together. Make sure you properly torque your lugnuts. Then turn the car on and hope nothing went terribly wrong.
Someone asked me why I didn't replace both and if I was concerned about one being new and the other old. Quick answer: Not really worried. If this one was bad enough to trigger an error code, it needed to be replaced. Visually looking at it, the old one was pretty nasty and I'm glad the error code was so specific. I would have HATED to troubleshoot it without a specific code!! If the other one gets bad, it'll likely trigger another error code (the error codes do indicate which side has a problem, which is also extremely helpful!). Meanwhile, my car seemed to run much more smoothly at cold start this morning that it has been lately.
I also had no idea what I was getting into with this task. Like I said from the very beginning of the DIY, this is a 5-10 minute job on every other car I've worked on but the MAF sensors on Vantages are buried in the front of the car. Surprisingly, the MAF sensor itself was much less expensive than some I've seen for other cars. If the other MAF sensor triggers a fault code, I now know how to replace it and I know I can get the job done much more quickly next time.
As for causes, this shouldn't be typical of a 7-year old car with 43k miles. This is entirely speculation, but I'm guessing that the cause was oil from the K&N filters the original owner had on the car. I have nothing to actually support that, but it's my guess because I can't think of anything else that would cause this. I personally avoid oiled filters and removed them as soon as I bought the car, but if the oil was already on the sensor then it was just a matter of time.
dicktahoe brought up an excellent point in another thread so I wanted to share it here:
Originally Posted by dicktahoe
I think if you are careful, you can spray a solvent on the "Dirty MAF" and then blow it off with low pressure air to clean it. That should make it "work like new" again.
We can't just use any type of solvent to clean the MAF Sensor. Here are a couple of very important guidelines on what to use:
CRC MAF Sensor Cleaning Spray
This cleaner is made by CRC Industries and its part number is: 05110.
You can buy it at your local autoparts store (Autozone, Pepboys, O'Reilly, etc).
Don't use carburator or brake clean spray or gasoline.
These solvents will leave a residue on the wires.
Not to mention the harsh solvent can damage the MAF Sensor's electronics.
Also, don't attempt to physically clean the sensor with anything (like a cotton swab) or you may break the wires.
He's absolutely right and provided great info about what to use.
I have some of the cleaner from CRC and I've used it on other vehicles. For the amount of effort needed to get to the MAFs on our cars, I decided to just replace it. On any other car, I'd try cleaning before replacing.
I didn't even think to do it before, but now that my old MAF sensor it out, I'll clean it and post before/after pics.
The original owner put the Power Pack on my car, then swapped out the Power Pack airboxes for standard ones that had been drilled. He also had K&N oiled air filters in them. I had MAF issues, so I replaced the oiled filters with RSC dry filters. That didn't fix the problem so I took off the drilled standard airboxes and putting on the unmodified Power Pack airboxes, along with OEM air filters. I still had the CEL so I pulled one of the MAFs (it was ruined).
I *think* what happened was the oil from the K&Ns fouled my MAFs. I'm not starting that whole debate, just explaining my own experiences. The obviously-bad MAF sensor is the one that was used during all the above intake swapping, and the one on the right is a new one from Aston Martin:
Seeing is believing, I think, and there it is. I've never liked oiled filters, and this obviously didn't help change my mind.
Anyway, point being that I was running drilled airboxes and I don't think the problems I experienced (CELs due to bad MAFs) were related to the airboxes, but rather were caused by the filters. The main concern I'd have with drilling the airboxes is that it exposes the filters to an increased chance of getting wet (the car is really, low, and the airboxes are in the bottom of the front end, so it's not unthinkable that they can get wet under the right circumstances).
If water isn't an issue for you, then have at it. Tuning would be ideal, but all you're really doing is creating an "always open" version of the Power Pack's extra inlet flaps.
I sold my drilled airboxes (I think to Kanga) a while back. I wanted to stick with enclosed airboxes because I drive my car in all sorts of weather and wanted the extra protection.
Recently did this when I installed replacement non OE filters. Couple of additional tips.
The plastic clamp that Aston Martin used from factory is a joke. It is really a single use plastic clamp similar to the one that clamps on the intake up above. If you are removing the MAF tubes or sensors - change these cheap plastic clamps for two 3.5" stainless steel ring types - you will be grateful when you go to reconnect it and next time you want to disconnect the tubes. (I picked them up at Home Hardware for $2 each). In addition to being a pain to disconnect the ridged teeth on the plastic clamps can wear out after a couple of removals and the clamp is never really secure to begin with since there is no real measure of tightness. They're popular for speeding up assembly lines though.
Fortunately these same exact MAF sensors are used on a wide range of Ford engines. The Part number on the original Aston Martin factory installed is FoMoCo 3W4Z12B579AB (Which is a Ford part number).
It has several OE cross reference numbers as such:
Other Part Number # 1: 1F7013210A 3W4Z12B579AC 4G7Z12B579AB 6L3Z12B579A L
Brand: Ford
Manufacturer Part Number: Y3W4Z12B579AB
Although there is an aftermarket version of this MAF sensor for as little as $10 each I do not recommend them. I have learned from BMW experience that it is not wise to stray from OE supplier ever with a very sensitive MAF sensor so I purchased two new FoMoCo (Motorcraft) (OE) 3W4Z12B579AB for $41 each that were removed from two new Ford F350 trucks prior to use. Both work perfectly. I saw a link on this forum to buy two from a sponsor but the price including tax would've been close to $1400 - still scratching my head on that. The average I see at online auto retailers seems to be between $150-200 each. The Ford dealer close to me sells them for $220 each.
I also removed the 4 security torx screws for regular torx since they are completely unnecessary and add nothing except billable time for a service dept.
Lastly, I'll throw in this tip, feel free to disagree - it's a free world, I've read on here folk trying K&N air filters as a replacement for OE - from BMW experience - do not use oil recharged K&N air filters with this MAF sensor (or any for that matter) - the very sensitive platinum wire that detects air flow, temperature etc. get's fouled from the oil used in the K&N filter and it gives off plausible but incorrect readings, this may throw codes, cause misfire and activate your CEL.
Aston Martin Vantage V8 OE Mass Airflow Sensor (MAF) FoMoCo #3W4Z12B579AB


 Anyway, I had a fault code for one of my mass air flow (MAF) sensors, so I figured I'd replace it. The part came quickly from Stuart and eventually I got around to installing it. I apologize in advance if my pics aren't as good as the ones I usually take. I used my cell phone for the pics and usually I have a Nikon.