
Telum01's Updated Catch Can Installation


Thread Starter
|
Registered User

Joined: Apr 2009
Posts: 4,366
From: NoVa
Rep Power: 295


Telum01's Updated Catch Can Installation
This is very straight forward and anyone with a couple common tools can install it. However, if you're unsure or do not want to work on your car, please take it to a mechanic. This kit is easy to install and can be done in about 15 minutes after having done it once. Please read the entire installation guide before beginning. And here are a few tips:
Custom-spec oil catch can
Custom brushed aluminum mounting bracket
Long rubber hose with OEM connector
Short rubber hose with OEM connector
3 nuts, 3 bolts,
Zip ties
Tools Needed
8mm socket
10mm socket
Ratchet
Allen keys
Step 1
Attach the hoses to the catch can. The long one goes on the top hose nipple, and the short one goes on the bottom hose nipple. (The allen head screw at the bottom of the can is the drain port. Do not turn over the can to drain.) Use the zipties to prevent oil from getting out from between the hoses and can. I included extra zipties so you can use them where the connectors fit into the hoses as well.
Step 2
Remove the hard plastic tube going from the PCV to the intake manifold. You'll notice that one side of the quick-release on the tube at the PCV side is pointed down. I've found that a long, flat-head screwdriver can be used to push in that side while using your finger to push in the top side.
Bag and tag the plastic tube for later use in case you decide to remove the kit. Clean any oil you find in the PCV outlet or intake manifold inlet.

Step 3
Remove the bolt holding the power steering fluid reservoir in place. It will spring open so be very careful not to lose the bolt when it comes loose.

Step 4
Move the power steering fluid reservoir to the side so you can access the next two bolts. DO NOT disconnect the hoses from it! Use the 8mm socket to remove those two bolts.
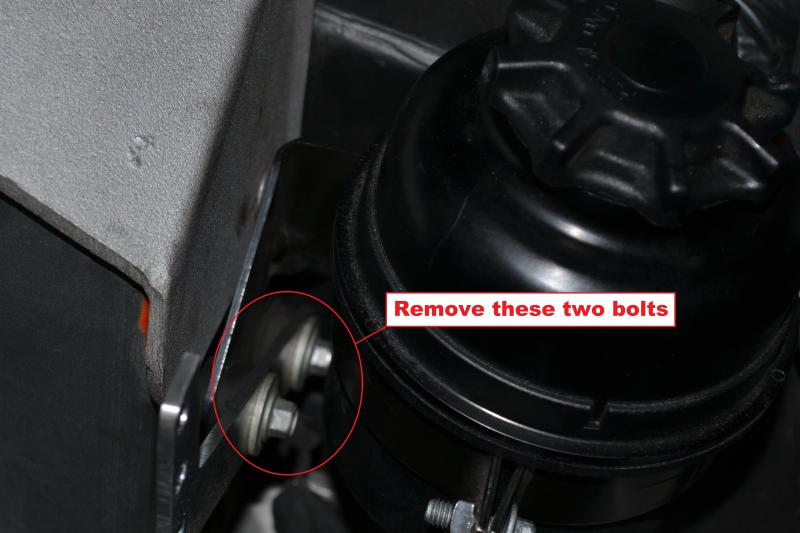
Step 5
Install the catch can mounting bracket and re-install the two bolts you just removed. The bracket will go between the bolt heads and the rubber isolators. DO NOT over-tighten the bolts! Inside the rubber isolators there are metal cylinders that can crush if the bolts are over-tightened. Once the two bolts are back in and the catch can mounting bracket installed, return the power steer fluid reservoir to its place and reinstall the bolt to keep it in place.
Step 6
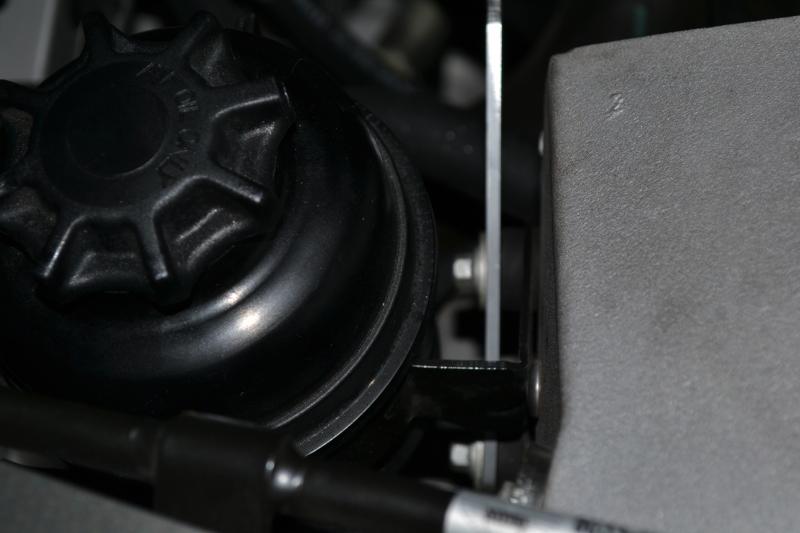
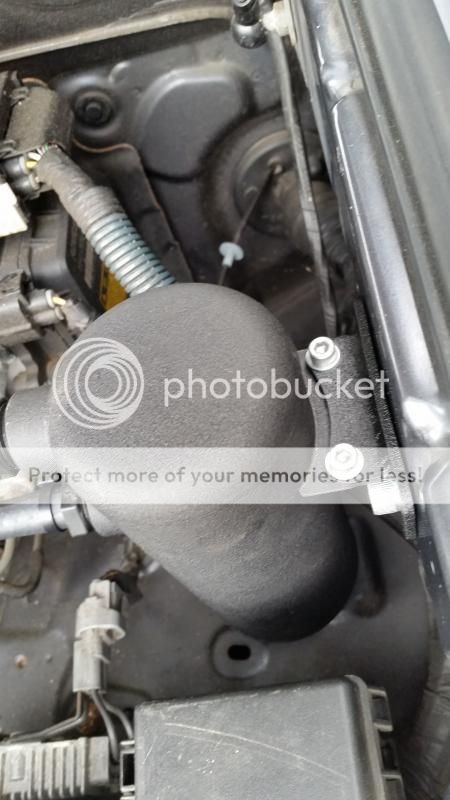
Install the catch can! I've found that the easiest way to install the catch can is to put on the hoses first (as in Step 1), then position the can in place with the hoses pointing toward the back of the car, then rotate it to align the hoses with the PCV and intake manifold.
There are three hard plastic hoses that run parallel to each other. The long hose coming from the top of the catch can will go above these and connect to the intake manifold. The short hose coming from the catch can will go below the three hard plastic hoses and connect to the PCV. Once the hoses are connected, the catch can will rest in place.
Step 7
Use the 10mm socket and allen key (5mm, I think) to install the three bolts (or just two, if you prefer) to attach the catch can to its mounting bracket. It should now look like this:
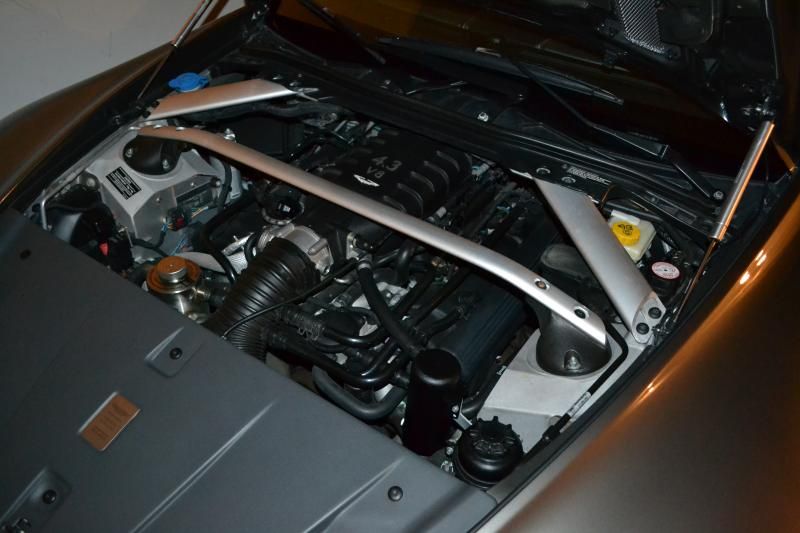
And that's it!
Final note: Remember to drain the catch can from time to time!
- The hoses included with the kit have some text printed along one side. Try to rotate the hoses so the text points downward when you install them. This will give it a more OEM look.
- When tightening the zipties, point the 'knot' down so it can't be seen and snip the extra length of the ziptie. This will also help the kit look better. (These little details matter!)
- I specified the top hose nipple angle based on the natural curve of the long hose - so keep that curve in mind when attaching the top hose to the catch can and rotate it accordingly.
- Be very careful not to drop anything. The bolts you're handling are small and can be difficult to retrieve when dropped.
- The nuts used to attach the can to the mounting bracket have built-in lock washers that can be difficult to thread a bolt into initially. Be careful not to drop the nuts or bolts while getting these started.
Custom-spec oil catch can
Custom brushed aluminum mounting bracket
Long rubber hose with OEM connector
Short rubber hose with OEM connector
3 nuts, 3 bolts,
Zip ties
Tools Needed
8mm socket
10mm socket
Ratchet
Allen keys
Step 1
Attach the hoses to the catch can. The long one goes on the top hose nipple, and the short one goes on the bottom hose nipple. (The allen head screw at the bottom of the can is the drain port. Do not turn over the can to drain.) Use the zipties to prevent oil from getting out from between the hoses and can. I included extra zipties so you can use them where the connectors fit into the hoses as well.
Step 2
Remove the hard plastic tube going from the PCV to the intake manifold. You'll notice that one side of the quick-release on the tube at the PCV side is pointed down. I've found that a long, flat-head screwdriver can be used to push in that side while using your finger to push in the top side.
Bag and tag the plastic tube for later use in case you decide to remove the kit. Clean any oil you find in the PCV outlet or intake manifold inlet.
Step 3
Remove the bolt holding the power steering fluid reservoir in place. It will spring open so be very careful not to lose the bolt when it comes loose.
Step 4
Move the power steering fluid reservoir to the side so you can access the next two bolts. DO NOT disconnect the hoses from it! Use the 8mm socket to remove those two bolts.
Step 5
Install the catch can mounting bracket and re-install the two bolts you just removed. The bracket will go between the bolt heads and the rubber isolators. DO NOT over-tighten the bolts! Inside the rubber isolators there are metal cylinders that can crush if the bolts are over-tightened. Once the two bolts are back in and the catch can mounting bracket installed, return the power steer fluid reservoir to its place and reinstall the bolt to keep it in place.
Step 6
Install the catch can! I've found that the easiest way to install the catch can is to put on the hoses first (as in Step 1), then position the can in place with the hoses pointing toward the back of the car, then rotate it to align the hoses with the PCV and intake manifold.
There are three hard plastic hoses that run parallel to each other. The long hose coming from the top of the catch can will go above these and connect to the intake manifold. The short hose coming from the catch can will go below the three hard plastic hoses and connect to the PCV. Once the hoses are connected, the catch can will rest in place.
Step 7
Use the 10mm socket and allen key (5mm, I think) to install the three bolts (or just two, if you prefer) to attach the catch can to its mounting bracket. It should now look like this:
And that's it!
Final note: Remember to drain the catch can from time to time!
Last edited by telum01; Aug 26, 2014 at 12:01 PM.
Registered User
Joined: Apr 2014
Posts: 12
From: eastsound
Rep Power: 0
Catch Can install
Telum01,
Just to give you a heads up. My catch can arrived today and this kit is great! Easy to install and looks factory under the hood. This is a much nicer set up than I installed on my 13 Ram Hemi last year. (If anyone is still thinking about this and you can talk him into another set,) Id urge you to jump on it. One thing I did do, and Id love any feed back on this as I dont want to screw anything up, but I took out the bottom drain plug and installed a brass drain valve. You can pick one up at about any auto parts store. (i use NAPA) Then when you need to drain it, just spin the valve open, drain and close it. I still think this is a second or 3d(?) job for you! Job well done! stevev201
Just to give you a heads up. My catch can arrived today and this kit is great! Easy to install and looks factory under the hood. This is a much nicer set up than I installed on my 13 Ram Hemi last year. (If anyone is still thinking about this and you can talk him into another set,) Id urge you to jump on it. One thing I did do, and Id love any feed back on this as I dont want to screw anything up, but I took out the bottom drain plug and installed a brass drain valve. You can pick one up at about any auto parts store. (i use NAPA) Then when you need to drain it, just spin the valve open, drain and close it. I still think this is a second or 3d(?) job for you!
Job well done! stevev201
Thread Starter
|
Registered User
Joined: Apr 2009
Posts: 4,366
From: NoVa
Rep Power: 295
Glad you're happy with it, Steve! And thanks for the compliments!
I offered a valve option with the original kit, but this time around I left it out to make my life a little easier. If anyone wants to add a valve, they're out there and can be obtained from various sources.
I've already had two more people ask about another batch, but honestly it's a lot of work and there's no way I would do it again at the same price point. I put a ton of free labor into this batch, and now that classes are back in full swing as well as a couple extra projects at work ramping up, I can't put in the time without being paid
I'm in talks with a company that might pick up the design. If so, they'll be priced higher to cover business costs which are much higher than me working out of my garage - plus they'd have to pull in some profit. The kits would still be worthwhile regardless of the higher price, but the price I charged was an absolute steal considering the work I put into them for development, testing, assembly, packing, shipping, and everything I posted online about them.
Registered User
Joined: Apr 2011
Posts: 2,358
From: Melbourne
Rep Power: 214
Thank for doing this for us. I'm glad I jumped on it while I had the chance.
I was thinking of modifying mine at some point (imagine that) to put in a sight glass. I was thinking I could add a 90 degree angle fitting with a clear plastic tube so I could see the level of oil in the can without having to remove it. I would put some sort of filter on the top end of the tube to keep stuff from falling in or oil from spitting out. In other catch cans I have seen, the sight glass tube connects back to the can at the top and bottom but I can't really do that here unless I drill and tap a new hole on the side of the nice new can -something I'm not sure I want to do. What are your thoughts?
I was thinking of modifying mine at some point (imagine that
) to put in a sight glass. I was thinking I could add a 90 degree angle fitting with a clear plastic tube so I could see the level of oil in the can without having to remove it. I would put some sort of filter on the top end of the tube to keep stuff from falling in or oil from spitting out. In other catch cans I have seen, the sight glass tube connects back to the can at the top and bottom but I can't really do that here unless I drill and tap a new hole on the side of the nice new can -something I'm not sure I want to do. What are your thoughts?
Thread Starter
|
Registered User
Joined: Apr 2009
Posts: 4,366
From: NoVa
Rep Power: 295
I've thought about that as well... You could cut open the bottom of the can, cut a window section in the side, insert the window material through the bottom where you cut it open, seal it, and then weld the bottom back on. The tricky part is getting the window to seal properly to the can, and to use something that won't leak over time, especially since it's being exposed to hot oil vapors.

Thread Starter
|
Registered User
Joined: Apr 2009
Posts: 4,366
From: NoVa
Rep Power: 295
I had considered those, but I'm not a fan of how clunky the design is. Just my opinion, based on my preferences and how clean and minimalistic our engine bays are.
But maybe this?
Take out the drain plug at the bottom of the can.
Insert a 90-degree fitting and point it upwards.
Take out the lower hose and install a T-fitting, pointing the T downward.
Install a clear tube between the T and 90-degree fittings.
Technically, oil can enter the can through either the top entry point (where the T fitting goes into the can), as well as through the drain port (down from the bottom of the T-fitting). But that's fine because all that matters is that there is still only one outlet (at the top of the can).
However, this will be very difficult to do with the custom-spec can because of the hose nipples. It might be a lot more practical to do with the original can since you can thread the T-fitting into the NPT ports of the original can.
Trending Topics
Thread Starter
|
Registered User
Joined: Apr 2009
Posts: 4,366
From: NoVa
Rep Power: 295
I've gotten feedback from a few people so far saying that installation went off without a hitch, but if anyone has any problems or questions please let me know!
Also, I'm open to making more of these so contact me if interested. As I stated in the other thread, yes the price will be higher - but still reasonable and worthwhile.
Also, I'm open to making more of these so contact me if interested. As I stated in the other thread, yes the price will be higher - but still reasonable and worthwhile.
Registered User

Joined: May 2010
Posts: 794
From: SF East Bay
Rep Power: 66
I just finished installing the catch can kit and it went in very well. Thanks Rich for putting together such a nice package!
As I had some plasti-dip left over from my grill job, I went ahead and sprayed the aluminum mounting bracket black, which makes it blend in even more.
Rummaging through my "salvage parts bin" I happened to find two black hose clamps which I used instead of the tie-wraps. These make it look even more OEM, so that a nosy Smog Technician won't notice the change, I hope") .
.
Anyhow, I delayed responding as I wanted to make sure the drain valve I used would not cause any issues-no interferences noted. When I drop the under pan at the next oil change, I'll route a 1/4" drain hose from the valve to a place where I can easily collect the oil-or maybe not .
.
As I had some plasti-dip left over from my grill job, I went ahead and sprayed the aluminum mounting bracket black, which makes it blend in even more.
Rummaging through my "salvage parts bin" I happened to find two black hose clamps which I used instead of the tie-wraps. These make it look even more OEM, so that a nosy Smog Technician won't notice the change, I hope
.Anyhow, I delayed responding as I wanted to make sure the drain valve I used would not cause any issues-no interferences noted. When I drop the under pan at the next oil change, I'll route a 1/4" drain hose from the valve to a place where I can easily collect the oil-or maybe not
.
Thread Starter
|
Registered User
Joined: Apr 2009
Posts: 4,366
From: NoVa
Rep Power: 295
I just finished installing the catch can kit and it went in very well. Thanks Rich for putting together such a nice package!
As I had some plasti-dip left over from my grill job, I went ahead and sprayed the aluminum mounting bracket black, which makes it blend in even more.
Rummaging through my "salvage parts bin" I happened to find two black hose clamps which I used instead of the tie-wraps. These make it look even more OEM, so that a nosy Smog Technician won't notice the change, I hope.
Anyhow, I delayed responding as I wanted to make sure the drain valve I used would not cause any issues-no interferences noted. When I drop the under pan at the next oil change, I'll route a 1/4" drain hose from the valve to a place where I can easily collect the oil-or maybe not.
As I had some plasti-dip left over from my grill job, I went ahead and sprayed the aluminum mounting bracket black, which makes it blend in even more.
Rummaging through my "salvage parts bin" I happened to find two black hose clamps which I used instead of the tie-wraps. These make it look even more OEM, so that a nosy Smog Technician won't notice the change, I hope
.Anyhow, I delayed responding as I wanted to make sure the drain valve I used would not cause any issues-no interferences noted. When I drop the under pan at the next oil change, I'll route a 1/4" drain hose from the valve to a place where I can easily collect the oil-or maybe not
.Got any pics of it installed in the car, with the valve? Curious as to clearance around it. Also want to see the black bracket
I spec'd the brushed aluminum because it's lightweight and blends in with the strut bracing above it - but the black would look good, too!Btw, I did consider hose clamps instead of zip ties, but I hate clamps and avoid them whenever possible. Plus the zip ties are black on the black hoses - more blending in (btw, those zip ties are rated at like 40 lbs - they're tough little guys! I, um, I tend to over-engineer things sometimes lol). And where they're used, they don't have to be undone. The easiest way I've found to pull the can out (for draining if you don't put in a valve) is to pop the quick-connects from the PCV and intake manifold, and unbolt the can from the mount. I've done it so many times with testing that I can do it in a minute or less lol, and I've never had to remove the hoses from the can - so the zip ties shouldn't ever have to be snipped.
Last edited by telum01; Sep 4, 2014 at 03:04 PM.
Registered User
Joined: May 2010
Posts: 794
From: SF East Bay
Rep Power: 66
Photos added...
Have attached a couple of the requested photos, showing the black bracket and the drain valve. Please excuse the slight blurry third photo.
I'm lazy and it's easier for me to turn the ball valve a 1/4 turn and let the oil drain rather than unbolting the can.
I used the black hose clamps because of an earlier bad experience with an over zealous CA Smog tech, who failed one of my cars because of a split hose end that I had repaired with some black electrician's tape. The car had passed at my normal station several times before with the "split end", but I made the mistake of using a "coupon" to try and save a few bucks. It cost me 3x the coupon savings to purchase an OEM hose to satisfy the p...k!
So, I may be going overboard to make the changes unnoticeable, but it's easier in the long run.
Thus the OEM looking clamps...however, don't look too close at the photo, as I used the tie wraps also since the clamps I had were slightly large.
One more thing to take care of before the next smog check .
.
I'm lazy and it's easier for me to turn the ball valve a 1/4 turn and let the oil drain rather than unbolting the can
.I used the black hose clamps because of an earlier bad experience with an over zealous CA Smog tech, who failed one of my cars because of a split hose end that I had repaired with some black electrician's tape. The car had passed at my normal station several times before with the "split end", but I made the mistake of using a "coupon" to try and save a few bucks. It cost me 3x the coupon savings to purchase an OEM hose to satisfy the p...k!
So, I may be going overboard to make the changes unnoticeable, but it's easier in the long run.
Thus the OEM looking clamps...however, don't look too close at the photo, as I used the tie wraps also since the clamps I had were slightly large.
One more thing to take care of before the next smog check
.
Thread Starter
|
Registered User
Joined: Apr 2009
Posts: 4,366
From: NoVa
Rep Power: 295
Looks good! Looks like there's *just* enough room for the valve - next is just hose routing. One thing I was hesitant about with the hose is that you've got a length of hose that will have oil in it, and there will be some left after draining that might dribble out over time... I think it'd be worth coming up with a plug of some kind to seal the drain tube. Also, make sure there's something keeping the drain tube in place - don't want that thing flopping around while driving. It might hit the hot exhaust manifolds or, even worse, get stuck in the belts.
One thing you might consider whenever you want to mess with it: I put the bolts in from the front so they point toward the rear (bolt on front side, nut on rear side). It gives it a little more of a clean look. Not terribly obvious, but it's another little detail
Another option if you like the black look is maybe look into anodizing the mounting bracket. It won't be reversible like plasti-dip, but I bet it'd look pretty damn good!
Thread Starter
|
Registered User
Joined: Apr 2009
Posts: 4,366
From: NoVa
Rep Power: 295
Hi Kiet - it should be available soon, working out some final details before it goes to market.
However, I do have a small order on the way and included an extra catch can just in case I believe it's black (I'll have to double check). I'll PM you!
However, I do have a small order on the way and included an extra catch can just in case
I believe it's black (I'll have to double check). I'll PM you!
Thread Starter
|
Registered User
Joined: Apr 2009
Posts: 4,366
From: NoVa
Rep Power: 295
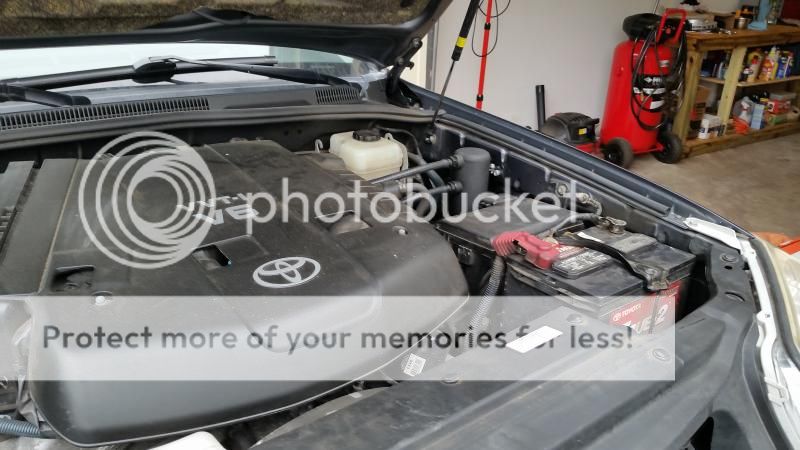
I was thinking about what Don did and figured I'd test it out. What do you guys think?
This is the kit I did for my 4Runner (same concept - installs same as the V8 Vantage kit, 100% reversible, existing bolt holes, etc etc). Uses my original catch can that I used for development on my V8V, so it isn't custom-designed for the hoses attached to it like the current V8V kit. The black coating on the mounting bracket is the same used on the custom catch cans.
Don't mind the dirty engine bay lol
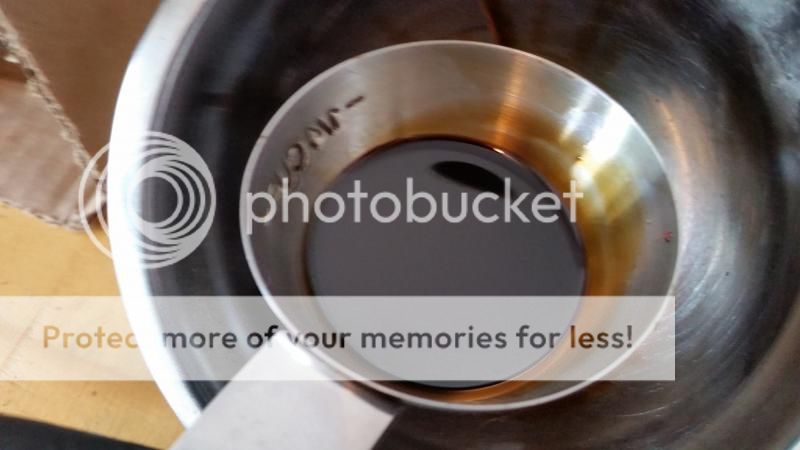
And here's what it collected after less than a couple thousand miles
Don't mind the dirty engine bay lol
And here's what it collected after less than a couple thousand miles
Last edited by telum01; Sep 24, 2014 at 08:30 PM.