When you click on links to various merchants on this site and make a purchase, this can result in this site earning a commission. Affiliate programs and affiliations include, but are not limited to, the eBay Partner Network.
Car looks great! Only suggestion I would have is get the lug nuts color matched or get black lug nuts so they stand out much less and blend in more.
Other than that awesome! Enjoy her
I guess you are talking about my Vantage and not the op... I heard that F150 Raptor are the same lug nuts but in black, I will have to visit my local Ford dealer and see if it is true
Wow. You don't visit the forum as frequently and then you discover all sorts of treats when you pop in.
The car is looking fantastic. Great job. Congrats.
Keep up the great work.
Thanks! As we had discussed previously via email, I had planned on driving the car as is for a couple years before I started adding my own tweaks.
Regarding the previous tap in the rear, the reason I started down this path with the newer bumpers is I wanted to replace the rear cover. The indentations above the license plate were driving me crazy. I have seen several other cars with these same issues and most owners do not see them. I also saw that the shop you used did not properly refinish the rear bumper. They blended just the middle and did not re-clear the entire panel afterwards, just the area they blended. I saw this after unwrapping the car and chose to not go near that area with any compound.
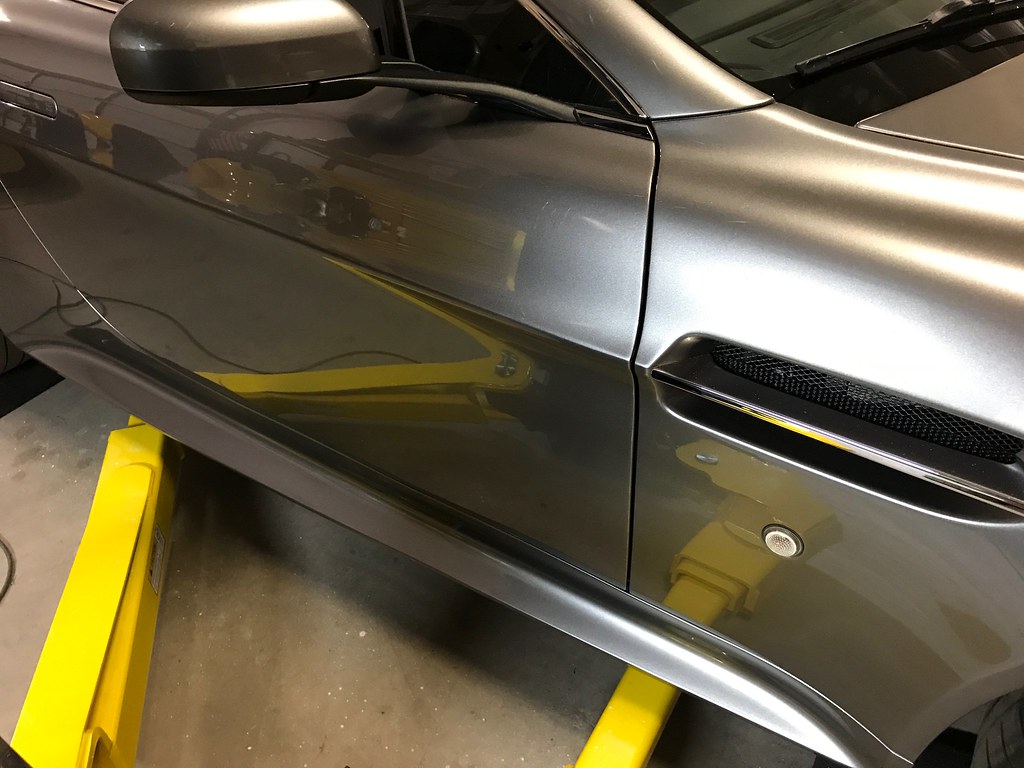
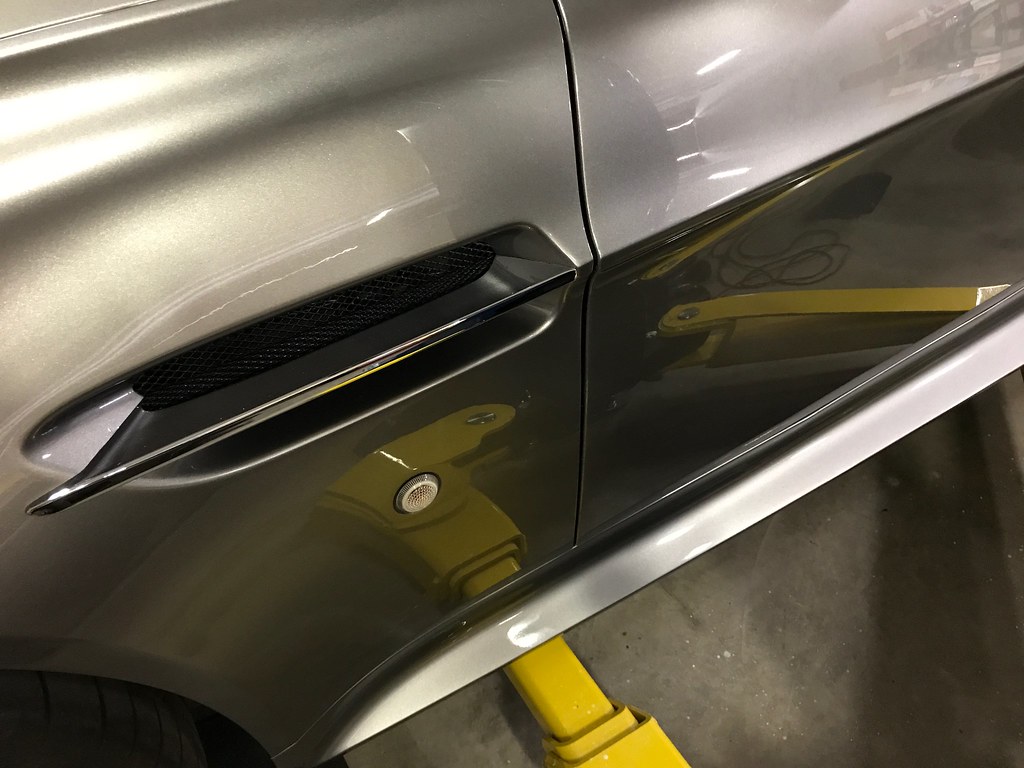
I grew up in a house that restored and refinished cars. My eyes are automatically drawn to defects of that nature. That also goes for the side sills. Most do not see the mismatch but it was a glaring issue to me. Again, I am picker than most and that is why I chose to go down the path I am on.
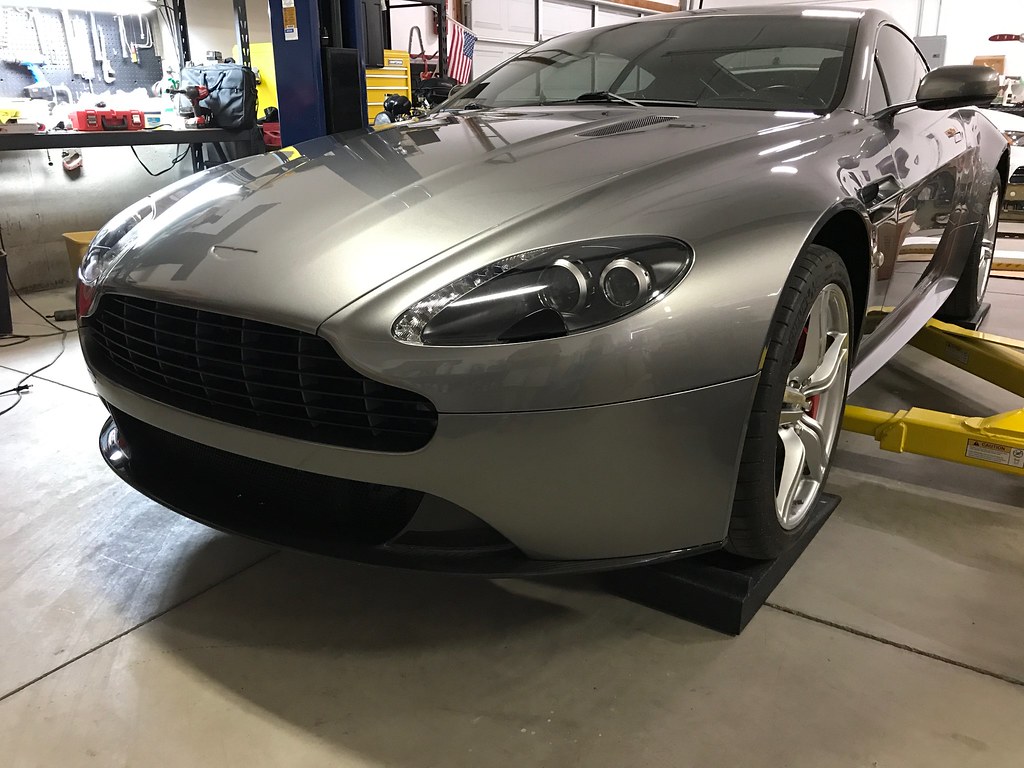
With the additional extrusions on the bumper beam I feel they are what caused the entire beam to be replaced. Had it been a square on tap onto that flat surface it probably would have not caused any damage. Those extra pieces cause concentrated stress in that beam when tapped from the rear. Either way, an Aston is not an inexpensive car to repair. The bill would have been high no matter what. I chose to go with the ROW kit to remove the unsightly corner markers and filler pieces next to the plate (black plastic in a sea of beautiful carbon fiber).
And I would like to thank you again for all the thorough detail you put into this car during your ownership. And also for the clear documentation as I now have a complete history.
On a side note, I completed some underneath details this past weekend. No photo updates as nothing has visually changed, just some small nagging things that I wanted to correct.
Also, I have decided on some custom wheels for this car. With proper fitment, these cars look incredible on certain styles of 20" wheels. I have selected a style I think will look great. I just need to get the finish idea I have proposed to the manufacturer finalized before I say what I am going with. More details to follow.
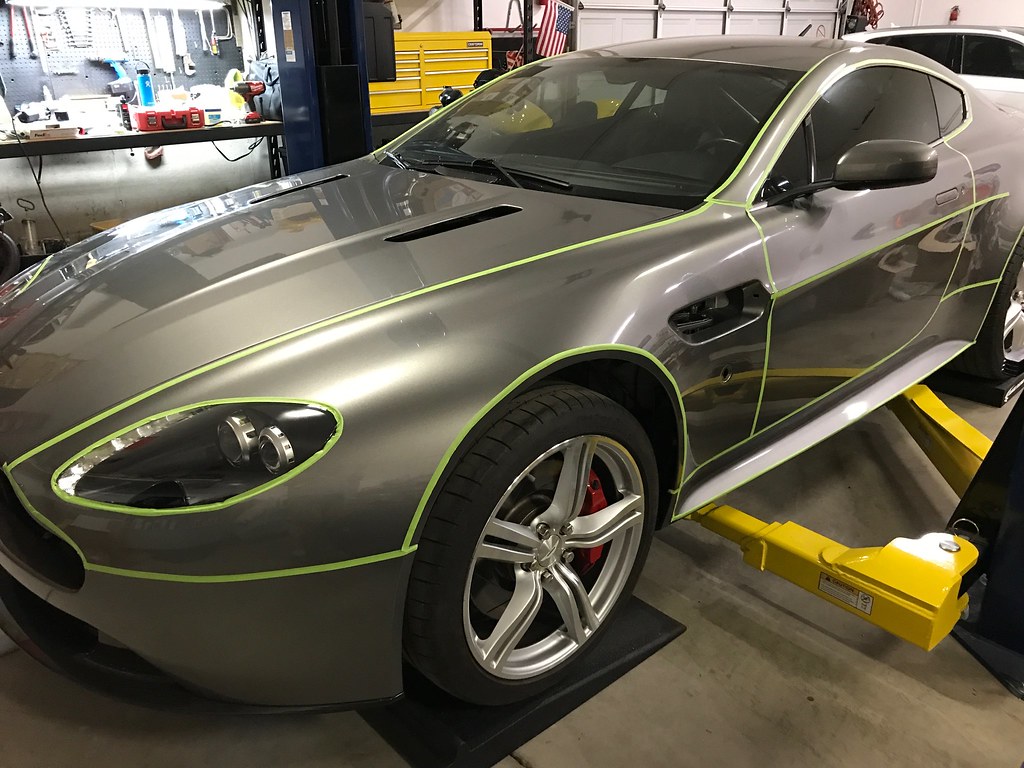
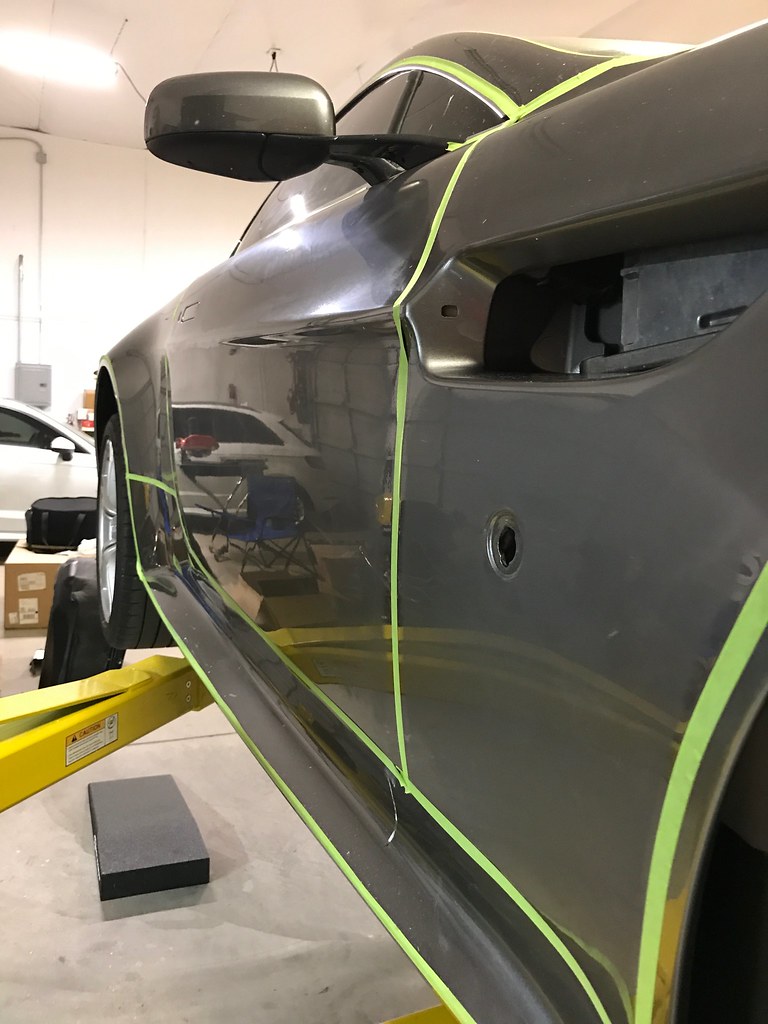
Something aligned with the planets miraculously and I was able to put in 20 hours on the car over the last 3 days. The majority of the work was some final wet sanding and compounding. I am doing all the wet sanding by hand and the polishing is with a couple different orbital machines. The main goal is to have all the minimal texture in the clear matching from panel to panel. I am not going to level the clear completely smooth as the untouched panels on my car (factory paint) are not that perfect. If they are that perfect, you will easily see every minor blemish going forward. This is not just a show car, I do drive it 2-3k miles a year. I am going to have a paint protection film installed on the nose and the side sills (along with some other strategic areas) to prevent most rock chips. If a rock gets the right trajectory it could impact one of the doors or even the top of one of the rear quarter panels. I am not going to wrap the entire car in fear of a blemish. I do care for my cars excessively more than most but small blemishes can occur. Here is a photo of the hood near where the emblem is mounted.
The front end is now completely reassembled except for the side strakes and grille. I ran out of time in the shop as the monsoon storms have now arrived. I normally use an evaporation cooler on my shop and those no longer work when the humidity rises above 20%. In the early summer months the humidity level is in single digits. The cooler will keep the shop in the low 80 deg. F range when it is 115+ deg. F. outside.
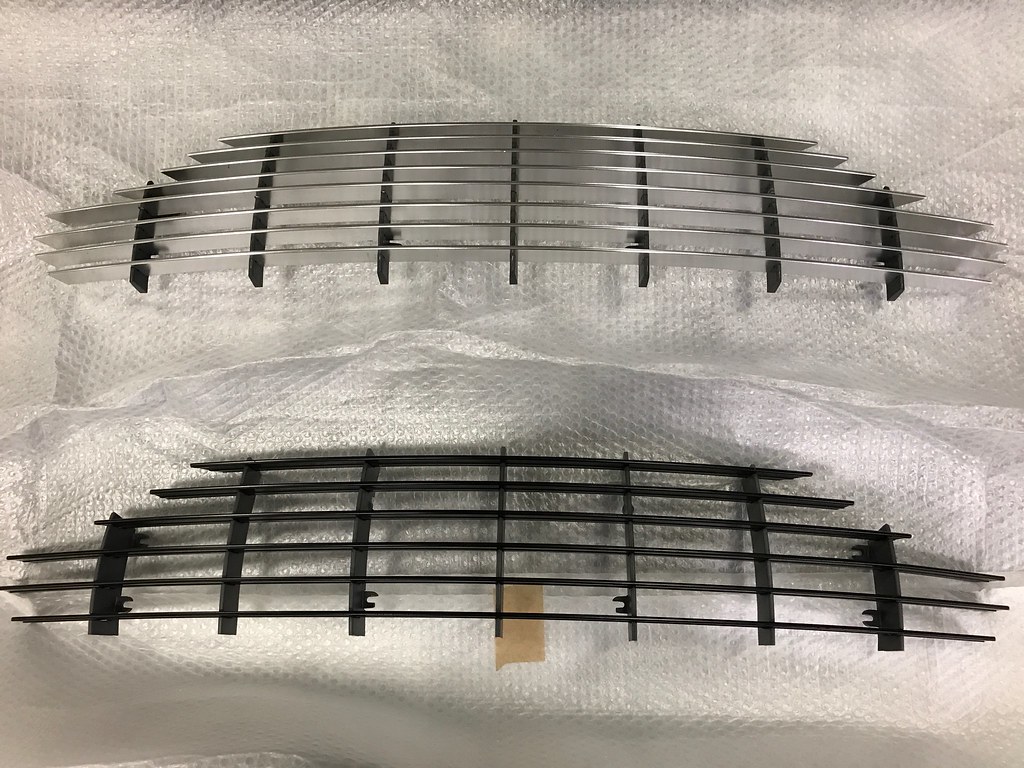
I am also undecided on the side strakes and the grille. I might order the carbon strakes and go with a black 6 bar grille, or the AMR mesh grille. I would then consider wrapping the polished trim with gloss black vinyl. I like the more aggressive look the carbon splitter gave the car and I think I might want to continue that theme. I am changing the wheels for a darker image overall, a gloss dark silver color. Thankfully, the strakes are not that bad to get to later if I change my mind.
I will work early mornings moving forward 2-3 days a week. I have an appointment for the paint protection film in a couple weeks. The car is almost ready to go.
I need to finish the small details and install the new fender liners and front undertray (after I cut the oil cooler exit hole in the new one to match the old one). I also have a kit from Scrape Armor to install. Opening that package I was impressed by their fabrication work and presentation. The kit is very thorough and well documented. I might make a separate post or thread regarding the install of that kit.
Work will slow a little but I do have some projects I need to work on that I can do in the comfort of my home. Previously, there was an aftermarket stereo installed (see the video in my first post). I had to remove part of it in order to access all the fasteners for the taillights and rear bumper. I am going to locate some better matching carpet and recover those components. I am also considering wrapping them in an Alcantara to match my dark headliner. There are always decisions to be made.
The wheels are about 6-8 weeks out and I will also install the lightweight flywheel and V12 clutch from VelocityAP when the weather cools. I would also like to drive the car after this part to ensure I can clear all current codes on the dash. It was started and moved around without any lighting or connections to the left rear emissions equipment (end of the rear bumper harness). That and I have not taken the car for a nice drive in over 2 months.
Like you I wanted to go black vs chrome so here is a few picture of my 09 Meteorite Silver with black out grill, exhaust tips, side stalks and grills (hood and fenders), also wrapped window trim. I really like the look now with the front and rear carbon fiber and V8S side sills. Yours is lighter silver but it gives you a idea of what it would look like, cheers.
Like you I wanted to go black vs chrome so here is a few picture of my 09 Meteorite Silver with black out grill, exhaust tips, side stalks and grills (hood and fenders), also wrapped window trim. I really like the look now with the front and rear carbon fiber and V8S side sills. Yours is lighter silver but it gives you a idea of what it would look like, cheers.
Thank you for posting those. My car already had the black mesh on the hood and side vents when I purchased it. Seeing it without the bright finish grille in my shop currently had me wanting to go that look, especially with the front splitter in carbon. I will put my existing grille on the shelf for now. I just located a 6-bar grille in black locally that I plan to pick up soon. That gives me the later 6-bar look as well. The only 2 differences on the exterior of my car from a 2012 and newer will be the rear hatch and the external antenna. I actually prefer the earlier hatch as I feel it flows better with the quarter panels. I am running the Mini Cooper accessory stubby antenna as it looks perfect with the base as far as color and texture.
I am still undecided on the window trim. I just spent a few hours polishing it back to a perfect finish. It is one nice design element of the car. I may leave it polished as AM did so on the carbon black cars. Although those cars did offer a bright finish grille. The debate never ends. I may go ahead and wrap it as it is just vinyl. I can easily reverse it.
I have acquired a black 6-bar grille from a local former owner. At least I now have options.
I am now deciding what to do for the side strakes. I am leaning towards replacing them with the carbon ones. It is a case of while I have it apart I might as well install the carbon ones vs wrapping the stainless ones gloss black.
I am finally finished with wet sanding and initial polishing of the new paint. I have been doing this for years on many other project vehicles. Therefore, I see nothing wrong with taking sandpaper to 1.5 month old paint on my Aston. I do not recommend anyone who has never done this, and/or been trained to do so, to go sanding on their own cars.
First step is to tape off all sharp edges so you do not risk burn through. I handle those differently/separately from the main texture leveling operations.
Up first was sanding with 1500 grit as this was the most aggressive that was needed in order to level the texture. This was done with an orbital machine as hand sanding can be uneven and can lead to a more aggressive cutting method. I hand finish near the sharp edges separately. I have several custom made sanding blocks that I have fabricated over the years to help me in getting into the more delicate/tougher areas. Here is the passenger side after most of the 1500 grit leveling. Some areas did not need leveling as they had flowed-out smooth during painting.
I followed up the 1500 grit with 3000 grit on the orbital machine. I worked the edges by hand for this process as well. The photo below is of the door mostly through sanding, still showing the 1500 grit sanding on the front fender and the front edge of the door.
Finally, I finished off the weekend's effort with a course compound, a heavy cut pad, and my Rupes 21 polisher. Here is a photo of the same door after a first pass of compound.
The reflections will be even more defined/clearer after a few passes of polish. I will complete the polishing after I have reassembled the remaining parts (strakes, fender liners, etc.).
Again, this is not recommended for anyone who has not done it previously. This is a similar procedure that Aston performs on the cars at the factory. I have seen new cars on the dealership floor with orbital machine sanding marks that were missed during the compound and polish stages. Also, I only performed this work on the freshly painted areas. I asked for a couple extra passes of clear coat so I had plenty to work with. Per gauge measurements, I have only removed 20% of the extra clear I paid for over the standard amount during a respray. I still have plenty of extra clear remaining. I am only polishing the areas that still retain factory paint.
Progress was made this past weekend with me being able to spend almost 20 hours in the shop. I completed the reassembly of the exterior components after polishing all the bright trim. I also installed the recently acquired black 6 bar grille.
The new front fender liners were a pain to get into place. After I figured out a sequence that would work for them I was finally successful. The original ones had taken a set after all these years so they were very easy to remove and replace. I am short a few threaded clips to be complete with the under tray install. Once they are here I will also install the Scrape Armor kit I received a while back. The kit calls for drilling holes in the carbon splitter for additional fasteners. I will not be doing that. Instead, I will use some 3M body molding tape along with the black RTV they include for the front edge. That should be sufficient along with the 8 fasteners the lip uses already (the ones that hold the under tray to the lip).
I spent most of the time in the shop dialing in the finish. Using various light sources I went over the car again and made some additional corrections. After working for many hours, like I did last weekend, you can get snow-blind and miss some small spots. After that was complete I polished the entire car. I will go over the car again with a finer polish the night before I take it for the clear bra install. Hopefully that will be later next week or the week after. Here are some photos showing the current state of the paint. I look forward to getting it outside for some proper photos/further inspection.
I have had a few PM's regarding where I purchase my polishing materials. I will say that I have learned a lot over the years from a gentleman named Kevin Brown. He runs a site based out of CA called buffdaddy.com. He is incredibly knowledgeable and his tips have truly improved my results after doing this for many years. I helped pay my way through college doing detailing. I still pick up a few cars a year to prep for the January auto auctions here in the Phoenix area (RM, Gooding, Barrett-Jackson, etc.). Search YouTube for Kevin Brown and you will find several videos featuring his tips and techniques. The best ones were put out by Larry at AMMONYC. Learning his tips regarding pad "seasoning" or "priming" was a game changer for me. Some call it excessive but I do see an improvement. His main thing is residue control. And the "seasoning" is part of that. If you are interested in any polishing supplies or techniques visit his site and read around. If you email or call he is very friendly and responds with helpful information and insight. I could not recommend him more. Some will shop elsewhere to save a few dollars. I prefer to support him because of the wealth of knowledge I have learned from him over the years.
I have decided to keep the polished side strakes as I feel that they should compliment the window trim. To me, they are also a throw back to the early DB cars. It is a design element I have always liked so I do not want to remove it or cover it up. I will try the black grille for a bit but I am not sure if I will keep it that way or not. I am tempted to polish the leading edges only as a different look, or maybe swap with someone who has a bright finish grille and wants a black one. I will make this decision after I have the new wheels on the car.
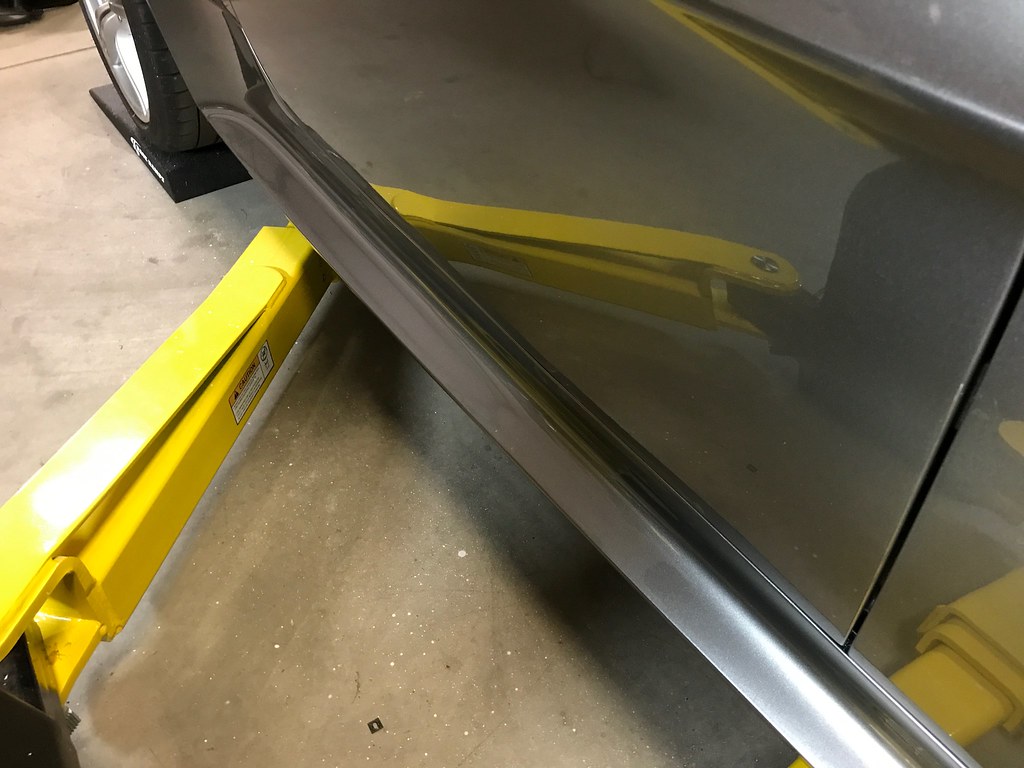
All that is holding me up from the car being on the road are those clips I mentioned earlier and an issue with the left rear fender liner. I was sent the rear liners from a V8S/V12 instead of a standard V8. The former cars run wider wheels from the factory so the liners curve in towards the top for additional clearance. The right rear fits perfectly. The DMTL assembly is preventing me from installing the left rear liner. The components appear to be the same but just the bracket has changed. I am dealing through Rich at Redpants to get this straightened out as I ordered this kit through him. AM originally wanted to send out a new left rear liner which I declined. I now prefer the additional clearance in the rear fender liners and sending just the bracket is a much cheaper solution vs an entire new liner. They are still dragging their feet which is only aggravating Rich and myself. I will say that Rich has been very helpful in all of this. Just because they say it is a "kit" does not mean it is a pre-packaged solution. They pull a list of parts, or at least attempt to, and send them together. Most fasteners are sold in packages of 10 so that leads to a few extra pieces of hardware. I am an engineer for a living. Sometimes it messes with my mind if I assemble something and have a few extra pieces left over. I cannot say enough great about Rich though. To me, customer service is key, and he excels at it.
Step 1 of this build is almost complete. Once I have the above minor issues sorted I will take the car for a clear bra. The new wheels should be arriving shortly after that as well. That will be it till fall comes around. The monsoon rains just started here last week so my evaporative cooler is no longer useful. My time in the shop is limited for the next month or so.
Step 2 of this build will be after the monsoon ends. I will be installing the lightweight flywheel and clutch kit I purchased from Stuart a couple months ago. I may also decide to purchase and install a set of headers at that time. They have to come off anyway to remove the torque tube so I might as well do it then. I will then be looking into a reflash and tune. I will probably stick with Stuart for the headers and tune.
Thanks for the compliments. The key to the finish was choosing the body shop with the best dust control and attention to detail I could find. This shop has done work for me on several restoration projects and I travel almost 100 miles round trip to go to them. Their work was on par with a new Aston but I decided to take it a little further.
As far as clear bra/paint protection film, I am planning on the front bumper, the entire hood, both full front fenders, full rocker panels, full rear bumper, and a piece on the rear quarters (a little larger than the section that comes on a new Aston). I thought about the doors but there were no rock chips on the car in those areas previously. I may change my mind though. I know I am doors, full quarters, rear hatch, and roof away from full coverage but I feel that is excessive (and the rear quarter coverage is very expensive). I am mainly wanting rock chip protection. I am covering entire panels as much as justifiable in order to not have seams in the middle of a panel.
I am looking forward to the new wheels as well. The fitment is the same as many have posted about previously. I am taking a different approach to the finish though, a dark clear over a polished finish.
Last edited by skywagon; Jul 25, 2017 at 10:58 AM.
A quick update on my project. The last parts I need to complete the bumper upgrade effort should be arriving tomorrow. The main thing is the DMTL assembly to fit the V8S/V12 rear fender liner. Rich was pivotal in convincing AM that this was the best recovery plan and the cheapest for them. Shipping a new fender liner is more expensive than supplying the DMTL assembly shipped. This is a better situation for me as I will have some additional tire clearance in the rear. Thanks again Rich!
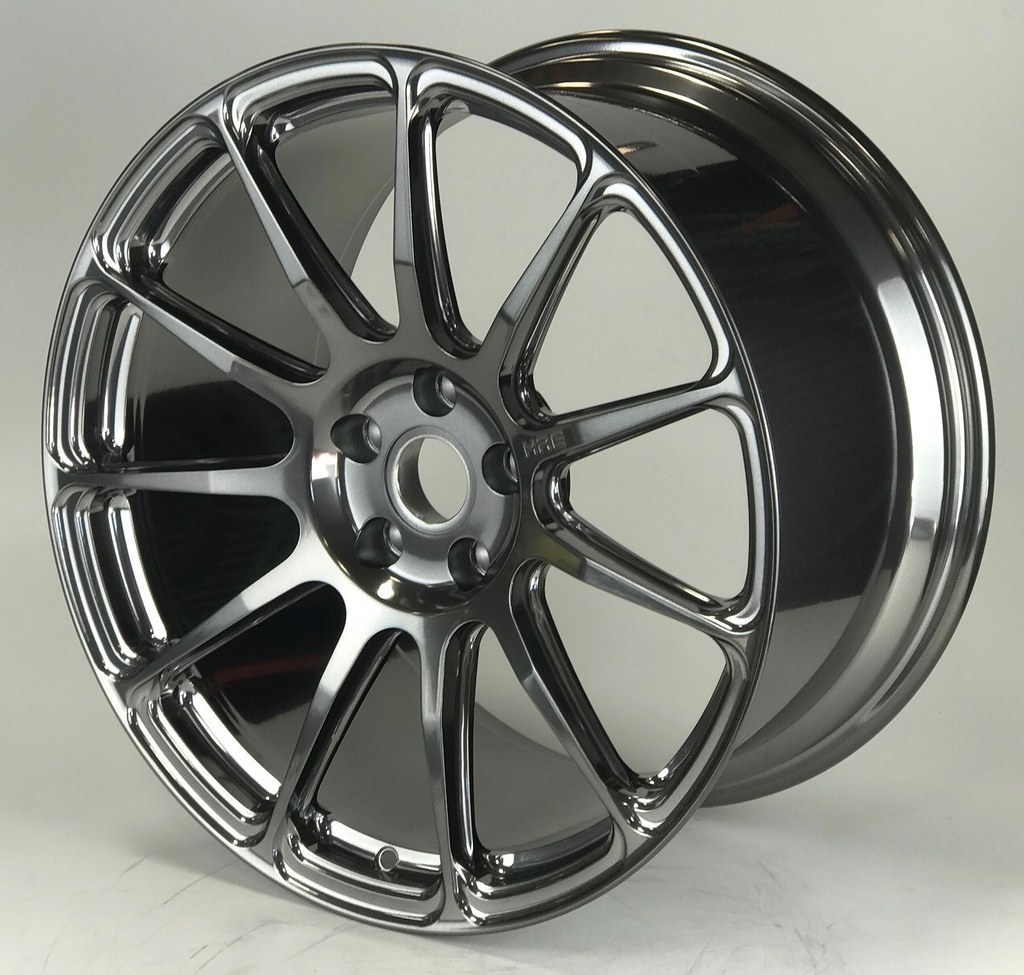
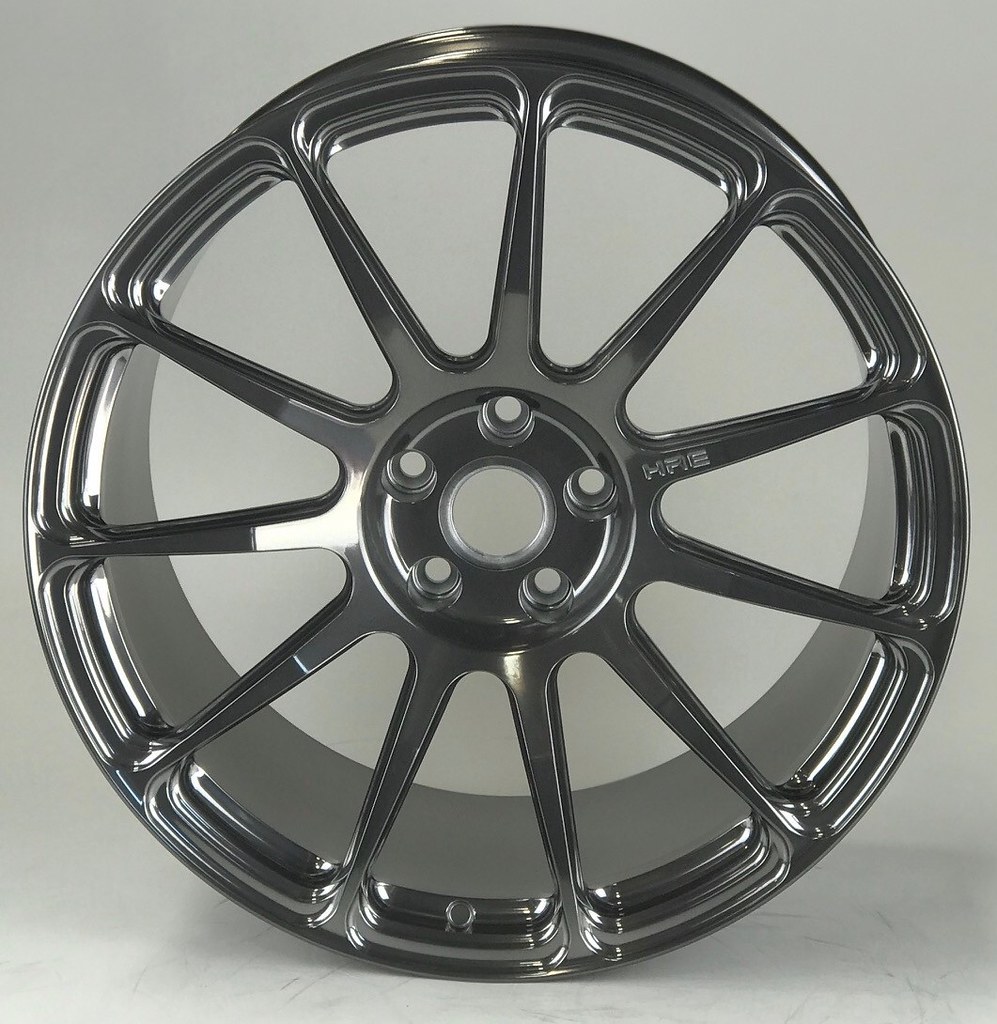
The other news is the wheels are now completed and I had photos sent to me today. They are a set of HRE P43SC's that are fully polished then coated with a dark tinted clear, a new finish offering for HRE. These are the first wheels through this new process. This is also one of the last sets of the P43SC design as they have decided to discontinue it. It could still be requested but it is no longer a standard offering. I like this design as it reminds me of the Vantage GT4 wheels. The set is also cut to accept Aston Martin center caps. I am debating which ones currently.
GT4 Wheels:
The wheels should be arriving either later this week or early next week. The specs are: 20x9 ET42 for the fronts and 20x11 ET51 for the rears. I already have a set of tires sitting here for them: 255/35ZR20 for the front and 305/30ZR20 for the rear. I went with the new Michelin PS4's.
I will finish reassembly this weekend and transport the car to have paint protection film installed next week. After that I will finish my detail on the exterior and apply some offerings from Larry at AmmoNYC; Ammo, Reflex, and Creme.
I will then take the car to have an alignment in preparation for the new wheels/tires. I am waiting on a set of titanium lug nuts, all with a security feature, to be fabricated by Charlie at Tikore. Those should be machined next week.
I hope to have phase 1 complete on this car very soon. I would like to drive and enjoy the car a little before I do any more work on it. In the next phase I will be installing the V12 clutch kit I purchased from Stuart at VelocityAP. I am considering a set of headers and 200 cell cats to go with them. I would then probably complete that package and pick up Stuart's tune set-up as well.
Anticipation is building for the big reveal in a couple weeks. Stay tuned...
Last edited by skywagon; Aug 10, 2017 at 12:10 PM.
The wheels look good but I'll bet it is one of those things you have to see in person to really appreciate. Now looking forward to seeing them on the car in the sunlight. And of course at different angles.
A quick update on my project. The last parts I need to complete the bumper upgrade effort should be arriving tomorrow. The main thing is the DMTL assembly to fit the V8S/V12 rear fender liner. Rich was pivotal in convincing AM that this was the best recovery plan and the cheapest for them. Shipping a new fender liner is more expensive than supplying the DMTL assembly shipped. This is a better situation for me as I will have some additional tire clearance in the rear. Thanks again Rich!
Glad we were able to get it sorted!
Took a bit of work... After AML realized they sent the wrong fender liner, they insisted on sending the correct one and would pay for the return of the one that didn't fit. Skywagon wanted to keep that one for the extra clearance and instead get a different DMTL to accommodate that fender liner. So it basically came down to convincing AML to send a completely unrelated part (from their perspective) to fix an erroneous part shipment... Worked out in the end, but took much longer than anyone would have liked!